
Szukasz włóczki?



























Komentarze / Pytania (29)
 Karen napisała::
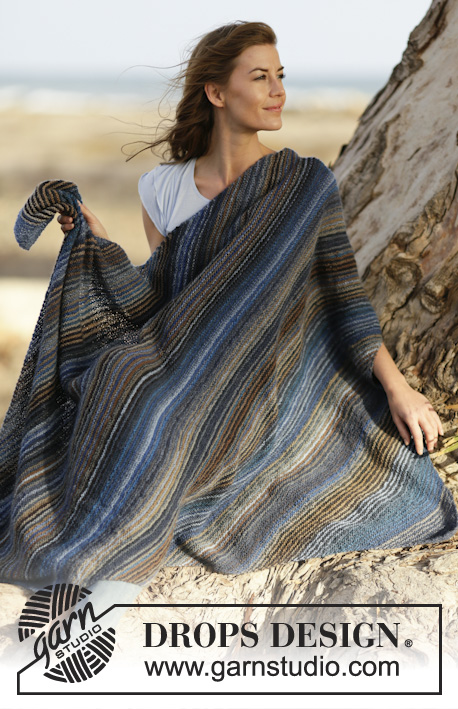
Hello, I have worked the pattern to 35cm and have started the striped pattern. Following your advice to Christina below I have stopped increasing and now both my edges are knitting up straight and not getting wider on one side as the photograph appears to do. I am using Drops Fabel and knitting to the tension suggested, yet my blanket does seam to be getting wider as In the photograph. Am I doing something wrong? Thank you for your help.
28.11.2020 - 17:27Odpowiedź DROPS Design :
Dear Karen, it looks llike the answer below was wrong - sorry for that, after the piece measures 35 cm you start stripes but you continue working as before (= increase on each side) until piece measures 85 cm (= width of piece) - this video might help you to understand how this kind of blankets are worked (remember to work the stripes as in the pattern). Happy knitting!
30.11.2020 - 08:43
 Christina napisała::
I’m sorry to bother you again, but I have another question. When the piece measures 85 cm I begin the decrease/increase. Does that 85 cm include the first 35 when I was increasing at the beginning, or is it 85 cm beyond the first 35? Thank you!
11.04.2020 - 18:50Odpowiedź DROPS Design :
Dear Christina, 85 cm means from the beginning (includes the first 35). Happy knitting!
12.04.2020 - 18:25
Christina napisała::
Am I supposed to stop increasing when the piece reaches 35 cm and continue with the striping without increasing? Thanks for your help!
25.03.2020 - 04:09Odpowiedź DROPS Design :
Hi Christina, Yes, you stop increasing when the piece measures 35 cm and continue working the stripes without further increases. Happy knitting!
25.03.2020 - 07:56
Jen Ann napisała::
Hello, What are the average total rows of this piece using a US 7 Circular Needles? Blessings
02.02.2020 - 03:42Odpowiedź DROPS Design :
Dear Mrs Ann, this will depend on your tension in height - in this kind of pattern measurements are more important than number of rows. Happy knitting!
03.02.2020 - 10:01
 Martinet napisała::
Bonsoir Après les 35 cm indiqués pour les côtés, est ce que l’on Co toi je les augmentations de la même manière jusqu’à atteindre 85 cm ? Merci d’autre part je souhaite la faire plus large et plus longue, me suffit il de continuer à augmenter jusqu’à la largeur que je souhaite et ensuite commencer l’alternance diminution/augmentation ?
24.11.2019 - 18:58Odpowiedź DROPS Design :
Bonjour Mme Martinet, on continue comme avant (on augmente 1 m de chaque côté) jusqu'à ce que la largeur de la couverture mesure 85 cm; à 35 cm, on commence simplement les rayures. Si vous voulez une couverture plus large, continuez à augmenter jusqu'à la largeur souhaitée pour la couverture - cette vidéo peut vous aider à adapter - rappelez-vous qu'il vous faudra plus de laine. Bon tricot!
25.11.2019 - 10:18
 Nathalie élément napisała::
Je ne vois pas les explications pour la section qui est uniquement de couleur naturel au début du travail... pouvez-vous m'indiquer svp?
25.07.2019 - 18:08Odpowiedź DROPS Design :
Bonjour Nathalie, tout le debut est en naturel: "Monter 3 m avec l'aiguille circulaire 4.5 en naturel et tricoter 1 côte au POINT MOUSSE – voir ci-dessus, EN MÊME TEMPS, augmenter 1 m au début de chaque rang (à la fois sur l'endroit et sur l'envers) en faisant 1 jeté à 1 m point mousse du bord. Au rang suivant, tricoter le jeté torse à l'end pour éviter les trous. Répéter ces augmentations au début de chaque rang jusqu'à ce que l'ouvrage mesure 35 cm le long des 2 côtés". Bon tricot!
25.07.2019 - 18:33
RAULET napisała::
Bonjour Pour ce modèle la laine est utilisée en double ou pas ? tricot avec numéro 4.5 alors que la laine est avec un numéro 3 . Merci de votre réponse.
07.01.2019 - 21:09Odpowiedź DROPS Design :
Bonjour Mme Raulet, on tricote ici volontairement avec des aiguilles plus large pour obtenir la texture souhaitée. Chacune tricotant différemment, vérifiez bien votre tension et ajustez la taille des aiguilles si besoin, vous devez avoir 20 m x 40 rangs au point mousse avec 1 seul fil = 10 x 10 cm. Bon tricot!
08.01.2019 - 08:58
 Dorthe Kemp napisała::
Heg vil gerne strikke dette tæppe, men bare en 1/2 gang større. Vil det kunne lade sig gøre ved at øge længde og bredde med 50% eller skal det gøres på en anden måde. Hvor meget ekstra garn skal der til. Tak for hjælpen. Med venlig hilsen Dorthe
29.10.2018 - 10:41
Marion napisała::
Bonjour, pour la 1ère rayure, après 7xA1, il faut tricoter en naturel sur 2,5cm. Faut-il les mesurer le long de la bordure (comme il est indiqué pour mesurer la longueur totale de l'ouvrage) ou en hauteur, tout "droit", de manière classique? Merci pour votre aide. Marion
22.07.2018 - 15:36Odpowiedź DROPS Design :
Bonjour Marion, les mesures se font le long du côté. Bon tricot!
23.07.2018 - 08:12
 Rósa Mjöll Ragnarsdóttir napisała::
Hæ mjög skemmtilegt mynstur og falleg litasamsetning. Ég er samt ekki alveg að skilja mynstrið. Ef það á að prjóna A. 1 7x eru það þá ekki fjórir prjónar í einu A. 1 mynstri?
05.05.2018 - 19:45Odpowiedź DROPS Design :
Eitt A.1 mynstur = 1 umferð bláa lónið og 1 umferð natur
31.05.2018 - 09:54
|
|||||||||||||
Under The Sea#underthesea |
|||||||||||||
 |
 |
||||||||||||
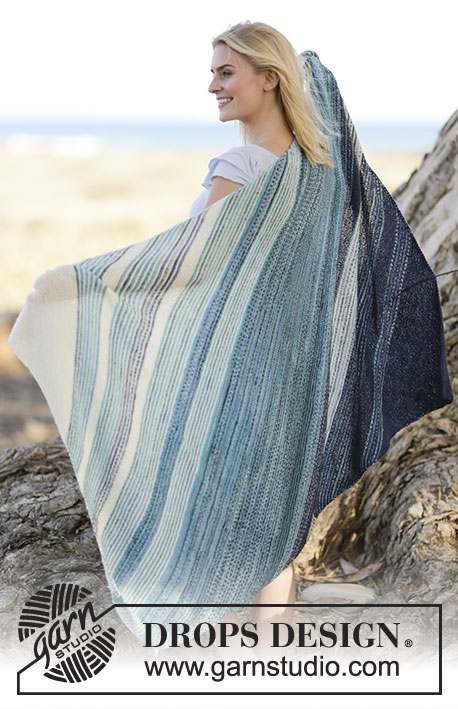
Koc DROPS ściegiem francuskim w paski, z włóczki „Fabel”.
DROPS 161-16 |
|||||||||||||
|
ŚCIEG FRANCUSKI (w tę i z powrotem): Przer. wszystkie rzędy na prawo. 1 „ściągacz” francuski = 2 rz. na prawo. ŚCIEG FANTAZYJNY: Patrz schematy A.1-A.5. Przerabiane w całości ściegiem francuskim. PASKI: Przer. 7 razy na wysokość schemat A.1, dalej przer. kolorem ecru przez 2½ cm. Przer. 6 razy na wysokość schemat A.1, 4 razy schemat A.2 na wysokość, dalej przer. kolorem ecru przez 2 cm. Przer. 8 razy na wysokość schemat A.1, 1 ściągacz francuski kolorem błękitna laguna, dalej 4 razy schemat A.3 na wysokość. Przer. 7 razy na wysokość schemat A.1, 1 ściągacz francuski kolorem błękitna laguna, dalej schemat A.3 przez 31 cm. Przer. 4 razy na wysokość schemat A.4, dalej przer. 4 razy schemat A.3 na wysokość. Przer. 4 razy na wysokość schemat A.5, dalej przer. kolorem niebieskim przez 4 cm. Przer. 8 razy na wysokość schemat A.2, dalej A.5 przez 10 cm, dalej przer. kolorem niebieskim przez 4 cm. Przer. A.5 przez 5 cm. Zakończyć kolorem niebieskim. ---------------------------------------------------------- KOC: Przerabiany w całości ściegiem francuskim, od jednego do drugiego rogu. Na drutach z żyłką nr 4,5 nabrać 3 o. kolorem ecru i przer. 1 ściągacz ściegiem francuskim – patrz powyżej, W TYM SAMYM CZASIE dodać 1 o. na początku każdego rz. (na prawej stronie robótki i na lewej stronie robótki) wykonując 1 narzut w odl. 1 o. ściegiem francuskim od brzegu. W nast. rzędzie przer. oczko przekręcone w miejscu narzutu na prawo aby uniknąć dziur. Powt. dodawanie o. na początku każdego rz., aż dł. robótki wynosi 35 cm wzdłuż 2 boków (UWAGA: zawsze mierzyć wzdłuż boku). ZACHOWAĆ TAKIE SAME NAPRĘŻENIE NICI JAK W PRZYPADKU PRÓBKI! Dalej przer. ściegiem fantazyjnym zachowując układ PASKÓW – patrz powyżej. W TYM SAMYM CZASIE gdy dł. robótki wynosi 85 cm, zamknąć 1 o. na pocz. rz. na prawej stronie robótki przerabiając 2 o. przekręcone i przerobione na prawo w odl. 1 o. od brzegu. W TYM SAMYM CZASIE na końcu tego samego rzędu (tj. na końcu rzędu na prawej stronie robótki) dodać 1 o. wykonując 1 narzut w odl. 1 o. od brzegu, obrócić i przer. rząd powrotny na prawo bez zamykania i dodawania o. (przer. narzuty przekręcone na prawo). Powt. zamykanie o. na pocz. rzędu i dodawanie o. na końcu rzędu co 2 rz. (tzn. w każdym rzędzie na prawej stronie robótki – ogólna liczba o. pozostaje taka sama), aż dł. robótki wynosi 135 cm wzdłuż dłuższego boku koca. Zamknąć teraz 1 o. na początku każdego rz. przerabiając 2 o. razem na prawo w odl. 1 o. od brzegu. Powt. zamykanie o. na początku każdego rz. (na prawej stronie robótki i na lewej stronie robótki naraz) aż zostaje 5 o. Przer. kolejny rząd na prawej stronie robótki następująco: 1 o.p., zdjąć 1 o. jak do przerobienia na prawo, 2 o. razem na prawo, przełożyć oczko zdjęte nad przerobionym oczkiem, 1 o.p. Obrócić, przer. rząd powrotny na prawo i zamknąć 3 ost. o. |
|||||||||||||
Objaśnienia do schematu |
|||||||||||||
|
|||||||||||||
 |
|||||||||||||
Skończyłaś ten wzór?Otaguj swoje zdjęcia #dropspattern #underthesea lub prześlij je do #dropsfan gallery. Potrzebujesz pomocy w związku z tym wzorem?Zobacz 8 instrukcje video, sekcję Komentarze/Pytania i jeszcze więcej, wchodząc na stronę wzoru na garnstudio.com © 1982-2026 DROPS Design A/S. Wszelkie prawa zastrzeżone. Ten dokument, w całości, jest chroniony prawem. Zobacz co możesz robić z naszymi wzorami na dole każdego wzoru na naszej stronie. |
|||||||||||||






Posiadając 40 lat doświadczenia w projektowaniu wzorów na druty i szydełko, DROPS Design oferuje jedną z największych kolekcji bezpłatnych wzorów w internecie – przetłumaczonych na 17 języków. Obecnie jest dostępnych 333 katalogów i 12532 wzorów w języku polskim.
Dokładamy wszelkich starań, aby oferować Wam druty i szydełka, inspiracje, fachowe porady oraz doskonałej jakości włóczki w najlepszych cenach! Zamierzasz wykorzystać nasze wzory inaczej niż tylko do osobistego użytku? Przeczytaj jakie masz prawa w Copyright, który znajdziesz na końcu każdego wzoru. Miłej pracy!
Dodaj komentarz do modelu DROPS 161-16
Chcielibyśmy się dowiedzieć co masz do powiedzenia o tym wzorze!
Jeśli chcesz zadać pytanie i szybko uzyskać odpowiedź, upewnij się, że została wybrana właściwa kategoria w formularzu poniżej. Pola obowiązkowe są oznaczone *.