
Popularne kategorie
Szukasz włóczki?


Komentarze / Pytania (127)
![]() Loele Van Den Bergh napisała::
Loele Van Den Bergh napisała::
Kan iemand mij uitleggen hoe de mouwen gehaakt worden. Ik begrijp het principe wel, maar als ik op de goede kant haak en met de 5 losse de nieuwe toeren begin loopt de hele mindering gedraaid over de voorkant van de mouw. Ik heb overigens ook meer losse bogen dan aangegeven in het patroon. Dit kan ik oplossen door midden onder te minderen maar hoe voorkom ik dat het begin van de rondes over de mouw lopen?
03.01.2016 - 18:02Odpowiedź DROPS Design :
Hoi Loele. Je moet ervoor zorgen, dat de minderingen steeds op dezelfde plek worden gemaakt. Het lijkt dat je de minderingen op de toer opschuift waardoor ze zich verplaatsen en het mouw "draait". Ik zou ook kijken of je het patroon volgt zodat er niet steeds meer bogen komen.
05.01.2016 - 15:39
![]() Yvonne Pottgießer-Bündgen napisała::
Yvonne Pottgießer-Bündgen napisała::
Meine Frage vom 20.12.15 wurde leider noch nicht beantwortet. Darf ich mich nochmal in Erinnerung rufen? Vielen Dank.
30.12.2015 - 17:33Odpowiedź DROPS Design :
Sie müssen bis zur Mitte einer Seite des Quadrats häkeln, Sie häkeln also die Hälfte dieser Seite, dann überspringen Sie den Rest der Seite (also die andere Hälfte), indem Sie statt der Maschen die entsprechende Anzahl an Luftmaschen häkeln. Die Ecke häkeln Sie dann wieder normal und wiederholen das Ganze dann an der gegenüberliegenden Seite. Die Armausschnitte umfassen also jeweils die Hälfte einer Seite.
05.01.2016 - 19:18
![]() Christine Hohenstein napisała::
Christine Hohenstein napisała::
Are any further questions being answered????? I have a customer waiting on this item to be made. Can someone else help me if the creator isnt available to help me?
29.12.2015 - 16:55Odpowiedź DROPS Design :
Dear Mrs Hohenstein, please find answer below and thank you very much for your patience. Happy crocheting!
02.01.2016 - 15:17
![]() Christine Hohenstein napisała::
Christine Hohenstein napisała::
I am so confused as to how to do the sleeve. I got the first corner done. But from there I do not understand the written instructions I have also read many comments and answers and am still confused is there anyway that you can try and in a very simple way explain how to do the first side including the first sleeve? Please and thank you
27.12.2015 - 21:39Odpowiedź DROPS Design :
Dear Mrs Hohenstein, to shape armholes, work to 1st corner, work 3 dc+3ch+3 dc in corner, then you will work a chain to shape the hole for the sleeve as follows: count number of sts from the 1st corner to the middle of side between 1st and 2nd corner and chain this number of sts, continue working as before from middle of this side to 2nd corner, continue as before to the 3rd corner, then work as before from the corner to the mid of side between 3rd and 4th corner, you will now skip the next sts to the 4th corner and replace these skipped sts by a chain of the number of skipped sts. Finish round as before. Happy crocheting!
02.01.2016 - 14:19
![]() Yvonne Pottgießer-Bündgen napisała::
Yvonne Pottgießer-Bündgen napisała::
Ich habe Probleme mit den Ärmelausschnitten. Verstehe ich das richtig, dass ich ein Stäbchen gehäkelt habe, dann 3 Lfm + nochmal 3 Lfm um das nächste Stb.zu überspringen,dann wieder 3 Lfm und das nächste Stb häkele? Wenn ja, wie wiederhole ich dass in der nächsten Runde? Verdoppele ich die Lfm zum überspringen, da ja auch der Luftmaschenbogen breiter ist? Ich hoffe, ich habe mich einigermaßen verständlich ausgedrückt. Vielen Dank.
20.12.2015 - 18:15Odpowiedź DROPS Design :
Antwort siehe oben!
25.01.2016 - 11:09
![]() Tara napisała::
Tara napisała::
Sorry, I wasn't talking about the armholes, but the sides. It's under the "Front Piece" section of the pattern.
18.11.2015 - 02:35Odpowiedź DROPS Design :
Dear Tara and sorry, my mistake - the 2nd front piece is worked as you did for the first side but this time crochet between the 3rd and 4th corner (seen from RS): crochet row 1 starting in the 3rd corner and finishing in the 4th corner. Happy crocheting!
18.11.2015 - 09:44
![]() Tara napisała::
Tara napisała::
This is under the Front section: Repeat on the other side, now work back and forth from third to fourth corner. So am I working this on 3 out of 4 sides? If so, on the bottom side, do I go all the way to the front corners or just the middle to connect the sides (which would not make the sides any longer in front)? I hope this makes sense. I appreciate the help!
17.11.2015 - 14:32Odpowiedź DROPS Design :
Dear Tara, first armhole is worked between 1st corner and middle of side before 2nd corner, 2nd armhole is worked from middle of side after 3rd corner (work to the middle of the side as before) to the 4th corner (ch same number of ch you crocheted for 1st armhole and skip same number of sts as for 1st armhole). Happy crocheting!
17.11.2015 - 16:39
![]() Tara napisała::
Tara napisała::
I have read through all the comments and I am confused on Lauren's question. She said that on the 4th side there is an extra DC + 3ch but you said there should not be. However, in the diagram if you count the DC lines it shows 4 on the 4th side and 3 on the other side. When does this get straightened out to be an equal number of DC's on each side? Thanks in advance.
11.11.2015 - 03:10Odpowiedź DROPS Design :
Dear Tara, your question has been forwarded. Thank you in advance for your patience and comprehension.
12.11.2015 - 09:49Helen Watt napisała::
Hi there! I would like some clarification regarding the increase on the body after the chain for the armhole. The pattern reads"On next round work pattern and inc as before OVER ALL STS, also in ch for armholes." To increase over all sts would make the garment very large? I assume this is incorrect and the increase is the same as previous to the making the armhole. Therefore increasing every 6th row? I just want to make sure that this is correct.
05.11.2015 - 10:06Odpowiedź DROPS Design :
Dear Mrs Watt, yes that's correct, you continue as before and increase as you did before (= continue increasing every 6h row). Happy crocheting!
05.11.2015 - 10:27
![]() Sarah napisała::
Sarah napisała::
I am not sure what to do on round 5, it says to increase on each corner, which is a total of 4 increases? Correct? Where do i increase and do i still do the extra treble and chain 3 in the last chain space?
01.11.2015 - 17:42Odpowiedź DROPS Design :
Dear Sarah, on round 5 continue as before (there will be 3 ch, 1 tr more between corners), and on round 6 start inc with 1 tr + 3 ch more in every place with a star in the diagram. Happy crocheting!
02.11.2015 - 09:22
|
||||||||||||||||||||||
Around the World#aroundtheworldcardigan |
||||||||||||||||||||||
 |
 |
|||||||||||||||||||||
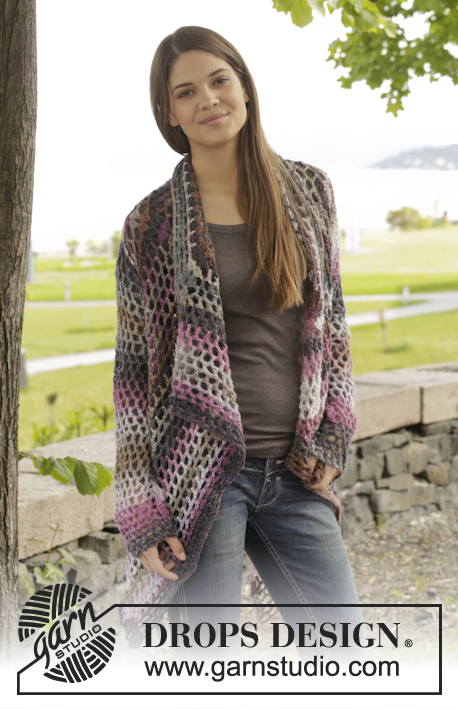
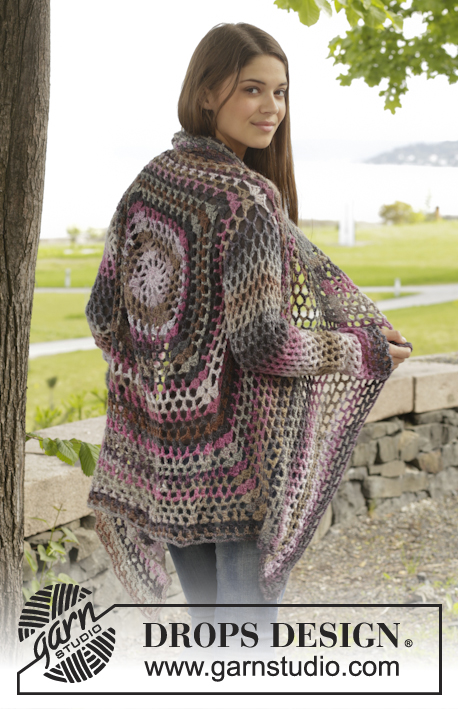
Ażurowy sweter DROPS na szydełku, z włóczki „Big Delight”. Od S do XXXL
DROPS 156-42 |
||||||||||||||||||||||
|
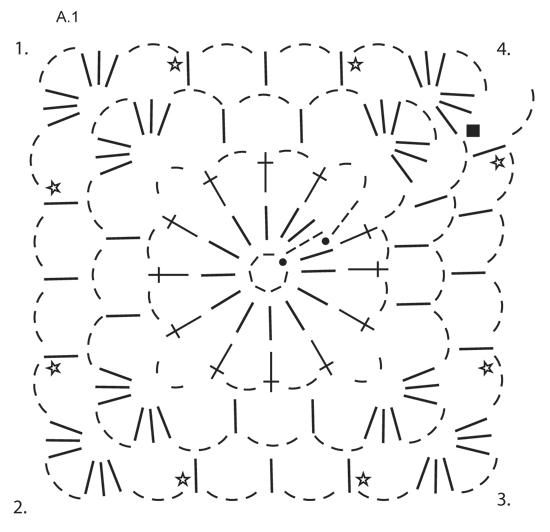
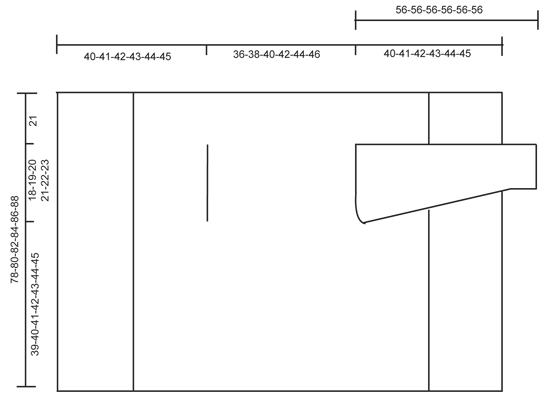
ŚCIEG FANTAZYJNY: Patrz schemat A.1. ZAMYKANIE OCZEK (rękawy): Zamknąć 1 motyw (= 1 sł + 3 oł) nie wykonując oczek łańcuszka, ale przer. 2 sł następująco: przer. 1 sł, ale nie wykonywać ost. narzutu (= 2 pętelki na szydełku), dalej przer. nast. sł, a po ost. narzucie przeciągnąć nitkę przez wszystkie pętelki na szydełku. ---------------------------------------------------------- TYŁ & PRZODY: Przerabiane na okrągło, zaczynając od środka tyłu. Na szydełku nr 5 wykonać 6 oł włóczką Big Delight i zamknąć w pierścień podstawy przerabiając 1 oz w 1-sze oł. Przer. wg schematu A.1 następująco: OKR. 1: 3 oł, 13 sł w pierścień podstawy, zakończyć przerabiając 1 oz w 3-cie oł na pocz. okrążenia. OKR. 2: 5 oł, ominąć 1 sł, 1 sł w nast. sł, *2 oł, 1 sł w nast. sł *, powt. od *-* całe okrążenie, zakończyć przerabiając 2 oł = 12 sł + 2 oł. OKR. 3: teraz koło przerabiamy w kwadrat następująco: 3 sł + 3 oł + 3 sł (= róg) w 1-szy łuk, 3 oł, 1 sł w nast. łuk, 3 oł, 1 sł w nast. łuk, 3 oł, *3 sł + 3 oł + 3 sł (= róg) w nast. łuk, 3 oł, 1 sł w nast. łuk, 3 oł, 1 sł w nast. łuk, 3 oł*, powt. od *-* w sumie 3 razy, 1 sł w nast. łuk (= 2 ost. oł poprzedniego okrążenia), 3 oł. OKR. 4: 3 sł + 3 oł + 3 sł (= róg) w 1-szy łuk, *3 oł, 1 sł w nast. łuk, 3 oł, 1 sł w nast. łuk, 3 oł, 1 sł w nast. łuk, 3 oł, 3 sł + 3 oł + 3 sł (= róg) w nast. łuk*, powt. od *-* w sumie 3 razy, 3 oł, 1 sł w nast. łuk, 3 oł, 1 sł w nast. łuk, 3 oł, 1 sł w nast. łuk, 3 oł, 1 sł w nast. łuk, 3 oł. ZACHOWAĆ TAKIE SAME NAPRĘŻENIE NICI JAK W PRZYPADKU PRÓBKI! Powt. okr. 4 z dodawaniem o., tj. przer. dodatkowo 1 sł + 3 oł między każdym rogiem w każdym okr. (= 4 dodane o. w okrążeniu). W TYM SAMYM CZASIE co 6 okr. dodać dodatkowo 1 sł + 3 oł z każdej strony rogów - patrz gwiazdka w schemacie (= 8 dodatkowo dodanych o. w okr.). Dalej przer. tak samo, aż wymiary kwadratu wynoszą 36-38-40-42-44-46 cm x 36-38-40-42-44-46 cm. Przer. teraz podkroje rękawów następująco: dalej przer. jak wcześniej do 1-szego rogu, przer. 3 sł + 3 oł + 3 sł w łuk w rogu. Przer. teraz oł do środka nast. strony (tj. na środku między 1-szym i 2-gim rogiem) następująco: 1 oł na każde ominięte oł/sł. Dalej przer. jak wcześniej do środka między 3-cim i 4-tym rogiem. Przer. teraz oł do początku okrążenia następująco: 1 oł na każde ominięte oł/sł. W nast. okrążeniu przer. i dodawać o. jak wcześniej przez wszystkie oczka i w łańcuszki podkroju rękawów. Dalej przer. tak samo, aż wymiary kwadratu wynoszą 78-80-82-84-86-88 cm x 78-80-82-84-86-88 cm (tj. 21 cm od pokrojów rękawów we wszystkich rozmiarach). Zakończyć. PRZODY: Dalej przer. w tę i z powrotem między 1-szym i 2-gim rogiem. UWAGA! przer. przód bez dodawania o. 1-szy RZĄD: przer. od 1-szego rogu następująco: 3 sł w łuk w rogu,*3 oł, 1 sł w łuk*, powt. od *-* i zakończyć przerabiając 3 oł i 3 sł w róg. 2-gi RZĄD: obrócić i przer. następująco: 1 sł w każdy z 3 pierwszych sł, *1 sł w łuk, 3 oł*, powt. od *-* i zakończyć przerabiając 1 sł w ost. łuk i 1 sł w każdy z 3 sł. 3-ci RZĄD: obrócić i przer. następująco: 1 sł w każdy z 3 pierwszych sł, *3 oł, 1 sł w ost. łuk*, powt. od *-* i zakończyć przerabiając 3 oł i 2 sł w każdy z 3 ost. sł. Dalej przer. powtarzając rzędy 2 i 3 aż zostanie przerobione 19-20-21-22-23-24 cm w tę i z powrotem, zakończyć. Powt. z drugiej strony: przer. teraz w tę i z powrotem od 3-ciego do 4-tego rogu. Zakończyć przerabiając okrążenie wokół kwadratu, jak wcześniej, ale w łuk w każdym rogu przer. 6 sł. Zakończyć. RĘKAWY: Przerabiane na okrągło, z góry na dół, od pokrojów rękawów, zaczynając na środku pod rękawem na prawej stronie robótki. OKR. 1: 6 oł (= 1 sł + 3 oł), *1 sł w nast. łuk, 3 oł*, powt. od *-* w sumie 16-17-18-19-20-21 razy, zakończyć przerabiając 1 oz w 3-cie oł. OKR. 2: 5 oł, *1 sł w nast. łuk, 3 oł*, powt. od *-* w sumie 16-17-18-19-20-21 razy, 1 oł, zakończyć przerabiając 1 oz w 3-cie oł na początku okrążenia. Powt. okr. 1 i 2 - W TYM SAMYM CZASIE zamknąć 1 sł + 3 oł na pocz. 4-tego-6-tego-6-tego-8-mego-8-mego-6-tego okr. przerabiając 2 sł razem – PATRZ ZAMYKANIE OCZEK – na środku pod rękawem. Powt. zamykanie o. co 6-6-6-4-4-4 okr. = 12-12-13-13-14-14 sł. Dalej przer. na okrągło bez zamykania o., aż dł. rękawa wynosi ok. 56 cm we wszystkich rozmiarach. Zakończyć. Wykonać drugi rękaw w taki sam sposób. |
||||||||||||||||||||||
Objaśnienia do schematu |
||||||||||||||||||||||
|
||||||||||||||||||||||
 |
||||||||||||||||||||||
 |
||||||||||||||||||||||
Skończyłaś ten wzór?Otaguj swoje zdjęcia #dropspattern #aroundtheworldcardigan lub prześlij je do #dropsfan gallery. Potrzebujesz pomocy w związku z tym wzorem?Zobacz 6 instrukcje video, sekcję Komentarze/Pytania i jeszcze więcej, wchodząc na stronę wzoru na garnstudio.com © 1982-2026 DROPS Design A/S. Wszelkie prawa zastrzeżone. Ten dokument, w całości, jest chroniony prawem. Zobacz co możesz robić z naszymi wzorami na dole każdego wzoru na naszej stronie. |
||||||||||||||||||||||


Posiadając 40 lat doświadczenia w projektowaniu wzorów na druty i szydełko, DROPS Design oferuje jedną z największych kolekcji bezpłatnych wzorów w internecie – przetłumaczonych na 17 języków. Obecnie jest dostępnych 324 katalogów i 12290 wzorów w języku polskim.
Dokładamy wszelkich starań, aby oferować Wam druty i szydełka, inspiracje, fachowe porady oraz doskonałej jakości włóczki w najlepszych cenach! Zamierzasz wykorzystać nasze wzory inaczej niż tylko do osobistego użytku? Przeczytaj jakie masz prawa w Copyright, który znajdziesz na końcu każdego wzoru. Miłej pracy!
Dodaj komentarz do modelu DROPS 156-42
Chcielibyśmy się dowiedzieć co masz do powiedzenia o tym wzorze!
Jeśli chcesz zadać pytanie i szybko uzyskać odpowiedź, upewnij się, że została wybrana właściwa kategoria w formularzu poniżej. Pola obowiązkowe są oznaczone *.