
Popularne kategorie
Szukasz włóczki?


Komentarze / Pytania (123)
Lisa napisała::
Hi, I am working on the sleeve for size S, and after the third increase I already have the total 57 tr/ch stitches , because increasing by 1tr+1ch at each end of the row means there is an increase of 4 stitches for the row, but the pattern only counts 2 to calculate the total. Is that correct, and if so should I end up with a total of 69 stitches? Or am I doing something wrong? thanks
30.04.2017 - 16:33Odpowiedź DROPS Design :
Dear Lisa, number of sts after increase will be check, thank you. Happy crocheting!
02.05.2017 - 10:35
![]() Sylvia napisała::
Sylvia napisała::
What does, A.1B stands for. First time doing symbols. Thanks
02.04.2017 - 07:12Odpowiedź DROPS Design :
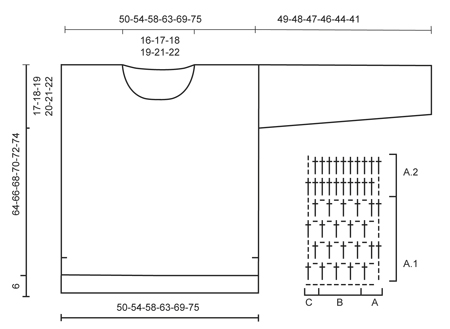
Dear Sylvia, diagram A.1 is divided into 3 parts: A.1A = beg of row from RS (= row1: 3 ch, 1 ch, skip 1 st, 1 dc in next st) and end of row from WS, then A.1B to repeat until last 3 sts on row 1 (= *1 ch, skip 1 st, 1 dc in next ch*, repeat from *-* a total of 3 times for 1 repeat of A.1B, repeat these until 2 sts remain on row, and A.1C = end of row from RS, beg of row from WS (row 1 = 1 ch, 1 dc in last st). Your DROPS store will provide you any further invidivual assistance required for reading charts. Happy crocheting!
03.04.2017 - 10:39
![]() Tommie napisała::
Tommie napisała::
Can you send me the pattern for this. I would be happy to pay for a pdf or written out.
03.11.2016 - 02:33Odpowiedź DROPS Design :
Dear Tommie, you will find the pattern for free scrolling down the page. Happy crocheting!
03.11.2016 - 09:45Eva napisała::
Hello!!!Can you tell me the size of the jumper on picture?Thank you.
10.08.2016 - 00:13Odpowiedź DROPS Design :
Dear Eva, our models are usually wearing size M - read more about sizing here. Happy crocheting!
10.08.2016 - 08:45
![]() Wendy napisała::
Wendy napisała::
I am on the back section starting A2 which seems to be a row of treble's. I've done that and I have 5 extra trebles which I don't know how to get rid of but also, because it has gone from a mesh pattern to all treble's, it is very curly. Am I reading the pattern correctly, is it a row of all treble's?
04.08.2016 - 23:51Odpowiedź DROPS Design :
Dear Wendy, A.2 is all trebles - remember to check and keep gauge (17 tr = 10 cm) when working A.1, and do not work too tight the rows with ch and tr. Happy crocheting!
05.08.2016 - 09:45
![]() Wendy napisała::
Wendy napisała::
I really want to make this and looking at it, it appears easy, however, I don't understand the pattern at all. On the back piece, after the foundation row, I've done a treble in the 6th chain from the hook as instructed. It tells me that is A.1A, but the diagram shows it as two chains and a treble. Is it possible to get the written pattern instructions as opposed to looking at the diagram? If not, can you tell me what to do after the first treble in row 2.
31.07.2016 - 01:57Odpowiedź DROPS Design :
Dear Wendy, when you work first row you skip first 5 ch (working in the 6th ch from hook), these first 5 ch are : 1st tr (= 3 ch), 1 ch before next tr + 1 ch skipped before crocheting next tr). At the beg of row 2 work A.1C: 3ch, 1 tr around next ch, then repeat A.1B and finish with A.1C. Happy crocheting!
01.08.2016 - 09:35
![]() Sarah napisała::
Sarah napisała::
I need further clarification on the sleeve increases, inadvertently I am acquiring an extra two stitches when increasing the sleeves leading to too many stitches. I have looked at the pattern to see how I can prevent the extra stitches from occurring but having great difficulty in figuring out how, can you advise further? The first increase stitch is placed at A.1 A and at the end however the extra stitches are occurring in every third row following this, hope this makes sense, Thanks Sarah
11.03.2016 - 23:30Odpowiedź DROPS Design :
Dear Sarah, you inc for sleeve 1 st in each side, ie you will have a total of 2 tr more on every inc row - increase should be done by working 1 tr + 1 ch more in outermost tr in each side. On next row, work in A.1 as before, you will have same as before, but just 2 more tr per inc row. Happy crocheting!
12.03.2016 - 18:03Trishy napisała::
I'm new to the Crotchet world. And was wondering, if I try to make a large size in this jumper, how do I know how many stitches do I need for the back, & front etc?
31.10.2015 - 04:23Odpowiedź DROPS Design :
Dear Trishy, you will find at the bottom of the pattern a measurement chart, compare the measurements (in cm) to a similar garment you have and like the shape and find out the matching size - you can then follow this size in the pattern. Read more about sizing here. Happy crocheting!
31.10.2015 - 18:09
![]() Federica Piucci napisała::
Federica Piucci napisała::
Buon pomeriggio, io intendo confezionare questa maglia in con due colori diversi, uno per la parte superiore e uno per quella inferiore. Indicativamente quanti grammi potrebbero servire per le due parti prese separatamente?
12.10.2015 - 15:06Odpowiedź DROPS Design :
Buongiorno Federica. Non riusciamo ad essere precisi sul quantitativo di filato necessario per lavorare con due colori. Lavorare un piccolo campione con i due diversi motivi potrebbe dare una prima indicazione. Il suo rivenditore di fiducia è a sua disposizione per consigliarla. Se possibile e non troppo oneroso, si informi anche sulla possibilità di restituire eventuali gomitoli di filato integri e non utilizzati. Buon lavoro!
16.10.2015 - 23:39Dalia napisała::
When piece measures 53-54-55-56-57-58 cm / 21''-21¼''-21 5/8''-22''-22½''-22¾'', insert 1 marker in each side (marks where armhole beg). where exactly do I insert my markers?
14.07.2015 - 10:29Odpowiedź DROPS Design :
Dear Dalia, see answer below. Happy crocheting!
27.07.2015 - 11:29
|
|||||||
Donna#donnasweater |
|||||||
 |
 |
||||||
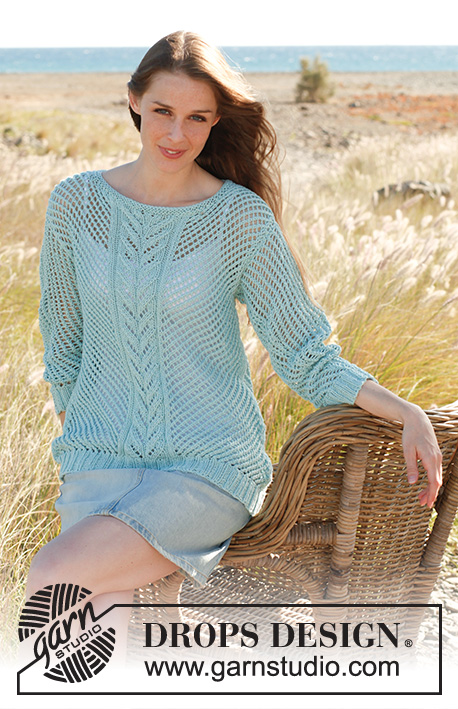
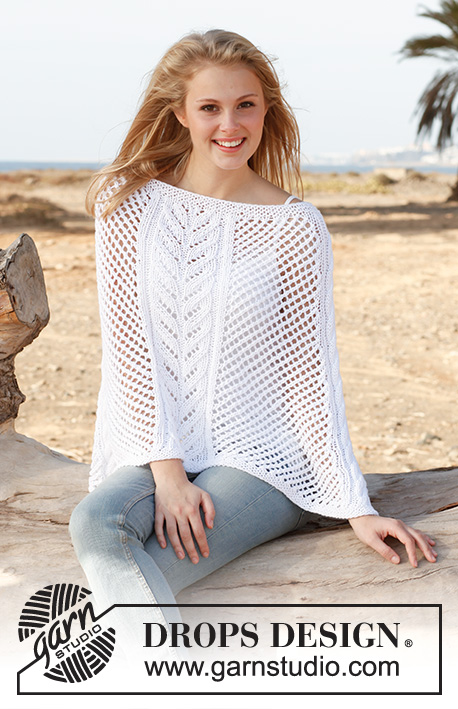
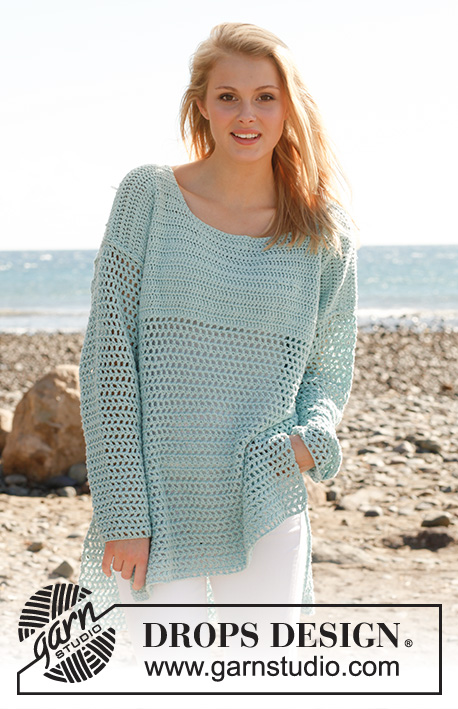
Sweter DROPS na szydełku, z włóczki „Cotton Light”. Od S do XXXL.
DROPS 145-19 |
|||||||
|
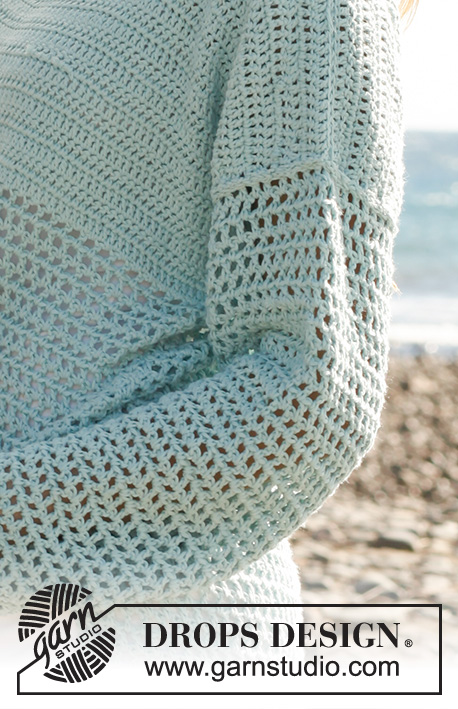
ŚCIEG FANTAZYJNY: Patrz schematy A.1 i A.2. ZAMYKANIE OCZEK: Obrócić, gdy zostaje 1 sł = 1 zamknięty sł. DODAWANIE OCZEK: Aby dodać oczko, przer. dodatkowy 1 sł + 1 oł w 1-szy/ost. sł z każdej strony. Jak to tylko możliwe przer. dodawane o. ŚCIEGIEM FANTAZYJNYM A.1. ---------------------------------------------------------- TYŁ: Przerabiany w tę i z powrotem. Tył jest o 6 cm de dłuższy niż przód. Na szydełku nr 4 LUŹNO wykonać 88-94-102-110-120-130 oł (aby brzeg nie był zbyt ścisły) włóczką Cotton Light. Obrócić i przer. 1 sł w 6-te oł od szydełka (A.1 A jest teraz gotowy – patrz schemat). Przer. A.1 B ponad 80-86-94-102-112-122 nast. oł i zakończyć przerabiając A.1 C w 2 ost. oł. Dalej przer. wg schematu A.1. Na wys. 47-48-49-50-51-52 cm od dołu robótki przer. następująco: A.2 A, powt. A.2 B aż zostaje 2 sł/oł, zakończyć przerabiając A.2 C = 85-91-99-107-117-127 sł. Dalej przer. ŚCIEGIEM FANTAZYJNYM A.2 do końca. Na wys. 53-54-55-56-57-58 cm od dołu robótki, umieścić 1 marker z każdej strony (oznaczenie na początek podkroju rękawów). Na wys. 68-70-72-74-76-78 cm od dołu robótki, nie przer. już ponad 27-29-31-33-35-37 sł środk. = zostaje 29-31-34-37-41-45 sł na każde ramię. Zakończyć teraz każde ramię osobno i dalej przer. ŚCIEGIEM FANTAZYJNYM A.2, odciąć i wrobić nitkę na wys. 70-72-74-76-78-80 cm od dołu robótki. PRZÓD: Przer. jak z tyłu, aż dł. robótki wynosi 41-42-43-44-45-46 cm od dołu robótki - UWAGA: dł. tyłu jest o 6 cm dłuższy niż przód, stąd miary są różne. Teraz przer. następująco: A.2 A, powt. A.2 B aż zostaje 2 sł/oł, zakończyć przerabiając A.2 C = 85-91-99-107-117-127 sł. Dalej przer. ŚCIEGIEM FANTAZYJNYM A.2 do końca. Na wys. 47-48-49-50-51-52 cm od dołu robótki, umieścić 1 marker z każdej strony (oznaczenie początku podkroju rękawów). Na wys. 56-58-60-62-64-66 cm od dołu robótki, nie przer. już ponad 23-25-27-29-31-33 sł środk. i zakończyć teraz każde ramię osobno, w tym samym czasie, zamknąć od strony dekoltu 2 razy 1 sł w każdym rzędzie – patrz ZAMYKANIE OCZEK = zostaje 29-31-34-37-41-45 sł na każde ramię. Dalej przer. ŚCIEGIEM FANTAZYJNYM A.2, odciąć i wrobić nitkę na wys. 64-66-68-70-72-74 cm od dołu robótki. RĘKAWY: Przerabiane w tę i z powrotem. Na szydełku nr 4 LUŹNO wykonać 48-48-50-52-54-56 oł (łańcuszek musi być luźny aby brzeg nie był zbyt ścisły) włóczką Cotton Light. Obrócić i przer. 1 sł w 6-te oł od szydełka (A.1 A jest gotowy), przer. A.1 B ponad 40-40-42-44-46-48 nast. oł i zakończyć przerabiając A.1 C w 2 ost. oł = 45-45-47-49-51-53 sł/oł. Dalej przer. ŚCIEGIEM FANTAZYJNYM A.1. Na wys. 8 cm od dołu robótki, dodać 1 o. z każdej strony – patrz DODAWANIE OCZEK! Powt. dodawanie o. jeszcze 5-7-8-9-9-10 razy (w sumie 6-8-9-10-10-11 razy) co 7-5-4½-3½-3½-3 cm = 57-61-65-69-71-75 sł/oł. Odciąć i wrobić nitkę na wys. 49-48-47-46-44-41 cm od dołu robótki (krócej dla większych rozmiarów, gdyż ramiona są szersze). WYKOŃCZENIE: Zszyć ramiona. Wszyć rękawy – od ramienia do markerów przodu i tyłu. Zszyć rękawy pod spodem oraz boki, zatrzymać się w odl. 26 cm od dolnej części tyłu i 20 cm od dolnej części przodu = pęknięcia na bokach. |
|||||||
Objaśnienia do schematu |
|||||||
|
|||||||
 |
|||||||
Skończyłaś ten wzór?Otaguj swoje zdjęcia #dropspattern #donnasweater lub prześlij je do #dropsfan gallery. Potrzebujesz pomocy w związku z tym wzorem?Zobacz 4 instrukcje video, sekcję Komentarze/Pytania i jeszcze więcej, wchodząc na stronę wzoru na garnstudio.com © 1982-2026 DROPS Design A/S. Wszelkie prawa zastrzeżone. Ten dokument, w całości, jest chroniony prawem. Zobacz co możesz robić z naszymi wzorami na dole każdego wzoru na naszej stronie. |
|||||||


Posiadając 40 lat doświadczenia w projektowaniu wzorów na druty i szydełko, DROPS Design oferuje jedną z największych kolekcji bezpłatnych wzorów w internecie – przetłumaczonych na 17 języków. Obecnie jest dostępnych 324 katalogów i 12290 wzorów w języku polskim.
Dokładamy wszelkich starań, aby oferować Wam druty i szydełka, inspiracje, fachowe porady oraz doskonałej jakości włóczki w najlepszych cenach! Zamierzasz wykorzystać nasze wzory inaczej niż tylko do osobistego użytku? Przeczytaj jakie masz prawa w Copyright, który znajdziesz na końcu każdego wzoru. Miłej pracy!
Dodaj komentarz do modelu DROPS 145-19
Chcielibyśmy się dowiedzieć co masz do powiedzenia o tym wzorze!
Jeśli chcesz zadać pytanie i szybko uzyskać odpowiedź, upewnij się, że została wybrana właściwa kategoria w formularzu poniżej. Pola obowiązkowe są oznaczone *.