
Popularne kategorie
Szukasz włóczki?


Komentarze / Pytania (51)
Margaret Black napisała::
Hi again when i have done the pick ups and 2cm how do I knowcwhich is the right side to start stocking st.this is the first boot.would the right side start from 5 garter st side or curved edge,thank you.
23.02.2015 - 12:07Margaret Black napisała::
Where do I put the markers...ie mid toe and heel?help
23.02.2015 - 08:16Odpowiedź DROPS Design :
Dear Mrs Black, that's correct, put 1 marker on mid toe (= towards the sts worked back and forth before) and 1 mid back - make sure there is the same number between markers. Happy knitting!
23.02.2015 - 10:57
![]() Maureen napisała::
Maureen napisała::
Would appreciate some help. In the foot section, where the 11/13/13 stitches (middle piece) are worked, does this end on a right or wrong sided row? and then do you break off yarn? and start again at the picking up the stitches off the stitch holder? When you're picking up the side stitches, are you picking up and knitting, then continuing in the round with seed stitch? I am using a circular needle. I hope you understand my questions. Thanks for your time.
12.02.2015 - 18:44Odpowiedź DROPS Design :
Dear Maureen, adjust last row over the 11-13 sts for upper foot to required measurements, cut the yarn and start again from RS: slip sts from st holder back to needle, pick up sts sts along side of middle piece, slip sts from middle piece, pick up sts along other side of middle piece. Happy knitting!
13.02.2015 - 09:23
![]() Iliane napisała::
Iliane napisała::
Ich habe diese Schuhe gestrickt, weil sie so schön aussahen. Leider ist der Schaft viel zu weit und auch wenn ich ihn enger nähe, sitzen die Schuhe überhaupt nicht gut. Ich werde soe wohl auftrennen und normale Socken draus machen. Schade!
23.10.2014 - 10:57Odpowiedź DROPS Design :
Stimmt denn Ihre Maschenprobe? Das ist ganz wichtig für eine richtige Passform. Wenn Sie nicht die kleinste Größe gestrickt haben, können Sie versuchen, die M-Zahl dieser Größe zu verwenden, aber die Fußrücken-Länge einer größeren Größe zu stricken (und entsprechend die M-Zahl aus dem Rand auffassen), wenn Sie sehr schmale Beine und Füße haben.
23.10.2014 - 13:23
![]() Maria Teresa napisała::
Maria Teresa napisała::
En la traducción del patron he comprobado que hay un error en el número de puntos que hay que montar para la pierna en la talla 35/37: pone 32 puntos, cuando en realidad deben ser 42
02.03.2014 - 12:59
![]() Andie Midbon napisała::
Andie Midbon napisała::
Thank You for the msg. I understand what you recommend for the 2nd slipper but it is not possible to bind off stiches at the end as you end up with 1 stitch left on your needle and the yarn at that end. Please help. Thank You. The slippers are adorable but I want to finish them.
07.02.2014 - 00:48Odpowiedź DROPS Design :
If you don't want to cut the yarn at the end of row, you can also bind off in the beg of the row from WS instead, work over the middle sts, and put last sts on a holder.
07.02.2014 - 01:28
![]() Andie Midbon napisała::
Andie Midbon napisała::
Please help me with the second slipper. Obviously the buttons go on the outside of the left slipper, but I can't figure out how to reverse the pattern. Thank You.
06.02.2014 - 02:34Odpowiedź DROPS Design :
Dear Mrs Midbon, on 1st slipper, you cast off first 5 sts, keep then on needle the next 9-11 sts and put on a st holder the remaining 28-30 sts. On 2nd slipper, you will put on a st holder the first 28-30 sts, keep the 9-11 next sts for upper foot on needle and cast off the last 5 sts, and then continue as for 1st slipper. Happy knitting!
06.02.2014 - 08:58
![]() Andie Midbon napisała::
Andie Midbon napisała::
The instructions for the second slipper are too vague....it has taken me a whole day to figure out what you mean and am not even sure I have it right. The keep the last 9 and slip the remaining 28 should be reversed in the instructions....soooo confusing
05.02.2014 - 19:38
![]() Laurel napisała::
Laurel napisała::
Started this pattern but don't see any instructions for the slipper. How many stitches are cast on, etc.
03.12.2013 - 03:50Odpowiedź Laurel :
Please disregard my question. I have figured out the pattern. Thanks.
03.12.2013 - 03:52
![]() BOURDET napisała::
BOURDET napisała::
Bonsoir, Concernant le Modèle 142-36 Je ne comprends pas bien où mettre les marqueurs. 1 Marqueur milieu devant = milieu des 11 m? Pointe ? et 1 Marqueur milieu dos ? sur les 28 mailles ? où? Car ça fait 2 fois que je recommence Merci
24.10.2013 - 19:46Odpowiedź DROPS Design :
Bonjour Mme Bourdet, à la fin du chausson, les marqueurs se placent, 1 au milieu devant (côté pointe du pied= dans la 6ème des 11 m du milieu devant) et l'autre au milieu dos (côté talon). Vous diminuez ensuite 1 m de chaque côté des m avec les marqueurs. Bon tricot!
24.10.2013 - 21:29
|
|
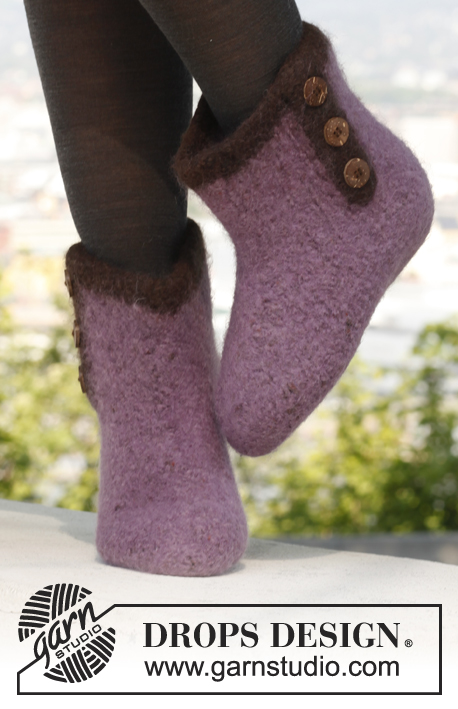
St Louis Boots#stlouisbootsslippers |
|
|
|
|
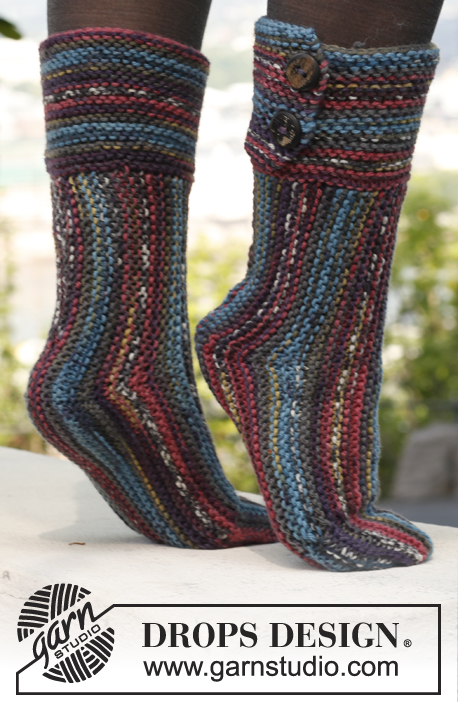
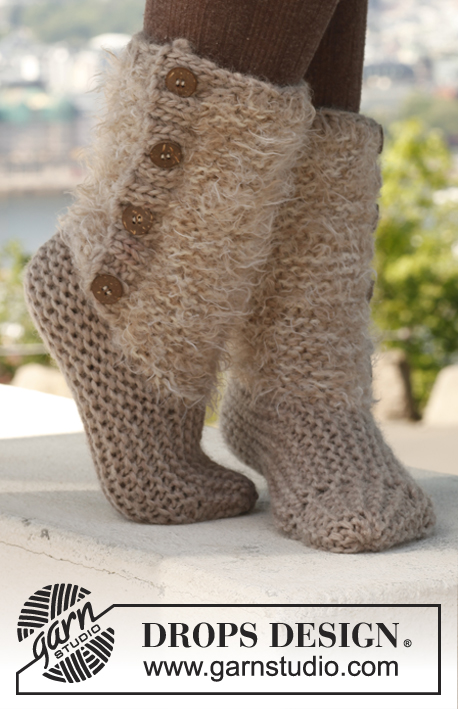
Kapcie DROPS ściegiem ryżowym, z włóczki „Snow”. Od 35 do 42.
DROPS 142-36 |
|
|
ŚCIEG FRANCUSKI (w tą i z powrotem): Przer. wszystkie rzędy na prawo. 1 „ściągacz” francuski = 2 rz. na prawo. Ścieg ryżowy: Rząd 1: *1 o.p., 1 o.l. * powt. od * do * Rząd 2: Przer. o.p. na lewo i o.l. na prawo Powt. rząd 2. ---------------------------------------------------------- KAPCIE: Przer. najpierw w tą i z powrotem, a następnie na okrągło na drutach pończoszniczych. CHOLEWKA: Na druty nr 6 nabrać 42-44-46 o. włóczką Snow. Przer. 4 rz. ŚCIEGIEM FRANCUSKIM - patrz powyżej, następnie przer. ŚCIEGIEM RYŻOWYM z 5 o. ściegiem francuskim z każdej strony - patrz powyżej. Przer. w tą i z powrotem, aż dł. robótki wynosi 15 cm. Zamknąć 5 pierwszych o. = 37-39-41 o. STOPA: Zostawić na drucie 9-11-11 pierwszych o. (= środek), zdjąć 28-28-30 pozostałych o. na drut pomocniczy. Dalej przer. ściegiem ryżowym, w tą i z powrotem przez te 9-11-11 o. – W TYM SAMYM CZASIE w 1-szym rz. nabrać 1 o. z każdej strony (o. brzeg.) = 11-13-13 o. Po przerobieniu 7-8½-10 cm, zamknąć 1 o. brzeg. z każdej strony = 9-11-11 o. Wziąć ponownie oczka z drutu pomocniczego na druty pończosznicze nr 6 i nabrać 12-14-16 o. z każdej strony części środkowej, w odl. 1 o. od brzegu (nie nabierać oczek ponad 5 o. ściegiem francuskim, które były wcześniej zamknięte)= 61-67-73 o. Mierzyć od tego momentu i przer. na okrągło na drutach pończoszniczych. Umieścić 1 marker na środku przodu na palcach i 1 marker na środku tyłu na pięcie. Dalej przer. na okrągło ściegiem ryżowym przez 2 cm. Następnie przer. dżersejem – W TYM SAMYM CZASIE, przer. 2 o. razem na prawo z każdej strony każdego markera (= 4 o. mniej) co 2 okr.; dalej przer. aż część dżersejem mierzy 3-3-4 cm, zakończyć. Zszyć pod spodem stopy w odl. 1 o. od brzegu, aby szew nie był zbyt gruby. Przer. drugi kapeć, ale zamknąć 5 ost. o. i zostawić na drucie 9-11-11 ost. o., zdjąć 28-28-30 pozostałych o. na drut pomocniczy. Przer. dalej jak 1-szy kapeć. WYKOŃCZENIE: Nałożyć 5 o. ściegiem francuskim na drugą stronę cholewki i przyszyć 3 guziki wbijając igłę przez 2 warstwy. |
|
Skończyłaś ten wzór?Otaguj swoje zdjęcia #dropspattern #stlouisbootsslippers lub prześlij je do #dropsfan gallery. Potrzebujesz pomocy w związku z tym wzorem?Zobacz 8 instrukcje video, sekcję Komentarze/Pytania i jeszcze więcej, wchodząc na stronę wzoru na garnstudio.com © 1982-2026 DROPS Design A/S. Wszelkie prawa zastrzeżone. Ten dokument, w całości, jest chroniony prawem. Zobacz co możesz robić z naszymi wzorami na dole każdego wzoru na naszej stronie. |


Posiadając 40 lat doświadczenia w projektowaniu wzorów na druty i szydełko, DROPS Design oferuje jedną z największych kolekcji bezpłatnych wzorów w internecie – przetłumaczonych na 17 języków. Obecnie jest dostępnych 324 katalogów i 12290 wzorów w języku polskim.
Dokładamy wszelkich starań, aby oferować Wam druty i szydełka, inspiracje, fachowe porady oraz doskonałej jakości włóczki w najlepszych cenach! Zamierzasz wykorzystać nasze wzory inaczej niż tylko do osobistego użytku? Przeczytaj jakie masz prawa w Copyright, który znajdziesz na końcu każdego wzoru. Miłej pracy!
Dodaj komentarz do modelu DROPS 142-36
Chcielibyśmy się dowiedzieć co masz do powiedzenia o tym wzorze!
Jeśli chcesz zadać pytanie i szybko uzyskać odpowiedź, upewnij się, że została wybrana właściwa kategoria w formularzu poniżej. Pola obowiązkowe są oznaczone *.