
Popularne kategorie
Szukasz włóczki?


Komentarze / Pytania (20)
![]() Marie Mansi napisała::
Marie Mansi napisała::
I don’t understand the first instruction “bund odd 1 st at beginning of every row on each side. Does that mean bind off 2 stitches on each row
05.11.2020 - 00:59Odpowiedź DROPS Design :
Hi Marie, This means you bind off 1 stitch at the beginning of the first row, then bind off 1 stitch at the beginning of the next row, when you turn and work back and continue like this. Happy knitting!
05.11.2020 - 07:11
![]() Jacqueline Briscoe napisała::
Jacqueline Briscoe napisała::
What changes are required if using bernat blanket yarn?
21.01.2020 - 19:08Odpowiedź DROPS Design :
Dear Mrs Briscoe, We are able to provide free patterns thanks to our yarns sold throughout the world. You will therefore understand that we can only recomand you to contact your DROPS Store in Canada for any further help & assistance. Thank you for your comprehension.
22.01.2020 - 08:16
![]() Patricia Bauer napisała::
Patricia Bauer napisała::
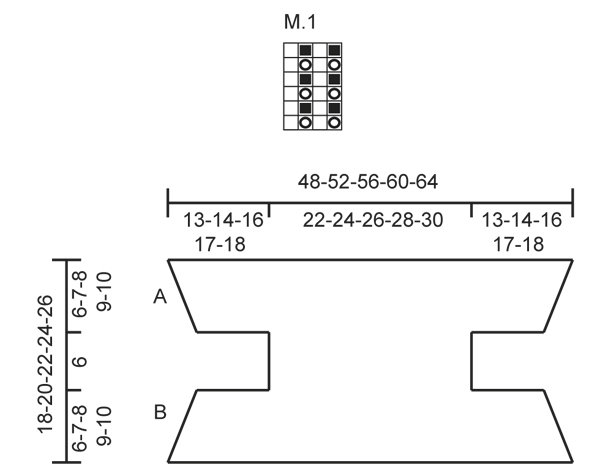
Sorry--still confused. To assemble, A and B are stitched together--but A has the extra edge stitch (seam allowance)on both sides on ALL rows, whereas last row of B the 2 edge stitches have been bound off--is this last row of B not part of the assembly seam?
03.12.2013 - 16:42Odpowiedź DROPS Design :
Dear Mrs Bauer, A and B are sewn together on each side (armholes), so that 1 st at beg of row + 1 st at end of row will be used for seam both armholes. Happy knitting!
04.12.2013 - 09:56
![]() Patricia Bauer napisała::
Patricia Bauer napisała::
88-96-102-110-120 sts. Piece now measures approx. 18-20-22-24-26 cm / 7"-8"-8 3/4"-9½"-10 1/4". On next row bind off 1 st at beg and end of row, then slip sts on a stitch holder. Why is the seam allowance (2 edge stitches) bound off as described above (to make 94 st on the size 5/6), when that is not done on the starting row that it will meet (96 st)?
03.12.2013 - 13:46Odpowiedź DROPS Design :
Dear Mrs Bauer, in size 5/6 you have 94 sts left at the end of body and pick up 94 sts in the 96 sts from cast on row so that you have again 1 st each side for seam = a total of 188 sts. Happy knitting!
03.12.2013 - 14:26
![]() Annetta Kerans napisała::
Annetta Kerans napisała::
Thank you so much for your reply and the video. I actually found the answer from someone else's question. It's always nice to know there is someone who can answer questions.
09.04.2013 - 22:31
![]() Riet napisała::
Riet napisała::
Zo heb ik het ook gedaan, maar dan krult het niet om! Op de foto is goed te zien,dat het het omgekrulde randje ribbelsteek en geen boordsteek is.
14.02.2013 - 15:00Odpowiedź DROPS Design :
Het is een rand van 1 r/1 av. Kijk op de foto van dichtbij, dat is geen ribbelst.
14.02.2013 - 15:33
![]() Riet Moraal napisała::
Riet Moraal napisała::
De beschrijving van de rand is anders dan op de foto staat. Ik heb de rand,( 8 cm.) in patroon M1 gebreid, maar dan krult hij niet om, zoals op de foto.volgens mij moeten de laatste naalden weer in ribbelsteek gebreid worden? Met vr. grt. Riet Moraal
29.01.2013 - 16:37Odpowiedź DROPS Design :
Het patroon klopt. Je moet niet de laatste nld in ribbelsteken breien, maar heel LOSJES afkanten met r boven r en av boven av.
06.02.2013 - 18:32
![]() Laura Graciani napisała::
Laura Graciani napisała::
Entiendo que para seguir la secuencia del diagrama M.1,es necesario que el número de puntos a tejer sea impar.Tenemos que terminar la secuencia con 1YO + slip 1 st, para que en la 2º vuelta poder K tog YO and slipped st. Gracias.
29.12.2012 - 08:06Odpowiedź DROPS Design :
Hola Laura, el diagrama M.1 se teje así: 1a vuelta: * 1 HEB + deslizar 1 pt de derecho, 1 revés *, repetir de *a* en toda la vta. 2a vuelta: * Tejer juntos de derecho la HEB y el pt desl, 1 revés *, repetir de *a* en toda la vta. Repetir la 1a y 2a vuelta.
29.12.2012 - 10:07Helen napisała::
I am almost finished this little vest but am not sure how to work the M1 diagram. Is it possible to get the instructions as words. Is the purl stitch every second round or every second stitch in a round row?
20.08.2012 - 04:13Odpowiedź DROPS Design :
Work 1st round in M1: *1 YO + slip 1 st as if to K, P1*, rep *-* around. 2nd round: *K tog YO and slipped st, P1*, rep *-* around. Repeat 1st and 2nd round.
25.08.2012 - 02:47Jill Forward napisała::
I've had 2attempts at this pattern & it still doesn't make sense. Cast off -does this mean knit to end and slip one over last stitch? The decline seems too rapid. Is the pattern grid illustrated referring to this pattern and in what way? Can't see the relevance of the 13, 48, 13 written at top of drawing. Help, I really want to make this.
20.04.2012 - 11:02Odpowiedź DROPS Design :
You bind off in beg of every row, which is not as how you write it above. Gauge in both width and height is just as important for correct measures. Numbers in chart are measures in centimeters.
23.04.2012 - 20:00
|
||||||||||
Pixie#pixievestbolero |
||||||||||
 |
 |
|||||||||
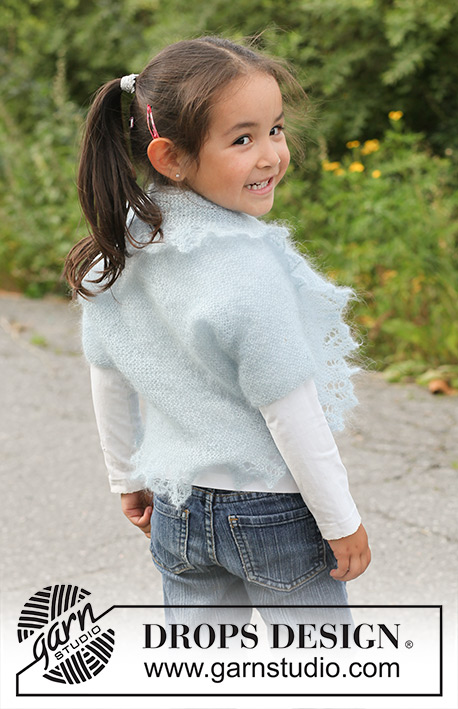
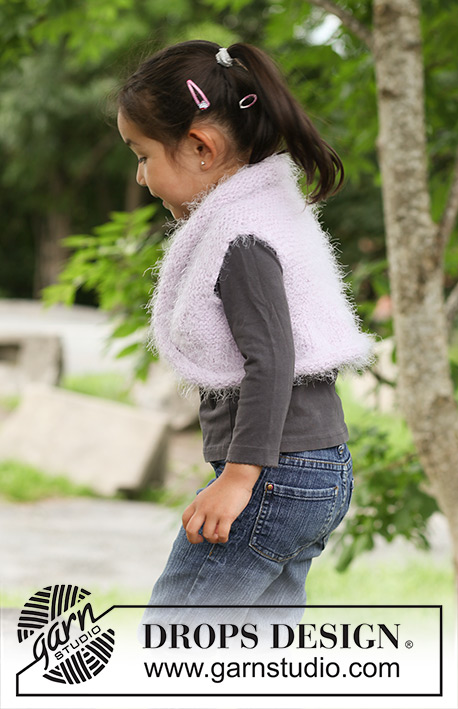
Bolerko na drutach z włóczki DROPS Symphony. Rozmiary od 3 do 12 lat.
DROPS Children 22-19 |
||||||||||
|
ŚCIEG FRANCUSKI (w tą i z powrotem): Przer. wszystkie rz. na prawo. ŻAKARD: Patrz schemat M.1. --------------------------------------------------------- TYŁ & PRZODY: Przer. w tą i z powrotem na drutach z żyłką. Na druty z żyłką nr 4,5 nabrać 88-96-102-110-120 o. (w tym 1 o. brzeg. z każdej strony) włóczką Symphony. Przer. ŚCIEGIEM FRANCUSKIM przez wszystkie o. – patrz powyżej – W TYM SAMYM CZASIE w 2-gim rz., zamknąć 9-11-12-14-16 razy 1 o. na pocz. każdego rz. z każdej strony, następnie zamknąć 1 raz 15-15-16-16-17 o. z każdej strony = zostaje 40-44-46-50-54 o. Dalej przer. ściegiem francuskim, aż dł. robótki wynosi 12-13-14-15-16 cm. Dalej nabrać luźno na końcu każdego rz.: 1 raz 15-15-16-16-17 o. z każdej strony i 9-11-12-14-16 razy 1 o. z każdej strony = 88-96-102-110-120 o. Robótka mierzy teraz ok. 18-20-22-24-26 cm. W nast. rz. zamknąć 1 o. na pocz. i na końcu rz., następnie zdjąć oczka na drut pomocniczy. WYKOŃCZENIE : Przyłożyć A do B - patrz schemat – i zszyć w odl. 1 o. od brzegu. Wykonać taki sam szew z 2 stron robótki. OBSZYCIE: Przer. na okrągło na drutach z żyłką. Wziąć ponownie oczka z drutu pomocniczego na druty z żyłką i nabrać 86-94-100-108-118 o. (1 o. w każde o.) wzdłuż rz. nabierania o. = 172-188-200-216-236 o. Przer. 1-sze okr. następująco: *1 o.p., 1 o.l.*, powt. od *-* całe okr. Dalej przer. wg schematu M.1. Kiedy wys. obszycia wyniesie 8-9-9-10-10 cm, zamknąć LUŹNO o. tak jak schodzą z drutu. WYKOŃCZENIE NA SZYDEŁKU: Na szydełku nr 5 wykonać nast. wykończenie wokół bolerka + wokół podkroju rękawów: 1 oś w 1-sze o., *3 oł, ominąć ok. 1 cm, 1 oś w nast. o.*, powt. od *-* i zakończyć 1 oz w oś na pocz. okr. |
||||||||||
Objaśnienia do schematu |
||||||||||
|
||||||||||
 |
||||||||||
Skończyłaś ten wzór?Otaguj swoje zdjęcia #dropspattern #pixievestbolero lub prześlij je do #dropsfan gallery. Potrzebujesz pomocy w związku z tym wzorem?Zobacz 11 instrukcje video, sekcję Komentarze/Pytania i jeszcze więcej, wchodząc na stronę wzoru na garnstudio.com © 1982-2026 DROPS Design A/S. Wszelkie prawa zastrzeżone. Ten dokument, w całości, jest chroniony prawem. Zobacz co możesz robić z naszymi wzorami na dole każdego wzoru na naszej stronie. |
||||||||||


Posiadając 40 lat doświadczenia w projektowaniu wzorów na druty i szydełko, DROPS Design oferuje jedną z największych kolekcji bezpłatnych wzorów w internecie – przetłumaczonych na 17 języków. Obecnie jest dostępnych 324 katalogów i 12290 wzorów w języku polskim.
Dokładamy wszelkich starań, aby oferować Wam druty i szydełka, inspiracje, fachowe porady oraz doskonałej jakości włóczki w najlepszych cenach! Zamierzasz wykorzystać nasze wzory inaczej niż tylko do osobistego użytku? Przeczytaj jakie masz prawa w Copyright, który znajdziesz na końcu każdego wzoru. Miłej pracy!
Dodaj komentarz do modelu DROPS Children 22-19
Chcielibyśmy się dowiedzieć co masz do powiedzenia o tym wzorze!
Jeśli chcesz zadać pytanie i szybko uzyskać odpowiedź, upewnij się, że została wybrana właściwa kategoria w formularzu poniżej. Pola obowiązkowe są oznaczone *.