
Popularne kategorie
Szukasz włóczki?


Komentarze / Pytania (59)
![]() Gilardi Claudette napisała::
Gilardi Claudette napisała::
Je ne comprends pas l'explication des manches.que veut dire "avec les rangs raccourcis comme avant,aux mêmes endroits" Merci
31.01.2022 - 09:02Odpowiedź DROPS Design :
Bonjour Mme Gilardi, vous avez auparavant tricoté des rangs raccourcis sur toute la longueur, lorsque vous tricotez les manches, vous allez tourner aux mêmes endroit qu'avant (moins de fois car moins de marqueurs), et continuer ainsi les rangs raccourcis comme avant. Bon tricot!
31.01.2022 - 10:23
![]() Martens napisała::
Martens napisała::
Ik ben deze Eden vest aan het breien. Ik ben nu de libkermouw aan het breien. Deze moeten in verkorte toeren gebreid worden. De eerste en de tweede toer van de verkorte toeren moeten gewoon volledig heen en terug gebreid worden. Blijft dit ook gelden in de mouw? Want er zijn maar 2 verkorte toeren in de mouw ipv 3. Ik begrijp tevens niet hoe je 35 cm meet (aan de onderkant op het breedste deel) in de uitleg van de linkermouw. Kan u mij daarmee helpen, please?
09.01.2021 - 20:24Odpowiedź DROPS Design :
Dag Martens,
De lengte van de mouw meet je aan de onderkant van de mouw op het breedste deel. Als je verkorte toeren maakt op de mouw, keer je het werk op het zelfde punt als bij de panden, dus het aantal steken vanaf de hals tot het keerpunt voor de verkorte toeren moet hetzelfde zijn. Hoe de verkorte toeren herhaald worden is verder precies hetzelfde als op de panden.
10.01.2021 - 12:15
![]() Bobby Garland napisała::
Bobby Garland napisała::
OK, I think I get it. I need to do 1 more row on the LF (row 1 for me) in order to end at the top. Then, I need to attach a new yarn to stitch #64 on the WS and knit the side piece. Then I will end up with the last row on the RS. Then I will cut that yarn. Then I will go back to the top edge on the LF and pick up yarn and turn to the WS to start the sleeve on those 51 sts. It would have been nice if the instructions had been more specific, instead of saying "work approximately..."
08.01.2021 - 19:57
![]() Bobby Garland napisała::
Bobby Garland napisała::
I get what you are saying, but I am not asking about the sleeve, as I am not there yet. I need to know if I am to cut the yarn at the lower edge of the left front piece and reattach it to the WS at stitch #64 to start the first row of the side piece so as to end on the RS of the side piece as instructed. There is no other way to end up on the RS unless you start the side piece on the WS in the middle of the work.
08.01.2021 - 17:21Odpowiedź DROPS Design :
Dear Mrs Garland, after left front piece measures 23 cm, adjust so that next row will be worked from RS and now work this 1 cm starting from RS = from the bottom edge over the first 64 cm - adjust this 1 cm so that last row is worked from RS, then cut the yarn and join it to work sleeve (starting from RS) over the 51 sts left unworked on needle (starting from RS). Happy knitting!
11.01.2021 - 06:57
![]() Bobby Garland napisała::
Bobby Garland napisała::
OK, so you also cut the yarn at the end of the left front, which for me is at the lower edge, and reattach to stitch # 64 (for small size) in order to start the side piece on the WS, so as to finish last row of side piece on the RS?
08.01.2021 - 15:15Odpowiedź DROPS Design :
Dear Mrs Garland, the last row on left front piece is worked from RS, but when you turn and work sleeve, first row on sleve is worked from WS = this means you don't need to cut the yarn between left front piece and sleeve, then after sleeve, just work the 64 sts on side at the end of a WS row. - no need to cut the yarn neither between sleeve and back piece. Happy knitting!
08.01.2021 - 16:19
![]() Bobby Garland napisała::
Bobby Garland napisała::
Thank you for your response. Another question....I finished the left front and ended on row 8 of short row sequence, which means the next row would be a right side row. In order to finish the side piece on the RS as instructed and have the side pieces be the same number of rows and have a marker in the middle, I would have to start the side piece on the WS. Do I cut the yarn and start at stitch number 64 at the other end from the WS?
08.01.2021 - 14:08Odpowiedź DROPS Design :
Dear Mrs Garland, last row worked for side on front piece is worked from the right side, then cut the yarn and work sleeve. Last row worked on sleeve is from WS, after you have worked this last row on sleeve, work the stitches of the side at the end of this row = from WS, all stitches are now back on needle, turn and start short rows at the beg of next row from RS. Happy knitting!
08.01.2021 - 15:02
![]() Bobby Garland napisała::
Bobby Garland napisała::
For short rows, when moving from left front to sleeve to back to sleeve to right front, do you continue in the same numerical sequence from the previous section, or do you start again at row 1 or do you reverse the short row sequence, work rows 8-1? You start with row 1 at the left front border and end up with row 8 at the right front....the pieces would not be "mirrored." Even if you have the same number of rows, the short rows would not be in the same place. Does it matter?
04.01.2021 - 14:50Odpowiedź DROPS Design :
Dear Mrs Garland, after you have worked the sleeve, work the short rows on back piece starting from row 1 of short rows. Happy knitting!
05.01.2021 - 10:43
![]() LISA RENBARGER napisała::
LISA RENBARGER napisała::
A friend and I are about to cast on Eden to knit at the same time. My bust measurement is between size M & L. Is there positive ease built in to the pattern?
13.01.2020 - 16:49Odpowiedź DROPS Design :
Dear Mrs Renbarger, measure a similar garment you have and like the shape and compare these measurements to the one in the measurement chart (taken flat from side to side, in cm) to find out the matching size. You can then either decide if you want it rather tight or rather loose (with negative or positive ease). Read more here. Happy knitting!
14.01.2020 - 07:17
![]() Kironieke napisała::
Kironieke napisała::
If i cast on 120 stitches for size M with 23st/cm (tension) how do i get to the total height of 75cm? It only adds up to the 52cm of the body, not the yoke/sleeve part.
21.05.2019 - 20:53Odpowiedź DROPS Design :
Dear Kironieke, the 120 stitches will measure 52 cm = whole length of jacket as shown in measurement chart (= 23 cm yoke + 29 cm body). Happy knitting!
22.05.2019 - 09:14
![]() Rosie FRANCIS napisała::
Rosie FRANCIS napisała::
When knitting the left sleeve, you will have between 51 and 62 stitches, how many do you work before turning on the short rows? The short row instructions work for the whole garment (between 115 and 138 stitches)
06.08.2018 - 22:35Odpowiedź DROPS Design :
Dear Mrs Francis, you should work the short rows on the left sleeve on the same places you worked the short rows on the top of front piece before, ithe "turns" should continue and be aligned from the beg of piece. Happy knitting!
07.08.2018 - 09:38
|
||||
Eden#edencardigan |
||||
|
|
||||
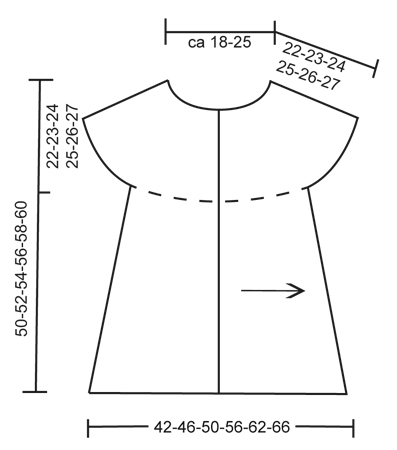
Kamizelka DROPS ściegiem francuskim przerabiana wzdłuż robótki rzędami skróconymi, z włóczki „Fabel”. Od S do XXXL.
DROPS 134-4 |
||||
|
WSKAZÓWKA: Za każdym razem kiedy obracamy robótkę w środku rz. należy zdjąć 1 o. jak do przerobienia na prawo, zacisnąć nitkę i przer. kolejny rz. Dzięki temu unikniemy dziur w rzędach skróconych. RZĘDY SKRÓCONE: Przer. rz. skrócone na środku robótki, aby nadać kamizelce kształt rozszerzającego się trapezu. Zacząć od dołu i przer. następująco postępując w stronę dekoltu: *przer. wszystkie o., obrócić i przer. nast. rz. Przer. 103-108-112-115-119-122 o., obrócić i przer. nast. rz. PATRZ WSKAZÓWKA! Przer. 89-94-97-99-103-105 o., obrócić i przer. nast. rz. Przer. 71-75-77-79-81-83 o., obrócić i przer. nast. rz.*. Powt. od *-*, tj. 1 seria rz. skróconych = 2 rz. do górze i 8 rz. na dole. WSKAZÓWKA DO MIERZENIA: Do mierzenia należy rozłożyć robótkę na płasko, nie naciągać podczas mierzenia. -------------------------------------------------------- KAMIZELKA: Przer. wzdłuż robótki w tą i z powrotem, zaczynając na środku lewego przodu i zakończyć na środku prawego przodu. UWAGA: zdjęcie kamizelki jest odwrócone. LEWY PRZÓD: Przer. w całości ściegiem francuskim, tj. przer. wszystkie rz. na prawo. Na druty nr 3.5 nabrać luźno 115-120-125-129-134-138 o. włóczką Fabel kolor ‘widok na morze’. 1-szy rz. przer. na prawej stronie robótki (= od dołu w kierunku dekoltu). Przer. 3 cm przez wszystkie o. (= obszycie przodu), zatrzymać się po 1 rz. na lewej stronie robótki. ZACHOWAĆ TAKIE SAME NAPRĘŻENIE NICI JAK W PRZYPADKU PRÓBKI! Dalej przer. RZĘDY SKRÓCONE - patrz powyżej! Dalej przer. tak samo, aż robótka mierzy ok. 23-25-27-30-33-35 cm od rzędu nabierania oczek (mierzyć na dole od szerszej strony) – PATRZ WSKAZÓWKA DO MIERZENIA! Dalej przer. bok następująco: Przer. 1 cm w tą i z powrotem tylko przez 64-67-70-72-74-76 o. od dołu. Umieścić 1 marker (= środek boku). Przer. 1 cm w tą i z powrotem przez wszystkie o., zdjąć oczka na drut pomocniczy (zatrzymać się za 1 rz. na prawej stronie robótki, później o. będą przer. na tył). Następnie przer. rękaw. LEWY RĘKAW: = 51-53-55-57-60-62 o. na drucie. Przer. w tą i z powrotem rz. skrócone tak samo jak poprzednio, aż dł. robótki wynosi ok. 30-31-32-33-34-35 cm (mierzyć na dole od szerszej strony), zatrzymać się za 1 rz. na lewej stronie robótki. TYŁ: Przer. 64-67-70-72-74-76 o. z drutu pomocniczego (na lewej stronie robótki) = 115-120-125-129-134-138 o. Dalej przer. rz. skrócone jak wcześniej. Na wys. ok. 21-23-25-28-31-33 cm od markera z boku (mierzyć na dole od szerszej strony), umieścić nowy marker (= środek tyłu). Dalej przer. rz. skrócone, aż dł. robótki wynosi ok. 20-22-24-27-30-32 cm od markera na środku tyłu (mierzyć na dole od szerszej strony). Dalej przer. bok następująco: przer. 1 cm w tą i z powrotem tylko przez 64-67-70-72-74-76 o. na dole. Umieścić nowy marker (= środek boku). Przer. 1 cm w tą i z powrotem te same oczka (zatrzymać się za 1 rz. na prawej stronie robótki), następnie zdjąć oczka na drut pomocniczy. Przer. prawy rękaw. PRAWY RĘKAW: Przer. jak lewy rękaw. PRAWY PRZÓD: Przer. 64-67-70-72-74-76 o. z drutu pomocniczego (na lewej stronie robótki) = 115-120-125-129-134-138 o. Dalej przer. rz. skrócone jak z tyłu. Jak zostanie przer. taka sama liczba rz. na prawy przód jak na lewy przód (minus obszycie przodu = 3 cm), przer. obszycie przodu następująco: przer. 1½ cm w tą i z powrotem przez wszystkie o. W nast. rz. na prawej stronie robótki utworzyć dziurki na guziki następująco (= od dołu): przer. 12 o. dla każdego rozmiaru, zamknąć 2 nast. o., *przer.12-13-14-14-15-15 o., zamknąć 2 nast. o.*, powt. od *-* 4 razy, przer. pozostałe o. w rz. W nast. rz. nabrać 2 o. ponad zamkniętymi o. Przer. przez wszystkie o., aż wys. obszycia wynosi 3 cm. Luźno zakończyć. WYKOŃCZENIE: Na szydełku nr 4 wykonać 2 nitkami w kolorze brązowym następujące obszycie: zacząć na dole prawego przodu 1 oś, *2 oł, ominąć ok. 1 cm, 1 oś *, powt. od *-* postępując wzdłuż prawego przodu, kołnierza, dekoltu tyłu i dalej na dół wzdłuż lewego przodu. Odciąć i wrobić nitki. Przyszyć guziki. |
||||
Objaśnienia do schematu |
||||
|
||||
 |
||||
Skończyłaś ten wzór?Otaguj swoje zdjęcia #dropspattern #edencardigan lub prześlij je do #dropsfan gallery. Potrzebujesz pomocy w związku z tym wzorem?Zobacz 6 instrukcje video, sekcję Komentarze/Pytania i jeszcze więcej, wchodząc na stronę wzoru na garnstudio.com © 1982-2026 DROPS Design A/S. Wszelkie prawa zastrzeżone. Ten dokument, w całości, jest chroniony prawem. Zobacz co możesz robić z naszymi wzorami na dole każdego wzoru na naszej stronie. |
||||


Posiadając 40 lat doświadczenia w projektowaniu wzorów na druty i szydełko, DROPS Design oferuje jedną z największych kolekcji bezpłatnych wzorów w internecie – przetłumaczonych na 17 języków. Obecnie jest dostępnych 324 katalogów i 12290 wzorów w języku polskim.
Dokładamy wszelkich starań, aby oferować Wam druty i szydełka, inspiracje, fachowe porady oraz doskonałej jakości włóczki w najlepszych cenach! Zamierzasz wykorzystać nasze wzory inaczej niż tylko do osobistego użytku? Przeczytaj jakie masz prawa w Copyright, który znajdziesz na końcu każdego wzoru. Miłej pracy!
Dodaj komentarz do modelu DROPS 134-4
Chcielibyśmy się dowiedzieć co masz do powiedzenia o tym wzorze!
Jeśli chcesz zadać pytanie i szybko uzyskać odpowiedź, upewnij się, że została wybrana właściwa kategoria w formularzu poniżej. Pola obowiązkowe są oznaczone *.