


Komentarze / Pytania (59)
![]() Lara napisała::
Lara napisała::
Muss ich den Zopf dann auch erst links und danach rechts sricken? Weil bei mir flicht sich das Muster nicht.
19.01.2013 - 20:44Odpowiedź DROPS Design :
Hallo Lara, in der Legende zum Diagramm finden Sie beschrieben, wie die Verzopfung entsteht (die M abwechselnd VOR und HINTER die Arbeit legen).
20.01.2013 - 19:08
![]() Saar napisała::
Saar napisała::
Er ontstaat geen gat in het breiwerk zelf maar onderin de kabel ontstaat er een soort van hol
18.01.2013 - 14:38Odpowiedź DROPS Design :
Dat is ook wat ik bedoelde in mijn vorige antwoord ;o) Ik denk dat jij de kabel wat strakker moet breien. Zie video of ga naar de winkel voor persoonlijke ondersteuning.
18.01.2013 - 16:07
![]() Lara napisała::
Lara napisała::
Hallo! Muss ich während dem Muster auch abwechselnd re. li. stricken oder nur am Ende? LG
17.01.2013 - 18:50Odpowiedź DROPS Design :
Hallo Lara, es wird in den Hin-R rechts gestrickt und in den Rück-R links. Viel Erfolg!
18.01.2013 - 07:54
![]() Saar napisała::
Saar napisała::
Aan het begin van het patroon als ik een naald heb gemaakt, begin ik met de kabel maar er ontstaat na de eerste naald een gat in het breiwerk.
17.01.2013 - 18:32Odpowiedź DROPS Design :
Er ontstaat een gat in de kabel zelf? Dan moet je het kabeltje een beetje strakker breien. Zie evt de instructievideo hoe u het kan breien.
18.01.2013 - 13:37
![]() Sofie napisała::
Sofie napisała::
Je n'arrive pas à faire la torsade :( Pourtant je sais les tricoter mais je crois que je ne comprends pas bien les explications. Faut-il d'abord tricoter 5 mailles endroit et ensuite en passer 5 sur aiguilles auxiliaire ??? Merci par avance !
27.11.2012 - 21:05Odpowiedź DROPS Design :
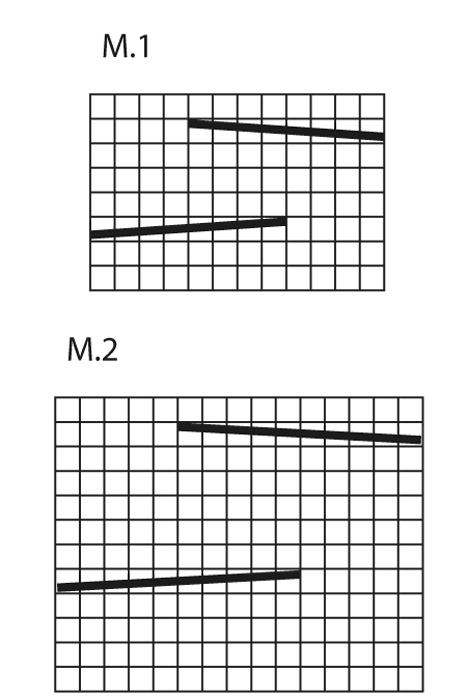
Bonjour Sofie, dans les diagrammes 1 case= 1mx1 rang. Au rang 5 de M.2, vous tricotez : 5 m end, puis la torsade : glissez 5 m sur l'aiguille auxiliaire devant l'ouvrage, tricotez 5 m end, reprenez les 5 m en attente et tricotez les à l'end. Au rang 11, vous commencez par la torsade : glissez 5 m sur l'aiguille auxiliaire derrière l'ouvrage, tricotez 5 m end, reprenez les 5 m en attente et tricotez les à l'end, terminez par 5 m end. Bon tricot !
28.11.2012 - 09:27
![]() Ulla napisała::
Ulla napisała::
Meget flot og smart
22.10.2012 - 10:59
![]() Steffi napisała::
Steffi napisała::
Was für eine Randmasche muss ich denn stricken? vielen dank!
21.06.2012 - 18:03Odpowiedź DROPS Design :
Am besten sticken Sie die Randmasche immer rechts.
25.06.2012 - 22:11Anastasia napisała::
I wanna knit this lovely scarf , but can't understand how to read the diagram: from what side and what corner? Thanks!
08.06.2012 - 13:55Odpowiedź DROPS Design :
Dear Anastasia, the diagrams are read begninng in the lower right-hand corner and work towards the left (1st row = RS). On return row, work from the left to the right. Happy Knitting !
06.12.2012 - 11:20
![]() Wallry napisała::
Wallry napisała::
Il est indique sur les explications qu'il faut 300g de laine pour le tour du cou.
02.02.2012 - 12:19
![]() Drops Design France napisała::
Drops Design France napisała::
Bonjour Lange et merci. Cliquez en haut sur "détaillants" puis choisissez votre pays pour accéder à la liste des détaillants. La quantité nécessaire est toujours indiquée au poids, cliquez sur "voir le nuancier" pour voir les couleurs et en savoir plus sur la laine, en l’occurrence, Polaris se présente sous forme de pelote de 100 g. Bon tricot !
03.01.2012 - 09:18
|
||||||||||||||||
Braidy#braidyset |
||||||||||||||||
 |
 |
|||||||||||||||
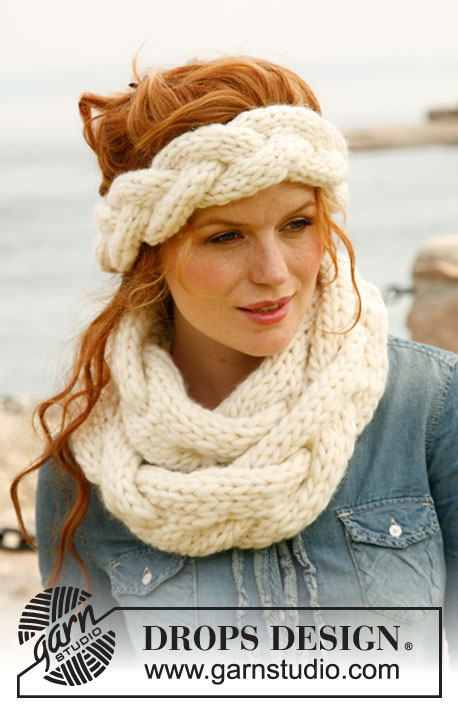
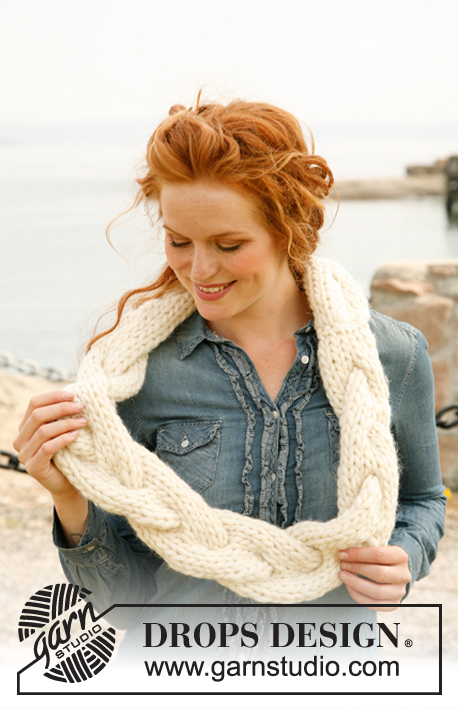
Opaska i komin DROPS z szerokim warkoczem, z włóczki „Polaris”.
DROPS 134-7 |
||||||||||||||||
|
ŚCIEG FANTAZYJNY: Patrz schemat M.1 dla opaski i schemat M.2 dla komina. Schematy przedstawiają motyw na prawej stronie robótki. WSKAZÓWKA DO ZMIANY MOTKA: Aby zmienić kłębek przerabiając włóczką Polaris, należy podzielić nitkę na 2 części na końcu motka na dł. 15 ost. cm – odciąć jedną część i zrobić to samo na pocz. drugiego motka. Złożyć razem 15 pierwszych i 15 ost. cm, nitka ma w ten sposób normalną grubość i dalej przerabiać. Dzięki temu zmiana motka będzie niewidoczna. -------------------------------------------------------- OPASKA: Przer. w tą i z powrotem i na końcu zszyć na okrągło. Na druty nr 12 nabrać 12 o. włóczką Polaris. Przer. wg schematu M.1 aż dł. robótki wyniesie ok. 50 cm – dopasować po 1 całym motywie. Przer. 1 rz. dżersejem i zamknąć luźno o. Doszyć rz. nabierania o. do o. zamkniętych, brzeg do brzegu, aby szew nie był zbyt gruby. -------------------------------------------------------- KOMIN: Przer. w tą i z powrotem i na końcu zszyć na okrągło. Na druty nr 15 nabrać 15 o. włóczką Polaris. Przer. wg schematu M.2 aż dł. robótki wyniesie ok. 120 cm – dopasować po 1 całym motywie. Przer. 4 rz. dżersejem i zamknąć luźno o. Doszyć rz. nabierania o. do o. zamkniętych, brzeg do brzegu, aby szew nie był zbyt gruby. Do noszenia złożyć komin na pół (jak ‘8’). |
||||||||||||||||
Objaśnienia do schematu |
||||||||||||||||
|
||||||||||||||||
 |
||||||||||||||||
Skończyłaś ten wzór?Otaguj swoje zdjęcia #dropspattern #braidyset lub prześlij je do #dropsfan gallery. Potrzebujesz pomocy w związku z tym wzorem?Zobacz 5 instrukcje video, sekcję Komentarze/Pytania i jeszcze więcej, wchodząc na stronę wzoru na garnstudio.com © 1982-2026 DROPS Design A/S. Wszelkie prawa zastrzeżone. Ten dokument, w całości, jest chroniony prawem. Zobacz co możesz robić z naszymi wzorami na dole każdego wzoru na naszej stronie. |
||||||||||||||||


Posiadając 40 lat doświadczenia w projektowaniu wzorów na druty i szydełko, DROPS Design oferuje jedną z największych kolekcji bezpłatnych wzorów w internecie – przetłumaczonych na 17 języków. Obecnie jest dostępnych 324 katalogów i 12245 wzorów w języku polskim.
Dokładamy wszelkich starań, aby oferować Wam druty i szydełka, inspiracje, fachowe porady oraz doskonałej jakości włóczki w najlepszych cenach! Zamierzasz wykorzystać nasze wzory inaczej niż tylko do osobistego użytku? Przeczytaj jakie masz prawa w Copyright, który znajdziesz na końcu każdego wzoru. Miłej pracy!
Dodaj komentarz do modelu DROPS 134-7
Chcielibyśmy się dowiedzieć co masz do powiedzenia o tym wzorze!
Jeśli chcesz zadać pytanie i szybko uzyskać odpowiedź, upewnij się, że została wybrana właściwa kategoria w formularzu poniżej. Pola obowiązkowe są oznaczone *.