


Komentarze / Pytania (59)
![]() Camilla napisała::
Camilla napisała::
Jeg er ved at lave pandebåndet. I diagrammet står der man skal strikke ret over ret og vrang over vrang. Når jeg har slået de 12 masker op er 1. pind på vrang-siden, den næste pind på ret-siden. Dvs. snoninger bliver lavet fra vrang siden? Hvorfor skal jeg så strikke ret på hjælpepinden og de resterende masker?
02.11.2014 - 23:31Odpowiedź DROPS Design :
Hej Camilla. 1. pind er retsiden. Snoningerne laves paa retsiden.
06.11.2014 - 13:42
![]() Carla napisała::
Carla napisała::
Il modello è bellissimo, ma devo mettere il doppio dei punti. Come costruire lo schema? Devo farlo speculare? Grazie per la risposta
07.09.2014 - 10:29Odpowiedź DROPS Design :
Deve mettere il doppio dei punti perché utilizza un filato più sottile? Nel caso in cui dovesse fare così potrebbe lavorare la treccia più larga (con più maglie ogni fascia della treccia) per esempio. Se deve fare la fascia deve fare prima un campione per capire quanto rende con il filato che utilizzerà.
11.09.2014 - 16:31
![]() Klára S napisała::
Klára S napisała::
Dobrý den, v českém návodu neodpovídá popis vzorku originálu. Hezký den Klára S
01.02.2014 - 20:23Odpowiedź DROPS Design :
Dobrý den, děkuji za upozornění - opraveno!
08.02.2014 - 01:06
![]() Isabel napisała::
Isabel napisała::
Hallo, Maakt het nog uit wat voor maat kabelnaald ik gebruik voor de hoofdband? Bedankt
26.10.2013 - 14:06Odpowiedź DROPS Design :
Hoi Isabel. De kabelnld moet niet te dun zijn. Heb je niet een hele dikke kabelnld, dan kan je eventueel een sokkenbreinld gebruiken.
28.10.2013 - 19:13
![]() Jan napisała::
Jan napisała::
Got it - thank you - sorry to be so dense :)
30.01.2013 - 00:43
![]() Jan napisała::
Jan napisała::
Yes, I have checked your video which is great for a cable stitch in the middle of a row, not as the first stitch in the row. The difference is that the skein side of the wrapping yarn is on the cable needle not the right hand needle so i am not sure if that yarn should go behind the cable needle or infront of the cable needle prior to knitting the next/6th stitch.
29.01.2013 - 18:49Odpowiedź DROPS Design :
In front, because stitches you have to knit next are in front of slipped sts.
29.01.2013 - 21:49
![]() Jan napisała::
Jan napisała::
Another source of my confustion -the wrap over yarn is on the cable needle since it is the first 5 stiches being slipped, when a cable is worked in the middle of a piece, the wrap over yarn is on the right hand knitting needle. Thank you again.
29.01.2013 - 13:41Odpowiedź DROPS Design :
Have you checked out our Video tutorials for cable knitting?
29.01.2013 - 14:58
![]() Jan napisała::
Jan napisała::
Thank you for your response and clarification. One more question - does the wrapping yarn for the 11th row go behind the cable needle and slipped stiches or in front? Thank you
29.01.2013 - 13:35Odpowiedź DROPS Design :
The yarn should not run over stitches in front and should not be visible. When you slip first 5 sts to cable needle behind piece, keep yarn front to knit next st from left needle.
29.01.2013 - 14:48
![]() Jan napisała::
Jan napisała::
I am making the neckwarmer and have a question regarding the 11th row. If I read the pattern correctly, this row starts with the 5 stitches slipped off to the cable needle. I find this awkward since the first stitch has the wrapping yarn (for lack of a better term). Am I reading the pattern correctly? I hope I am explaining myself properly.
28.01.2013 - 23:43Odpowiedź DROPS Design :
Dear Jan, you are correct, on row 11 the first 5 sts are slipped on cable needle behind piece for the cable. Happy knitting!
29.01.2013 - 09:02
![]() Isabel Hicks napisała::
Isabel Hicks napisała::
Would be grateful for some help! Am doing this lovely headband but- cast on 12 stitches K1 then cabled 4 back knitted 4 . Three stitches left - please tell me how do I get the braiding as no stitches left to do the other half of the chart - where am I going wrong?.. Many thanks
20.01.2013 - 00:32Odpowiedź DROPS Design :
Dear Mrs Hicks, diagram is read from bottom right towards the left (RS) and left towards right side (WS), and M1 =12 sts, row 3 is : K4, cable on the next 8 sts. R7 : cable on the first 8 sts, K4. Happy knitting!
21.01.2013 - 18:21
|
||||||||||||||||
Braidy#braidyset |
||||||||||||||||
 |
 |
|||||||||||||||
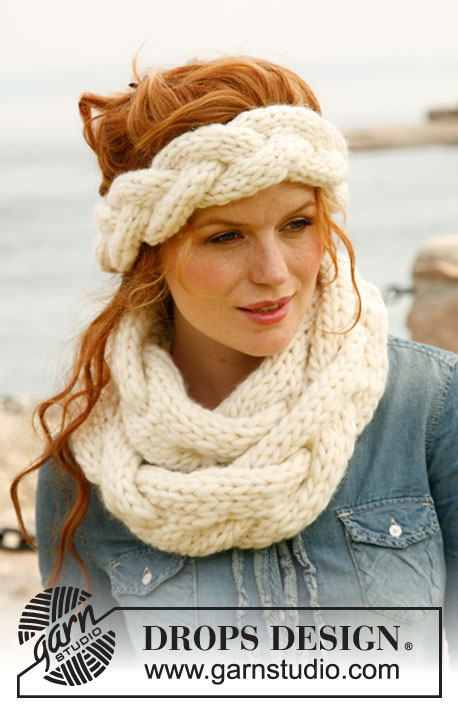
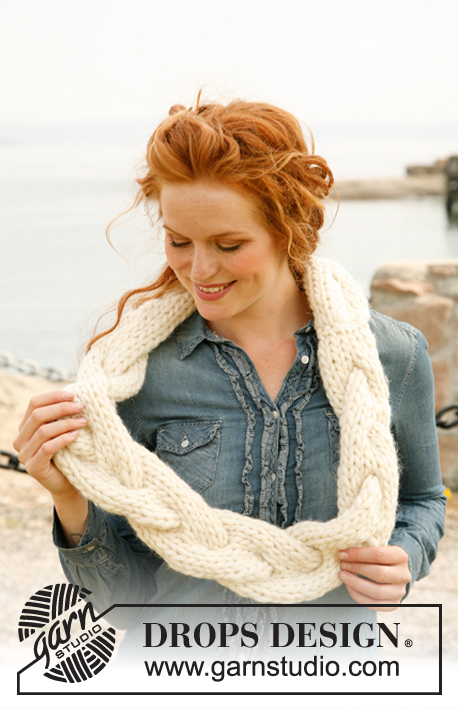
Opaska i komin DROPS z szerokim warkoczem, z włóczki „Polaris”.
DROPS 134-7 |
||||||||||||||||
|
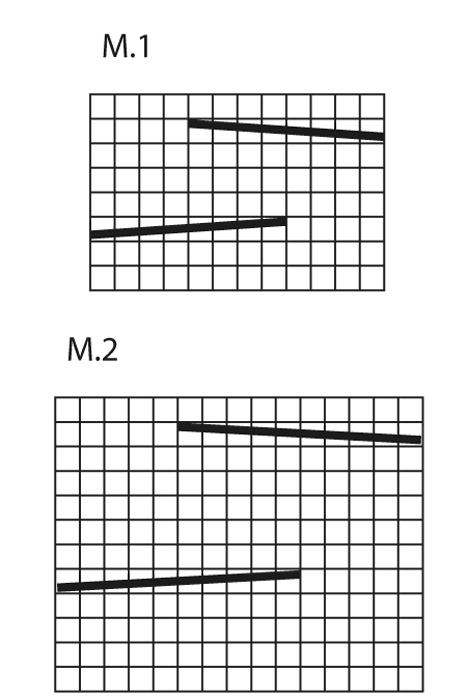
ŚCIEG FANTAZYJNY: Patrz schemat M.1 dla opaski i schemat M.2 dla komina. Schematy przedstawiają motyw na prawej stronie robótki. WSKAZÓWKA DO ZMIANY MOTKA: Aby zmienić kłębek przerabiając włóczką Polaris, należy podzielić nitkę na 2 części na końcu motka na dł. 15 ost. cm – odciąć jedną część i zrobić to samo na pocz. drugiego motka. Złożyć razem 15 pierwszych i 15 ost. cm, nitka ma w ten sposób normalną grubość i dalej przerabiać. Dzięki temu zmiana motka będzie niewidoczna. -------------------------------------------------------- OPASKA: Przer. w tą i z powrotem i na końcu zszyć na okrągło. Na druty nr 12 nabrać 12 o. włóczką Polaris. Przer. wg schematu M.1 aż dł. robótki wyniesie ok. 50 cm – dopasować po 1 całym motywie. Przer. 1 rz. dżersejem i zamknąć luźno o. Doszyć rz. nabierania o. do o. zamkniętych, brzeg do brzegu, aby szew nie był zbyt gruby. -------------------------------------------------------- KOMIN: Przer. w tą i z powrotem i na końcu zszyć na okrągło. Na druty nr 15 nabrać 15 o. włóczką Polaris. Przer. wg schematu M.2 aż dł. robótki wyniesie ok. 120 cm – dopasować po 1 całym motywie. Przer. 4 rz. dżersejem i zamknąć luźno o. Doszyć rz. nabierania o. do o. zamkniętych, brzeg do brzegu, aby szew nie był zbyt gruby. Do noszenia złożyć komin na pół (jak ‘8’). |
||||||||||||||||
Objaśnienia do schematu |
||||||||||||||||
|
||||||||||||||||
 |
||||||||||||||||
Skończyłaś ten wzór?Otaguj swoje zdjęcia #dropspattern #braidyset lub prześlij je do #dropsfan gallery. Potrzebujesz pomocy w związku z tym wzorem?Zobacz 5 instrukcje video, sekcję Komentarze/Pytania i jeszcze więcej, wchodząc na stronę wzoru na garnstudio.com © 1982-2026 DROPS Design A/S. Wszelkie prawa zastrzeżone. Ten dokument, w całości, jest chroniony prawem. Zobacz co możesz robić z naszymi wzorami na dole każdego wzoru na naszej stronie. |
||||||||||||||||


Posiadając 40 lat doświadczenia w projektowaniu wzorów na druty i szydełko, DROPS Design oferuje jedną z największych kolekcji bezpłatnych wzorów w internecie – przetłumaczonych na 17 języków. Obecnie jest dostępnych 324 katalogów i 12245 wzorów w języku polskim.
Dokładamy wszelkich starań, aby oferować Wam druty i szydełka, inspiracje, fachowe porady oraz doskonałej jakości włóczki w najlepszych cenach! Zamierzasz wykorzystać nasze wzory inaczej niż tylko do osobistego użytku? Przeczytaj jakie masz prawa w Copyright, który znajdziesz na końcu każdego wzoru. Miłej pracy!
Dodaj komentarz do modelu DROPS 134-7
Chcielibyśmy się dowiedzieć co masz do powiedzenia o tym wzorze!
Jeśli chcesz zadać pytanie i szybko uzyskać odpowiedź, upewnij się, że została wybrana właściwa kategoria w formularzu poniżej. Pola obowiązkowe są oznaczone *.