
Popularne kategorie
Szukasz włóczki?


Komentarze / Pytania (21)
![]() Julia Schueler napisała::
Julia Schueler napisała::
Hallo, ich habe nicht richtig aufgepasst und den Kragenteil nicht rund sondern hin und her gestrickt. Nach 27cm aufgeteilt und eine Seite nun in Hin und Her fertig gestellt. Ich kann mir irgendwie nicht vorstellen, wie das Teil nachher aussieht oder angezogen wird. Ich werde nun den Kragen zusammen naehen, damit er rund wird. Haben Sie noch einen Tipp? Danke im Voraus, Julia
12.12.2014 - 13:42Odpowiedź DROPS Design :
Antwort siehe unten! :-)
14.12.2014 - 10:24
![]() Julia Schueler napisała::
Julia Schueler napisała::
Hallo, ich habe nicht richtig aufgepasst und den Kragenteil nicht rund sondern hin und her gestrickt. Nach 27cm aufgeteilt und eine Seite nun in Hin und Her fertig gestellt. Ich kann mir irgendwie nicht vorstellen, wie das Teil nachher aussieht oder angezogen wird. Ich werde nun den Kragen zusammen naehen, damit er rund wird. Haben Sie noch einen Tipp? Danke im Voraus, Julia
12.12.2014 - 10:48Odpowiedź DROPS Design :
Sie können auf dem Foto ja das Vorderteil sehen, dieser "Lappen", der sich an den Halsteil anschließt. Das sieht auf der Rückseite, im Nacken den Rücken runter, ebenso aus. Wenn Ihnen das hinten zu lang ist, können Sie den hinteren Teil auch einfach kürzer stricken. Sie können den oberen Teil des Kragens, den Halsteil, einfach zusammennähen, das ist kein Problem.
14.12.2014 - 10:01
![]() Kate napisała::
Kate napisała::
V popisu je spatna delka lanka, ma byt 60cm ne 80cm, pro zacatecnika to muze byti matouci. Diky za opravu.
08.12.2014 - 14:52Odpowiedź DROPS Design :
Dobrý den, díky za upozornění - opraveno.
10.12.2014 - 00:10Diane Carlson napisała::
Hi again. I just posted a question but have found my answer in the other comments made for this pattern. Looks like I have to rip out a row and get back to 120 stitches. Oh well, live and learn!
23.11.2014 - 03:08Diane Carlson napisała::
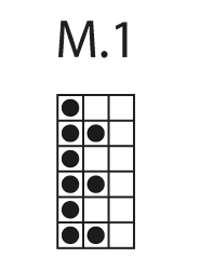
I have started this pattern but am confused about the M1 on all stitches. Will I have 240 stitches on my needle after I M1 on all stitches? Thank you for your help.
23.11.2014 - 03:00Odpowiedź DROPS Design :
Dear Mrss Carlson, you have 120 sts for the neck warmer (ie "collar"), you work M1 on all sts, ie you repeat the 3 sts in diagram a total of 40 times around (Row 1 = *K1, P2* repeat from *-* around). When piece measures 27 cm, divide work in 2 pieces and finished each piece (front & back piece = 60 sts each) separately back and forth on needle. Happy knitting!
24.11.2014 - 11:04
![]() Carole napisała::
Carole napisała::
It did not say in the pattern to start at the bottom right square and read from right to left every round . Now I am dividing the stitches. My last right side row was K1P2 reading from right to left. Now going back on the wrong side am I going to K1P2 or am I going to P2K1? Pattern just not matching.
20.01.2014 - 01:43Odpowiedź DROPS Design :
Dear Carole, look at your last st worked from RS at the end of row and mark it on the diagram, you will then know how where to start from WS. Happy knitting!
20.01.2014 - 09:24
![]() Carole napisała::
Carole napisała::
My last row on right side on 60 stitches was Purl 2 Knit 1 and then I added a stitch on the end to make 61. Please just tell me what to do going back across on the wrong side. I have worked on this all day and keep ripping out. I did not have any trouble until I divided the stitches. Thank you.
04.01.2014 - 06:14Odpowiedź DROPS Design :
Dear Carole, just mark in diagram where you stopped from RS and continue following diag back and forth, reading from right to left the RS rows and from right to left the WS rows. the first 2 sts each side should be worked in garter st. Happy knitting!
04.01.2014 - 10:52
![]() Carole Lewis napisała::
Carole Lewis napisała::
After you cast on stitches, are the first 4 rows worked in the round--Rnd 1-k, Rnd-2 p, Rnd-3 k, and Rnd-4 p. Then do you start working back and forth or continue in the round. Diagram is confusing to me.
28.12.2013 - 02:03Odpowiedź DROPS Design :
Dear Mrs Lewis, after cast on sts, continue in the round until work measures 27 cm, then divide in 2 pieces and work each part separately. In the diagram, 1 square = 1st x 1row, in the round, start on the bottom corner on the right side towards the left every round. When working in rows, read WS rows from left towards the right. Happy knitting!
30.12.2013 - 15:21
![]() Colleen napisała::
Colleen napisała::
Confused when switching from knitting in the round to knitting back and forth. Cannot get the pattern to match. Last row worked (RS) was P1K2 across. What would be the pattern going from row 2 (WS)? Thanks.
09.02.2013 - 14:44Odpowiedź DROPS Design :
Dear Colleen, it seems last round you work was a row 2 in the diagram, so that you have to continue with row 3 in the diagram, seen from WS. Happy knitting!
11.02.2013 - 09:19Maria Del Consuelo Hernandez napisała::
Hola me gustaria que me dijeran como terminar mi prenda gracias
30.11.2011 - 03:13
|
|||||||
Snuggles#snugglesneckwarmer |
|||||||
|
|
|||||||
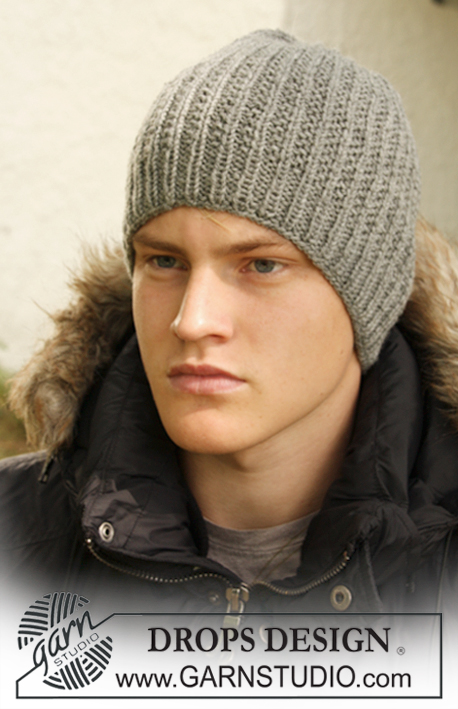
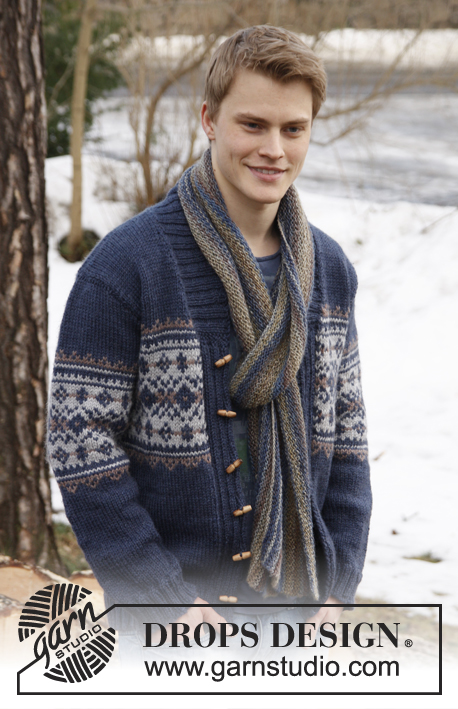
Komin męski na drutach ze ściegiem strukturalnym, z włóczki DROPS Karisma.
DROPS 135-30 |
|||||||
|
ŚCIEG FRANCUSKI (w tą i z powrotem): przer. wszystkie rz. na prawo. ŚCIEG FRANCUSKI (na okrągło): 1 okr. na prawo, 1 okr. na lewo. ŚCIEG FANTAZYJNY: Patrz schemat M.1. Schemat przedstawia motyw na prawej stronie robótki. -------------------------------------------------------- KOMIN MĘSKI: Przer. z góry na dół. ZACHOWAĆ TAKIE SAME NAPRĘŻENIE NICI JAK W PRZYPADKU PRÓBKI! Na druty z żyłką nr 4 nabrać 120 o. włóczką Karisma. Przer. 4 rz. ŚCIEGIEM FRANCUSKIM– patrz powyżej! Dalej przer. wg schematu M.1 przez wszystkie o. Na wys. 27 cm od dołu robótki podzielić robótkę na 2 części, na przód i tył. Zostawić na drucie 60 pierwszych o. i zdjąć na drut pomocniczy 60 pozostałych o. PRZÓD: Przer. w tą i z powrotem 60 o. na drucie, ściegiem fantazyjnym jak poprzednio. W TYM SAMYM CZASIE w 1-szym rz. nabrać 1 o. na końcu rz. = 61 o. Dalej przer. wg schematu M.1 jak poprzednio z 2 o. ŚCIEGIEM FRANCUSKIM - patrz powyżej – z każdej strony. Przer. tak samo do wys. ok. 12 cm od momentu podzielenia robótki. Dalej przer. 4 rz. ściegiem francuskim przez wszystkie o. i luźno zakończyć. Robótka mierzy ok. 40 cm. TYŁ: Nabrać o. z drutu pomocniczego i przer. jak przód. |
|||||||
Objaśnienia do schematu |
|||||||
|
|||||||
 |
|||||||
Skończyłaś ten wzór?Otaguj swoje zdjęcia #dropspattern #snugglesneckwarmer lub prześlij je do #dropsfan gallery. Potrzebujesz pomocy w związku z tym wzorem?Zobacz 11 instrukcje video, sekcję Komentarze/Pytania i jeszcze więcej, wchodząc na stronę wzoru na garnstudio.com © 1982-2026 DROPS Design A/S. Wszelkie prawa zastrzeżone. Ten dokument, w całości, jest chroniony prawem. Zobacz co możesz robić z naszymi wzorami na dole każdego wzoru na naszej stronie. |
|||||||


Posiadając 40 lat doświadczenia w projektowaniu wzorów na druty i szydełko, DROPS Design oferuje jedną z największych kolekcji bezpłatnych wzorów w internecie – przetłumaczonych na 17 języków. Obecnie jest dostępnych 324 katalogów i 12290 wzorów w języku polskim.
Dokładamy wszelkich starań, aby oferować Wam druty i szydełka, inspiracje, fachowe porady oraz doskonałej jakości włóczki w najlepszych cenach! Zamierzasz wykorzystać nasze wzory inaczej niż tylko do osobistego użytku? Przeczytaj jakie masz prawa w Copyright, który znajdziesz na końcu każdego wzoru. Miłej pracy!
Dodaj komentarz do modelu DROPS 135-30
Chcielibyśmy się dowiedzieć co masz do powiedzenia o tym wzorze!
Jeśli chcesz zadać pytanie i szybko uzyskać odpowiedź, upewnij się, że została wybrana właściwa kategoria w formularzu poniżej. Pola obowiązkowe są oznaczone *.