
Popularne kategorie
Szukasz włóczki?


Komentarze / Pytania (13)
![]() Linda Pine napisała::
Linda Pine napisała::
I am COMPLETELY confused by the instructions for working the stripe pattern "at the same time inc 1 st each side on every and every other row alternately". After reading the questions and answers in the Comments section - I am even MORE confused. Surely there is a better way to describe what should be done.!!!!
06.01.2023 - 16:39
![]() Kathy Tee napisała::
Kathy Tee napisała::
The instructions state “ inc 1 st each side on every and every other row alternately”. What specifically does “every and every other row alternately” mean. Please provide an example in your reply eg. if I have to work a total of 10 rows, on which of those rows do I include the increases.
12.08.2022 - 03:34Odpowiedź DROPS Design :
Dear Mrs Tee, this lesson explains how to decrease or increase on every 3rd and 4th row alternately, maybe it can help you to understand how to decrease here on every row (instead of on every 3rd row in the lesson) and 2nd row (instead of every 4th row in the lesson). Hope it can help you.
12.08.2022 - 09:57
![]() Kathy Tee napisała::
Kathy Tee napisała::
In your earlier reply to HCL (05.03.2020 kl. 10:06 ) you advise, ”*1 row with decreases, 1 row with decreases, 1 row without decreases*” which confirms I am to work in the first 2 of every 3 rows, but the decreases would occur on Rows 1, 2, 4, 5, 7, 8, 10, 11, 13 etc. instead. Please confirm which example, either the one shown here or the one in my previous message (12.08.2022 - 00:56.) is correct.
12.08.2022 - 01:33Odpowiedź DROPS Design :
Dear Mrs Tee, you can also work that way, you will have decreased the same number of rows at the end with the same number of rows, decreasing alternately on every row and every other row would be more likely as previous comment. Hope it can help.
12.08.2022 - 09:51
![]() Kathy Tee napisała::
Kathy Tee napisała::
Based on your reply to Jane Doe (10.08.2022 kl. 16:14), if for example I worked in pattern for 13 rows, are you indicating the decreases would occur on Rows 1, 3, 4, 6, 7, 9, 10, 12, 13 etc. So, after Rows 1 and 2, I am to then decrease in the first 2 of every next 3 rows. “Row 1 - decrease, Row 2 -no decrease, then *Decrease in next 2 rows, next row (rows 5, 8, 11 etc) no decrease* repeat from *to*”. Is this correct?
12.08.2022 - 00:56Odpowiedź DROPS Design :
Dear Mrs Tee, that's correct. Happy knitting!
12.08.2022 - 09:49
![]() Jane Doe napisała::
Jane Doe napisała::
Your answer is incredibly confusing! "you will decrease 1 stitch on both sides of the 2 middle stitches but you should decrease on every row and on every other row alternately, i.e.: *work 1 row with decrease, 1 row without decrease, 1 row with decrease* and repeat from *-*" So, I actually decrease every other row (1 row without decrease, 1 row with decrease). Not every row and every other row alternately.
11.08.2022 - 18:22Odpowiedź DROPS Design :
Dear Mrs Doe, sorry for confusion, let me try again - you have to decrease 2 stitches alternately on every row and every other row, this means the decreases might occure from the right side as well as from the wrong side, after 1 row you have decreased 2 sts, after these 3 rows you will have decreased 4 sts. Hope it can help.
12.08.2022 - 09:56
![]() Kathy Tee napisała::
Kathy Tee napisała::
Please provide detailed explanation as to which rows inc’s and dec’s are worked in the following instructions: “inc 1 st each side on every and every other row alternately”, “Continue inc each side, at the same time dec 1 st on both sides of the 2 middle sts on every and every other row alternately”, “discontinue dec in the middle of piece and now dec each side as inc before on every and every row alternately”
10.08.2022 - 16:33
![]() Jane Doe napisała::
Jane Doe napisała::
After joining the two top pieces on the front, I understand that you increase at either end of every row and decrease every other row 2 stitches in the center ? Is this correct?
10.08.2022 - 13:22Odpowiedź DROPS Design :
Dear Mrs Doe, not exactly, you will decrease 1 stitch on both sides of the 2 middle stitches but you should decrease on every row and on every other row alternately, i.e.: *work 1 row with decrease, 1 row without decrease, 1 row with decrease* and repeat from *-*. Happy knitting!
10.08.2022 - 16:14
![]() Wilma Keighley napisała::
Wilma Keighley napisała::
Sorry, it’s me again. I’m at the stage where the central deceased have been discontinued and decreases at the edges are happening. I can see that the side decreases are forming the shoulder but it really looks like the central decreases should continue. I am definitely correct that the central decreases should have stopped ;as the pattern says). Even the picture of the jersey looks like the central decreases continue the the end.
16.03.2022 - 15:59
![]() Wilma Keighley napisała::
Wilma Keighley napisała::
Re your reply. Yes tension is fine. What should mid front (where the decrease line is) measure when side measures 52cm?
08.03.2022 - 14:58Odpowiedź DROPS Design :
Hi Wilma, When you now continue and start to decrease in each side, the sides will not get any longer, but the mid front will. When piece measures 39-40-42 cm mid front, put piece aside. :)
09.03.2022 - 09:11
![]() Wilma Keighley napisała::
Wilma Keighley napisała::
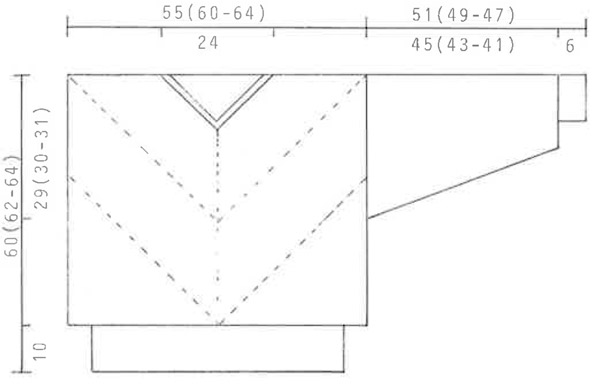
I am working on the front and the side now measures 52 cm. Looking at the diagram, I think the mid front ought to be about 26 cm but it is much less than this. Have I misunderstood where to measure the side or done something else wrong? Thanks.
07.03.2022 - 23:18Odpowiedź DROPS Design :
Dear Mrs Keighley, do you have correct tension? ie 36 rows stocking stitch = 10 cm?
08.03.2022 - 11:09
|
|
City Jungle |
|
 |
 |
Sweter na drutach przerabiany po skosie, z włóczki DROPS Alpaca. Od S do L.
DROPS 9-18 |
|
|
PASKI: Są przerabiane dżersejem: * 2 rzędy kolorem czarnym, 2 rzędy kolorem beż *, powtarzać od *-*. ŚCIĄGACZ: * 1 oczko przekręcone i przerobione na prawo, 1 oczko lewe *. Powtarzać od *-*. ZAMYKANIE OCZEK NA ŚRODKU PRZODU: Na prawej stronie robótki: przerobić 2 oczka przekręcone razem na prawo przed 2 oczkami środkowymi, 2 oczka razem na prawo za 2 oczkami środkowymi. Na lewej stronie robótki: przerabiać odpowiednio 2 oczka przekręcone razem na lewo i 2 oczka razem na lewo. PRZÓD: Przerabiany w tę i z powrotem w 2 częściach, następnie łączonych razem. Na drutach nr 3 nabrać 3 oczka kolorem czarnym i przerabiać dżersejem w paski, w tym samym czasie dodawać 1 oczko z każdej strony na przemian w każdym rzędzie i co 2 rzędy. Zachować takie samo naprężenie nici jak w przypadku próbki! Gdy będzie w sumie 99-107-115 oczek na drucie, odłożyć. Długość boku wynosi ok. 28-30-32 cm. Wykonać drugą część tak samo i następnie wziąć oczka obu części na te same druty nr 3 = 198-214-230 oczek. Dalej dodawać oczka z każdej strony, w tym samym czasie zamykać 1 oczko z każdej strony 2 oczek środkowych na przemian w każdym rzędzie i co 2 rzędy – patrz powyżej. Gdy długość boku robótki wynosi 50-52-54 cm, zakończyć zamykanie oczek na środku robótki i teraz zamykać tylko oczka z każdej strony jak były wcześniej dodawane oczka: na przemian w każdym rzędzie i co 2 rzędy. Na wys. 39-40-42 cm (mierząc po środku przodu), odłożyć. TYŁ: jest przerabiany jak przód. RĘKAWY: Na drutach pończoszniczych nr 2,5 nabrać 50-52-54 oczka kolorem czarnym i przerobić 6 cm ściągaczem. Dalej przerabiać na drutach pończoszniczych nr 3 dżersejem w paski, w tym samym czasie w 1-szym rzędzie równomiernie dodać 25 oczek = 75-77-79 oczek. W TYM SAMYM CZASIE po przerobieniu ściągacza dodać 2 oczka pod rękawem; powtarzać dodawanie oczek 35-37-38 razy co 4 okrążenia w rozmiarze S i na przemian co 3 i 4 okrążenia w rozmiarach M + L = 145-151-155 oczek. Zakończyć, gdy długość rękawa wynosi 51-49-47 cm. WYKOŃCZENIE: Zszyć ramiona. Wziąć z powrotem odłożone oczka tyłu i przodu i przełożyć na druty pończosznicze nr 2,5. Przerobić 2 cm ściągaczem kolorem czarnym, a w tym samym czasie zamykać oczka na środku przodu i na środku tyłu następująco: przerabiać okrążenie do 3 oczek na środku przodu/tyłu, zdjąć oczko środkowe na drut pomocniczy przed robótką, przerobić razem na prawo 1-sze i 3-cie oczko i przełożyć oczko środkowe ponad przerobionym oczkiem. Zamykać tak samo co 4 okrążenia. Zakończyć na wys. 2 cm. Zszyć boki swetra. Na drutach nr 2,5 nabrać ok. 214-222-230 oczek wzdłuż dołu swetra kolorem czarnym i przerabiać 10 cm ściągaczem, zakończyć. Wszyć rękawy. |
|
 |
|
Skończyłaś ten wzór?Otaguj swoje zdjęcia #dropspattern lub prześlij je do #dropsfan gallery. Potrzebujesz pomocy w związku z tym wzorem?Zobacz 27 instrukcje video, sekcję Komentarze/Pytania i jeszcze więcej, wchodząc na stronę wzoru na garnstudio.com © 1982-2026 DROPS Design A/S. Wszelkie prawa zastrzeżone. Ten dokument, w całości, jest chroniony prawem. Zobacz co możesz robić z naszymi wzorami na dole każdego wzoru na naszej stronie. |
|


Posiadając 40 lat doświadczenia w projektowaniu wzorów na druty i szydełko, DROPS Design oferuje jedną z największych kolekcji bezpłatnych wzorów w internecie – przetłumaczonych na 17 języków. Obecnie jest dostępnych 324 katalogów i 12290 wzorów w języku polskim.
Dokładamy wszelkich starań, aby oferować Wam druty i szydełka, inspiracje, fachowe porady oraz doskonałej jakości włóczki w najlepszych cenach! Zamierzasz wykorzystać nasze wzory inaczej niż tylko do osobistego użytku? Przeczytaj jakie masz prawa w Copyright, który znajdziesz na końcu każdego wzoru. Miłej pracy!
Dodaj komentarz do modelu DROPS 9-18
Chcielibyśmy się dowiedzieć co masz do powiedzenia o tym wzorze!
Jeśli chcesz zadać pytanie i szybko uzyskać odpowiedź, upewnij się, że została wybrana właściwa kategoria w formularzu poniżej. Pola obowiązkowe są oznaczone *.