
Popularne kategorie
Szukasz włóczki?


Komentarze / Pytania (12)
![]() Clare napisała::
Clare napisała::
Hi, can you please let me know if this pattern can be updated to include larger sizes ? Like up to XXXL
21.01.2024 - 19:26
![]() Lynne Randall Caloggero napisała::
Lynne Randall Caloggero napisała::
I haven't begun to knit the project yet, but as I read through the instructions I'm wondering why it's necessary to shift M.1 half a pattern repeat to the right on every other row?
01.07.2020 - 15:30Odpowiedź DROPS Design :
Dear Mrs Randall Caloggero, you will displace the diagrams so that the flowers are note the one over each other but one flower will come over 2 from previous diagram. Happy knitting!
01.07.2020 - 15:43
![]() Debra napisała::
Debra napisała::
Hi, I have another question about the directions. I am working on the sleeve and am almost finished. I have cast off 10 sts mid underarm, ready to work back and forth on the needles. It says to decrease 6 sts 3 times on every other row. Where do I place these decreases- at the beginning, middle, end of row or equally spaced out across the row? Please clarify for me. Thanks for all your help so far.
20.06.2020 - 01:38Odpowiedź DROPS Design :
Dear Debra, after you have cast off 10 sts on mid under arm, you continue back and forth casting off (you don't decrease, pattern will be updated) 6 sts at the begining of every row on each side a total of 3 times (= 6 sts at the beg of next 6 rows). Happy knitting!
22.06.2020 - 07:37
![]() Debra napisała::
Debra napisała::
I am working on the sleeve and am questioning the instructions. Do I work M1 just once and then change to M2 as soon as it's completed or do I continue with M1 repeated several times until I have 122 sts and then switch to M2 once all 122 sts are made?
17.06.2020 - 19:41Odpowiedź DROPS Design :
Dear Debra, diagram M.1 is worked only one time in height (but around all stitches in the round - make sure to center a diagram mid on top of sleeve), then you work M.2 (both in width and height) to the end of sleeve. Happy knitting!
18.06.2020 - 09:37
![]() Debra napisała::
Debra napisała::
Thanks for your answer but I am still unsure about the meaning of decreasing 2 sts 2 times and 1 st 2 times. Is that all in one row and consecutively cast off. Why doesn't it just say cast off 6 stitches? Maybe I'm not understanding and making it more complicated than it is. Please help clear this up for me.
05.06.2020 - 18:08Odpowiedź DROPS Design :
Dear Debra, you don't cast off 6 sts 1 time to make the neck line somewhat rounded. You have to cast off the sts for neckline at the beg of row from neck towards armhole, then work row to the end, turn and work next row and repeat this 2 rows until all sts are cast off (you repeat these 2 rows 2 times casting off 2 sts at the beg of row then repeat 2 times castinf off 1 st at the beg of row). Happy knitting!
08.06.2020 - 07:35
![]() Debra napisała::
Debra napisała::
Can you give me more explicit details on how to shape the front neckline? I don't know what you mean by decrease 2 sts 2 times , 1 st 2 times. Are these all in the same row?How many stitches will I be decreasing in total? I assume I will be using the knit 2 together technique to do these decreases.
05.06.2020 - 02:08Odpowiedź DROPS Design :
Dear Debra, you first cast off the middle 41 sts for neck and finish each shoulder separately, at the beginning of every row from neck towards armhole (from RS on one shoulder, from WS on the other shoulder), you will cast off (will looks nicer than decrease): 2 sts 2 times and 1 stitch 2 times = you have cast off a total of 6 sts towards neck. Happy knitting!
05.06.2020 - 07:41
![]() Debra napisała::
Debra napisała::
Ughhh, I have already knitted one complete diagram as before the edits. Do you know if I can continue on pearling as the original pattern and just turn the garment inside out when finished so the knit side shows? Or is there a way to retread the stitches on the needle ? Or do I have to rip it all out and begin again? Please tell me what you think.
25.05.2020 - 23:14Odpowiedź DROPS Design :
Dear Debra, you could turn your work inside outside so that the knit side will be now towards outside (= from RS) and the purl side inside (from WS) - just do this at at the beg of the round - you might also continue working with purled sts outside and then just turn inside outside when dividing piece for armholes; Happy knitting!
26.05.2020 - 08:47
![]() Debra napisała::
Debra napisała::
Hi, Can you please give me some details as to how to shift the diagram half a pattern repeat to the right. Would I begin the rows on stitch 13 ? Thanks for your help.
24.05.2020 - 16:07Odpowiedź DROPS Design :
Dear Debra, when working the 2nd M.1 in height, you can start the round with the 13rd stitch and then repeat M.1 and finish round with the 12th stitch. On 3rd repeat, start again as before and continue like this. Happy knitting!
25.05.2020 - 09:53
![]() Debra napisała::
Debra napisała::
This pattern diagram is starting with a pearl row and the rose is done in knit stitch. Will this mean the right side of the sweater has the pearl side facing out? in the sweater photo, it looks like the main body is stocking stitch with the knitted side showing and the rose in pearls. Can you please help? Did I do something wrong to have the right side out showing pearl stitch?
23.05.2020 - 19:36Odpowiedź DROPS Design :
Dear Debra, diagram text has been reversed - it has been edited now, thanks for your feedback - a white square should be a K stitch and a small black square a P - Happy knitting!
25.05.2020 - 09:06
![]() Debra Briere napisała::
Debra Briere napisała::
I am confused with the instructions for the moss stitch pattern. It says to repeat second row but I am thinking it should say repeat these 2 rows of K1P1 over P1K1. Can you please clarify this for me?
22.05.2020 - 05:35Odpowiedź DROPS Design :
Hi Debra, Row 2 says to knit over purl and purl over knit, which is then repeated in the following rows - so all rows consist of knit over the previous row's purl and purl over the previous row's knit. I hope this helps and happy knitting!
22.05.2020 - 07:49
|
||||||||||
DROPS 29-22 |
||||||||||
|
|
||||||||||
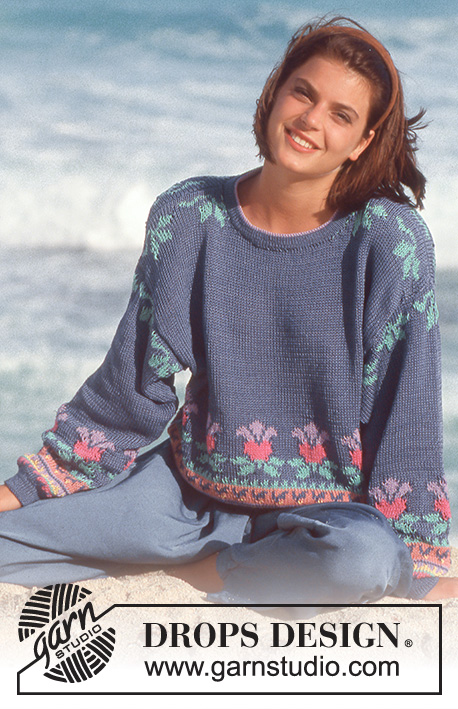
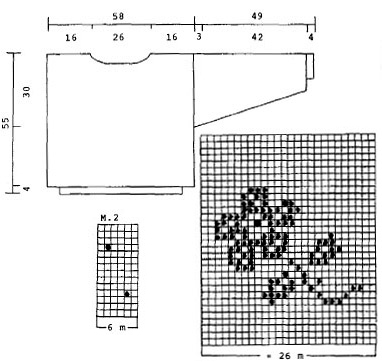
Sweter na drutach, z kwiatami ściegiem strukturalnym z włóczki DROPS Muskat. Rozmiar M
DROPS 29-22 |
||||||||||
|
ŚCIEG FANTAZYJNY: patrz schematy poniżej. Schematy przedstawiają motywy na prawej stronie robótki. ŚCIEG RYŻOWY: Rz. 1: *1 oczko prawe, 1 oczko lewe * powtarzać od * do *. Rz. 2: przerabiać oczka prawe na lewo, a lewe na prawo. Powtarzać rząd 2. DŁUŻSZY SWETER: przewidzieć o 100 g włóczki więcej. Zamykać oczka na podkroje rękawów i dekolt o 14 cm dalej, całkowita długość swetra wynosi 69 cm. TYŁ & PRZÓD: Sweter jest przerabiany na okrągło na drutach z żyłką. Na drutach nr 2,5 nabrać 188 oczek i przerabiać 4 cm ściegiem ryżowym. Dalej przerabiać na drutach nr 4, W TYM SAMYM CZASIE w 1-szym okrążeniu równomiernie dodać 46 oczek = 234 oczka. Przerabiać schemat M.1, ale co 2 okrążenia przesuwać schemat M1 o pół motywu w prawo. ZACHOWAĆ TAKIE SAMO NAPRĘŻENIE NICI JAK W PRZYPADKU PRÓBKI! Na wys. 25 cm podzielić robótkę na 2 części i kończyć przód i tył oddzielnie. Przód: = 117 oczek. Na wys. 50 cm zamknąć 41 oczek środkowych na dekolt, dalej zamykać co 2 rzędy od strony dekoltu: 2 razy 2 oczka i 2 razy 1 oczko. Zakończyć na wys. 55 cm. Tył: = 117 oczek. Na wys. 53 cm zamknąć 49 oczek środkowych na dekolt, a w następnym rzędzie zamknąć 2 oczka od strony dekoltu. Zakończyć jak przód. RĘKAWY: Są przerabiane na okrągło na drutach pończoszniczych. Na drutach pończoszniczych nr 2,5 nabrać 46 oczek i przerabiać 4 cm ściegiem ryżowym. Dalej przerabiać na drutach nr 4, W TYM SAMYM CZASIE w 1-szym okrążeniu równomiernie dodać 14 oczek = 60 oczek. Przerabiać schemat M.1 (wyśrodkować 1 motyw na rękawie), a w tym samym czasie dodać 2 oczka pod rękawem; powtarzać dodawanie oczek w sumie 31 razy co 3 okrążenia = 122 oczka (przerabiać dodawane oczka ściegiem fantazyjnym w miarę postępu robótki). Po przerobieniu schematu M.1, dalej przerabiać wg schematu M.2. Na wys. 46 cm zamknąć 10 oczek pod rękawem i kończyć w tę i z powrotem zamykając z każdej strony co 2 rzędy: 3 razy 6 oczek. Zakończyć na wys. 49 cm. WYKOŃCZENIE: Zszyć ramiona. Na drutach pończoszniczych nr 2,5 nabrać ok. 102 oczek wokół dekoltu i przerobić 4 okrążenia ściegiem ryżowym, zakończyć. Na szydełku nr 3 przerabiać brzeg wokół dekoltu: 1 półsłupek, *3 oczka łańcuszka, 1 słupek w 1-sze oczko łańcuszka, ominąć 2 oczka, 1 półsłupek*, powtarzać od *-*. Wszyć rękawy. |
||||||||||
Objaśnienia do schematu |
||||||||||
|
||||||||||
 |
||||||||||
Skończyłaś ten wzór?Otaguj swoje zdjęcia #dropspattern lub prześlij je do #dropsfan gallery. Potrzebujesz pomocy w związku z tym wzorem?Zobacz 25 instrukcje video, sekcję Komentarze/Pytania i jeszcze więcej, wchodząc na stronę wzoru na garnstudio.com © 1982-2026 DROPS Design A/S. Wszelkie prawa zastrzeżone. Ten dokument, w całości, jest chroniony prawem. Zobacz co możesz robić z naszymi wzorami na dole każdego wzoru na naszej stronie. |
||||||||||


Posiadając 40 lat doświadczenia w projektowaniu wzorów na druty i szydełko, DROPS Design oferuje jedną z największych kolekcji bezpłatnych wzorów w internecie – przetłumaczonych na 17 języków. Obecnie jest dostępnych 324 katalogów i 12290 wzorów w języku polskim.
Dokładamy wszelkich starań, aby oferować Wam druty i szydełka, inspiracje, fachowe porady oraz doskonałej jakości włóczki w najlepszych cenach! Zamierzasz wykorzystać nasze wzory inaczej niż tylko do osobistego użytku? Przeczytaj jakie masz prawa w Copyright, który znajdziesz na końcu każdego wzoru. Miłej pracy!
Dodaj komentarz do modelu DROPS 29-22
Chcielibyśmy się dowiedzieć co masz do powiedzenia o tym wzorze!
Jeśli chcesz zadać pytanie i szybko uzyskać odpowiedź, upewnij się, że została wybrana właściwa kategoria w formularzu poniżej. Pola obowiązkowe są oznaczone *.