
Popularne kategorie
Szukasz włóczki?


Komentarze / Pytania (39)
![]() Wendy napisała::
Wendy napisała::
Is there a complete video somewhere for this fish Tale sweater knitting pattern
17.11.2025 - 22:09
![]() Yvonne napisała::
Yvonne napisała::
” när arb mäter 21,5-24,5-28,5 (31,5-34,5-37,5) cm stickas axel så här: Sätt 4 m mitt under ärmen på en tråd. Sätt sedan 8 m i varje sida på tråden på vartannat v 2 ggr. Sedan sätts alla m tillbaka på st och sticka M.1. Maska av efter M.1. Arb mäter ca 26-30-34 (37-40-43) cm.” Jag har stickat ärmen runt på strumpstickor/kort rundsticka. Är det meningen att slutet av ärmen enl ovan stickas fram och tillbaka och inte runt?
11.09.2025 - 19:26Odpowiedź DROPS Design :
Ja, ärmkullen ska stickas fram och tillbaka. Du kan sticka fram och tillbaka på rundstickan.
23.09.2025 - 19:33
![]() Lone Essom napisała::
Lone Essom napisała::
Jeg forstår ikke jeres beskrivelse af mønster. Hvad mener I med mønster 1, 8 cm af mønster 2??? hvilket skal man starte med og hvor mange cm?
06.05.2025 - 12:39Odpowiedź DROPS Design :
Hei Lona. Usikker på hvor du ser 1,8 cm. I oppskriften står det at du skal strikke 6-7-7,5 (7,5-8-8,5) cm av mønster M.2. På Ryg- og forstykke i f.eks str. 3/4 år skal du etter vrangborden bytte til rundpinne 5 og strikke glattstrikk til arbeidet måler 17 cm, så skal det strikkes Mønster ryg- og forstk. Mønster ryg- og forstk er forklart øverst i oppskriften = Strikk M.1 (6 omganger), så skal du strikke etter M.2 i 6 cm, strikk M.1 (6 omganger), M.2 i 6 cm, så enda en gang: M.1 (6 omganger), M.2 i 6 cm og avslutt Ryg- og forstykke med M. 1 før det felles av. mvh DROPS Design
12.05.2025 - 09:23
![]() Lulu Kamp napisała::
Lulu Kamp napisała::
Kan denne opskrift ikke fås til voksne mænd ?
18.04.2025 - 15:14
![]() Cécile napisała::
Cécile napisała::
Je ne comprends pas comment procéder pour le haut de la manche. ..comment utiliser le porte-maille? (2mailles de chaque côté, tricoter aller-retour, puis 8 mailles)
10.05.2024 - 15:36Odpowiedź DROPS Design :
Bonjour Cécile, quand vous avez mis en attente 4 mailles sous la manche (= 2 mailles de chaque côté du milieu sous la manche), continuez en allers et retours et mettez en attente les 8 premières mailles au début des 4 rangs suivants (= 2 x 8 mailles + 1 x 2 mailles en attente de chaque côté). Bon tricot!
10.05.2024 - 16:38
![]() Ida napisała::
Ida napisała::
I am having trouble with these instructions….shape the sleeve cap as follows: put 2 sts on each side of the marker on a holder. Knit the sleeve cap back and forth on the needle placing sts at each edge on a holder every other row as follows: 8 sts 2 times. Then put all sts back on needle and knit Pattern 1.
03.04.2024 - 20:42Odpowiedź DROPS Design :
Dear Ida, When you knit the upper part of the sleeve, you knit back and forth, and while doing that, at the beginning of each row, you put the number of stitches described on a stitch-holder (after you knitted them). Then you put all the stitches back to the circular needle, and continue with the pattern. I hope this helps. Happy Knitting!
03.04.2024 - 23:20
![]() Linda Mccoy napisała::
Linda Mccoy napisała::
When sewing in the Sleeve s is it done from wrong side or right side?
16.01.2023 - 21:37Odpowiedź DROPS Design :
Dear Mrs Mccoy, sleeves are generally sewn from right side - see this video. Happy assembly!
17.01.2023 - 10:12
![]() Linda Mccoy napisała::
Linda Mccoy napisała::
Hello and Happy New year. This has got to be the worst pattern to follow. I have been reading patterns 50 yrs. I have never had a pattern that has stumped me like this one. I realise that this has been translated from another language. However maybe someone should rewrite it so people can understand what the pattern is saying. Thank you
04.01.2023 - 19:59
![]() Lisa Hertel napisała::
Lisa Hertel napisała::
Does this cap take place under the arm? i cannot figure this out. I have knitted this portion of the pattern 3 times. the graphic does not show a cap for shoulder it looks straight across. again may i ask what is the purpose of this?
19.12.2022 - 15:43Odpowiedź DROPS Design :
Dear Mrs Hertel, this portion is the sleeve cap, is you will work short rows (leaving first 2 sts 1 time then 8 sts 2 times unworked on each side of mid under sleeve, ie the first 2+8+8 sts from mid under sleeve and the last 2-8-8 sts towards mid under sleeve (the middle 36 sts under sleeve the sleeve are on a thread, 16 sts on each side of mid under sleeve) - chart is just standard and just don't show this sleeve cap. Hope it can help. Happy knitting!
19.12.2022 - 15:59
![]() Lisa Hertel napisała::
Lisa Hertel napisała::
I followed the directions given to Mrs. Frew. The pattern was askew and the work was done under the arm. If it is a cap, shouldn't it be on the top near the shoulder? I am very confused
18.12.2022 - 19:16Odpowiedź DROPS Design :
Dear Mrs Hertel, please let us know if the previous answer could help you or if you need more information.
19.12.2022 - 09:40
|
|||||||
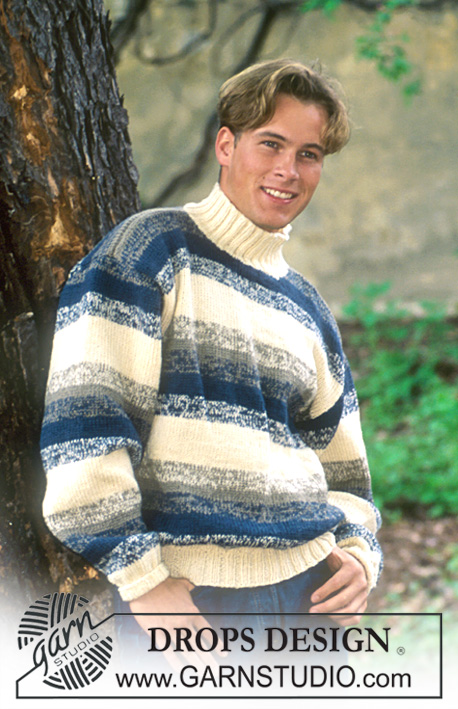
Fish Tales |
|||||||
|
|
|||||||
Sweter na drutach, z włóczki DROPS Alaska
DROPS Children 7-5 |
|||||||
|
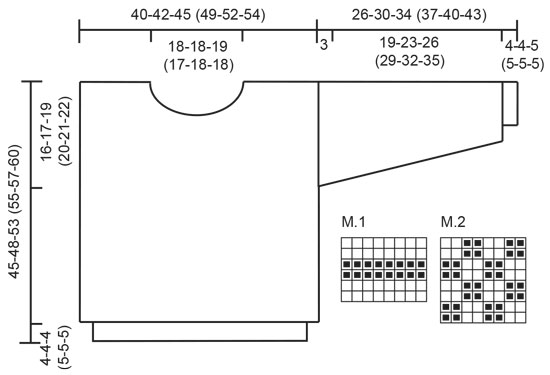
Próbka: 17 oczek i 22 rzędy na drutach nr 5 dżersejem prawym = 10 x 10 cm Ścieg fantazyjny: patrz schematy. Schemat pokazuje 1 powtórzenie ściegu fantazyjnego. Schemat jest pokazany na prawej stronie robótki. Pierwszy rząd schematu znajduje się na dole schematu (początek schematu jest w prawym dolnym rogu). Instrukcje: Ścieg fantazyjny 1: * 2 rzędy dżersejem prawym, 2 rzędy dżersejem lewym, 2 rzędy dżersejem prawym *. Ścieg fantazyjny 2: Rząd 1: * 2 oczka prawe, 2 oczka lewe*. Rząd 2: * 2 oczka lewe, 2 oczka prawe *. Rząd 3: * 2 oczka lewe, 2 oczka prawe *. Rząd 4: * 2 oczka prawe, 2 oczka lewe*. Powtórzyć te 4 rzędy. Ściągacz: *2 oczka prawe, 2 oczka lewe *. Powtarzać od * - *. Tył i przód: Na drutach z żyłką nr 3,5 nabrać 136-144-152 (168-176-184) oczka kolorem niebieskim. Połączyć na okrągło, uważając, aby nie skręcić pierwszego rzędu robótki. Umieścić 1 marker na początku okrążenia i przerobić 2 rzędy dżersejem prawym, a następnie przerabiać ściągaczem aż długość robótki wynosi 4-4-4 (5-5-5) cm. Wziąć teraz druty z żyłką nr 5 i przerabiać dżersejem prawym. Gdy długość robótki wynosi 17-17-20,5 (22,5-23-24,5) cm, przerabiać schematy następująco: Przerabiać 1 raz schemat 1 (6 rzędów). Przerabiać 6-7-7,5 (7,5-8-8,5) cm wg schematu 2. Przerabiać 1 raz schemat 1 (6 rzędów). Przerabiać 6-7-7,5 (7,5-8-8,5) cm wg schematu 2. Przerabiać 1 raz schemat 1 (6 rzędów). Przerabiać 6-7-7,5 (7,5-8-8,5) cm wg schematu 2. Przerabiać 1 raz schemat 1 (6 rzędów). W tym samym czasie gdy długość robótki wynosi 29-31-34 (35-36-38) cm, podzielić robótkę na przód i tył i przerabiać każdą część oddzielnie. Przód: 68-72-76 (84-88-92) oczka. Dalej przerabiać schematy jak powyżej. Gdy długość robótki wynosi 41-44-49 (50-52-54) cm, zamknąć 24-24-26 (22-24-24) oczka środkowe na dekolt. Zamykać z każdej strony dekoltu co 2 rzędy: 2 oczka 1 raz, 1 oczko 1 raz. Zakończyć po zakończeniu schematu. Długość robótki wynosi ok. 45-48-53 (55-57-60) cm. Tył: 68-72-76 (84-88-92) oczka. Dalej przerabiać schematy jak na przodzie. Gdy długość robótki wynosi 43-46-51 (53-55-58) cm, zamknąć 26-26-28 (24-26-26) oczek środkowych na dekolt. W następnym rzędzie zamknąć 2 oczka z każdej strony dekoltu. Zakończyć po zakończeniu schematu. Długość robótki wynosi ok. 45-48-53 (55-57-60) cm. Rękawy: na drutach pończoszniczych nr 3,5 nabrać 30-32-32 (34-34-36) oczek kolorem niebieskim. Połączyć na okrągło, uważając, aby nie skręcić pierwszego rzędu robótki. Umieścić 1 marker na początku okrążenia i przerobić 2 rzędy dżersejem prawym, a następnie ściągaczem aż długość robótki wynosi 4-4-5 (5-5-5) cm. Wziąć teraz druty pończosznicze nr 5 i przerabiać dżersejem prawym, w pierwszym rzędzie równomiernie dodając 4-6-8 (6-8-6) oczek = 34-38-40 (40-42-42) oczka. Po przerobieniu ściągacza dodać 1 oczko z każdej strony; powtarzać dodawanie oczek 10-10-12 (14-15-16) razy: Rozmiar 3/4 lata: na przemian co 3 i 4 rzędy. Rozmiary 5/6 + 7/8 + 9/10 + 11/12 + 13/14 lat: na przemian co 4 i 5 rzędów = 54-58-64 (68-72-74) oczka. Gdy długość robótki wynosi 15-18-21,5 (24,5-27-29,5) cm przerabiać schemat 1 jeden raz, a dalej przerabiać 6-7-7,5 (7,5-8-8,5) cm wg schematu 2. Gdy długość robótki wynosi 21,5-24,5-28,5 (31,5-34,5-37,5) cm formować główkę rękawa następująco: zdjąć 2 oczka z każdej strony markera na nitki. Przerabiać główkę rękawa w tę i z powrotem, zdejmując oczka z każdej strony na nitki co 2 rzędy następująco: 8 oczek 2 razy. Następnie wziąć z powrotem wszystkie oczka na druty i przerabiać schemat 1. Zakończyć po przerobieniu schematu 1. Długość robótki powinna wynosić ok. 26-30-34 (37-40-43) cm. Wykończenie: zszyć ramiona. Na drutach z żyłką nr 3,5 nabrać ok. 72-84 oczka wokół dekoltu kolorem niebieskim, 2 rzędy na lewo, następnie przerobić 4-4-5 (5-6-6) cm ściągaczem i 2 rzędy dżersejem prawym. Zakończyć. Wszyć rękawy. |
|||||||
Objaśnienia do schematu |
|||||||
|
|||||||
 |
|||||||
Skończyłaś ten wzór?Otaguj swoje zdjęcia #dropspattern lub prześlij je do #dropsfan gallery. Potrzebujesz pomocy w związku z tym wzorem?Zobacz 19 instrukcje video, sekcję Komentarze/Pytania i jeszcze więcej, wchodząc na stronę wzoru na garnstudio.com © 1982-2026 DROPS Design A/S. Wszelkie prawa zastrzeżone. Ten dokument, w całości, jest chroniony prawem. Zobacz co możesz robić z naszymi wzorami na dole każdego wzoru na naszej stronie. |
|||||||


Posiadając 40 lat doświadczenia w projektowaniu wzorów na druty i szydełko, DROPS Design oferuje jedną z największych kolekcji bezpłatnych wzorów w internecie – przetłumaczonych na 17 języków. Obecnie jest dostępnych 324 katalogów i 12290 wzorów w języku polskim.
Dokładamy wszelkich starań, aby oferować Wam druty i szydełka, inspiracje, fachowe porady oraz doskonałej jakości włóczki w najlepszych cenach! Zamierzasz wykorzystać nasze wzory inaczej niż tylko do osobistego użytku? Przeczytaj jakie masz prawa w Copyright, który znajdziesz na końcu każdego wzoru. Miłej pracy!
Dodaj komentarz do modelu DROPS Children 7-5
Chcielibyśmy się dowiedzieć co masz do powiedzenia o tym wzorze!
Jeśli chcesz zadać pytanie i szybko uzyskać odpowiedź, upewnij się, że została wybrana właściwa kategoria w formularzu poniżej. Pola obowiązkowe są oznaczone *.