
Popularne kategorie
Szukasz włóczki?


Komentarze / Pytania (31)
![]() Laura napisała::
Laura napisała::
I’m finished with Decrease 2 every 2nd round total of 10 times with 63 stitches on needles. Directions state: then every round 2 times=14 stitches. Don’t understand how that’s done.
28.04.2026 - 22:08Odpowiedź DROPS Design :
Hi Laura, You decrease 7 stitches on each decrease-round (1 stitch decreased after each marker) x 11. 98- 70 = 28 stitches. Then decrease every round x 2. 28 - 14 = 14 stitches left on the needle. Regards, Drops Team.
29.04.2026 - 06:02
![]() Su napisała::
Su napisała::
Can you tell me where the amount of wool required on patterns is please.
01.03.2026 - 13:18Odpowiedź DROPS Design :
Hi Su, The yarn amounts are to the lower right of the main photo, under the title Materials. Regards, Drops Team.
02.03.2026 - 07:08
![]() Katharina napisała::
Katharina napisała::
Jeg forstår ikke helt linierne med indtagning efter at have strikket en omgang med indtagning efter hver markør. Dublin Town hat str s
17.01.2026 - 13:50
![]() Tania napisała::
Tania napisała::
I have read further along in the pattern and can see that the length is the same for all sizes. Apologies. My former question is answered.
26.11.2025 - 02:17
![]() Tania napisała::
Tania napisała::
Clarification required. Dublin Town pattern 225-29 knitted hat. Size M/L says to knit for 18cm before decreasing for the crown. The S size requires you to knit 19cm in length. Is the pattern correct for the M/L size hat?? Thank you.
26.11.2025 - 00:17Odpowiedź DROPS Design :
Hi Tania, You work further up the hat before decreasing in size S as there are fewer decreases to the top of the hat than in size M/L. Regards, Drops Team.
26.11.2025 - 06:50
![]() Julie napisała::
Julie napisała::
I don’t understand why the pattern calls for needle size US4 when the pattern states the yarn used was Drops Alaska which is a US8. Can you explain?
03.09.2025 - 21:10
![]() Merja napisała::
Merja napisała::
Haluaisin tehdä saman mallisen myssyn paksummalla langalla ja paksummilla puikoilla, saisikohan sille ohjeen?
08.01.2025 - 17:20Odpowiedź DROPS Design :
Valitettavasti emme suunnittele uusia myssyjä juuri nyt, mutta voit käydä selaamassa jo olemassa olevia myssyohjeitamme. Toivottavasti löydät mieluisan mallin!
08.01.2025 - 17:57
![]() Jo Pitcairn napisała::
Jo Pitcairn napisała::
Got it, I now see the ribbing has been folded up plus some of the stocking stitch !
06.10.2024 - 19:06
![]() Jo Pitcairn napisała::
Jo Pitcairn napisała::
Looking at the hat it looks as if you knit in stocking stitch for 2 cms, then rib up to 7 then stocking stitch again. The turn up doesnyt look like rib. Please clarify? thanks
06.10.2024 - 16:03
![]() Elina napisała::
Elina napisała::
Ohjeessa pipo aloitetaan 2o, 2n joustinneuleella. Kuvassa pipon alareuna näyttää kuitenkin olevan sileää neuletta, joka rullautuu kauniisti. Onko ohjeessa virhe?
06.01.2024 - 10:29
|
|
Dublin Town#dublintownhat |
|
 |
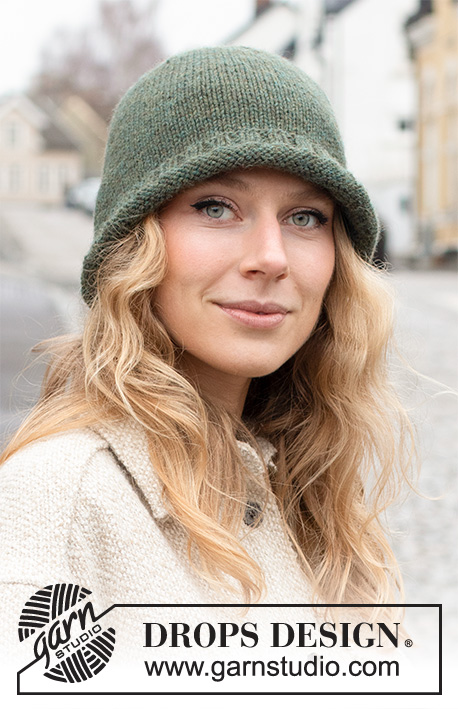 |
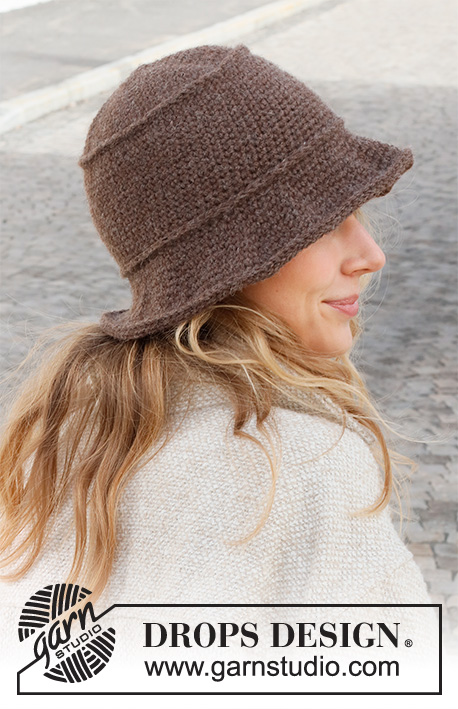
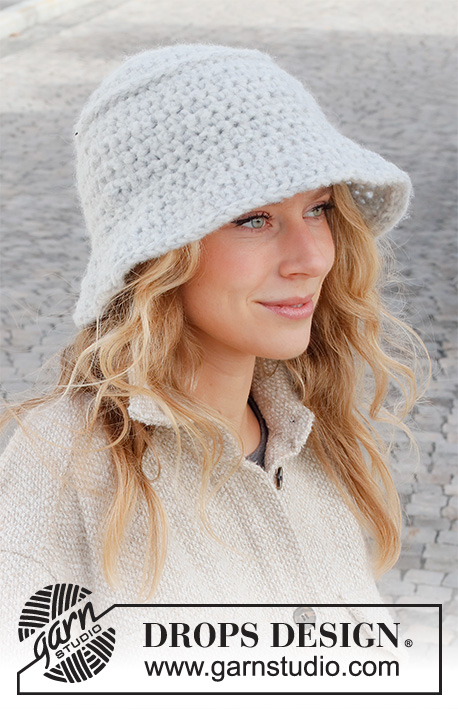
Czapka na drutach z włóczki DROPS Alaska. Przerabiana od dołu do góry.
DROPS 225-29 |
|
|
------------------------------------------------------- WYKORZYSTYWANE TECHNIKI: ------------------------------------------------------- ZAMYKANIE OCZEK-1 (w regularnych odstępach/równomiernie): Aby obliczyć gdzie zamykać oczka, należy wziąć ogólną liczbę oczek (np. 132 oczek) i podzielić ją przez liczbę oczek jaka ma być zamknięta (np. 34) = 3,8. W tym przykładzie, aby zamknąć oczka będziemy przerabiać razem na prawo ok. każde 3-cie i 4-te oczko oczko. ZAMYKANIE OCZEK-2: Zamykać za każdym markerem następująco: zdjąć 1 oczko jak do przerobienia na prawo, 1 oczko prawe i przełożyć oczko zdjęte nad przerobionym oczkiem (= zostaje zamknięte 1 oczko). ------------------------------------------------------- ROBÓTKĘ ROZPOCZYNAMY TUTAJ: ------------------------------------------------------- CZAPKA – SKRÓCONY OPIS ROBÓTKI: Przerabiana od dołu do góry, na okrągło na drutach z żyłką, zacząć przerabiać na drutach pończoszniczych, gdy jest za mało oczek na druty z żyłką. CZAPKA: Na drutach z żyłką nr 3,5 nabrać 132-140 oczek włóczką DROPS Alaska. Przerabiać na okrągło, ściągaczem (2 oczka prawe, 2 oczka lewe) przez 2 cm. Dalej przerabiać dżersejem, aż długość robótki wynosi 7 cm. ZACHOWAĆ TAKIE SAMO NAPRĘŻENIE NICI JAK W PRZYPADKU PRÓBKI! W następnym okrążeniu równomiernie zamknąć 34-35 oczek – patrz ZAMYKANIE OCZEK-1 = 98-105 oczek. Dalej przerabiać dżersejem. Gdy długość robótki wynosi 19-18 cm, umieścić 7 markerów, co 14-15 oczek każdy. W następnym okrążeniu zamknąć 1 oczko za każdym markerem – patrz ZAMYKANIE OCZEK-2 (= zostaje zamkniętych 7 oczek). Zamykać tak samo w sumie 10-11 razy co 2 okrążenia, dalej 2-2 razy w każdym okrążeniu = zostaje 14 oczek. W następnym okrążeniu przerobić każde 2 kolejne oczka razem na prawo = 7 oczek. Odciąć nitkę, przeciągnąć ją przez pozostałe oczka, zacisnąć i zakończyć. Długość czapki w obydwu rozmiarach wynosi ok. 26 cm (od góry do dołu). Wywinąć ściągacz na prawą stronę robótki. |
|
Skończyłaś ten wzór?Otaguj swoje zdjęcia #dropspattern #dublintownhat lub prześlij je do #dropsfan gallery. Potrzebujesz pomocy w związku z tym wzorem?Zobacz 15 instrukcje video, sekcję Komentarze/Pytania i jeszcze więcej, wchodząc na stronę wzoru na garnstudio.com © 1982-2026 DROPS Design A/S. Wszelkie prawa zastrzeżone. Ten dokument, w całości, jest chroniony prawem. Zobacz co możesz robić z naszymi wzorami na dole każdego wzoru na naszej stronie. |
|


Posiadając 40 lat doświadczenia w projektowaniu wzorów na druty i szydełko, DROPS Design oferuje jedną z największych kolekcji bezpłatnych wzorów w internecie – przetłumaczonych na 17 języków. Obecnie jest dostępnych 324 katalogów i 12290 wzorów w języku polskim.
Dokładamy wszelkich starań, aby oferować Wam druty i szydełka, inspiracje, fachowe porady oraz doskonałej jakości włóczki w najlepszych cenach! Zamierzasz wykorzystać nasze wzory inaczej niż tylko do osobistego użytku? Przeczytaj jakie masz prawa w Copyright, który znajdziesz na końcu każdego wzoru. Miłej pracy!
Dodaj komentarz do modelu DROPS 225-29
Chcielibyśmy się dowiedzieć co masz do powiedzenia o tym wzorze!
Jeśli chcesz zadać pytanie i szybko uzyskać odpowiedź, upewnij się, że została wybrana właściwa kategoria w formularzu poniżej. Pola obowiązkowe są oznaczone *.