
Categorie popolari
State cercando un filato?


Commenti / Domande (92)
![]() Malin ha scritto:
Malin ha scritto:
Hej. Ni har länkat fel video i instruktionerna när det gäller "ökning till ärm". Följer man instruktionerna för den länkade videon så ökas det på fram och bakstycket och inte på ärmen som bilden och mönstret illustrerar. Rätt video är väl "how to increase to sleave with a saddle shoulder" på Youtube? Går det att fortsätta följa mönstret ändå när man gjort fel och ökat på fram och bakstycket?
25.11.2021 - 12:10DROPS Design ha risposto:
Hej Malin, jo men først öker du til fram och bakstycket, sedan öker du till ärmen. Du finder begge videoer med flere nederst i opskriften. Lycka till :)
25.11.2021 - 15:45
![]() Sa ha scritto:
Sa ha scritto:
Hi, I am knitting this in Big Merino, and would like to knit it from Bottom UP. I have done the body , just need a few pointers on the yoke? Or could you please suggest another pattern I can follow Bottom UP? Thanks.
03.09.2021 - 08:16DROPS Design ha risposto:
Dear Sa, we are unfortunately not able to adjust every pattern to every single request, but you can take inspiration from another jumper for men worked bottom up with a yarn group C - such as Big Merino - see here. Thanks for your comprehension. Happy knitting!
03.09.2021 - 11:58
![]() Julie ha scritto:
Julie ha scritto:
I'd like to use the print pattern option, but the cookies button is in the way.
21.08.2021 - 01:59DROPS Design ha risposto:
Dear Julie, click on the print icon, then clock on "continue to pattern" and then print pattern. It should give you the print pages. Happy Stitching!
30.08.2021 - 03:22
![]() Anne Mette ha scritto:
Anne Mette ha scritto:
Jeg vil gerne vide hvilken størrelse modellen på opskrift Urban Forest 219-16 er, da jeg skal strikke den uden at kunne måle gutten som skal buge den. Mvh Anne mette
17.08.2021 - 19:46DROPS Design ha risposto:
Hei Anne Mette. Modellen bruker str. M. Har du tilgang til en genser gutten har fra før anbefaler jeg deg å ta mål av den, og sammenlign med målene i målskissen for å finne beste passform. mvh DROPS design
18.08.2021 - 15:13
![]() Pernille ha scritto:
Pernille ha scritto:
Den tilhørende video med udtagning til ærmer er misvisende. Følges den, bliver der ikke en tydelig markering af ærmet, som på foto af Urban Forest. Udtagningerne skal laves på ydersiden af forrige udtagning, og ikke på indersiden, som det vises i videoen
10.08.2021 - 21:56
![]() Pernille Larsen ha scritto:
Pernille Larsen ha scritto:
Kan man på nogen måde ændre i opskriften, så halsåbningen bliver lavere fortil? Altså forskel på ryg og forstykke. Hvorfor er der ikke forskel?
10.08.2021 - 20:22DROPS Design ha risposto:
Hej Pernille, nej ikke denne teknik med sadelskulder. Men du kan finde en herreopskrift med forhøjning bagpå :)
11.08.2021 - 16:04
![]() Corinna ha scritto:
Corinna ha scritto:
Bei der Anleitung Urban Forest soll ich nun die Arbeit teilen, um Rumpf und Ärmel getrennt zu Ende zu stricken. Dabei sollen nach der Stilllegung des Ärmels 12 Maschen "aus der Seite unter dem Arm" zugenommen werden. Wo ist bitte "aus der Seite unter dem Arm"? Gibt es hierzu ein Video? Oder ein Foto? Herzliche Grüße
05.07.2021 - 21:16
![]() Anna ha scritto:
Anna ha scritto:
Hallo, erstmal vielen Dank für diese tolle Anleitung! Ich habe eine Verständnis Frage. Bei der Zunahme der Passe, steht dass alle Zugenommenen Maschen glatt rechts gestrickt werden. Was bedeutet das? Sollen die Zunahmen vor und nach dem Markierter dann so gestrickt werden wie im Zunahmetipp, oder sollen sie beide so gestrickt werden, dass sie sich dann nach rechts neigen? Vielen Dank! LG Anna
12.06.2021 - 12:06DROPS Design ha risposto:
Liebe Anna, ja genau, diese Zunahmen sollen genauso wie die vorrigen gestrickt werden (wie unter ZUNAHMETIPP - glatt rechts gestrickt meint hier, daß diese Maschen rechts gestrickt werden. Viel Spaß beim stricken!
14.06.2021 - 08:37
![]() Nicolette Mörth ha scritto:
Nicolette Mörth ha scritto:
Guten Tag, ich möchte dieses Modell Stricken aber mit einem Garn, bei dem die Maschenprobe 21 Maschen für eine Breite von 10 cm ergibt. Wie kann ich es am besten anpassen?
26.05.2021 - 14:58DROPS Design ha risposto:
Liebe Frau Mörth, leider können wir jeder Anleitung nach jedem individuellen Frage anpassen und einzelne Modelle auf individuellen Wunsch hin umrechnen. Wenn sie Hilfe damit brauchen, wenden Sie sich bitte an dem Laden wo Sie die Wolle gekauft haben, dort hilft man Ihnen gerne weiter. Danke im voraus für Ihr Verständnis. Hier finden Sie alle unsere Anleitungen für Herrenpullover mit 21 Maschen = 10 cm - es kann Ihnen vielleicht weiterhelfen. Viel Spaß beim stricken!
26.05.2021 - 15:50
![]() Judy Collins Currell ha scritto:
Judy Collins Currell ha scritto:
Just a design choice query - I note that on the Urban Forest the increases are done using M1R and M1L rather than the yarn over method of the Glacier Waters. Was this done because of the weight of the increased yarn gauge? Also re the neck, I c/o with larger needle, trans to smaller, K to length the folded up and k2tog the knit sts with corresponding c/o sts then purls the purls alone. It's too tight if you do them all. I'll go to lengths to avoid sewing
18.05.2021 - 15:39DROPS Design ha risposto:
Dear Judy, the used increases are the designer's choice, based on a number of things, like used yarn, shape, pattern, etc. As for the neckline, you can always do what works the best for you, the one you mention is a good solution. Happy Knitting!
18.05.2021 - 23:04
|
|||||||||||||
Urban Forest#urbanforestsweater |
|||||||||||||
 |
 |
||||||||||||
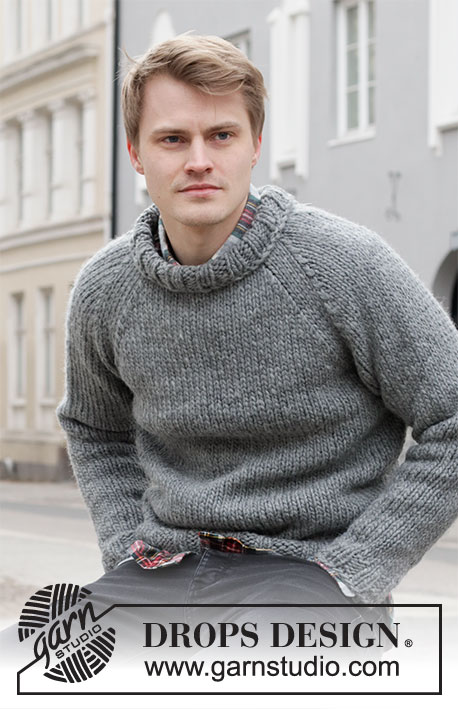
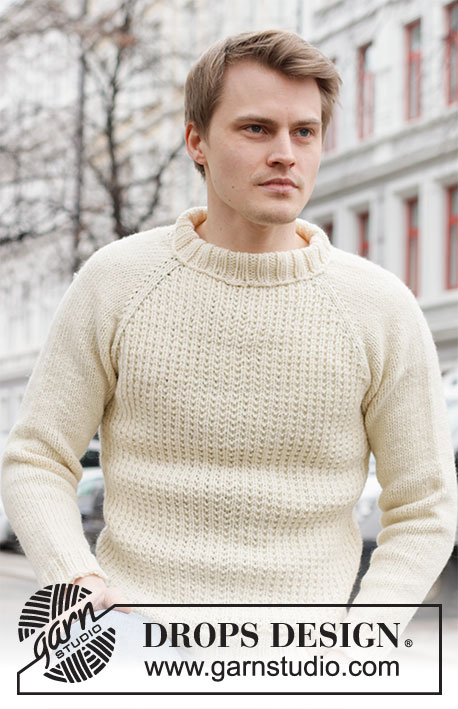
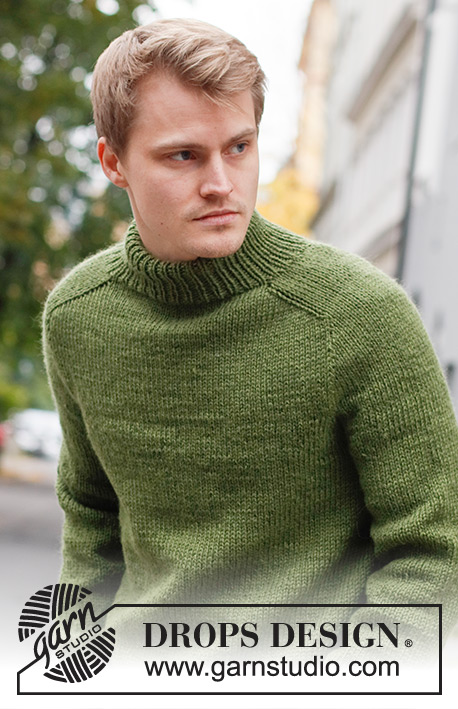
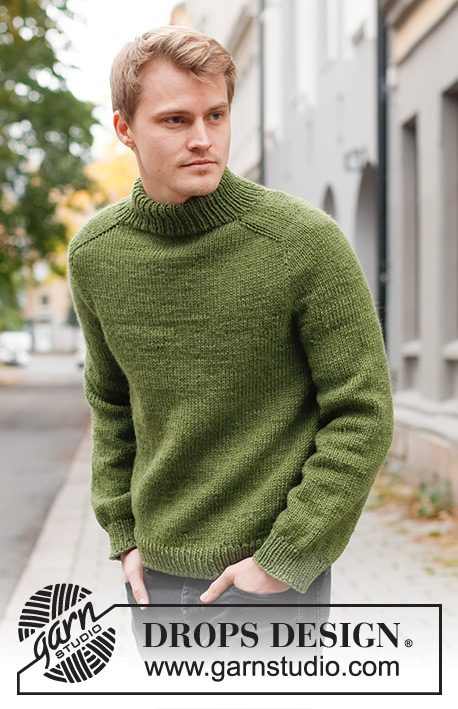
Maglione da uomo lavorato ai ferri in DROPS Alaska. Lavorato dall’alto in basso, con collo doppio e spalla a sella. Taglie: S - XXXL.
DROPS 219-16 |
|||||||||||||
|
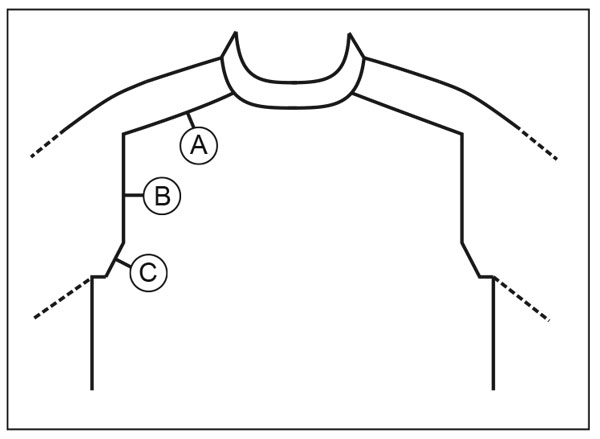
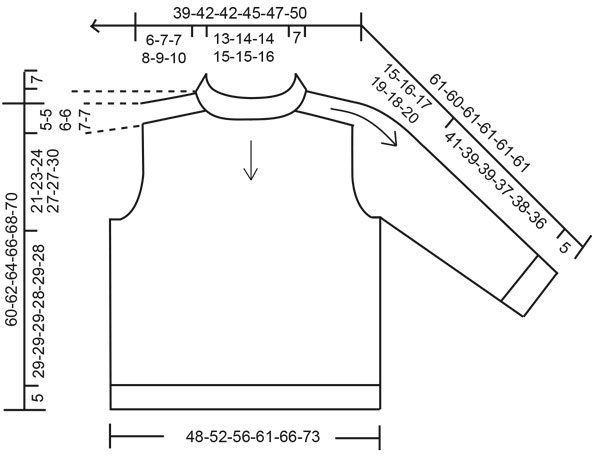
------------------------------------------------------- TECNICHE IMPIEGATE: ------------------------------------------------------- SUGGERIMENTO PER GLI AUMENTI/DIMINUZIONI (distribuiti in modo uniforme): Per stabilire ogni quanto aumentare/diminuire in modo uniforme, prendere il n° totale di maglie sul ferro (ad esempio 78 maglie) e dividerlo per il n° di aumenti/diminuzioni da fare (ad esempio 22) = 3,5. In questo esempio aumentare facendo 1 gettato in modo alternato ogni 3° e 4° maglia. Sul giro successivo lavorare i gettati a ritorto per evitare buchi. Durante le diminuzioni, lavorare insieme a diritto in modo alternato ogni 2° e 3° maglia e ogni 3° e 4° maglia. SUGGERIMENTO PER GLI AUMENTI: PRIMA DEL SEGNAPUNTI: Le nuove maglie sono allineate verso destra. Usare il ferro sinistro per prendere il filo tra 2 maglie del giro precedente; riprendere il filo da dietro e lavorarlo nel filo davanti. DOPO IL SEGNAPUNTI: Le nuove maglie sono allineate verso sinistra. Usare il ferro sinistro per prendere il filo tra 2 maglie del giro precedente; riprendere il filo da davanti e lavorarlo nel filo dietro. SUGGERIMENTO PER LE DIMINUZIONI (per le maniche): Diminuire 1 maglia a entrambi i lati del segnapunti come segue: lavorare fino a quando rimangono 3 maglie prima del segnapunti, 2 maglie insieme a diritto, 2 maglie diritto (il segnapunti è tra queste maglie), passare 1 maglia a diritto senza lavorarla, 1 maglia diritto, accavallare la maglia passata sopra quella appena lavorata. SUGGERIMENTO PER LA CHIUSURA: Per evitare che il bordo di chiusura sia tirato potete intrecciare con un ferro di una misura più grande. Se il bordo risulta ancora tirato, fare 1 gettato dopo circa 4 maglie durante la chiusura e intrecciare i gettati come maglie normali. ------------------------------------------------------- INIZIO DEL LAVORO: ------------------------------------------------------- MAGLIONE – BREVE RIASSUNTO DEL LAVORO: Lavorare il collo e lo sprone in tondo con i ferri circolari, dall’alto in basso dal centro dietro. Dividere lo sprone per il corpo e le maniche e continuare il corpo in tondo con i ferri circolari. Lavorare le maniche in tondo con i ferri circolari corti/ferri a doppia punta, dall’alto in basso. COLLO: Avviare 78-82-88-92-98-102 maglie con i ferri circolari n° 4 mm e Alaska. Lavorare 1 giro diritto, poi lavorare a coste (1 maglia diritto, 1 maglia rovescio) in tondo per 14½ cm. Lavorare 1 giro diritto in cui aumentare 22-22-32-32-34-38 maglie in modo uniforme – leggere il SUGGERIMENTO PER GLI AUMENTI/DIMINUZIONI = 100-104-120-124-132-140 maglie. Passare ai ferri circolari n° 5 mm. SPRONE: Inserire un segnapunti all’inizio del giro (= centro dietro) – MISURARE IL LAVORO DA QUI! Inoltre, inserire 4 segnapunti come descritto sotto – senza lavorare le maglie e inserire i segnapunti tra 2 maglie. Segnapunti 1: iniziare al centro dietro, contare 17-18-20-21-21-23 maglie (= ½ dietro), inserire il segnapunti prima della maglia successiva. Segnapunti 2: contare 16-16-20-20-24-24 maglie dal segnapunti 1 (= spalla), inserire il segnapunti prima della maglia successiva. Segnapunti 3: Contare 34-36-40-42-42-46 maglie dal segnapunti 2 (= davanti), inserire il segnapunti prima della maglia successiva. Segnapunti 4: Contare 16-16-20-20-24-24 maglie dal segnapunti 3 (= spalla), inserire il segnapunti prima della maglia successiva. Rimangono 17-18-20-21-21-23 maglie sul dietro dopo il segnapunti 4. Lasciare i segnapunti nel lavoro; verranno utilizzati durante gli aumenti per la spalla. AUMENTI PER LA SPALLA A SELLA: Lavorare a maglia rasata in tondo. ALLO STESSO TEMPO sul 1° giro, aumentare 4 maglie per le spalla come segue: Aumentare PRIMA dei segnapunti 1 e 3 e aumentare DOPO i segnapunti 2 e 4 – leggere il SUGGERIMENTO PER GLI AUMENTI. Qui si aumenta solo sul davanti e dietro e il n° di maglie della spalla rimane lo stesso. Aumentare in questo modo su ogni giro per un totale di 14-16-16-18-20-22 volte = 156-168-184-196-212-228 maglie. FARE ATTENZIONE ALLA TENSIONE DEL LAVORO! Alla fine dell’ultimo aumento il lavoro misura circa 6-7-7-8-9-10 cm dal segnapunti sul collo. Ora aumentare per le maniche come segue. AUMENTI PER LE MANICHE: Lavorare a maglia rasata in tondo. ALLO STESSO TEMPO sul giro successivo aumentare 4 maglie per le maniche come segue: Aumentare DOPO i segnapunti 1 e 3 e aumentare PRIMA dei segnapunti 2 e 4 – ricordarsi del SUGGERIMENTO PER GLI AUMENTI. Qui si aumenta solo sulle spalle e il n° di maglie del davanti e dietro rimane lo stesso. Aumentare in questo modo ogni 2 giri per un totale di 11-13-13-15-12-12 volte = 200-220-236-256-260-276 maglie. Il lavoro ora deve misurare 16-19-19-22-20-21 cm dal segnapunti sul collo. Per la tagli S continuare a lavorare fino a quando il lavoro misura 17 cm. Se la lunghezza è minore di quella indicate sopra per le taglie M, L, XL, XXL e XXXL, continuare fino alla lunghezza corretta senza ulteriori aumenti. Ora aumentare per lo sprone come descritto sotto. AUMENTO PER LO SPRONE: Spostare i 4 segnapunti in modo che ogni segnapunti sia nelle maglie più esterne delle maniche a ogni lato. Ci sono 36-40-44-48-46-46 maglie tra le maglie con i segnapunti su ogni manica. Sul giro successivo, aumentare 8 maglie per lo sprone aumentando a entrambi i lati di tutte e 4 le maglie con il segnapunti – ricordarsi del SUGGERIMENTO PER GLI AUMENTI. Qui si aumenta sul davanti e dietro e sulle maniche, lavorare gli aumenti a maglia rasata. Aumentare in questo modo ogni 2 giri per un totale di 4-4-6-6-8-10 volte = 232-252-284-304-324-356 maglie. Alla fine di tutti gli aumenti, il lavoro deve misurare 21-23-24-27-27-30 cm. Se la lunghezza è minore, continuare a lavorare fino alla lunghezza corretta senza ulteriori aumenti. Ora dividere lo sprone per il corpo e le maniche sul giro successivo come segue: Lavorare le prime 35-38-42-45-49-55 maglie (= ½ dietro), mettere le 46-50-58-62-64-68 maglie successive in sospeso per la manica, avviare 12-12-12-14-14-14 nuove maglie sul ferro (= a lato sotto la manica), lavorare le 70-76-84-90-98-110 maglie successive (= davanti), mettere le 46-50-58-62-64-68 maglie successive in sospeso per la manica, avviare 12-12-12-14-14-14 nuove maglie sul ferro (= a lato sotto la manica), lavorare le Ultime 35-38-42-45-49-55 maglie (= ½ dietro). Finire il corpo e le maniche in modo separato. ORA MISURARE IL LAVORO DA QUI. CORPO: = 164-176-192-208-224-248 maglie. Lavorare a maglia rasata in tondo. Quando il lavoro misura 29-29-29-28-29-28 cm dalla divisione, aumentare 16-18-20-20-22-26 maglie in modo uniforme = 180-194-212-228-246-274 maglie. Passare ai ferri circolari n° 4 mm e lavorare a coste (1 maglia diritto, 1 maglia rovescio) per 5 cm. Intrecciare con diritto su diritto e rovescio su rovescio – leggere il SUGGERIMENTO PER LA CHIUSURA. Il maglione misura circa 60-62-64-66-68-70 cm dalla spalla in giù. MANICA: Riportare le 46-50-58-62-64-68 maglie in sospeso a un lato del lavoro sui ferri a doppia punta/ferri circolari corti n° 5 mm e riprendere 1 maglia in ognuna delle 12-12-12-14-14-14 maglie avviate sotto la manica = 58-62-70-76-78-82 maglie. Inserire un segnapunti al centro delle nuove maglie sotto la manica. Lavorare a maglia rasata in tondo. Quando la manica misura 4 cm dalla divisione, diminuire 1 maglia a ogni lato del segnapunti – leggere il SUGGERIMENTO PER LE DIMINUZIONI. Diminuire in questo modo ogni 11-6-3½-3-3-2½ cm per un totale di 4-6-9-11-11-13 volte = 50-50-52-54-56-56 maglie. Continuare a lavorare fino a quando la manica misura 41-39-39-37-38-36 cm dalla divisione. Lavorare 1 giro diritto in cui diminuire 10-8-8-8-10-8 maglie in modo uniforme = 40-42-44-46-46-48 maglie. Passare ai ferri a doppia punta n° 4 mm e lavorare a coste (1 maglia diritto, 1 maglia rovescio) per 5 cm. Intrecciare con diritto su diritto e rovescio su rovescio – ricordarsi del SUGGERIMENTO PER LA CHISURA. Lavorare l’altra manica nello stesso modo. CONFEZIONE: Piegare il collo e metà verso il rovescio del lavoro e cucire. Per evitare che il collo sia tirato e sporga verso l’esterno, è importante che la cucitura sia elastica. |
|||||||||||||
Spiegazioni del diagramma |
|||||||||||||
|
|||||||||||||
 |
|||||||||||||
 |
|||||||||||||
Avete terminato questo modello?Allora taggate le vostre foto con #dropspattern #urbanforestsweater o inviatele alla #dropsfan gallery. Avete bisogno di aiuto con questo modello?Troverete 27 video tutorial, una sezione per i commenti/domande e molto altro guardando il modello su www.garnstudio.com © 1982-2026 DROPS Design A/S. Ci riserviamo tutti i diritti. Questo documento, compreso tutte le sue sotto-sezioni, è protetto dalle leggi sul copyright. Potete leggere quello che potete fare con i nostri modelli alla fine di ogni modello sul nostro sito. |
|||||||||||||


Con oltre 40 anni di esperienza nel design di modelli di maglia e uncinetto, DROPS Design offre la più estesa collezione di modelli gratuiti su internet - tradotti in 17 lingue. Ad oggi vi possiamo fornire 324 cataloghi e 12285 modelli - 9556 dei quali sono tradotti in Italiano.
Ci stiamo impegnando molto per darvi il meglio che vi possiamo offrire in termini di maglia e uncinetto, ispirazioni e consigli così come filati di grande qualità ad un prezzo incredibile! Volete utilizzare i nostri modelli per qualcosa d'altro oltre al vostro uso personale? Potete leggere tutto ciò che è consentito nel testo sul Copyright in basso su tutte le pagine dei nostri modelli. Buon lavoro!
Lasciare un commento sul modello DROPS 219-16
Noi saremmo felici di ricevere i tuoi commenti e opinioni su questo modello!
Se vuoi fare una domanda, fai per favore attenzione a selezionare la categoria corretta nella casella qui sotto per velocizzare il processo di risposta. I campi richiesti sono indicati da *.