
Categorie popolari
State cercando un filato?


Commenti / Domande (189)
![]() Geneviève ha scritto:
Geneviève ha scritto:
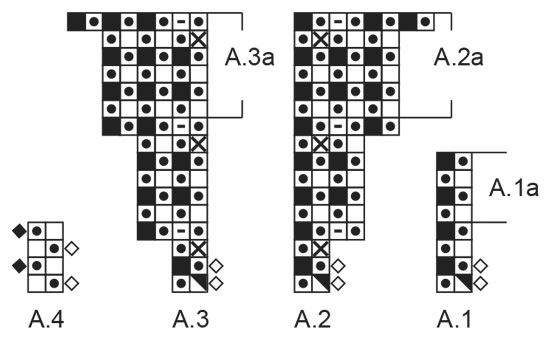
Bonjour. Je lis que quand on a tricoté a1, on répète a1a. Cela fait 12 rangs A2 fait 16 rangs : au 13ème rang, on continue a1?
04.09.2020 - 17:09DROPS Design ha risposto:
Bonjour Geneviève, les mailles tricotées en A.1a se continue en A.1a, indépendamment du nombre de rangs de A.2a, autrement dit, vous tricotez les mailles de A.1a toujours de la même façon et quand les 16 rangs de A.2a/A.3a ont été tricotés, reprenez A.2a/A.3a (= 6 rangs), et tricotez A.1a sur toutes les autres mailles. Bon tricot!
07.09.2020 - 08:05
![]() Mona Larsen ha scritto:
Mona Larsen ha scritto:
En super sød vest/slipover, men noget bøvlet start... Kunne I ikke lave en tilsvarende model - i samme lækre Air-garn som er knap så kompliceret - fx ved at starte den nedefra?
28.08.2020 - 21:47
![]() Bente Ulrich ha scritto:
Bente Ulrich ha scritto:
Glæder mig til det
21.08.2020 - 23:15
![]() MARIT MIKKELSPLASS ha scritto:
MARIT MIKKELSPLASS ha scritto:
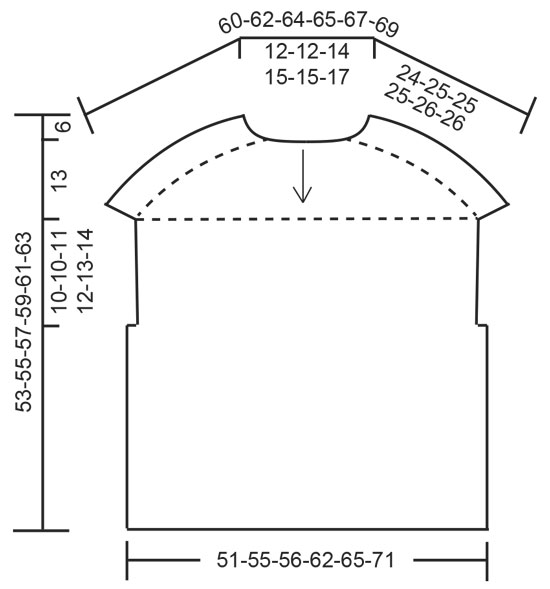
Hei! Det står at den skal felles av etter 49 cm målt fra halsen. Det blir da en veldig kort vest!? vesten på bildet ser ikke ut til å være en kort versjon. Stemmer dette?
21.08.2020 - 15:46DROPS Design ha risposto:
Hej Marit, du ser målene nederst i opskriften, hvis du måler fra halsen, så vil den blive ialt 55 cm ifølge måleskitsen :)
21.08.2020 - 15:54
![]() Cecile ha scritto:
Cecile ha scritto:
Bonsoir. Voilà la séparation des mailles est faite. J’ai mon devant d’un côté et le dos de l’autre. Pour le dos, le marqueur de début de rang est au milieu du rang ce qui fait qu’une moitié du travail se fait à l’endroit et l’autre à l’envers ! Est-ce bien cela ? Me suis je trompée ou comment dois je reprendre mon travail ? Merci de votre retour Cécile
12.07.2020 - 20:48DROPS Design ha risposto:
Bonjour Cécile, le dernier rang de l'empiècement se tricote en rond comme avant, autrement dit, les premières mailles du dos (= demi-dos environ) vont se tricoter de la même façon que les dernières mailles du tour (= demi-dos environ), à la fin de ce tour, coupez le fil. Glissez les mailles de la moitié du dos sur l'aiguille droite, tournez l'ouvrage et tricotez le premier rang du dos sur l'envers, en commençant par la maille point mousse tricotée après les (26-36 m côtes anglaises) et terminez par la m point mousse tricotée après avoir rabattu les 13m de la 2ème épaule. Bon tricot!
13.07.2020 - 09:16
![]() Cecile78 ha scritto:
Cecile78 ha scritto:
Au fur et à mesure des rangs, faut-il faire l’augmentation de A2a une fois à la fin et au début de la section ou autant de fois que le nombre de maille le permet au fur et à mesure ? Merci
05.07.2020 - 17:01DROPS Design ha risposto:
Bonjour Cécile78, quad A.2 (et A.3) ont été tricotés 1 fois en hauteur, vous continuez à augmenter comme le montrent A.2a/A.3a, autrement dit, vous augmentez tous les 6 rangs (= au 5ème rang de A.2a/A.3a) dans l'avant-dernière maille de A.2a et dans la 1ère maille de A.3a - avez-vous regardé cette vidéo? Bon tricot!
06.07.2020 - 09:02
![]() Lynda L Minter ha scritto:
Lynda L Minter ha scritto:
Need American English or translation, please.
17.06.2020 - 19:43DROPS Design ha risposto:
Dear Mrs Minter, please edit the language by clicking on the scroll down menu below picture. Happy knitting!
18.06.2020 - 09:38
![]() Mona ha scritto:
Mona ha scritto:
Når jeg øker 8 m 9 ganger (72m) så stemmer ikke m ant med det jeg skal ha i m. Har sett videoen men ble ikke klokere
03.06.2020 - 19:29DROPS Design ha risposto:
Hej Mona. Du har först 52 m (strl S), sedan stickar hela diagram A.3 och A.2 en gång på höjden så då har du ökat 24 m. Sedan upprepas A.3a och A.2a ytterligare 8 gånger (så 9 gånger totalt), dvs 64 (=8x8) ökade maskor. 52+24+64=140m. Mvh DROPS Design
05.06.2020 - 11:31
![]() Claire Stone ha scritto:
Claire Stone ha scritto:
I like it, it is different
27.05.2020 - 13:41
![]() Laraine Clarke ha scritto:
Laraine Clarke ha scritto:
Why do ALL your patterns use circular needles? I do not like knitting with circular needles - too bulky when you are working. I love your yarn but would like to use some patterns with ordinary needles.
01.05.2020 - 17:23DROPS Design ha risposto:
Dear Mrs Clarke, you will find how to adapt a pattern into straight needles. Happy knitting!
04.05.2020 - 14:03
|
||||||||||||||||||||||||||||
Mountain Moraine#mountainmorainevest |
||||||||||||||||||||||||||||
 |
 |
|||||||||||||||||||||||||||
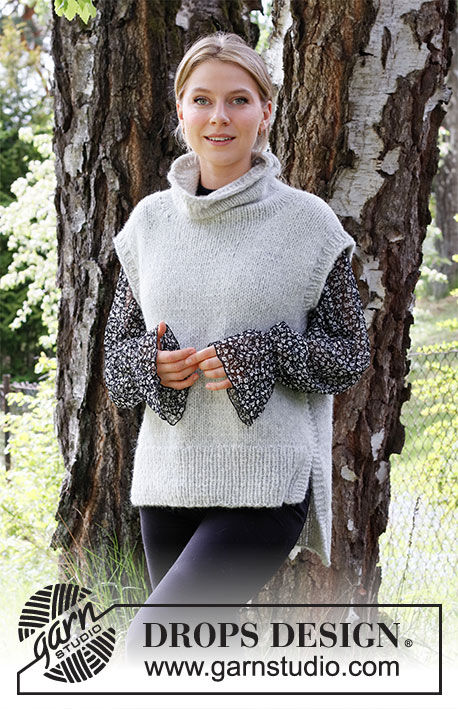
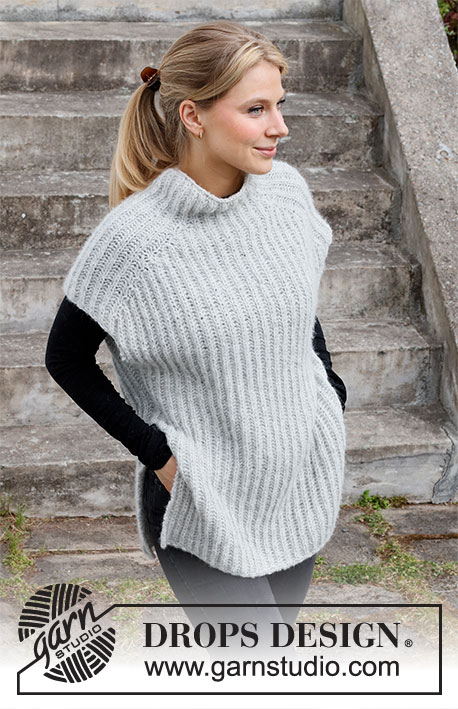
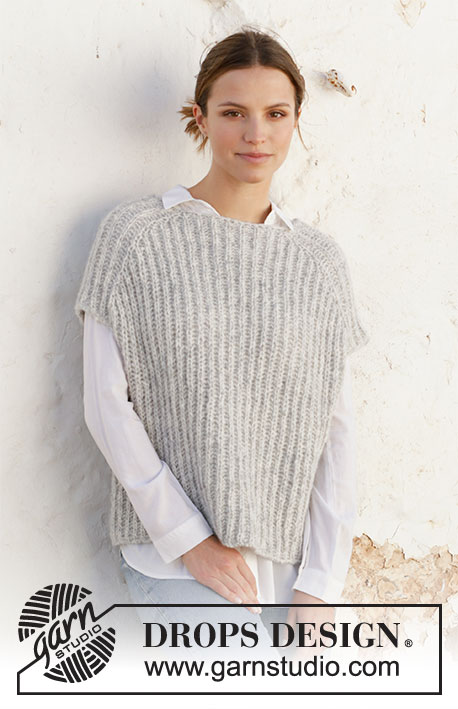
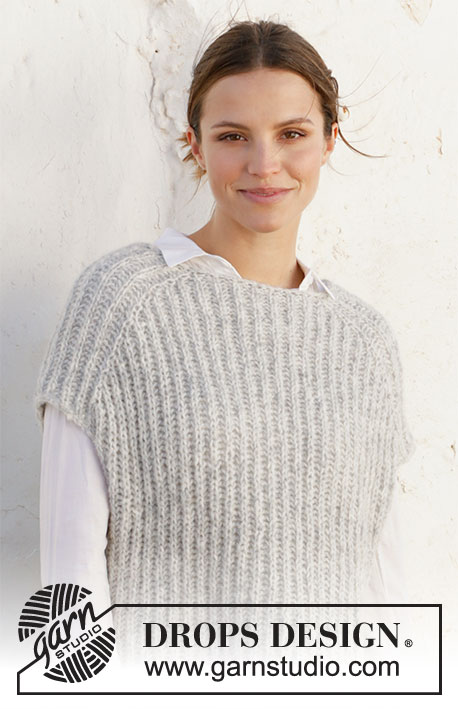
Gilet / smanicato lavorato ai ferri in DROPS Air. Lavorato dall’alto in basso a coste inglesi. Taglie: XS - XXL.
DROPS 210-4 |
||||||||||||||||||||||||||||
|
------------------------------------------------------- TECNICHE IMPIEGATE: ------------------------------------------------------- COSTA/MAGLIA LEGACCIO (avanti e indietro): Lavorare tutti i ferri a diritto. 1 costa in altezza = 2 ferri diritto. MOTIVO: Vedere i diagrammi A.1 - A.4 (lavorati a coste inglesi). SUGGERIMENTO PER LE DIMINUZIONI-1 (distribuiti in modo uniforme): Per stabilire ogni quanto diminuire in modo uniforme, prendere il n° totale di maglie sul ferro (ad esempio 62 maglie) e dividerlo per il n° di diminuzioni da fare (ad esempio 10) = 6,2. In questo esempio lavorare insieme a rovescio ogni 5° e 6° maglia circa. ------------------------------------------------------- INIZIO DEL LAVORO: ------------------------------------------------------- GILET – BREVE RIASSUNTO DEL LAVORO: Lavorare il collo e lo sprone in tondo con i ferri circolari dal centro dietro, dall’alto in basso. Aumentare le maglie per le spalle prima che venga diviso il lavoro e lavorare il davanti e il dietro in modo separato fino alla parte inferiore degli scalfi. Riunire le parti e continuare il corpo in tondo. COLLO: Avviare 62-62-66-70-70-74 maglie con i ferri circolari n° 6 mm e Air. Lavorare 1 giro rovescio, lavorare un altro giro a rovescio e diminuire 10 maglie in modo uniforme – leggere il SUGGERIMENTO PER LE DIMINUZIONI = 52-52-56-60-60-64 maglie. Lavorare 1 giro rovescio. Passare ai ferri circolari n° 7 mm. SPRONE: Lavorare il motivo come segue: A.1 (= 2 maglie) sulle prime 6-6-6-8-8-8 maglie (= metà dietro), A.2 (= 2 maglie), A.1 su 12 maglie, A.3 (= 2 maglie = spalla), A.1 su 10-10-12-14-14-16 maglie (= davanti), A.2 su 2 maglie, A.1 su 12 maglie, A.3 su 2 maglie (= spalla) e A.1 sulle ultime 4-4-6-6-6-8 maglie (= metà dietro). FARE ATTENZIONE ALLA TENSIONE DEL LAVORO! Alla fine di A.1, ripetere A.1a verso l’alto. Alla fine di A.2 e A.3, ripetere A.2a e A.3a, cioè continuare ad aumentare ogni 6 giri, lavorare gli aumenti a coste inglesi. Quando A.2a e A.3a sono stati lavorati per un totale di 8-9-9-10-11-12 volte in altezza ci sono 132-140-144-156-164-176 maglie sul ferro. Lavorare A.1a su tutte le maglie fino a quando il lavoro misura 24-25-25-25-26-26 cm nel punto più lungo (cioè misurati lungo la spalla); aggiustarlo in modo che il giro successivo sia a rovescio. Ora dividere il davanti e il dietro e intrecciare le maglie della spalla come segue: Lavorare 26-28-28-32-34-36 maglie a coste inglesi, 1 maglia a MAGLIA LEGACCIO – leggere la descrizione sopra (= metà dietro), intrecciare le 13 maglie successive (intrecciare i gettati come maglie separate), 1 maglia a maglia legaccio, lavorare 51-55-57-63-67-73 maglie a coste inglesi, 1 maglia a maglia legaccio (= davanti), intrecciare le 13 maglie successive (intrecciare i gettati come maglie separate), lavorare 1 maglia a maglia legaccio e a coste inglesi sulle ultime 25-27-29-31-33-37 maglie. Tagliare il filo. Ora continuare gli scalfi e il dietro, in piano. Lasciare che le altre maglie rimangano sui ferri. DIETRO: = 53-57-59-65-69-75 maglie. Lavorare come segue dal diritto del lavoro: 1 maglia a maglia legaccio, A.4 (= 2 maglie) fino a quando rimane 1 maglia (cioè il motivo a coste inglesi inizia e finisce con 1 maglia rovescio a coste inglesi) e finire con 1 maglia a maglia legaccio. Continuare questo motivo avanti e indietro per 10-10-11-12-13-14 cm, misurati lungo la maglia legaccio; fare in modo che l’ultimo ferro sia dal rovescio del lavoro. Lasciare le maglie sul ferro e lavorare il davanti. DAVANTI: Lavorare le 53-57-59-65-69-75 maglie del davanti nello stesso modo del dietro. CORPO: Lavorare A.1a sul davanti (cioè le maglie legaccio a ogni lato diventano maglie lavorate a coste inglesi), avviare 3 maglie, lavorare A.1a sul dietro e avviare 3 maglie alla fine del ferro = 112-120-124-136-144-156 maglie. Ora lavorare A.1a in tondo su tutte le maglie. Sul 1° ferro lavorare le 3 maglie avviate sotto ogni manica senza gettati. Quando il lavoro misura 47-49-51-53-55-57 cm (misurati dal collo) intrecciare a diritto; intrecciare i gettati come maglie separate (per evitare che il bordo di chiusura risulti tirato). |
||||||||||||||||||||||||||||
Spiegazioni del diagramma |
||||||||||||||||||||||||||||
|
||||||||||||||||||||||||||||
 |
||||||||||||||||||||||||||||
 |
||||||||||||||||||||||||||||
Avete terminato questo modello?Allora taggate le vostre foto con #dropspattern #mountainmorainevest o inviatele alla #dropsfan gallery. Avete bisogno di aiuto con questo modello?Troverete 19 video tutorial, una sezione per i commenti/domande e molto altro guardando il modello su www.garnstudio.com © 1982-2026 DROPS Design A/S. Ci riserviamo tutti i diritti. Questo documento, compreso tutte le sue sotto-sezioni, è protetto dalle leggi sul copyright. Potete leggere quello che potete fare con i nostri modelli alla fine di ogni modello sul nostro sito. |
||||||||||||||||||||||||||||


Con oltre 40 anni di esperienza nel design di modelli di maglia e uncinetto, DROPS Design offre la più estesa collezione di modelli gratuiti su internet - tradotti in 17 lingue. Ad oggi vi possiamo fornire 325 cataloghi e 12298 modelli - 9569 dei quali sono tradotti in Italiano.
Ci stiamo impegnando molto per darvi il meglio che vi possiamo offrire in termini di maglia e uncinetto, ispirazioni e consigli così come filati di grande qualità ad un prezzo incredibile! Volete utilizzare i nostri modelli per qualcosa d'altro oltre al vostro uso personale? Potete leggere tutto ciò che è consentito nel testo sul Copyright in basso su tutte le pagine dei nostri modelli. Buon lavoro!
Lasciare un commento sul modello DROPS 210-4
Noi saremmo felici di ricevere i tuoi commenti e opinioni su questo modello!
Se vuoi fare una domanda, fai per favore attenzione a selezionare la categoria corretta nella casella qui sotto per velocizzare il processo di risposta. I campi richiesti sono indicati da *.