
Categorie popolari
State cercando un filato?


Commenti / Domande (189)
![]() Vasiliki Orphanou ha scritto:
Vasiliki Orphanou ha scritto:
Can I knit the 210-4 Pattern with Baby Merino yarn? What is aquivelent to the Air Gauge 11 X 32 for Baby Merino yarn? Thank you so much for your help.
09.10.2020 - 15:36DROPS Design ha risposto:
Dear Vasiliki, you can knit it with Baby merino, however it will not be as "fluffy" as the original piece, and as with every substitution, you should knit a swatch, check your gauge, and make modifications, recalculations accordingly. Happy Crafting!
11.10.2020 - 06:54
![]() Elisabeth Gran ha scritto:
Elisabeth Gran ha scritto:
Hei, jeg er kommet til samme punkt i oppskriften som Marina hvor forstykket og bakstykke deles. Hva betyr 1 maske rille her? I forklaring står at RILLE strikkes frem og tilbake.
08.10.2020 - 19:02DROPS Design ha risposto:
Hei Elisabet. Ved ermåpningene strikkes det 1 rille i hver side (kantmaske), men når bakstykke og forstykke er strikket ferdig og det skal strikkes rundt, skal rillemaskene i hver side strikkes som rette patentmasker. God Fornøyelse!
12.10.2020 - 12:54
![]() Marina ha scritto:
Marina ha scritto:
Hei, når det står at "Nå deles arbeidet til forstykke og bakstykke og skuldermaskene felles av slik: Strikk 26-28-28-32-34-36 masker patentmønster, 1 maske RILLE – les forklaring over (= halve bakstykket), " osv. Hvor starter dette? Vi har til nå strikket fra midten på bakstykke. Betyr nå at denne beskrivelsen "26-28-28-32-34-36 masker patentmønster" gjelder fra baksiden skulder (dvs venstre skulder) eller gjelder fortsatt fra midten på bakstykke?
06.10.2020 - 12:38DROPS Design ha risposto:
Hei Marina. Du er fremdeles midt bak. Start med å strikke halve bakstykket (26-28-28-32-34-36 masker patentmønster, 1 maske RILLE), så feller du av de nesten 13 maskene (= 1.ermåpning), deretter 1 maske rille, strikk 51-55-57-63-67-73 masker patentmønster, 1 maske rille (= forstykke), så fell av de neste 13 maskene (= 2.ermåpning), 1 maske rille og strikk patentmønster over de siste 25-27-29-31-33-37 maskene (= halve bakstykke). God Fornøyelse!
12.10.2020 - 10:59
![]() Helen ha scritto:
Helen ha scritto:
Hi, I've just finished the Yoke and pattern says - Cut the strand. Now continue the armholes and back piece, working back and forth. Do I cut yarn then thread stitches back onto needle and start at the armhole or carry on from where I am?
05.10.2020 - 04:16DROPS Design ha risposto:
Dear Helen, correct, you have to slip all stitches of back piece on the left needle and now work back piece from RS as explained - you can leave the sts on front piece on needle or slip them on a thread if you rather. Happy knitting!
05.10.2020 - 11:21
![]() Marte ha scritto:
Marte ha scritto:
Jeg tror muligens jeg har forstått mønsteret, etter å ha begynt på nytt 3 ganger. For sikkerhets skyld: når jeg kommer til A2a så er økningen den nest siste masken. Altså, jeg strikker patentmønster helt til nest siste maske etterhvert som det blir flere masker?
29.09.2020 - 12:47DROPS Design ha risposto:
Hei Marte. Ja, økningen i A.2a er i den nest side masken og i den første masken i A.3a. Ta gjerne en titt på hjelpevideoen som er spesielt laget til denne vesten. Den finner du under oppskriften. "Hvordan starte å strikke vesten i DROPS 210-4" God Fornøyelse!
05.10.2020 - 10:00
![]() Marte ha scritto:
Marte ha scritto:
Når jeg skal strikke A3a, skal jeg strikke inn patentmaskene først og avslutte med økningen eller strikke slik A3a står og strikke inn patentmaskene etter økningen? Og det et slik at jeg følger mønsteret fra venstre til høyre?
28.09.2020 - 23:04
![]() Marte ha scritto:
Marte ha scritto:
Av en eller annen mystisk grunn er raglanen på den ene siden perfekt, mens på den andre siden kommer økningen inn mot midten av vesten. Jeg fatter ikke hvorfor det blir slik. Jeg har strikket slik det står i mønsteret. Er det noen som kan si hvor det gikk galt?
27.09.2020 - 09:53
![]() Grete ha scritto:
Grete ha scritto:
Når jeg skal strikke A.2a og A3a 9 ganget, står det at jeg skal fortsette økning hver 6 omg, er d kun på skuldre eller rundt hele omg 6?
24.09.2020 - 11:43DROPS Design ha risposto:
Hei Grete. A.2a og A.3a strikkes kun over skuldrene og det er der det økes. På forstykket og bakstykker strikkes A.1 / A.1a. Se gjerne videoen som er laget til denne vensten. Den finner du under oppskriften. "Hvordan starte å strikke vesten i DROPS 210-4" God Fornøyelse!
28.09.2020 - 10:33
![]() Marte ha scritto:
Marte ha scritto:
Av en eller annen mystisk grunn er raglanen på den ene siden perfekt, mens på den andre siden kommer økningen inn mot midten av vesten. Jeg fatter ikke hvorfor det blir slik.
22.09.2020 - 14:50
![]() Anne ha scritto:
Anne ha scritto:
Elsker at strikke op-fra-og-ned
18.09.2020 - 13:21
|
||||||||||||||||||||||||||||
Mountain Moraine#mountainmorainevest |
||||||||||||||||||||||||||||
 |
 |
|||||||||||||||||||||||||||
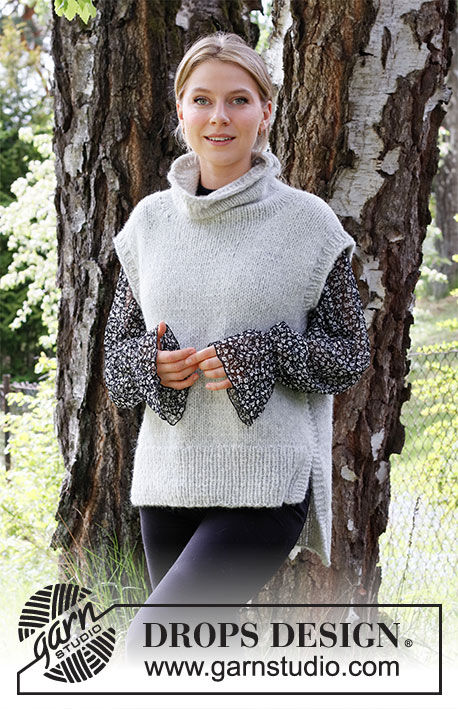
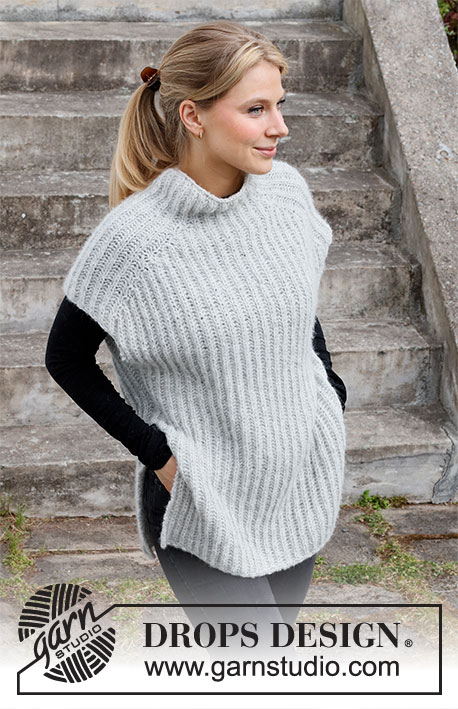
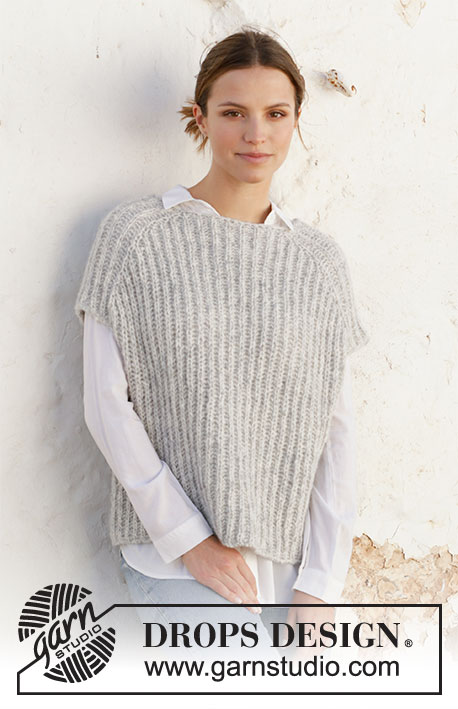
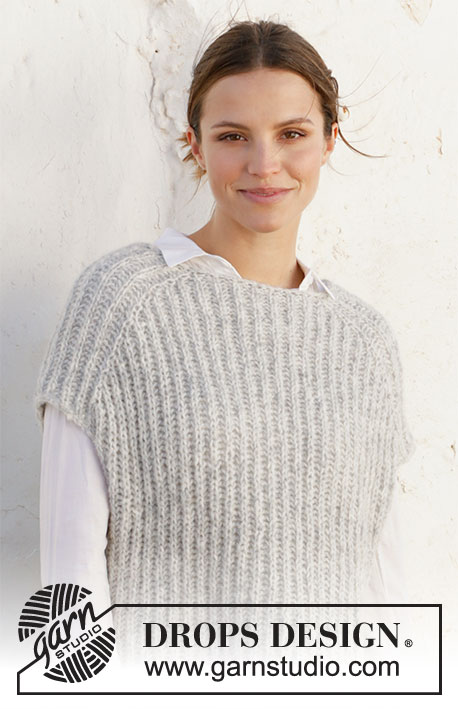
Gilet / smanicato lavorato ai ferri in DROPS Air. Lavorato dall’alto in basso a coste inglesi. Taglie: XS - XXL.
DROPS 210-4 |
||||||||||||||||||||||||||||
|
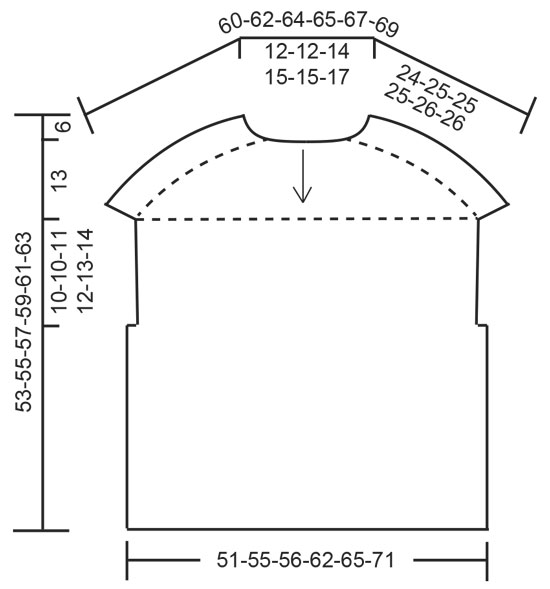
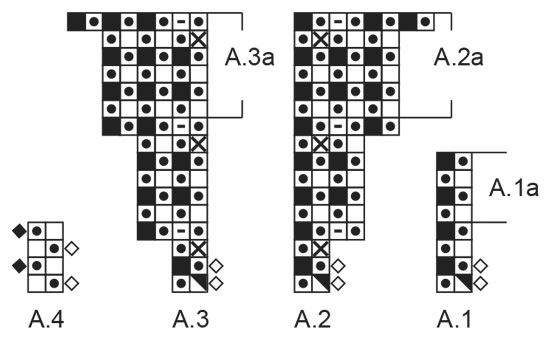
------------------------------------------------------- TECNICHE IMPIEGATE: ------------------------------------------------------- COSTA/MAGLIA LEGACCIO (avanti e indietro): Lavorare tutti i ferri a diritto. 1 costa in altezza = 2 ferri diritto. MOTIVO: Vedere i diagrammi A.1 - A.4 (lavorati a coste inglesi). SUGGERIMENTO PER LE DIMINUZIONI-1 (distribuiti in modo uniforme): Per stabilire ogni quanto diminuire in modo uniforme, prendere il n° totale di maglie sul ferro (ad esempio 62 maglie) e dividerlo per il n° di diminuzioni da fare (ad esempio 10) = 6,2. In questo esempio lavorare insieme a rovescio ogni 5° e 6° maglia circa. ------------------------------------------------------- INIZIO DEL LAVORO: ------------------------------------------------------- GILET – BREVE RIASSUNTO DEL LAVORO: Lavorare il collo e lo sprone in tondo con i ferri circolari dal centro dietro, dall’alto in basso. Aumentare le maglie per le spalle prima che venga diviso il lavoro e lavorare il davanti e il dietro in modo separato fino alla parte inferiore degli scalfi. Riunire le parti e continuare il corpo in tondo. COLLO: Avviare 62-62-66-70-70-74 maglie con i ferri circolari n° 6 mm e Air. Lavorare 1 giro rovescio, lavorare un altro giro a rovescio e diminuire 10 maglie in modo uniforme – leggere il SUGGERIMENTO PER LE DIMINUZIONI = 52-52-56-60-60-64 maglie. Lavorare 1 giro rovescio. Passare ai ferri circolari n° 7 mm. SPRONE: Lavorare il motivo come segue: A.1 (= 2 maglie) sulle prime 6-6-6-8-8-8 maglie (= metà dietro), A.2 (= 2 maglie), A.1 su 12 maglie, A.3 (= 2 maglie = spalla), A.1 su 10-10-12-14-14-16 maglie (= davanti), A.2 su 2 maglie, A.1 su 12 maglie, A.3 su 2 maglie (= spalla) e A.1 sulle ultime 4-4-6-6-6-8 maglie (= metà dietro). FARE ATTENZIONE ALLA TENSIONE DEL LAVORO! Alla fine di A.1, ripetere A.1a verso l’alto. Alla fine di A.2 e A.3, ripetere A.2a e A.3a, cioè continuare ad aumentare ogni 6 giri, lavorare gli aumenti a coste inglesi. Quando A.2a e A.3a sono stati lavorati per un totale di 8-9-9-10-11-12 volte in altezza ci sono 132-140-144-156-164-176 maglie sul ferro. Lavorare A.1a su tutte le maglie fino a quando il lavoro misura 24-25-25-25-26-26 cm nel punto più lungo (cioè misurati lungo la spalla); aggiustarlo in modo che il giro successivo sia a rovescio. Ora dividere il davanti e il dietro e intrecciare le maglie della spalla come segue: Lavorare 26-28-28-32-34-36 maglie a coste inglesi, 1 maglia a MAGLIA LEGACCIO – leggere la descrizione sopra (= metà dietro), intrecciare le 13 maglie successive (intrecciare i gettati come maglie separate), 1 maglia a maglia legaccio, lavorare 51-55-57-63-67-73 maglie a coste inglesi, 1 maglia a maglia legaccio (= davanti), intrecciare le 13 maglie successive (intrecciare i gettati come maglie separate), lavorare 1 maglia a maglia legaccio e a coste inglesi sulle ultime 25-27-29-31-33-37 maglie. Tagliare il filo. Ora continuare gli scalfi e il dietro, in piano. Lasciare che le altre maglie rimangano sui ferri. DIETRO: = 53-57-59-65-69-75 maglie. Lavorare come segue dal diritto del lavoro: 1 maglia a maglia legaccio, A.4 (= 2 maglie) fino a quando rimane 1 maglia (cioè il motivo a coste inglesi inizia e finisce con 1 maglia rovescio a coste inglesi) e finire con 1 maglia a maglia legaccio. Continuare questo motivo avanti e indietro per 10-10-11-12-13-14 cm, misurati lungo la maglia legaccio; fare in modo che l’ultimo ferro sia dal rovescio del lavoro. Lasciare le maglie sul ferro e lavorare il davanti. DAVANTI: Lavorare le 53-57-59-65-69-75 maglie del davanti nello stesso modo del dietro. CORPO: Lavorare A.1a sul davanti (cioè le maglie legaccio a ogni lato diventano maglie lavorate a coste inglesi), avviare 3 maglie, lavorare A.1a sul dietro e avviare 3 maglie alla fine del ferro = 112-120-124-136-144-156 maglie. Ora lavorare A.1a in tondo su tutte le maglie. Sul 1° ferro lavorare le 3 maglie avviate sotto ogni manica senza gettati. Quando il lavoro misura 47-49-51-53-55-57 cm (misurati dal collo) intrecciare a diritto; intrecciare i gettati come maglie separate (per evitare che il bordo di chiusura risulti tirato). |
||||||||||||||||||||||||||||
Spiegazioni del diagramma |
||||||||||||||||||||||||||||
|
||||||||||||||||||||||||||||
 |
||||||||||||||||||||||||||||
 |
||||||||||||||||||||||||||||
Avete terminato questo modello?Allora taggate le vostre foto con #dropspattern #mountainmorainevest o inviatele alla #dropsfan gallery. Avete bisogno di aiuto con questo modello?Troverete 19 video tutorial, una sezione per i commenti/domande e molto altro guardando il modello su www.garnstudio.com © 1982-2026 DROPS Design A/S. Ci riserviamo tutti i diritti. Questo documento, compreso tutte le sue sotto-sezioni, è protetto dalle leggi sul copyright. Potete leggere quello che potete fare con i nostri modelli alla fine di ogni modello sul nostro sito. |
||||||||||||||||||||||||||||


Con oltre 40 anni di esperienza nel design di modelli di maglia e uncinetto, DROPS Design offre la più estesa collezione di modelli gratuiti su internet - tradotti in 17 lingue. Ad oggi vi possiamo fornire 325 cataloghi e 12298 modelli - 9569 dei quali sono tradotti in Italiano.
Ci stiamo impegnando molto per darvi il meglio che vi possiamo offrire in termini di maglia e uncinetto, ispirazioni e consigli così come filati di grande qualità ad un prezzo incredibile! Volete utilizzare i nostri modelli per qualcosa d'altro oltre al vostro uso personale? Potete leggere tutto ciò che è consentito nel testo sul Copyright in basso su tutte le pagine dei nostri modelli. Buon lavoro!
Lasciare un commento sul modello DROPS 210-4
Noi saremmo felici di ricevere i tuoi commenti e opinioni su questo modello!
Se vuoi fare una domanda, fai per favore attenzione a selezionare la categoria corretta nella casella qui sotto per velocizzare il processo di risposta. I campi richiesti sono indicati da *.