
Categorie popolari
State cercando un filato?


Commenti / Domande (16)
![]() Sharon ha scritto:
Sharon ha scritto:
Hi! Good morning. I have the sleeves of this sweater so am almost done. Polaris is a thick yarn which make this sweater very heavy. It will be however very warm. Can I wash this on the wool program. It is impossible to wash this by hand per ball band instruction. Just knitting the sleeves make my shoulder hurts. Love this sweater though and do not want to damage it, but I must wash it som how. Thanks for all your help and responses to my many questions. Sharon
29.08.2023 - 09:21DROPS Design ha risposto:
Hi Sharon, The recommendation for this yarn is hand-washing at max 30 degrees. You could try a cool machine wash, if hand washing is difficult. Always dry the garment flat and shape it while it is still wet. Good luck!
30.08.2023 - 06:52
![]() Sharon Hunt ha scritto:
Sharon Hunt ha scritto:
Hi Working on the sleeves. Just checking to make sure that the increases on the sleeves are done every 4th row. Is my calculation correct? Thanks for your help. S
11.08.2023 - 18:45DROPS Design ha risposto:
Dear Mrs Hunt, when working sleeves you will only decrease - read decrease tip - alternately at the beg and at the end of the row on every other row: first decrease at the end of the row, then on next row from RS decrease at the beg of the row and repeat these 2 decreases as many time as required in your size, so that the decrease will be worked on every 4th row at the beg/end of the row. Happy knitting!
14.08.2023 - 08:31
![]() Sharon Hunt ha scritto:
Sharon Hunt ha scritto:
Hi and good day. Thanks 🙏 for answering my previous question. I tried on my sweater and must admit that I like my sweaters longer. Is this doable without it affecting the overall sweater? How many more balls should I purchase. Thank you for your response . Sharon.
17.07.2023 - 18:38DROPS Design ha risposto:
Hi Sharon, of course you can do it. Do not forget to increase 1 stitch after each marker thread every few centimetres. You will need at least 2 more balls of yarn but it depends on the total lenght of your sweater. Happy knitting!
17.07.2023 - 22:07
![]() Sharon Hunt ha scritto:
Sharon Hunt ha scritto:
Hi! Can I work the sleeves in the round? Can I work k2 tog on the right side and ssk on the left side. I hate sewing . Sharon
16.07.2023 - 08:20DROPS Design ha risposto:
Dear Sharon, yes, you could work them in the round. And yes, you could for ssk on the left side, just make sure that no holes are left in the sleeves. Happy knitting!
17.07.2023 - 11:55
![]() Sharon Hunt-Edwards ha scritto:
Sharon Hunt-Edwards ha scritto:
Hi Started the Cedar sweater and I have completed the first round of the chart A1 and A2 for Size XXL. I have 2 stitches left at the end of round one. Have I done something wrong her as I expected that there would be 4 stitches to complete the round. Please explain this and let me know what I should do to correct this. Thank you.
07.07.2023 - 20:00DROPS Design ha risposto:
Dear Sharon, you have 42 initial stitches. Work A.1 and A.2 10 times (= 40 stitches) and A.1 once more (= 2 stitches). You will have 42 stitches and 10 increases. Happy knitting!
10.07.2023 - 16:32
![]() Sharon Hunt ha scritto:
Sharon Hunt ha scritto:
Hi! Got cold feet after my question about this sweater. I have the yarn so I have no choice. I was looking at the schematics and it seem if I make the size 52 I would get a finished size 60. Not what I want, however if I choose size 47 I would have a finished size of 51. Close enough? Am not sure about this and need some help not to redesign the sweater, but to avoid making a sweater that is way too big. Thanks for your help.
09.03.2023 - 18:51DROPS Design ha risposto:
Dear Mrs Hunt, make first sure you have the correct tension so that you will have the finished measurements as in the chart, then take a similar garment you have and like the size and compare them to the ones in the chart, if you are between 2 sizes, choose the smaller one for a tighter fit and the larger one for a looser fit. read more here. Happy knitting!
10.03.2023 - 09:26
![]() Gabi ha scritto:
Gabi ha scritto:
Hallo, die Polaris wird als Filzwolle bezeichnet. Wie kann ich den Pullover waschen?
13.09.2022 - 18:52DROPS Design ha risposto:
Liebe Gabi, DROPS Polaris waschen Sie wie an der Banderolle bzw Farbekarte erklärt; mehr über Pflegehinweise lesen Sie hier. Viel Spaß beim stricken!
14.09.2022 - 09:01
![]() Sharon Hunt ha scritto:
Sharon Hunt ha scritto:
Hi! Am preparing to make this sweater and I have a question. I am making size (xxl) which gives a finished size 52. My question so far relates to the diagram. Reading from left to write I would start A2 then A1, or should I start reading right to left in that case I would Start with A1 as stated in the pattern. What does the number 6 at the top indicates? Thanks for your response. Sharon
02.08.2022 - 12:09DROPS Design ha risposto:
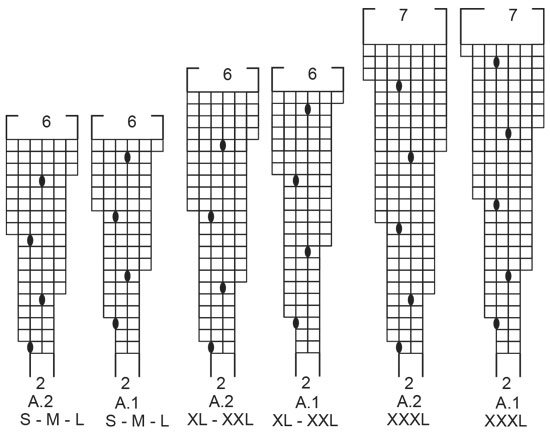
Dear Mrs Hunt, the jumper is worked top down and the diagrams are read bottom up; this means you will read every round from the right towards the left and repeat (A.1, A.2) all the round. Each diagram (A.1 and A.2) starts with 2 sts and finish with 6 sts (you increase 4 sts in each diagram). Can this help? Happy knitting!
02.08.2022 - 13:06
![]() Sharon ha scritto:
Sharon ha scritto:
Would i cast on 136 sts to make a size 52? I hsve never made a sweater top down so there will be a few questions.
20.01.2022 - 12:04DROPS Design ha risposto:
Dear Sharon, in size S you will cast on 34 sts for neck edge; look at this lesson, it shows how to work a jumper top down (this one is worked with a circular yoke but the lesson may help you to understand how to work here from top down) and maybe also this lesson for the diagrams. Happy knitting!
20.01.2022 - 17:00
![]() Bianca ha scritto:
Bianca ha scritto:
P.S. I found your tutorial on how to read knitting diagrams but I could not find a video tutorial. If you have one, I'd appreciate you post the link.
01.12.2019 - 08:00
|
|||||||
Cedar Wood#cedarwoodsweater |
|||||||
 |
 |
||||||
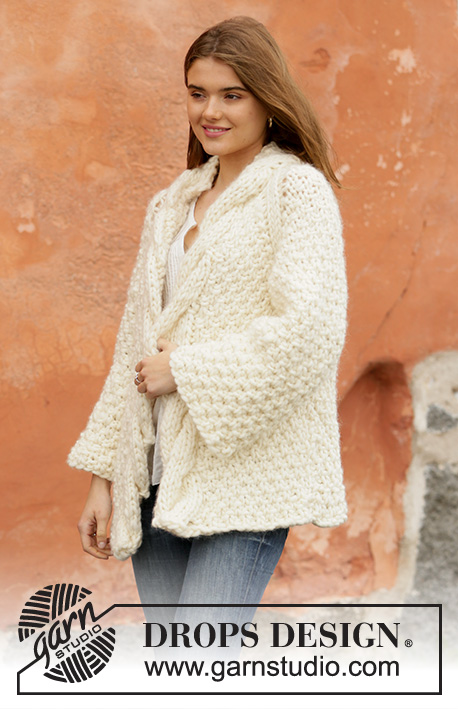
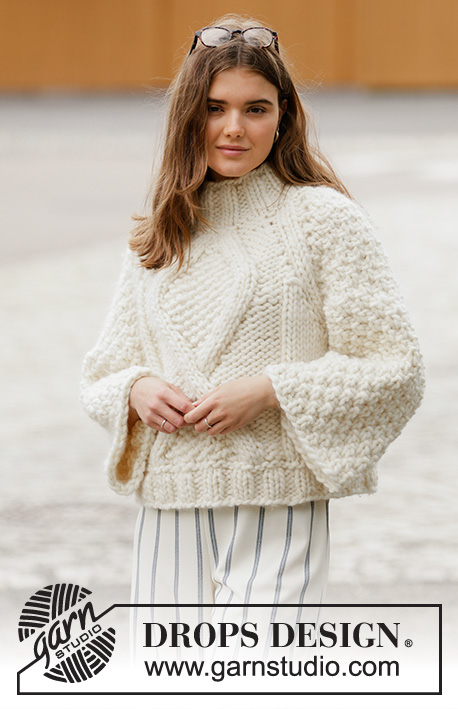
Maglione lavorato ai ferri con sprone rotondo in DROPS Polaris. Lavorato dall’alto in basso. Taglie: S - XXXL.
DROPS 206-39 |
|||||||
|
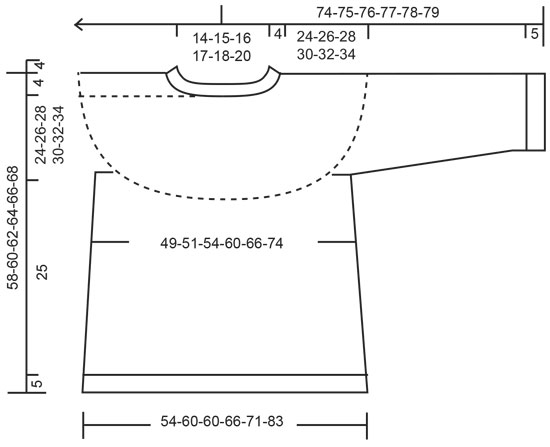
------------------------------------------------------- TECNICHE IMPIEGATE: ------------------------------------------------------- MOTIVO: Vedere i diagrammi A.1 e A.2. Scegliere il diagramma per la vostra taglia. SUGGERIMENTO: NOTA: Nella nostra selezione, non abbiamo ferri circolari 15 mm più corti di 60 cm. La circonferenza del lavoro è minore di 60 cm. Potete avviare le maglie con i ferri a doppia punta o lavorare il MAGIC LOOP con i ferri circolari – leggere la descrizione sotto, fino a quando ci sono abbastanza maglie per usare i ferri circolari. MAGIC LOOP: Se state lavorando in tondo con un ferro circolare che è troppo lungo per la circonferenza del lavoro, lavorare come segue (i ferri circolari devono avere un cavo flessibile): far scorrere le maglie al centro del cavo, dividerli al centro e far scorrere il cavo tra le maglie. Far scorrere le maglie ad ogni estremità, assicurandosi che il cavo non si arrotoli. Il filo di lavoro è sul ferro dietro e si inizia a lavorare sul ferro davanti. Sfilare il ferro posteriore per lavorare le maglie sul ferro davanti. Dopo aver lavorato le maglie sul ferro davanti, girare e far scorrere le maglie sul ferro vuoto; lavorare l’altro lato nello stesso modo. Continuare in tondo in questo modo; fare in modo di sfilare il ferro sul lato con il filo. SUGGERIMENTO PER GLI AUMENTI (per il corpo): Aumentare 1 maglia facendo 1 gettato. Sul giro successivo lavorare il gettato a diritto ritorto per evitare un buco. SUGGERIMENTO PER LE DIMINUZIONI (per le maniche): NOTA: Per fare in modo che le diminuzioni siano alternate sul lato destro e sinistro, lavorare come segue: Diminuire in modo alternato all’inizio e alla fine del ferro di diminuzioni. Diminuire dal diritto del lavoro: lavorare 2 maglie insieme a diritto. Diminuire dal rovescio del lavoro: lavorare 2 maglie rovescio. ------------------------------------------------------- INIZIO DEL LAVORO: ------------------------------------------------------- MAGLIONE – BREVE RIASSUNTO DEL LAVORO: Lavorato in tondo con i ferri a doppia punta/ferri circolari, dall’alto in basso. Lavorare le maniche avanti e indietro con i ferri circolari. COLLO: Avviare 34-36-38-40-42-44 maglie con i ferri a doppia punta/ferri circolari corti n° 12 mm – leggere il SUGGERIMENTO - e Polaris. Lavorare 1 giro diritto. Poi lavorare a coste (= 1 maglia diritto/ 1 maglia rovescio) per 4 cm. Passare ai ferri circolari n° 15 mm. Inserire 1 segnapunti qui. ORA MISURARE IL LAVORO DA QUI! SPRONE: Lavorare il motivo per le diverse taglie come segue: Taglie S, L e XXL: Lavorare * A.1, A.2 *, lavorare *-* per un totale di 8-9-10 volte, lavorare A.1. FARE ATTENZIONE ALLA TENSIONE DEL LAVORO! Taglie M, XL e XXXL: Lavorare * A.1, A.2 *, lavorare *-* per un totale di 9-10-11 volte fino alla fine del giro. FARE ATTENZIONE ALLA TENSIONE DEL LAVORO! TUTTE LE TAGLIE: Alla fine di A.1 e A.2 ci sono 102-108-114-120-126-154 maglie sul ferro. Lavorare 1 giro diritto in cui aumentare 0-4-2-8-10-2 maglie in modo uniforme = 102-112-116-128-136-156 maglie. Continuare a maglia rasata fino a quando il lavoro misura 24-26-28-30-32-34 cm dal segnapunti. Lavorare il giro successivo come segue: Lavorare le prime 15-16-17-19-20-23 maglie (= metà dietro), mettere le 21-24-24-26-28-32 maglie successive in sospeso per la manica e avviare 4-4-4-4-6-6 nuove maglie sul ferro (= a lato sotto la manica), lavorare le 30-32-34-38-40-46 maglie successive (= davanti), mettere le 21-24-24-26-28-32 maglie successive in sospeso per la manica e avviare 4-4-4-4-6-6 nuove maglie sul ferro (= a lato sotto la manica), lavorare le 15-16-17-19-20-23 maglie successive (= metà dietro). Lavorare il corpo e le maniche in modo separato. ORA MISURARE IL LAVORO DA QUI. CORPO: = 68-72-76-84-92-104 maglie. Inserire 1 segnapunti a ogni lato, al centro delle 4-4-4-4-6-6 nuove maglie avviate sotto ogni manica. Lasciare che i segnapunti seguano il lavoro verso l’alto; verranno usati durante gli aumenti laterali. Continuare in tondo a maglia rasata. Quando il lavoro misura 5 cm dalla divisione aumentare 1 maglia prima di entrambi i segnapunti – leggere il SUGGERIMENTO PER GLI AUMENTI (= 2 aumenti). Poi aumentare come segue: Quando il lavoro misura 8 cm aumentare 1 maglia dopo ogni segnapunti. Quando il lavoro misura 11 cm aumentare 1 maglia prima di ogni segnapunti. Quando il lavoro misura 14 cm aumentare 1 maglia dopo ogni segnapunti. Per le taglie M e XXXL continuare ad aumentare come segue: Quando il lavoro misura 17 cm aumentare 1 maglia prima di ogni segnapunti. Quando il lavoro misura 20 cm aumentare 1 maglia dopo ogni segnapunti. TUTTE LE TAGLIE: Alla fine di tutti gli aumenti ci sono 76-84-84-92-100-116 maglie sul ferro. Continuare in tondo a maglia rasata fino a quando il lavoro misura 25 cm dalla divisione. Poi lavorare a coste (= 1 maglia diritto / 1 maglia rovescio) per 5 cm. Intrecciare senza stringere con diritto su diritto e rovescio su rovescio. Il maglione misura circa 58-60-62-64-66-68 cm dalla spalla in giù. MANICA: Lavorare le maniche avanti e indietro con i ferri circolari e cucire alla fine. Riportare le 21-24-24-26-28-32 maglie in sospeso a un lato del lavoro sui ferri circolari n° 15 mm e avviare 2-2-2-2-3-3 nuove maglie a ogni lato = 25-28-28-30-34-38 maglie. Lavorare a maglia rasata avanti e indietro, allo stesso tempo sul ferro successivo dal diritto del lavoro diminuire 1-0-0-0-0-0 maglia (diminuire solo per la taglia S) lavorando insieme a diritto le 2 maglie più esterne = 24-28-28-30-34-38 maglie. Quando il lavoro misura 4-4-2-4-4-2 cm diminuire 1 maglia sul lato destro del lavoro – leggere il SUGGERIMENTO PER LE DIMINUZIONI. Diminuire in modo alternato sul lato destro e sinistro del lavoro ogni 2-2-2-1-1-1 ferri per un totale di 8-12-12-14-14-18 volte (= 4-6-6-7-7-9 volte a ogni lato) = 16-16-16-16-20-20 maglie. Continuare a lavorare fino a quando il lavoro misura circa 34-33-32-30-28-26 cm dalla divisione (NOTA: Misure più piccole per le taglie più grandi a causa della maggiore ampiezza delle spalle). Passare ai ferri circolari n° 12 mm e lavorare a coste (= 1 maglia diritto / 1 maglia rovescio) per 5 cm. Intrecciare senza stringere con diritto su diritto e rovescio su rovescio. Lavorare l’altra manica nello stesso modo. CONFEZIONE: Cucire le maniche nel filo più esterno della maglia più esterna in modo che la cucitura sia piatta. Cucire le aperture sotto le maniche. |
|||||||
Spiegazioni del diagramma |
|||||||
|
|||||||
 |
|||||||
 |
|||||||
Avete terminato questo modello?Allora taggate le vostre foto con #dropspattern #cedarwoodsweater o inviatele alla #dropsfan gallery. Avete bisogno di aiuto con questo modello?Troverete 26 video tutorial, una sezione per i commenti/domande e molto altro guardando il modello su www.garnstudio.com © 1982-2026 DROPS Design A/S. Ci riserviamo tutti i diritti. Questo documento, compreso tutte le sue sotto-sezioni, è protetto dalle leggi sul copyright. Potete leggere quello che potete fare con i nostri modelli alla fine di ogni modello sul nostro sito. |
|||||||


Con oltre 40 anni di esperienza nel design di modelli di maglia e uncinetto, DROPS Design offre la più estesa collezione di modelli gratuiti su internet - tradotti in 17 lingue. Ad oggi vi possiamo fornire 324 cataloghi e 12290 modelli - 9561 dei quali sono tradotti in Italiano.
Ci stiamo impegnando molto per darvi il meglio che vi possiamo offrire in termini di maglia e uncinetto, ispirazioni e consigli così come filati di grande qualità ad un prezzo incredibile! Volete utilizzare i nostri modelli per qualcosa d'altro oltre al vostro uso personale? Potete leggere tutto ciò che è consentito nel testo sul Copyright in basso su tutte le pagine dei nostri modelli. Buon lavoro!
Lasciare un commento sul modello DROPS 206-39
Noi saremmo felici di ricevere i tuoi commenti e opinioni su questo modello!
Se vuoi fare una domanda, fai per favore attenzione a selezionare la categoria corretta nella casella qui sotto per velocizzare il processo di risposta. I campi richiesti sono indicati da *.