
Categorie popolari
State cercando un filato?


Commenti / Domande (37)
![]() Ana Ramirez ha scritto:
Ana Ramirez ha scritto:
Jeg strikker største størrelse. Etter jeg strikker de tre fargene blir det 41. Det betyr at jeg starter ikke med den lyserosa til vrangbord. Har jeg gjørt feil?
11.05.2025 - 15:26DROPS Design ha risposto:
Hei Ana, Du har strikket stripene riktig. Da fortsetter du med glattstrikk og lys rosa til bolen måler 25 cm fra delingen, og deretter begynner vrangbord. Et annet alternativ er at du fortsetter med sjøgrønn til bolen måler 25 cm og bare har vrangbord i lys rosa. God fornøyelse!
12.05.2025 - 06:04
![]() Ana Cecilia ha scritto:
Ana Cecilia ha scritto:
Estoy trabajando el cuerpo. Talla 9/10. Pregunta es que se teje hasta 25 cm. Las ratas amarillas y azules suman 26 menos los cms antes de la divisjon. El rosa claro es solo para el resorte?
09.05.2025 - 14:22DROPS Design ha risposto:
Hola Ana, tienes 18 cm en el canesú (más los 3 pliegues iniciales, que también se trabajan con las rayas). Por lo que deberías haber trabajado rosa entero en el canesú y aprox. 3cm de amarillo. Después trabajas los aprox. 10cm restantes de amarillo en el cuerpo y 13 cm de azul (eso serían 23 cm desde la división). Así que deberías haber empezado el rosa claro antes de empezar con el resorte.
11.05.2025 - 00:07
![]() Ana Ramirez ha scritto:
Ana Ramirez ha scritto:
Jeg strikker st. 9/10. jeg er på bolen. Men får ikke til å stemme at det Blir 25 cm fra deling av arbeid, det er 13 cm på stripene gul og blå. Betyr at jeg starter med rosa?. Er vrangbord strikket i lyserosa?
09.05.2025 - 13:04DROPS Design ha risposto:
Hei Ana. Jakken strikkes ovenfra og ned og du starter med fargen 20 rose og strikker nesten hele bærestykket med den fargen, ca 13 cm + 3 riller. Så strikkes det ca 13 cm med gul, deretter ca 13 cm med sjøgrønn og avslutt med en vrangbord på ca 2 cm. mvh DROPS Design
12.05.2025 - 14:18
![]() Hej Se Nedenstående Kommentar ha scritto:
Hej Se Nedenstående Kommentar ha scritto:
Jeg har købt Drops Air garn hos jer og har strikket en trøje til mit barnebarn pige 9 år. Jeg har meget garn i overskud, har I en opskrift på en hue og luffer (vanter) i dette garn , pinde 5?. Med venlig hilsen Rise Skovsgaard 20627499
14.02.2025 - 18:05
![]() Marjolein Roosen ha scritto:
Marjolein Roosen ha scritto:
My next step is dividing the work. Now i have to make 32 stitches (left front piece), and then put the next 47 stitches on a thread. So do the first 32 stitches stay on the needle? And do i stitch the next 47 stitches (sleeve) before i put them on a thread? How and where should i start these six new stitches? And where will i leave them afterwards?
09.09.2024 - 13:08DROPS Design ha risposto:
Dear Mrs Roosen, yes work the first 32 sts and keep them on needle, slip the next 47 sts on a thread and cast on 6 sts, then work the 55 sts for back piece, slip the next 47 sts on a thread for 2nd sleeve and cast on 6 sts then work the last 32 sts on needle for front piece. Find also these steps in this lesson, from picture 9) - applies to a jumper but the technique will be the same for a jacket. Happy knitting!
10.09.2024 - 08:50
![]() Martina ha scritto:
Martina ha scritto:
Hallo, ich habe eine Frage zum Anschlag der Passe: Zu Beginn sollen 61 Maschen angeschlagen werden. Im Originalgarn mit einer Maschenprobe von 17M pro 10cm entspricht dies einer Breite von ca. 36 cm (35,88 cm). Im Schaubild sind aber für die Hälfte 15 cm angegeben - wird der Anschlag mit 61 M dann nicht zu weit? Oder ist hier die Mehrweite für die Knopfleiste berücksichtigt, die (weil überlappend) im Schaubild nicht sichtbar ist? Danke vorab!
19.07.2024 - 14:48DROPS Design ha risposto:
Liebe Martina, ja, zum einen überlappt die Knopfleiste, zum anderen wird der Beginn der Passe mit der dünneren Nadel gestrickt, dadurch wird der Halsausschnitt auch noch ein wenig enger im Vergleich zu dem, was Sie mit der genannten Maschenprobe errechnet haben. Erst nach 3 Krausrippen wird dann ja zur dickeren Nadel gewechselt. Viel Spaß beim Stricken!
23.07.2024 - 01:01
![]() Marjolein Roosen ha scritto:
Marjolein Roosen ha scritto:
Hello, I would love to create this for my daughter. A visual aide helps me often to better understand the pattern. Sometimes you have video lessons of a whole sweater, socks or cardigans. Is there a video lesson of a similar vest?
08.07.2024 - 11:51DROPS Design ha risposto:
Hi Marjolein, there is not a video for this whole pattern. In each pattern you will find the list of video and lessons to help you. If you have any questions when making the cardigan, please feel free to leave a question in the comment section at the bottom of the page, we will answer you as soon as possible. Happy knitting!
13.07.2024 - 14:28
![]() Marie-Claude FARGEON ha scritto:
Marie-Claude FARGEON ha scritto:
Bonjour, Je ne comprends pas bien ce qu'il faut faire au moment où l'on divise l'empiècement entre devant, dos et manches. Les 6 nouvelles mailles montées avant ou après les manches ( leur emplacement ne me semble par ailleurs pas symétrique par rapport au dos dans vos explications... ) se tricotent ensuite avec quelle partie? Merci pour les précisions que vous pourrez m'apporter! Marie-Claude
13.02.2024 - 20:42DROPS Design ha risposto:
Bonjour Mme Fargeon, si votre nombre de mailles est juste à la fin de l'empiècement, les 6 mailles doivent être symétriques, sous chaque manche. Retrouvez dans cette leçon comment on procède à partir de la division: à partir de la photo 9). Bon tricot!
14.02.2024 - 08:07
![]() Patty Walk ha scritto:
Patty Walk ha scritto:
On the yoke section of this sweater, in size 9-10 the directions say to increase to 241 stitches using raglan increase. Then it says to continue working until the piece measures 7 inches from the marker. What marker? And where do you measure the 7 inches from? Thank you for your time.
23.01.2024 - 08:32DROPS Design ha risposto:
Hi Patty, You should have inserted a marker after the 3 ridges at the top of the yoke (as you change to needle size 5 mm). This is where you measure from and it should be 7 cm not 7 inches. You then increase again and work until the piece measures (11)-11-12-12-13-13 cm, before inserting 4 new markers. Hope this helps and happy knitting!
24.01.2024 - 07:03
![]() Cathie Calagna ha scritto:
Cathie Calagna ha scritto:
Greetings! Could you tell me how wide the pink stripe above the sleeve ribbing should be for size 9/10? Thank you!
21.01.2024 - 07:25DROPS Design ha risposto:
Dear Mrs Calagna, you should have approx. 25 cm light pink over rib (neck edge 2 cm + yoke 13 cm pink + 5 cm yellow on yoke then 8 cm yellow on sleeve (13 cm yellow in total) + 13 cm green + 25 cm light pink = 31 cm before ribbing). Happy knitting!
22.01.2024 - 09:17
|
|
Candy Bar Jacket#candybarjacket |
|
 |
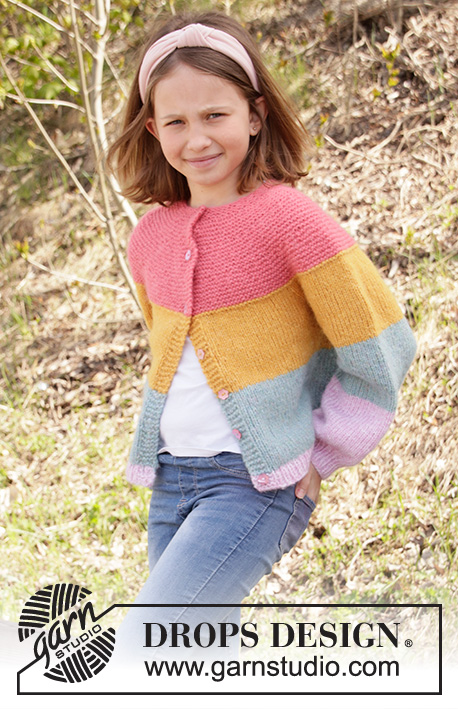 |
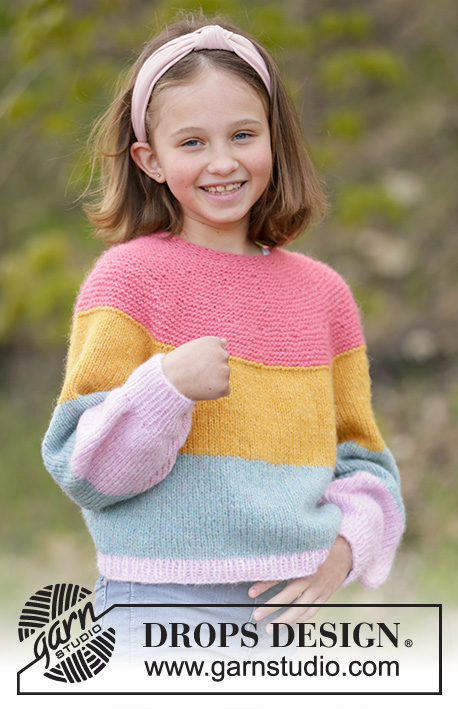
Cardigan lavorato ai ferri per bambini con strisce in DROPS Air, Nepal o Paris. Lavorato dall’alto in basso con sprone rotondo e raglan. Taglie: 1-10 anni.
DROPS Children 34-24 |
|
|
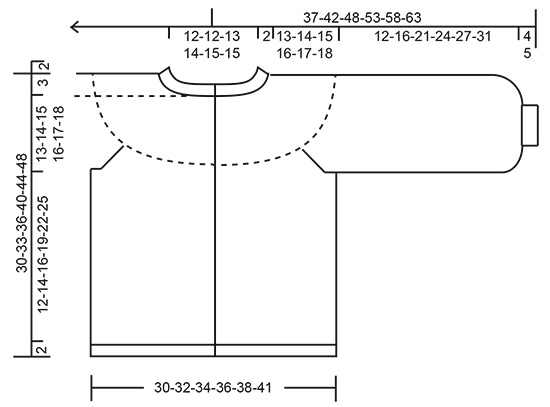
------------------------------------------------------- PRIMA DI INIZIARE: ------------------------------------------------------- STRISCE: Lavorare le strisce su tutto il capo come segue: Lavorare (10½) 11-12-13-14-15 cm con il rosa, (8½) 9-10-11-12-13 cm con il giallo e (8½) 9-10-11-12-13 cm con il verde mare. Poi finire il capo con il rosa chiaro. COSTA/MAGLIA LEGACCIO (lavorata avanti e indietro): 1 costa in altezza = 2 ferri diritto. ASOLE: Lavorare le asole sul bordo destro (con il capo indossato). Lavorare dal diritto del lavoro quando rimangono 3 maglie sul ferro come segue: fare 1 gettato, 2 maglie insieme a diritto e lavorare l’ultima maglia a diritto. Sul ferro successivo lavorare il gettato a diritto per creare un buco. Lavorare la 1° asola quando il lavoro misura circa 1 cm. Poi lavorare le (5) 5-5-6-6-6 asole successive a distanza di circa (5) 5½-6-6½-7 cm. SUGGERIMENTO PER GLI AUMENTI (distribuiti in modo uniforme): Per stabilire ogni quanto aumentare in modo uniforme, prendere il n° totale di maglie sul ferro (ad esempio 47 maglie) e dividerlo per il n° di aumenti da fare (ad esempio 40) = 1,1. In questo esempio, aumentare facendo 1 gettato dopo ogni maglia. Non aumentare sui bordi. Sul ferro successivo lavorare i gettati a ritorto per evitare buchi. RAGLAN: Aumentare per il raglan in ogni punto di passaggio tra il corpo e le maniche. Lavorare tutti gli aumenti dal diritto del lavoro! Iniziare 1 maglia prima del segnapunti, 1 gettato, 2 maglie diritto (= il segnapunti è tra queste 2 maglie) e fare 1 gettato. Sul ferro successivo lavorare il gettato a rovescio ritorto per evitare buchi. ------------------------------------------------------- INIZIO DEL LAVORO: ------------------------------------------------------- CARDIGAN – BREVE RIASSUNTO DEL LAVORO: Lavorare lo sprone avanti e indietro con i ferri circolari, dall’alto in basso. Dividere lo sprone per il corpo e le maniche e continuare il corpo avanti e indietro sui ferri circolari. Lavorare le maniche in tondo con i ferri a doppia punta. SPRONE: Avviare (47) 53-55-57-61-61 maglie con i ferri circolari n° 4 mm e Air – lavorare tutto il capo a STRISCE – leggere la descrizione sopra. Lavorare 3 coste; lavorare la prima asola dopo circa 1 cm – leggere la descrizione sopra. Passare ai ferri circolari n° 5 mm e inserire 1 segnapunti; ORA MISURARE IL LAVORO DA QUI. Sul ferro successivo aumentare (40) 42-42-44-48-50 maglie in modo uniforme – leggere il SUGGERIMENTO PER GLI AUMENTI nelle spiegazioni sopra = (87) 95-97-101-109-111 maglie. Lavorare a maglia legaccio fino a quando il lavoro misura (3) 3-3-3-3-3 cm. FARE ATTENZIONE ALLA TENSIONE DEL LAVORO! Sul ferro successivo aumentare (36) 38-38-40-46-48 maglie in modo uniforme = (123) 133-135-141-155-159 maglie. Lavorare a maglia legaccio fino a quando il lavoro misura (7) 7-7-7-7-7 cm. Sul ferro successivo aumentare 30-32-38-40-42-42 maglie in modo uniforme = (153) 165-173-181-197-201 maglie. Lavorare a maglia legaccio fino a quando il lavoro misura (11) 11-12-12-13-13 cm. Ora inserire 4 segnapunti nel lavoro senza lavorare le maglie come segue: Inserire 1 segnapunti dopo (25) 26-27-28-30-31 maglie (= davanti), il segnapunti successivo dopo (31) 35-37-39-43-43 maglie (= manica), il segnapunti successivo dopo (41) 43-45-47-51-53 maglie (= dietro) e il segnapunti finale dopo (31) 35-37-39-43-43 maglie (= manica). Rimangono 25-26-27-28-30-31 maglie dopo l’ultimo segnapunti (= davanti). Continuare a maglia rasata (continuare a maglia legaccio sulle 5 maglie più esterne a ogni lato fino alla fine del lavoro) e sul 1° ferro dal diritto del lavoro aumentare per il RAGLAN – leggere la descrizione sopra (8 aumenti sul ferro). Aumentare su ogni ferro dal diritto del lavoro per un totale di (2) 3-3-4-4-5 volte = (169) 189-197-2132-229-241 maglie. Continuare a lavorare fino a quando il lavoro misura (13) 14-15-16-17-18 cm dal segnapunti. Ora dividere lo sprone per il corpo e le maniche come segue: lavorare (27) 29-30-32-34-36 maglie (= davanti sinistro), mettere in sospeso le (35) 41-43-47-51-53 maglie successive per la manica, avviare 6 nuove maglie sul ferro (= a lato sotto la manica), lavorare (45) 49-51-55-59-63 maglie (= dietro), mettere in sospeso le (35) 41-43-47-51-53 maglie successive per la manica, avviare 6 nuove maglie sul ferro (= a lato sotto la manica) e lavorare le (27) 29-30-32-34-36 maglie successive (davanti destro). Finire il corpo e le maniche modo separato. ORA MISURARE IL LAVORO DA QUI! CORPO: = (111) 119-123-131-139-147 maglie. Continuare a maglia rasata (i bordi a maglia legaccio) e strisce come prima fino a quando il lavoro misura (12) 14-16-19-22-25 cm dalla divisione (o fino alla lunghezza desiderata; mancano circa 2 cm alla fine del lavoro). Passare ai ferri circolari n° 4 mm. Lavorare i bordi a maglia legaccio e il resto delle maglie a coste (1 maglia diritto/ 1 maglia rovescio) per 2 cm. Intrecciare senza stringere con diritto su diritto e rovescio su rovescio. Il cardigan misura circa (30) 33-36-40-44-48 cm dalla spalla in giù. MANICA: Riportare le (35) 41-43-47-51-53 maglie in sospeso a un lato del lavoro sui ferri a doppia punta n° 5 mm e riprendere 1 maglia in ognuna delle 6 maglie avviate sotto la manica = (41) 47-49-53-57-59 maglie. Inserire un segnapunti al centro delle 6 maglie sotto la manica; inizio del giro. Lavorare in tondo a maglia rasata e strisce fino a quando il lavoro misura (12) 16-21-24-27-31 cm (o fino alla lunghezza desiderata; mancano circa (4) 4-4-4-5-5 cm alla fine del lavoro). Sul giro successivo diminuire (13) 17-17-21-23-25 maglie in modo uniforme = (28) 30-32-32-34-34 maglie. Passare ai ferri a doppia punta n° 4 mm e lavorare a coste (1 maglia diritto/ 1 maglia rovescio) in tondo per circa (4) 4-4-4-5-5 cm. Intrecciare senza stringere con diritto su diritto e rovescio su rovescio. Lavorare l’altra manica nello stesso modo. CONFEZIONE: Attaccare i bottoni al bordo sinistro. |
|
 |
|
Avete terminato questo modello?Allora taggate le vostre foto con #dropspattern #candybarjacket o inviatele alla #dropsfan gallery. Avete bisogno di aiuto con questo modello?Troverete 29 video tutorial, una sezione per i commenti/domande e molto altro guardando il modello su www.garnstudio.com © 1982-2026 DROPS Design A/S. Ci riserviamo tutti i diritti. Questo documento, compreso tutte le sue sotto-sezioni, è protetto dalle leggi sul copyright. Potete leggere quello che potete fare con i nostri modelli alla fine di ogni modello sul nostro sito. |
|


Con oltre 40 anni di esperienza nel design di modelli di maglia e uncinetto, DROPS Design offre la più estesa collezione di modelli gratuiti su internet - tradotti in 17 lingue. Ad oggi vi possiamo fornire 324 cataloghi e 12290 modelli - 9561 dei quali sono tradotti in Italiano.
Ci stiamo impegnando molto per darvi il meglio che vi possiamo offrire in termini di maglia e uncinetto, ispirazioni e consigli così come filati di grande qualità ad un prezzo incredibile! Volete utilizzare i nostri modelli per qualcosa d'altro oltre al vostro uso personale? Potete leggere tutto ciò che è consentito nel testo sul Copyright in basso su tutte le pagine dei nostri modelli. Buon lavoro!
Lasciare un commento sul modello DROPS Children 34-24
Noi saremmo felici di ricevere i tuoi commenti e opinioni su questo modello!
Se vuoi fare una domanda, fai per favore attenzione a selezionare la categoria corretta nella casella qui sotto per velocizzare il processo di risposta. I campi richiesti sono indicati da *.