
Categorie popolari
State cercando un filato?


Commenti / Domande (79)
![]() Manuela ha scritto:
Manuela ha scritto:
Buongiorno, è la prima volta che provo a lavorare con i circolari, questo è un modello facile? posso allungare la manica? Grazie mille
11.03.2021 - 14:36DROPS Design ha risposto:
Buongiorno Manuela, è un modello che richiede un po' di attenzione, ma se dovesse aver bisogno di aiuto può scriverci. Per le maniche, può variare la lunghezza come preferisce. Buon lavoro!
11.03.2021 - 23:04
![]() Diana ha scritto:
Diana ha scritto:
Buongiorno, mi piacerebbe realizzare questo maglione, ma ammetto che dall\' alto verso il basso mi mette in difficoltà. Potrei avere lo schema, ma dal basso verso l \'alto e con la lavorazione dei singoli pezzi (davanti/dietro). Grazie mille Maria malerba
24.02.2021 - 09:32DROPS Design ha risposto:
Buongiorno Diana, se ci spiega quale difficoltà riscontra nella lavorazione possiamo aiutarla in modo più preciso. Questo modello è stato progettato con questa costruzione e in questa sede non ci è possibile fornirle un'assistenza così personalizzata. Buon lavoro!
24.02.2021 - 14:55
![]() Pia Wettergen ha scritto:
Pia Wettergen ha scritto:
Strikkes med enkelt eller dobbelt tråd?
03.08.2020 - 09:30DROPS Design ha risposto:
Hej Pia, enkel tråd :)
03.08.2020 - 14:32
![]() Irina Paglialunga ha scritto:
Irina Paglialunga ha scritto:
Liebes Team, ich stricke gerade Passe und bin an der Stelle angekommen wo ich A1 bis A3 ein mal in der Höhe gestrickt habe es ne habe 350 Maschen auf der Nadel . Jetzt soll ich A 1 , A 2 A3 ( endet mit Umschlag) A4 begibt mit Umschlag (?) das kann doch nicht sein . Bitte um Hilfe. Danke
03.07.2020 - 13:20DROPS Design ha risposto:
Liebe Frau Paglialunga, über die 121-131 M (siehe Größe) von A.1-A.3 (= Vorder- und Rückenteil) stricken Sie jetzt die Zunahmen weiter, dh: A.4 (anstatt A.1), A.2 wiederholen und mit A.5 (anstatt A.3) enden. So nehmen Sie beim Vorder- und Rückenteil noch extra Maschen, aber bei den Ärmeln wird es nicht mehr zugenommen, einfach A.6 (vor A.4) und A.7 (nach A.5) stricken. Viel Spaß beim stricken!
03.07.2020 - 14:49
![]() Maria ha scritto:
Maria ha scritto:
Dzień dobry. Robię sweter w rozmiarze S. Doszłam do strzałki we wzorze fantazyjnym A.4 i od razu mam liczbę oczek na przód/tył i rękawy (64-131). Pytanie, czy teraz powinnam robić kawałek prosto uwzględniając A.6 i A.7 i jeśli tak, to na jaką wysokość wzoru fantazyjnego i którego wzoru fantazyjnego powinnam użyć na przód/tył. A.2 od pierwszego rzędu mi się nie rozlicza. A.4 ma przesunięcie. Czy od razu podzielić i ominąć A.6 i a.7? Dziękuje za pomoc i pozdrawiam.
16.05.2020 - 23:24DROPS Design ha risposto:
Witaj Mario! Dalej przerabiać ściegiem fantazyjnym i dżersejem jak wcześniej, ale bez dodawania oczek, aż długość robótki wynosi 26 cm (mierząc od końca wykończenia dekoltu, nie od okrążenia nabierania oczek, a ostatniego przerobionego okrążenia na wykończenie dekoltu, w dół). To znaczy przerabiasz schematy takie jak dotychczas, ale uwzględniając A.6 i A.7, aż otrzymasz długość 26 cm. Na tyle i przodzie powtarzasz schemat A.2. Dopiero później dzielisz robótkę na tył i przód i na rękawy. Powodzenia!
18.05.2020 - 11:59
![]() Marzena Allan ha scritto:
Marzena Allan ha scritto:
Thank you for the lovely pattern. Is this correct that A.4 for size XL finishes before size L?
29.03.2020 - 18:18DROPS Design ha risposto:
Dear Mrs Allan, yes that's correct, you have increased the correct number of sts in size XL at this row, and you will continue working yoke 1 cm more than size L to get the correct width. Happy knitting!
30.03.2020 - 11:14
![]() Yvonne ha scritto:
Yvonne ha scritto:
Hallo Drops Team, bezüglich der Passe habe ich eine Frage. Passe,letzter Absatz, Größe M: 137 Maschen wie zuvor stricken (Rückenteil) , 72 Maschen für den Ärmel stilllegen, 137 Maschen wie zuvor stricken ( Vorderteil) usw. Muss ich nach dem stilllegen der Ärmelmaschen ,keine neuen Maschen unterhalb anschlagen? Danke.
18.02.2020 - 14:13DROPS Design ha risposto:
Liebe Yvonne, ja genau, hier wird man keine Masche unter den Ärmeln anschlagen. Viel Spaß beim stricken!
18.02.2020 - 16:28
![]() Vibeke Wiwe ha scritto:
Vibeke Wiwe ha scritto:
Når der står 77cm ved hoftebredden, er det så forstykket eller hele vejen rundt.
19.01.2020 - 16:01DROPS Design ha risposto:
Hei Vibeke. Det gjelder kun forstykket (eller bakstykket). Hele veien rundt er 77 x 2 = 154 cm). God Fornøyelse!
20.01.2020 - 14:58
![]() Chhavi Methi ha scritto:
Chhavi Methi ha scritto:
Hi I am sorry I am troubling you . But when I have last increase for the medium sweater size done , my sleeves only have 62 stitches , so I am supposed to inrease once more until I divide the body ? So should I continue increasing the sleeves and following the pattern on the body until all the increases are done ?
11.01.2020 - 06:39DROPS Design ha risposto:
Dear Mrs Mehti, thanks for these further explanations. You increase 29 times for sleeves in size M so that you should have 66 sts on sleeve when all decreases for body are done (20 inc row in A.1 + 8 inc row in A.4). On next increase row on sleeve work A.6 and A.7 on body to keep the lace pattern on raglan lines on body without increasing more stitches. Hope this helps! Happy knitting!
13.01.2020 - 08:40
![]() Chhavi Methu ha scritto:
Chhavi Methu ha scritto:
I am working on a medium size . So after 137 , my sleeves needed I be increased one more time for 64 stitches . Do I separate the body and the sleeves after all the increases ? Also should I discontinue working in raglan once u separate the sleeves . And so I include the raglan stitches of 2 in the sleeves ?
09.01.2020 - 13:03DROPS Design ha risposto:
Dear Mrs Methu, I'm sorry, I'm not sure what you mean here, have you make all increases for raglan, this means you have 418 stitches in size M and you are ready to work the dividing round which starts with 137 sts for back piece, then slip the next 72 sts for sleeve, etc..; this round is worked without increasing anymore. Happy knitting!
09.01.2020 - 14:12
|
|||||||||||||||||||
Strawberry Swing#strawberryswingsweater |
|||||||||||||||||||
 |
 |
||||||||||||||||||
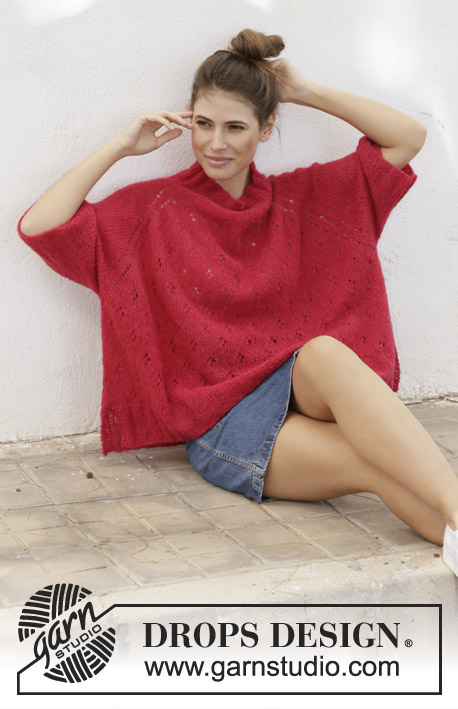
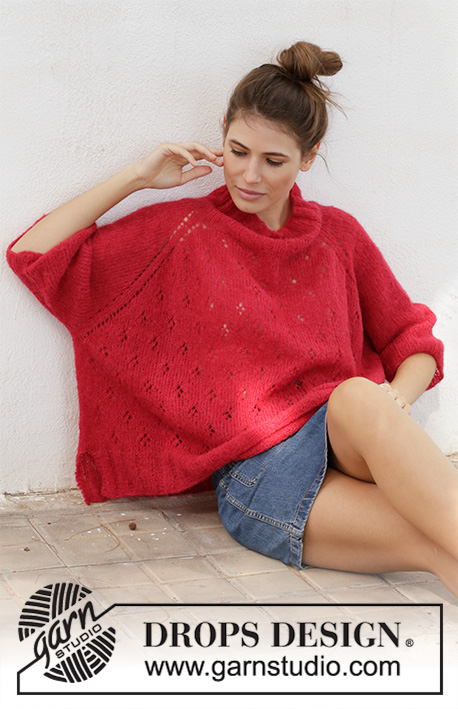
Maglione a poncho lavorato ai ferri con raglan in DROPS Brushed Alpaca Silk. Lavorato dall’alto in basso con motivo traforato. Taglie: S - XXXL.
DROPS 202-19 |
|||||||||||||||||||
|
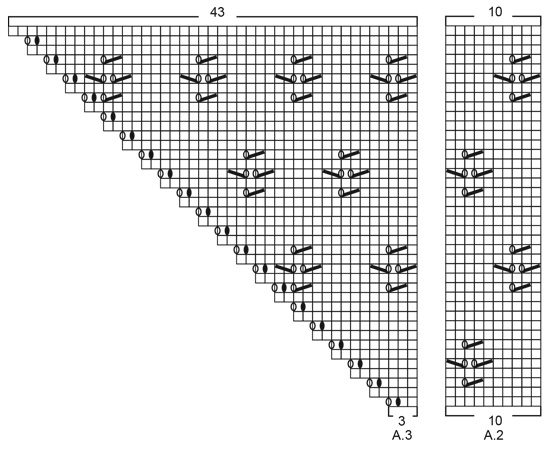
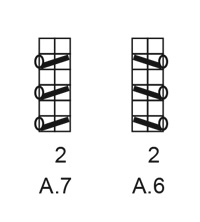
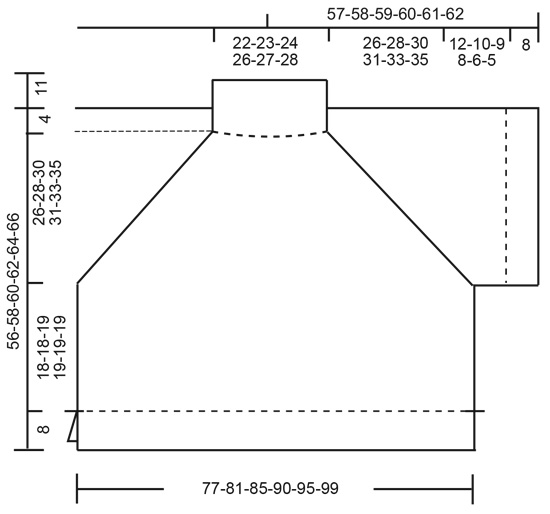
---------------------------------------------------------- PRIMA DI INIZIARE: ---------------------------------------------------------- SUGGERIMENTO PER GLI AUMENTI/DIMINUZIONI (distribuiti in modo uniforme): Per stabilire ogni quanto aumentare/diminuire in modo uniforme, prendere il n° totale di maglie sul ferro (ad esempio 102 maglie) e dividerlo per il n° di aumenti/diminuzioni da fare (ad esempio 8) = 12,8. In questo esempio, aumentare facendo 1 gettato circa dopo ogni 13esima maglia. Sul giro successivo lavorare i gettati a ritorto per evitare buchi. Durante le diminuzioni lavorare insieme a diritto ogni 12esima e 13esima maglia. MOTIVO: Vedere i diagrammi A.1 - A.7. Trovate la vostra taglia nei diagrammi (applicato a A.4 e A.5). COSTA/MAGLIA LEGACCIO (avanti e indietro): Lavorare tutti i ferri a diritto. 1 costa in altezza = 2 ferri diritto. ---------------------------------------------------------- INIZIO DEL LAVORO: ---------------------------------------------------------- MAGLIONE A PONCHO – BREVE RIASSUNTO DEL LAVORO: Lavorato dall’alto in basso. Lavorare il collo e lo sprone in tondo. Lavorare il corpo in tondo fino allo spacco, poi lavorare il davanti e il dietro avanti e indietro sui ferri circolari. Lavorare le maniche in tondo sui ferri a doppia punta/ferri circolari corti. COLLO: Avviare 102-108-108-114-120-126 maglie con i ferri circolari n° 4 mm con Brushed Alpaca Silk. Lavorare 1 giro diritto. Poi lavorare a coste (= 3 maglie diritto/3 maglie rovescio) per 11 cm. Lavorare 1 giro diritto in cui aumentare 8-2-2-16-10-4 maglie in modo uniforme – leggere il SUGGERIMENTO PER GLI AUMENTI/DIMINUZIONI = 110-110-110-130-130-130 maglie. Passare ai ferri circolari n° 5 mm e lavorare lo sprone come spiegato sotto. ORA MISURARE IL LAVORO DA QUI! SPRONE: Lavorare il 1° giro come segue: Lavorare A.1 (= 8 maglie), lavorare A.2 sulle 30-30-30-40-40-40 maglie successive (= 3-3-3-4-4-4 ripetizioni di 10 maglie), lavorare A.3 (= 3 maglie), lavorare 2 maglie a maglia rasata (= linea del raglan), fare 1 gettato, lavorare 10 maglie a maglia rasata (= manica), fare 1 gettato, lavorare 2 maglie a maglia rasata (= linea del raglan), lavorare A.1 (= 8 maglie), lavorare A.2 sulle 30-30-30-40-40-40 maglie successive (= 3-3-3-4-4-4 ripetizioni di 10 maglie), lavorare A.3 (= 3 maglie), lavorare 2 maglie a maglia rasata (= linea del raglan), fare 1 gettato, lavorare 10 maglie a maglia rasata (= manica), fare 1 gettato, lavorare 2 maglie a maglia rasata (= linea del raglan). Ora ci sono 122-122-122-142-142-142 maglie sul ferro. Continuare il motivo in questo modo. Cioè sul davanti e dietro aumentare a ogni lato come mostrato in A.1 e A.3. Sulle maniche aumentare a ogni lato con un gettato a ogni lato delle maglie a maglia rasata. La linea del raglan è sempre su 2 maglie a maglia rasata. Aumentare in questo modo a giri alterni 25-29-30-32-34-35 volte in totale, sul giro successivo lavorare i gettati a diritto sulle maniche (= buchi) e lavorare le maglie aumentate a maglia rasata. FARE ATTENZIONE ALLA TENSIONE DEL LAVORO! Alla fine di A.1-A.3, ci sono 350-350-350-370-370-370 maglie sul ferro. Poi lavorare come segue sulle 121-121-121-131-131-131 maglie di A.1 - A.3: lavorare A.4 (= 8 maglie), lavorare A.2 sulle 110-110-110-120-120-120 maglie successive (= 11-11-11-12-12-12 ripetizioni di 10 maglie) e lavorare A.5 (= 3 maglie). Continuare le maniche come prima ma alla fine degli aumenti finire le maniche senza aumenti. Per continuare il ferro traforato lungo la linea del raglan alla fine degli aumenti per il raglan, lavorare A.6 (= 2 maglie) sulle prime 2 maglie dopo la linea del raglan e A.7 sulle ultime 2 maglie prima della linea del raglan verso la manica. Quando si arriva al giro lavorato con la freccia per la vostra taglia, ci sono 390-418-438-462-486-506 maglie sul ferro e il lavoro misura circa 23-26-29-28-32-35 cm. Continuare con il motivo e a maglia rasata come prima ma senza aumenti fino a quando il lavoro misura 26-28-30-31-33-35 cm. Per continuare il ferro traforato lungo la linea del raglan alla fine degli aumenti, lavorare A.6 e A.7 nello stesso modo delle maniche. Lavorare il giro successivo come segue: lavorare 131-137-145-153-161-169 maglie come prima (= dietro), trasferire le 64-72-74-78-82-84 maglie successive in sospeso su un fermamaglie per la manica, lavorare 131-137-145-153-161-169 maglie come prima (davanti), trasferire le ultime 64-72-74-78-82-84 maglie in sospeso per la manica. Finire il corpo e le maniche in modo separato. ORA MISURARE IL LAVORO DA QUI. CORPO: = 262-274-290-306-322-338 maglie. Inserire 1 segnapunti all’inizio del giro, inserire 1 segnapunti dopo 131-137-145-153-161-169 maglie. I segnapunti indicano i lati. Lavorare 0-3-2-1-0-4 maglie a maglia rasata, ripetere A.2 fino a quando rimangono 1-4-3-2-1-5 maglie prima del segnapunti (= 13-13-14-15-16-16 ripetizioni di 10 maglie) – aggiustarlo per continuare il motivo sul ferro corretto, lavorare 1-7-5-3-1-9 maglie a maglia rasata (il segnapunti è tra queste maglie), ripetere A.2 fino a quando mancano 1-4-3-2-1-5 maglie all’inizio del giro (= 13-13-14-15-16-16 ripetizioni di 10 maglie) e lavorare le 1-4-3-2-1-5 maglie rimaste a maglia rasata. Continuare il motivo in questo modo fino a quando il lavoro misura 18-18-18-19-19-19 cm dalla divisione – aggiustarlo per finire dopo un giro tra 2 motivi traforati in verticale. Ora dividere il lavoro all’altezza dei segnapunti e finire il davanti e il dietro in modo separato. DIETRO: = 131-137-145-153-161-169 maglie. Lavorare 1 ferro diritto dal diritto del lavoro in cui diminuire 2-2-2-0-2-4 maglie in modo uniforme – leggere il SUGGERIMENTO PER GLI AUMENTI/SUGGERIMENTO PER LE DIMINUZIONI = 129-135-147-153-159-165 maglie. Passare ai ferri circolari n° 4 mm. Lavorare il ferro successivo come segue dal rovescio de lavoro: 3 maglie e MAGLIA LEGACCIO – leggere la spiegazione sopra - * 3 maglie rovescio, 3 maglie diritto *, ripetere *-* fino a quando rimangono 6 maglie sul ferro, finire con 3 maglie rovescio e 3 maglie a maglia legaccio. Continuare a coste in questo modo per 8 cm. Intrecciare con diritto su diritto e rovescio su rovescio (per evitare un bordo di chiusura tirato usare i ferri circolari n° 5 mm). DAVANTI: Lavorare come per il dietro. MANICA: Riportare le 64-72-74-78-82-84 maglie in sospeso dal fermamaglie a un lato del lavoro sui ferri circolari corti/ferri a doppia punta n° 5 mm. Continuare a maglia rasata fino a quando il lavoro misura 12-10-9-8-6-5 cm dalla divisione (misure più piccole per le taglie più grandi a causa delle spalle più ampie e dell’arrotondamento della manica più lungo). Lavorare 1 giro diritto in cui aumentare 2-0-4-0-2-0 maglie in modo uniforme = 66-72-78-78-84-84 maglie. Passare ai ferri a doppia punta n° 4 mm. Lavorare a coste = 3 maglie diritto/3 maglie rovescio per 8 cm. Intrecciare con diritto su diritto e rovescio su rovescio (per evitare un bordo di chiusura tirato usare i ferri n° 5 mm). Lavorare l’altra manica nello stesso modo. |
|||||||||||||||||||
Spiegazioni del diagramma |
|||||||||||||||||||
|
|||||||||||||||||||
 |
|||||||||||||||||||
 |
|||||||||||||||||||
 |
|||||||||||||||||||
 |
|||||||||||||||||||
 |
|||||||||||||||||||
Avete terminato questo modello?Allora taggate le vostre foto con #dropspattern #strawberryswingsweater o inviatele alla #dropsfan gallery. Avete bisogno di aiuto con questo modello?Troverete 27 video tutorial, una sezione per i commenti/domande e molto altro guardando il modello su www.garnstudio.com © 1982-2026 DROPS Design A/S. Ci riserviamo tutti i diritti. Questo documento, compreso tutte le sue sotto-sezioni, è protetto dalle leggi sul copyright. Potete leggere quello che potete fare con i nostri modelli alla fine di ogni modello sul nostro sito. |
|||||||||||||||||||


Con oltre 40 anni di esperienza nel design di modelli di maglia e uncinetto, DROPS Design offre la più estesa collezione di modelli gratuiti su internet - tradotti in 17 lingue. Ad oggi vi possiamo fornire 324 cataloghi e 12290 modelli - 9561 dei quali sono tradotti in Italiano.
Ci stiamo impegnando molto per darvi il meglio che vi possiamo offrire in termini di maglia e uncinetto, ispirazioni e consigli così come filati di grande qualità ad un prezzo incredibile! Volete utilizzare i nostri modelli per qualcosa d'altro oltre al vostro uso personale? Potete leggere tutto ciò che è consentito nel testo sul Copyright in basso su tutte le pagine dei nostri modelli. Buon lavoro!
Lasciare un commento sul modello DROPS 202-19
Noi saremmo felici di ricevere i tuoi commenti e opinioni su questo modello!
Se vuoi fare una domanda, fai per favore attenzione a selezionare la categoria corretta nella casella qui sotto per velocizzare il processo di risposta. I campi richiesti sono indicati da *.