
Categorie popolari
State cercando un filato?


Commenti / Domande (129)
![]() Ann ha scritto:
Ann ha scritto:
Hej igen! Tack för svar! Jag kan ändå inte få det att stämma A1+A2 blir 7 maskor och 91 maskor delat på 7 blir 13!
11.12.2020 - 09:30
![]() Ann ha scritto:
Ann ha scritto:
Hej! Jag stickar tröjan Agnes stl 7/8. Upplägg 80 maskor, öka21 =101. 10 maskor är kantmaskor. Kvar är 91 maskor. Mönstret är 7maskor. Det blir 13 mönster. I mönstret står det 15. Har jag missuppfattat något? Det blir inte rätt maskantal när jag har stickat klart mönsterstickningen.??
10.12.2020 - 23:06DROPS Design ha risposto:
Hej Ann. Du ska sticka efter den högra A.2 (det är olika A.2 beroende på storlek) och den A.2 är 6 maskor. Mvh DROPS Design
11.12.2020 - 06:57
![]() COLLET Sylvie ha scritto:
COLLET Sylvie ha scritto:
Très beau modèle qui fait un peu peur à exécuter mais qui est très bien expliqué.
09.12.2020 - 11:27
![]() Maarit Bäcklander ha scritto:
Maarit Bäcklander ha scritto:
Hej! Jag stickade koftan i storlek 7/8 år med Drops Cotton Merino som man skulle kunna använda istället för sky enligt konverteraren. Det skulle behövas 200 gr men köpte 250 gram och det räckte precis. Enligt beskrivningen skall 200 gr räcka ända till storlek 11/12 år, jag undrar om det verkligen skulle räcka.
17.11.2020 - 16:53
![]() Yvonne ha scritto:
Yvonne ha scritto:
Hej. Hur stickar man över en maska i diagrammet A1?
02.11.2020 - 23:57DROPS Design ha risposto:
Hej Yvonne. Vi menar helt enkelt att du ska sticka 1 maska i diagram A.1 när vi skriver så. Mvh DROPS Design
03.11.2020 - 10:07
![]() Mariela A ha scritto:
Mariela A ha scritto:
Hola. Muy lindos tutoriales, mi pregunta es que significa tejer sobre un punto y si se repite a lo largo del tejido o es sólo una vez
28.10.2020 - 15:00DROPS Design ha risposto:
Hola Mariela, A.1 se teje sobre un punto porque, si ves los diagramas debajo del patrón, está compuesto por 1 solo punto en cada fila. A medida que vas trabajando las filas, el punto de A.1 que tienes que trabajar es distinto. Para entender bien el diagrama puedes leer la siguiente lección: https://www.garnstudio.com/lesson.php?id=68&cid=23
19.11.2020 - 11:55
![]() Karyn ha scritto:
Karyn ha scritto:
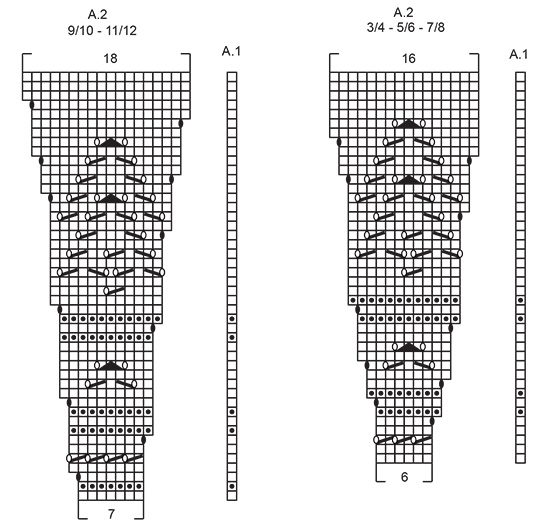
Hi, I am making the size 5/6 . I casted on 76 stitches which I increased to 95 evenly on row 5. I have completed the A1,A2 DESIGN. I have 12 perfect V designs cross my needle but only 104 stitches. I can't work out where have gone wrong. Please help as I love this pattern and would like to carry on.
13.10.2020 - 11:32DROPS Design ha risposto:
Dear Karyn, when working A.1 and A.2 in size 5/6 years, you will work them like this: 5 front band sts, A.1 (= 1 st), A.2 a total of 14 times, 5 front band sts. (= 5 + 1 + 14x6 + 5 = 95 sts). When A.2 is done, there are 16 sts in each diagram, this means you have: 5 front band sts, A.1 (= 1 st), A.2 a total of 14 times = 16 sts x 14, 5 front band sts = 5+1+ 16x14 + 5 = 235 sts. Hope this helps, happy knitting!
13.10.2020 - 12:53
![]() Liz ha scritto:
Liz ha scritto:
Still not clear. Do you mean instead of purling on a purl row (WS) , you knit instead, for those rows designated as "knit from wrong side"? The same symbol in the "Agnes set" diagram IS purl. I am working size 3-4, so not an issue til row 6.
24.09.2020 - 22:44DROPS Design ha risposto:
Dear Liz, correct, in the Agnes Set, diagram is worked in the round, so that the stitch will be purled from RS - for the jacket you work back and forth and in order to get this stitch look like "purl from RS" you need to knit it from WS. Happy knitting!
25.09.2020 - 09:12
![]() Liz ha scritto:
Liz ha scritto:
In the diagram explanations, what does "knit from wrong side" mean?
24.09.2020 - 16:31DROPS Design ha risposto:
Dear Liz, this stitch will be worked only from WS and has to be knitted, this means for example on row 2 in A.2 size 9/10 and 11/12 you will knit all stitches from WS. Happy knitting!
24.09.2020 - 16:46
![]() Cindy ha scritto:
Cindy ha scritto:
I’m making size 3/4 and at the end of A2 I have 345 stitches! I never did A1, is this salvageable or should I just quit?
19.09.2020 - 12:04DROPS Design ha risposto:
Dear Cindy, in size 3/4 you start with 89 sts and work diagrams A.1 x 1 and A.2 x 13 (A.1 makes both ends being the same), ie: 5 front band sts, 1 st (A.1), repeat 13 times the 6 sts in A.2 and end with 5 front band sts. When diagrams are done, there are: 5 + 1 + 16 x 13 + 5 = 219 sts. Happy knitting!
21.09.2020 - 08:42
|
||||||||||||||||||||||
Agnes#agnescardigan |
||||||||||||||||||||||
 |
 |
|||||||||||||||||||||
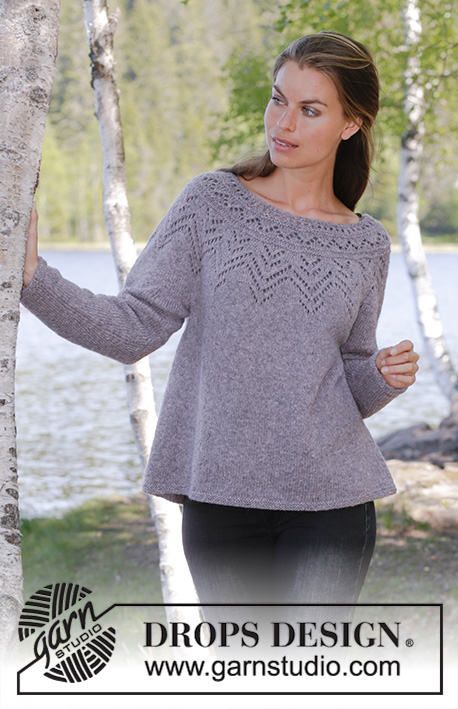
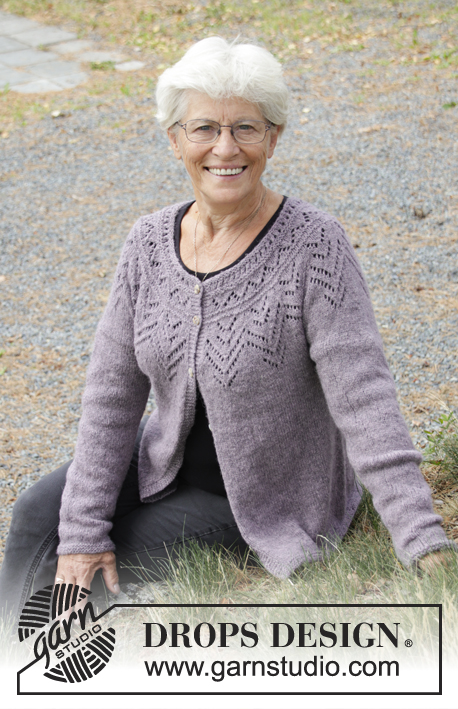
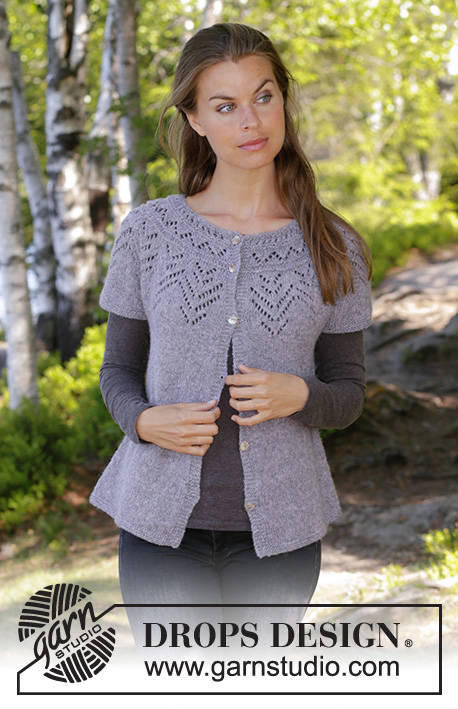
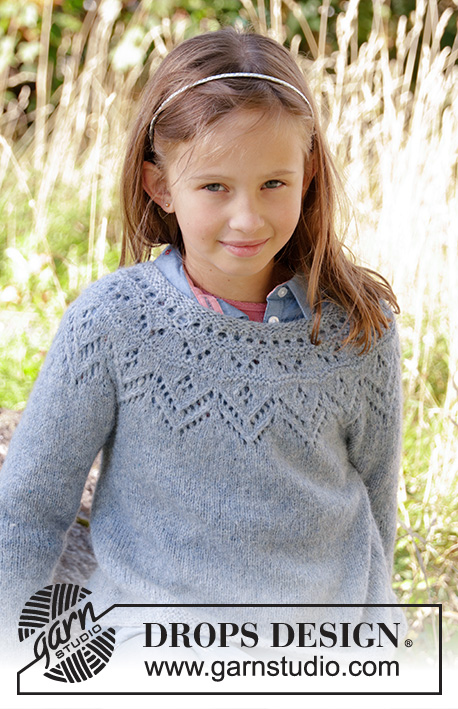
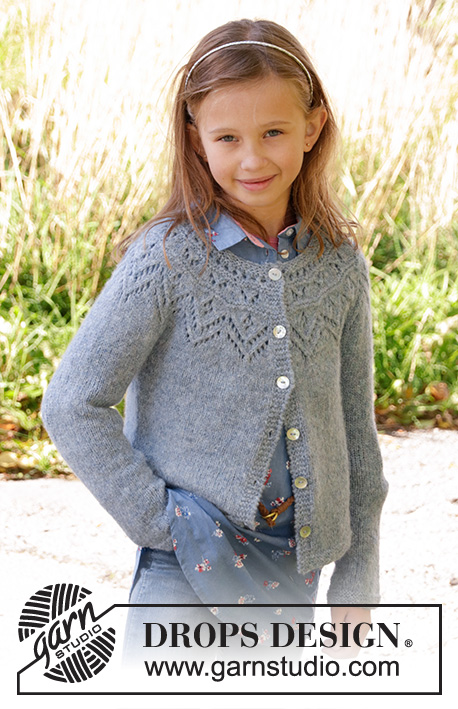
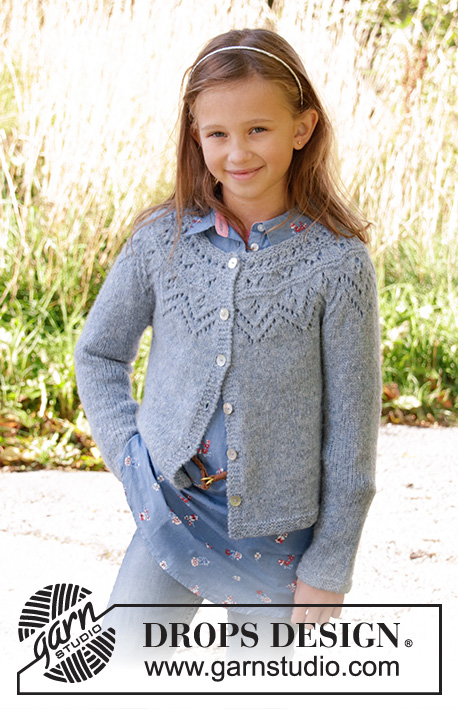
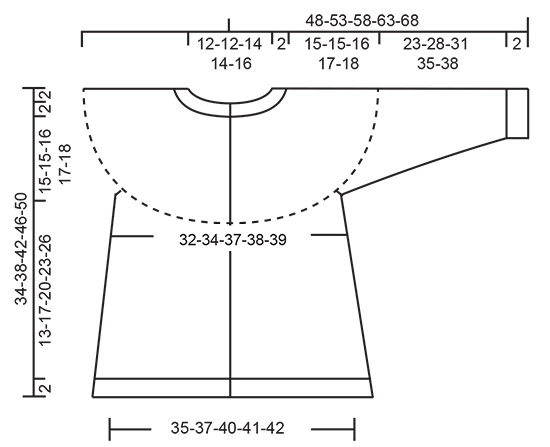
Cardigan per bambini lavorato ai ferri in DROPS Sky. Lavorato dall’alto in basso con sprone rotondo, motivo traforato, maglia rasata e maglia legaccio. Taglie: 3-12 anni.
DROPS Children 34-9 |
||||||||||||||||||||||
|
---------------------------------------------------------- SPIEGAZIONI DEL MODELLO: ---------------------------------------------------------- COSTA/MAGLIA LEGACCIO (lavorata avanti e indietro): 1 costa = 2 ferri diritto. COSTA/MAGLIA LEGACCIO (in tondo): 1 costa = 2 giri. Lavorare 1 giro a diritto e 1 giro a rovescio. MOTIVO: Vedere i diagrammi A.1 A.2. Scegliere il diagramma per la vostra taglia. I diagrammi mostrano tutti i ferri del motivo, visti sul diritto del lavoro. SUGGERIMENTO PER GLI AUMENTI-1 (distribuiti in modo uniforme): Per stabilire come aumentare in modo uniforme, prendere il numero totale di maglie sul ferro (ad esempio 72 maglie) e dividerlo per il numero di aumenti da fare (ad esempio 17) = 4,2. Quindi, in questo esempio, fare 1 gettato circa dopo ogni 4 maglie. Sul ferro successivo, lavorare i gettati a ritorto per evitare buchi. SUGGERIMENTO PER GLI AUMENTI-2 (per i lati del corpo): Lavorare fino a quando rimane 1 maglia prima del segnapunti, 1 gettato, 2 maglie diritto (il segnapunti si trova al centro di queste 2 maglie), 1 gettato = 2 aumenti. Sul ferro successivo, lavorare i gettati a ritorto per evitare buchi. Poi lavorare le nuove maglie a maglia rasata. SUGGERIMENTO PER LE DIMINUZIONI (per le maniche): Diminuire 1 maglia da ciascun lato del segnapunti come segue: lavorare fino a quando rimangono 3 maglie prima del segnapunti, 2 maglie insieme a diritto, 2 maglie diritto (il segnapunti è tra queste 2 maglie), passare 1 maglia a diritto senza lavorarla, 1 maglia diritto, accavallare la maglia passata sulla maglia lavorata = 2 diminuzioni. ASOLE: Lavorare le asole sul bordo destro (con il capo indossato). 1 asola = iniziare dal rovescio del lavoro e lavorare insieme a diritto la 2° e la 3° maglia dal bordo, fare 1 gettato. Sul ferro successive lavorare i gettati a diritto per creare un buco. Lavorare la 1° asola dopo circa 1 cm dal bordo del collo, poi lavorare le 5-5-5-6-6 asole successive ogni 5-6-6-6-7 cm. ---------------------------------------------------------- INIZIO DEL LAVORO: ---------------------------------------------------------- CARDIGAN - BREVI INDICAZIONI PER IL LAVORO: Si lavora avanti e indietro sui ferri circolari, dall’alto verso il basso. Dividere il lavoro per il corpo e le maniche. Continuare il corpo avanti e indietro sui ferri circolari. Lavorare le maniche in tondo sui ferri a doppia punta/ferri circolari corti. SPRONE: Avviare 72-76-80-86-92 maglie sui ferri circolari n° 4 con il filato Sky. Lavorare 2 COSTE – leggere le spiegazioni sopra – ricordarsi le ASOLE sul bordo destro – leggere le spiegazioni sopra. Lavorare 1 ferro diritto in cui aumentare 17-19-21-23-24 maglie in modo uniforme - LEGGERE IL SUGGERIMENTO PER GLI AUMENTI-1! = 89-95-101-109-116 maglie. Lavorare 1 ferro diritto dal rovescio del lavoro. Inserire un segnapunti in questo giro e misurare il lavoro da qui. Lavorare seguendo i diagrammi A.1 e A.2 come segue dal diritto del lavoro: lavorare 5 maglie per il bordo a MAGLIA LEGACCIO, lavorare A, su 1 maglia, A.2 per un totale di 13-14-15-14-15 volte sul ferro e poi 5 maglie per il bordo a maglia legaccio. FARE ATTENZIONE ALLA TENSIONE DEL LAVORO! Alla fine dei diagrammi A.1 e A.2, ci sono 219-235-251-263-281 maglie sul ferro. Sul ferro successivo dal diritto del lavoro, aggiustare il n° delle maglie a 219-235-253-261-283 maglie. Continuare a maglia rasata fino a quando il lavoro misura 15-15-16-17-18 cm dal segnapunti. Lavorare il ferro successivo come segue dal diritto del lavoro: 5 maglie per il bordo a maglia legaccio, lavorare 30-32-35-36-37 maglie a maglia rasata (= davanti), mettere le 44-48-51-53-62 maglie successive in attesa su un fermamaglie (= manica), avviare 6 nuove maglie sotto la manica, lavorare 61-65-71-73-75 maglie a maglia rasata (= dietro), mettere le 44-48-51-53-62 maglie successive in attesa su un fermamaglie (= manica), avviare 6 nuove maglie sotto la manica, lavorare 30-32-35-36-37 maglie (= davanti) e 5 maglie per il bordo a maglia legaccio. CORPO: Ci sono ora 143-151-163-167-171 maglie sul ferro. ORA MISURARE IL LAVORO DA QUI! Inserire 1 segnapunti al centro delle 6 nuove maglie avviate ai lati. Lavorare a maglia rasata avanti e indietro con 5 maglie per il bordo a maglia legaccio a ogni lato. Quando il lavoro misura 3 cm, aumentare 1 maglia a ogni lato di tutti i segnapunti (= 4 aumenti) – leggere il SUGGERIMENTO PER GLI AUMENTI-2! Ripetere questi aumenti ogni 3-4½-5½-6½-7½ cm per un totale di 3 volte = 155-163-175-179-183 maglie. Continuare come prima fino a quando il lavoro misura circa 15-17-20-23-26 cm (o fino alla lunghezza desiderata, mancano circa 2 cm alla fine del lavoro). Lavorare a maglie legaccio per 2 cm. Intrecciare senza stringere a diritto. Tagliare e affrancare il filo. MANICHE: Riportare le maglie di un fermamaglie sui ferri circolari corti /ferri a doppia punta n° 4 mm (= 44-48-51-53-62 maglie), e riprendere 1 maglia in ognuna delle 6 maglie avviate per il corpo (= 50-54-57-59-68 maglie). Inserire 1 segnapunti al centro di queste 6 maglie. Lavorare a maglia rasata in tondo fino a quando la manica misura 3 cm. Ora diminuire 1 maglia a ogni lato del segnapunti – leggere il SUGGERIMENTO PER LE DIMINUZIONI. Continuare a maglia rasata e ripetere le diminuzioni ogni 4-4-4-4-3½ cm fino a quando le diminuzioni sono state lavorate 5-6-7-8-10 volte in tutto = 40-42-43-43-48 maglie sui ferri. Lavorare a maglia rasata fino a quando la manica misura 23-28-31-35-38 cm in tutto. Lavorare a maglia legaccio per 2 cm. Intrecciare senza stringere a diritto. Tagliare e affrancare il filo. Lavorare l’altra manica nello stesso modo. CONFEZIONE: Attaccare i bottoni sul bordo sinistro. |
||||||||||||||||||||||
Spiegazioni del diagramma |
||||||||||||||||||||||
|
||||||||||||||||||||||
 |
||||||||||||||||||||||
 |
||||||||||||||||||||||
Avete terminato questo modello?Allora taggate le vostre foto con #dropspattern #agnescardigan o inviatele alla #dropsfan gallery. Avete bisogno di aiuto con questo modello?Troverete 28 video tutorial, una sezione per i commenti/domande e molto altro guardando il modello su www.garnstudio.com © 1982-2026 DROPS Design A/S. Ci riserviamo tutti i diritti. Questo documento, compreso tutte le sue sotto-sezioni, è protetto dalle leggi sul copyright. Potete leggere quello che potete fare con i nostri modelli alla fine di ogni modello sul nostro sito. |
||||||||||||||||||||||


Con oltre 40 anni di esperienza nel design di modelli di maglia e uncinetto, DROPS Design offre la più estesa collezione di modelli gratuiti su internet - tradotti in 17 lingue. Ad oggi vi possiamo fornire 324 cataloghi e 12290 modelli - 9561 dei quali sono tradotti in Italiano.
Ci stiamo impegnando molto per darvi il meglio che vi possiamo offrire in termini di maglia e uncinetto, ispirazioni e consigli così come filati di grande qualità ad un prezzo incredibile! Volete utilizzare i nostri modelli per qualcosa d'altro oltre al vostro uso personale? Potete leggere tutto ciò che è consentito nel testo sul Copyright in basso su tutte le pagine dei nostri modelli. Buon lavoro!
Lasciare un commento sul modello DROPS Children 34-9
Noi saremmo felici di ricevere i tuoi commenti e opinioni su questo modello!
Se vuoi fare una domanda, fai per favore attenzione a selezionare la categoria corretta nella casella qui sotto per velocizzare il processo di risposta. I campi richiesti sono indicati da *.