
Categorie popolari
State cercando un filato?


Commenti / Domande (22)
![]() Fia ha scritto:
Fia ha scritto:
Jag har en fråga angående ökningarna. Jag stickar efter XL, och man ska då öka vart 4:e varv 8 ggr. Ska man öka vart 4:e rätt varv eller vart annat rätt varv? Är i skrivandets stund på varv 40, och jag tycker inte att längden på mitt arbete stämmer med måttet på skissen. Enligt skissen ska jag ha 60 cm från uppläggsvarvet till ökningen för ärmarna. Men jag har nu 18 cm och 11 varv kvar innan jag ska lägga upp för ärmar.
14.09.2025 - 20:46DROPS Design ha risposto:
Hei Fia. Du skal øke på hver 4. pinne (1 pinne med økninger og 3 pinner uten økning), dette gjøres 8 ganger, deretter 10 ganger på hver 2. pinne. mvh DROPS Design
29.09.2025 - 10:51
![]() Fia ha scritto:
Fia ha scritto:
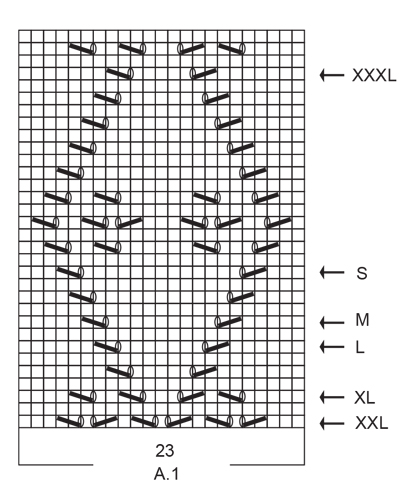
V ad menas med pilarna på diagram A.1? Jag förstår att det är olika storlekar, men XL är markerad på rad 3. Förstår inte riktigt vad som menas med detta. Snälla hjälp mig att förstå.
07.09.2025 - 17:26DROPS Design ha risposto:
Hej Fia. Det är på det varvet du börjar diagrammet (står inskrivet i beskrivningen också). Så om du stickar XL så börjar du diagrammet på rad 3. Mvh DROPS Design
09.09.2025 - 08:35
![]() Gerbon Laetitia ha scritto:
Gerbon Laetitia ha scritto:
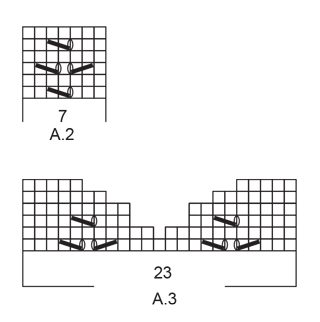
Bonsoir Je ne comprends pas la partie de l'encolure avec le schéma A3 je comprend pas comment je dois rabattre et a quel moment si vous voulez bien m'expliquer svp ou avoir une vidéo m'arrangerais. Merci
04.08.2025 - 21:48DROPS Design ha risposto:
Bonjour Mme Gerbon, vous rabattez la maille centrale au 1er rang de A.3, puis vous terminez chaque côté de l'encolure séparément, en commençant par l'épaule gauche pour le dos; vous terminez A.3 et en même temps, vous rabattez en début de rang sur l'endroit (pour l'encolure): 8 x 2 m puis 2-5 x 1 m. Reprenez ensuite les mailles de l'épaule droite et rabattez les mailles de l'encolure de la même façon, mais en début de rang sur l'envers - n'oubliez pas de terminer A.3 en fin de rang sur l'endroit. Bon tricot!
05.08.2025 - 08:46
![]() Pernille Matras ha scritto:
Pernille Matras ha scritto:
Hvordan kan det være at i skrive man skal lave forstykket som bagstykket, når både billed og diagram viser noget andet på forstykket. Der må være en del flere indtagninger på forstykket som ikke står i opskrifter? Faktisk vises forstykket som en v udskæring. Jeg vil gerne have en forklaring på hvordan jeg strikker forstykket efter 3 hele diagram mønster. På forhånd tak Pernille Matras
30.05.2025 - 23:25
![]() Jacqueline VERRIELE ha scritto:
Jacqueline VERRIELE ha scritto:
Peux ton tricoter ce modèle avec des aiguilles droites
01.05.2024 - 16:54DROPS Design ha risposto:
Bonjour Mme Verriele, tout à fait, car on tricote ici chaque partie séparément, en allers et retours sur aiguille circulaire pour avoir suffisamment de place pour toutes les mailles, vous pouvez donc utiliser des aiguilles droites, vos mailles seront juste plus serrées, pensez à bien conserver la bonne tension. Retrouvez ici plus d'infos sur les aiguilles circulaires. Bon tricot!
02.05.2024 - 08:13
![]() MARIANI DOMINIQUE ha scritto:
MARIANI DOMINIQUE ha scritto:
Bonjour, J'ai suivi scrupuleusement les indications et les mesures et je me retrouve quand même avec 3 pelotes de trop. Comment cela se fait-il?
23.05.2023 - 10:20DROPS Design ha risposto:
Bonjour Mme Mariani, votre tension en largeur (nombre de mailles) et en hauteur (nombre de rangs) est-elle la même que pour l'échantillon? Si tel est bien le cas, merci de bien vouloir nous indiquer quelle taille vous avez tricoté, nos stylistes pourront ainsi vérifier, merci d'avance. Bon tricot!
23.05.2023 - 13:59
![]() MARIANI DOMINIQUE ha scritto:
MARIANI DOMINIQUE ha scritto:
Bonjour, sur le schéma l encolure dos n'est pas la même que celle du devant. Pourtant les explications disent de faire la même chose dos et devant
16.05.2023 - 20:00DROPS Design ha risposto:
Bonjour Mme Mariani, le schéma utilisé ici est standard, raison pour laquelle l'encolure dos est différente, je vais transmettre le message à nos stylistes pour voir si elles peuvent le modifier), le dos et le devant de ce top sont identiques, comme indiqué dans les explications. Bon tricot!
17.05.2023 - 08:07
![]() Angelica ha scritto:
Angelica ha scritto:
Undrar över avmaskning till hals. Enligt beskrivningen är bakstycke och framstycke exakt lika, men enligt måttskissen ser det ut att vara V- hals fram och högre i nacken bak. Jag skulle vilja sticka den som den ser ut i måttskissen. Hur ska jag göra då?
02.05.2021 - 07:39DROPS Design ha risposto:
Hej Angelica, det bliver en V-hals om du følger diagrammet. Men forstykke og bagstykke er ens med mindre du vælger at strikke bagstykket højere uden at følge diagrammet. Vi kan desværre ikke hjælpe med at skrive opskriften om. God fornøjelse!
06.05.2021 - 11:23
![]() Emanuela Verzani ha scritto:
Emanuela Verzani ha scritto:
Hi, I am following small side, I start the pattern on row 13 and where do I end it? at the end of the pattern? and then I repeat from row 23 again. OR do i start from row 13, do it all then start from row 1 at next repeat? thanks
02.04.2021 - 22:51DROPS Design ha risposto:
Dear Mrs Verzani, finish diagram then start again from row 1 to last row. Happy knitting!
07.04.2021 - 08:42
![]() Torill Lehre ha scritto:
Torill Lehre ha scritto:
Hvor mange ganger sjal rapporten strikkes før det skal økes til ermer?
06.08.2020 - 19:20DROPS Design ha risposto:
Hei Torill. Det kommer an på hvilken størrelse du strikker. Du øker i hver side slik: Øk på hver 4.pinne 0-0-0-8-12-14 ganger og på hver 2.pinne 23-23-24-10-3-0 ganger. Husk at du starter ved pilen i din størrelse i diagrammet. God Fornøyelse!
10.08.2020 - 11:45
|
|||||||||||||
Beach Day#beachdaytop |
|||||||||||||
|
|
|||||||||||||
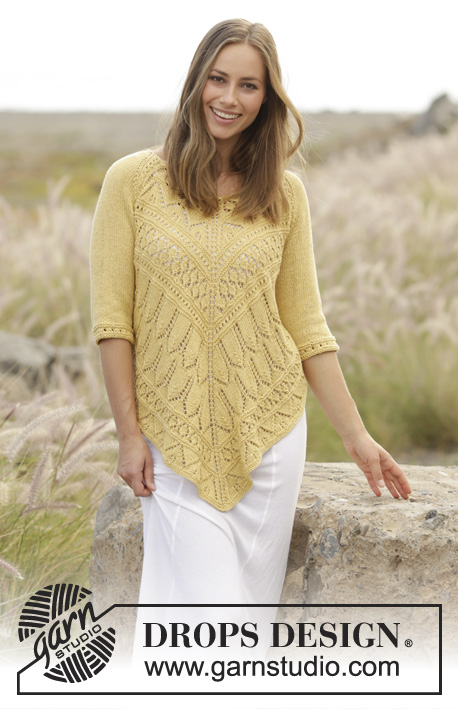
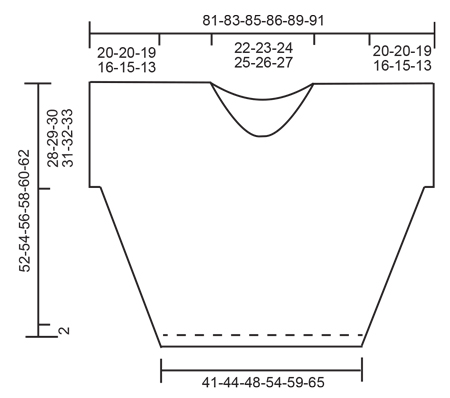
Top con motivo traforato, lavorato dall’alto in basso in DROPS Paris. Taglie: S - XXXL.
DROPS 176-8 |
|||||||||||||
|
COSTA/MAGLIA LEGACCIO (lavorata avanti e indietro): 1 “costa” = 2 ferri diritto. MOTIVO: Vedere i diagrammi A.1-A.3. I diagrammi mostrano tutti i ferri del motivo visti dal diritto del lavoro. GRANA DI RISO: FERRO 1: * 1 maglia diritto, 1 maglia rovescio *, ripetere *-* fino a quando rimane 1 maglia, 1 maglia diritto. FERRO 2: diritto su rovescio e rovescio su diritto. Ripetere il FERRO 2 di continuo. SUGGERIMENTO PER GLI AUMENTI: Aumentare 1 maglia lavorando 1 gettato. Sul ferro successivo lavorare il gettato a rovescio ritorto per evitare buchi. Gli aumenti vengono lavorati a maglia rasata. ---------------------------------------------------------- TOP: Lavorato in 2 sezioni che vengono cucite insieme alla fine. DIETRO: Avviare 71-77-83-93-103-113 maglie con i ferri circolari n° 5 mm e Paris. Lavorare 4 ferri a GRANA DI RISO – leggere la descrizione sopra. Ora lavorare il motivo come segue dal diritto del lavoro: lavorare 1 maglia di vivagno a MAGLIA LEGACCIO – leggere la descrizione sopra, lavorare 23-26-29-34-39-44 maglie a maglia rasata, iniziare sul 13°-9°-7°-3°-1°-29° ferro del diagramma e lavorare A.1 (= 23 maglie), lavorare 23-26-29-34-39-44 maglie a maglia rasata, 1 maglia di vivagno a maglia legaccio. Continuare il motivo in questo modo avanti e indietro, sul ferro successivo dal diritto del lavoro, aumentare 1 maglia all’interno della maglia di vivagno a maglia legaccio a ogni lato – LEGGERE IL SUGGERIMENTO PER GLI AUMENTI. Aumentare in questo modo ogni 4 ferri 0-0-0-8-12-14 volte e ogni 2 ferri 23-23-24-10-3-0 volte. FARE ATTENZIONE ALLA TENSIONE DEL LAVORO! Alla fine dei 2 ferri successivi, avviare 10-9-7-9-9-7 nuove maglie per le maniche = 137-141-145-147-151-155 maglie. Ora lavorare il motivo come segue dal diritto del lavoro: Lavorare 2 maglie di vivagno a grana di riso, lavorare A.2 (= 7 maglie), lavorare a maglia rasata e A.1 come prima fino a quando ci sono 9 maglie rimaste sul ferro, lavorare A.2 e finire con 2 maglie di vivagno a grana di riso. Quando il lavoro misura 40-42-43-45-46-48 cm ed è stata lavorata una ripetizione completa di A.1 in altezza iniziare gli intrecci per il collo e ogni spalla viene lavorata in modo separato. LEGGERE TUTTA LA SEZIONE PRIMA DI CONTINUARE! Lavorare il diagramma A.3 su A.1, lavorare come prima sulle altre maglie, ALLO STESSO TEMPO la maglia centrale dev’essere intrecciata per il collo come mostrato nel diagramma (A.3 viene quindi diviso e mostra il motivo a ogni lato del collo, il motivo in A.3 dev’essere lavorato 1 volta, poi lavorare a maglia rasata). Intrecciare le maglie su ogni ferro dal collo come segue: intrecciare 2 maglie 8 volte per tutte le taglie e 1 maglia 2-3-3-4-4-5 volte = 50-51-53-53-55-56 maglie sulla spalla. Lavorare l’altra spalla nello stesso modo. DAVANTI: Avviare e lavorare come per il dietro. CONFEZIONE: Cucire i margini delle spalle a punto maglia. Cucire i margini delle maniche. Cucire i margini dei lati all’interno della maglia di vivagno a maglia legaccio a ogni lato. Ripetere sull’altro lato. SCOLLATURA: Con l’uncinetto n° 5 mm lavorare un bordo attorno al collo come segue: lavorare 1 maglia bassa sulla spalla, * lavorare 1 catenella, saltare circa 1 cm, 1 maglia bassa *, ripetere *-* attorno a tutta la scollatura, finire con 1 catenella e 1 maglia bassissima nella maglia bassa all’inizio del giro. Tagliare e affrancare il filo. |
|||||||||||||
Spiegazioni del diagramma |
|||||||||||||
|
|||||||||||||
 |
|||||||||||||
 |
|||||||||||||
 |
|||||||||||||
Avete terminato questo modello?Allora taggate le vostre foto con #dropspattern #beachdaytop o inviatele alla #dropsfan gallery. Avete bisogno di aiuto con questo modello?Troverete 29 video tutorial, una sezione per i commenti/domande e molto altro guardando il modello su www.garnstudio.com © 1982-2026 DROPS Design A/S. Ci riserviamo tutti i diritti. Questo documento, compreso tutte le sue sotto-sezioni, è protetto dalle leggi sul copyright. Potete leggere quello che potete fare con i nostri modelli alla fine di ogni modello sul nostro sito. |
|||||||||||||


Con oltre 40 anni di esperienza nel design di modelli di maglia e uncinetto, DROPS Design offre la più estesa collezione di modelli gratuiti su internet - tradotti in 17 lingue. Ad oggi vi possiamo fornire 324 cataloghi e 12290 modelli - 9561 dei quali sono tradotti in Italiano.
Ci stiamo impegnando molto per darvi il meglio che vi possiamo offrire in termini di maglia e uncinetto, ispirazioni e consigli così come filati di grande qualità ad un prezzo incredibile! Volete utilizzare i nostri modelli per qualcosa d'altro oltre al vostro uso personale? Potete leggere tutto ciò che è consentito nel testo sul Copyright in basso su tutte le pagine dei nostri modelli. Buon lavoro!
Lasciare un commento sul modello DROPS 176-8
Noi saremmo felici di ricevere i tuoi commenti e opinioni su questo modello!
Se vuoi fare una domanda, fai per favore attenzione a selezionare la categoria corretta nella casella qui sotto per velocizzare il processo di risposta. I campi richiesti sono indicati da *.