
Categorie popolari
State cercando un filato?


Commenti / Domande (72)
![]() Hupfer ha scritto:
Hupfer ha scritto:
Ich bin bis zu den Vorderteilen gekommen und nun komme ich klar,wieso in Reihen weiterstricken. Wo ist da Anfang und Ende, irgendwie verstehe ich die Anleitung da nicht ganz. Vielleicht können Sie mir helfen.
15.08.2018 - 16:07DROPS Design ha risposto:
Liebe Frau Hupfer, Sie werden zuerst für einpaar cm die Vorderteile separat hin und zurück stricken : die Maschen zwischen den 2. und 4. Markierer zuerst für den linken Vorderteil hin und zurückstricken, gleichzeitig stricken Sie verkürtzen Reihen = die 2 letzten Maschen am Ende jeder Reihe werden nicht gestrickt (die Zunahmen wie zuvor weiterstricken). Dann stricken den rechten Vorderteil zw. 6. und 8. Markierer und dann wieder einpaar cm rum die ganze Jacke in der Runde stricken. Viel Spaß beim stricken!
16.08.2018 - 10:13
![]() Pia ha scritto:
Pia ha scritto:
Hvor meget garn skal jeg bruge til str 9/10,i garn gruppe c,vil gerne strikke i Drops bomull-Lin. Mvh Pia
14.06.2018 - 22:17DROPS Design ha risposto:
Hej Pia, Hvis du vil strikke str 9/10 skal du bruge ca 10 nøgler DROPS Bomull-Lin. God fornøjelse!
18.06.2018 - 11:06Ruth Elms ha scritto:
Ok it’s me again, how do I pick up and TWIST my yarn between every time st on st holder in each side is slipped on needle. I.e. between every other st to avoid holes in transition. It is a very confusing pattern. If I didn’t have so much done I would toss it, but I am a very determined person. Please can you explain it a bit better for me? Thanks in advance.
01.06.2018 - 22:09DROPS Design ha risposto:
Dear Mrs Elms, when you pick up yarn in transition, pick up this yarn with left needle and work it twisted = into back loop of this stitch instead into front loop of the st (like when you are making a "M1 increase") so that you will avoid holes. Happy knitting!
04.06.2018 - 08:38
![]() Ruth Elms ha scritto:
Ruth Elms ha scritto:
I’ve got this sweater almost done, but I’m having trouble with understanding how to do the left front. I find it’s very confusing. Can you help me please? Thanks
30.05.2018 - 20:14DROPS Design ha risposto:
Dear Mrs Elms, left front piece is worked back and forth over the sts between 2nd and 4th marker (= ie slip all remaining sts on a thread). Work now over the 72-84 sts on needle in garter st at the same time slip the last 2 sts at the end of every row (= both from RS and from WS) on a thread, ie you will work 2 sts less on every row until 32 sts remain on needle and slip these sts on a thread. Now work right front piece over the sts between 6th and 8th marker the same way. Then slip all sts around the circle back on needle, work 2 ridges and bind off with a picot edge. Happy knitting!
31.05.2018 - 08:04
![]() Debbie ha scritto:
Debbie ha scritto:
Sorry to worry you. I have now found it. Thank you. I look forward to the challenge.
02.03.2018 - 11:49Debbie ha scritto:
Is this pattern available in English?
02.03.2018 - 11:44
![]() Linda Stein ha scritto:
Linda Stein ha scritto:
In making Alvina, I notice corrections. There is also a box stating "new chart". I cannot have access to a new chart, if there is one. Please help.
20.02.2018 - 20:18DROPS Design ha risposto:
Dear Linda, yes, we made some correction on this pattern, included chart A.1 - both corrections are from 2016 and we made them online, directly in the pattern text and chart. (Info is useful for people who print old version of pattern, before correction.) So pattern and chart you can now see on our page is correct :-). Happy knitting!
20.02.2018 - 21:40
![]() Jackie Garrett ha scritto:
Jackie Garrett ha scritto:
Hi. I'm finding it really hard to get the correct number of stitches at the same time as the correct number of rows, i.e. 17st X 34rows. I'm using one strand of a yarn group C (Drops You 8) which I believe should be equivalent and have tried 5, 4.5 and 4mm needles. Please can you confirm that this is the correct tension to be aiming for. Thank you.
07.02.2018 - 21:56DROPS Design ha risposto:
Dear Mrs Garrett, 17 sts x 34 rows is a usual tension for a yarn group C or 2 strands yarn group A - read more about knitting tension here. Happy knitting!
08.02.2018 - 08:58
![]() Reveillaud ha scritto:
Reveillaud ha scritto:
Bonjour, je viens vers vous car j'ai fais les deux devant mais je ai du mal avec la suite, lorsqu'on tricote les mailles en attente on reprend toutes les mailles du tour ou seulement celle des devants ? Et on relève le fil en tricotent les groupes de deux mailles ou non ? Et si je comprends bien avec les jetés on augmente une maille entre les groupes de deux mailles ? Voilà je espère que vous pourrez me éclairer car les explications ne sont pas très clairs merci d'avance
01.10.2017 - 22:47DROPS Design ha risposto:
Bonjour Mme Reveillaud, c'est tout à fait ça, on va augmenter 1 maille entre chaque groupe de mailles mis en attente, mais sans faire un jeté en relevant simplement le fil entre les mailles mises en attente et en le tricotant torse à l'endroit (on augmente avec cette technique). Bon tricot!
02.10.2017 - 10:49
![]() RENAUX Jocelyne ha scritto:
RENAUX Jocelyne ha scritto:
Ce modèle est magnifique, je voudrais bien le faire pour ma petite fille mais je crains qu'il soit trop difficile. On voit une bordure tout le long, est-elle faite après ou pendant le tricot?
20.09.2017 - 14:28DROPS Design ha risposto:
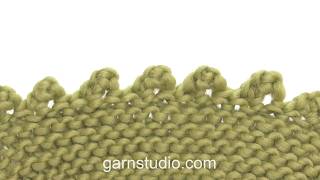
Bonjour Mme Renaux, lisez attentivement les explications et regardez la vidéo du début du gilet - la bordure de finition tout autour du cercle est faite avec des picots en rabattant, cette autre vidéo explique comment procéder. Bon tricot!
20.09.2017 - 15:58
|
||||||||||||||||||||||
Alvina#alvinajacket |
||||||||||||||||||||||
 |
 |
|||||||||||||||||||||
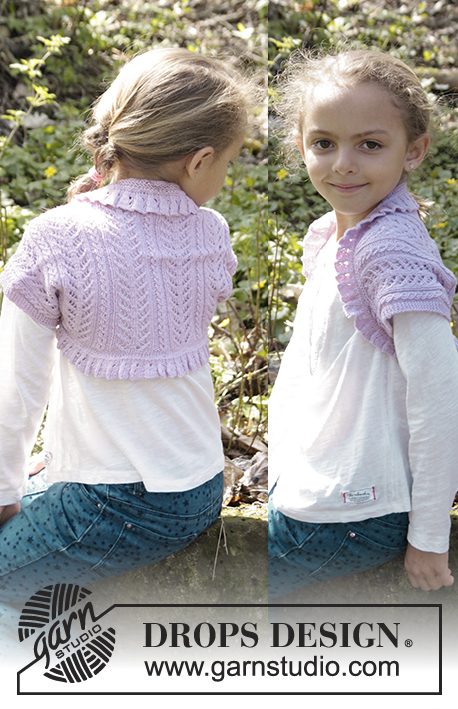
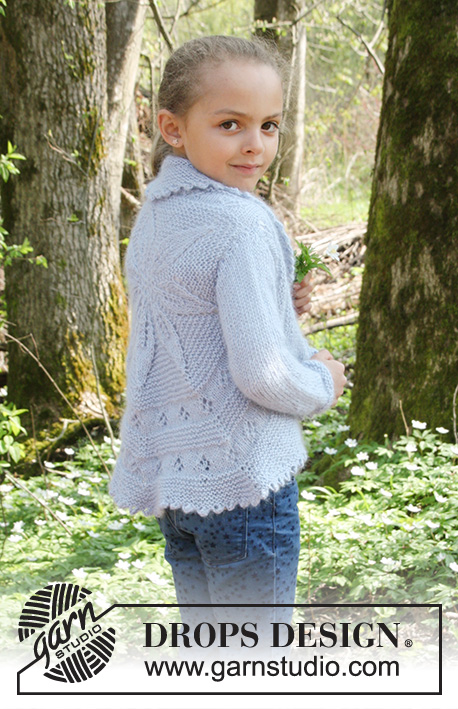
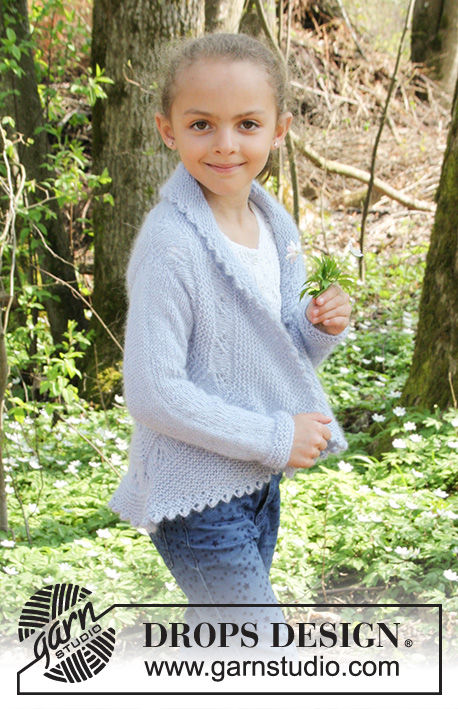
Cardigan lavorato ai ferri a cerchio a maglia legaccio con motivo a foglie in DROPS BabyAlpaca Silk e DROPS Kid-Silk. Taglie: 3 - 12 anni.
DROPS Children 27-12 |
||||||||||||||||||||||
|
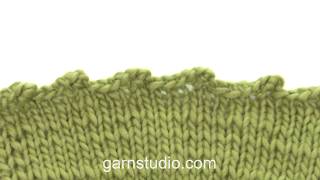
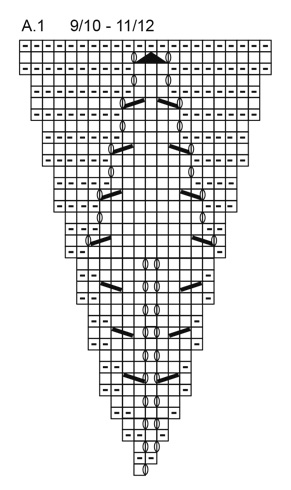
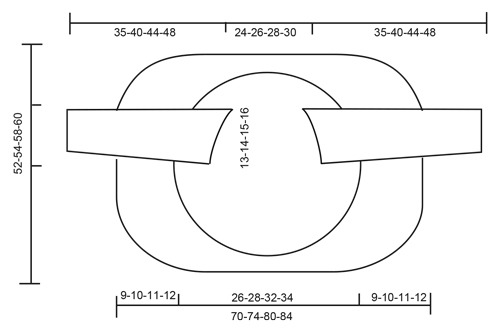
MOTIVO: Vedere i diagrammi A.1-A.2. Vedere il diagramma per la taglia corretta. M LEGACCIO (lavorato in tondo): 1 “costa” a m legaccio = 2 giri. * 1 giro dir e 1 giro rov *, ripetere *-*. M LEGACCIO (avanti e indietro): Lavorare tutti i f a dir. 1 “costa” a m legaccio = 2 f dir. ---------------------------------------------------------- DIETRO: Avviare 8 m con 1 capo di BabyAlpaca Silk e 1 capo di Kid-Silk (= 2 capi) e dividerli su 4 f a doppia punta n° 5 mm (= 2 m per f). Lavorare seguendo A.1 (= 8 ripetizioni di A.1 in larghezza). Quando sono stati lavorati i primi 15-15-19-19 giri di A.1, spostare l’inizio del giro 1 m verso sinistra, prima a giri alterni, poi ogni 4 giri – cioè l'inizio del giro è sempre prima del 1° gettato del diagramma in modo da renderlo meno visibile. L’inizio del giro alla fine sarà al centro della 1° ripetizione di A.1. FARE ATTENZIONE ALLA TENSIONE DEL LAVORO! Passare ai f circolari quando necessario. Quando A.1 è stato lavorato 1 volta in verticale = 144-144-176-176 m sul giro e il lavoro misura circa 22-22-28-28 cm in diametro. Inserire 8 segnapunti nel lavoro, inserire 1 segnapunti nella 1° m sul giro, poi inserire 7 segnapunti a 17-17-21-21 m di distanza, i segnapunti sono direttamente sopra la punta di ogni foglia. Lavorare a M LEGACCIO – leggere la spiegazione sopra, ALLO STESSO TEMPO sul 1° giro aumentare 1 m a ogni lato dei segnapunti. Aumentare con 1 gettato a ogni lato delle m con il segnapunti – sul giro successivo lavorare i gettati a rov ritorto per evitare buchi = 16 aumenti per giro. Aumentare in questo modo a giri alterni per un totale di 1-2-1-2 volte = 160-176-192-208 m. Continuare a m legaccio fino a quando il lavoro misura 26-28-32-34 cm in diametro. Sul giro successivo, lavorare a dir, e ALLO STESSO TEMPO intrecciare tutte le m tra il 2° e 3° segnapunti e tra il 7° e 8° segnapunti + 1 m a ogni lato del segnapunti per gli scalfi (= intrecciare 23-25-27-29 m a ogni lato). Lavorare il giro successivo a rov, ALLO STESSO TEMPO avviare 23-25-27-29 nuove m (in modo lasso) sulle m intrecciate tra il 2° e il 3° segnapunti e tra il 7° e 8° segnapunti. Quando sono state avviate ancora tutte le m, ci sono 160-176-192-208 m sul f. Poi lavorare come segue: lavorare A.2 su tutte le m, ALLO STESSO TEMPO aumentare 1 m a ogni lato delle m con il segnapunti su ogni giro con la stella (= 16 m per giro di aumenti). Lavorare A.2 2 volte in verticale = 288-304-320-336 m. Il lavoro misura circa 56-58-62-64 cm in diametro. DAVANTI SINISTRO: Poi lavorare come segue: tenere le m tra il 2° e il 4° segnapunti sul f, trasferire le m rimaste su un fermamaglie = 72-76-80-84 m sul f. Lavorare a M LEGACCIO – leggere la spiegazione sopra – avanti e indietro su queste m, ALLO STESSO TEMPO alla fine di ogni f trasferire le ultime 2 m su un fermamaglie (non lavorarle, girare). NOTA: Continuare ad aumentare a ogni lato del 3° segnapunti ogni 4 f. Continuare fino a quando rimangono 32 m sul f. Trasferire le ultime 32 m su un fermamaglie. DAVANTI DESTRO: Trasferire le m tra il 6° e 8° segnapunti sui f circolari n° 5 mm, e lavorare nello stesso modo del davanti sinistro. Poi lavorare a dir tutte le m dei fermamaglie dal diritto del lavoro e riportarle sui f circolari n° 5 mm – riprendere a ritorto il filo tra le m ogni volta che la m a ogni lato viene riportata sul f (cioè a m alterne per evitare buchi nei punti di passaggio) = circa 352-376-400-424 m. Lavorare 2 coste. Intrecciare senza stringere a dir dal diritto del lavoro come segue: 1 m dir, ((** inserire il f destro tra le prime 2 m sul f sinistro (cioè tra le m sul f, non attraverso le m), fare 1 gettato sul f destro, farlo passare tra le m e riportare il gettato sul f sinistro **, ripetere **-** altre 2 volte (= 3 nuove m sul f sinistro). * Lavorare a dir la 1° m sul f sinistro, accavallare la 1° m sul f destro sull’ultima m lavorata *)), ripetere *-* 6 volte in totale e riperere ((-)) lungo tutto il cardigan fino a quando rimane 1 m, tagliare il filo e farlo passare nell’ultima m rimasta. MANICHE: Lavorate in tondo con i f a doppia punta. Avviare 30-30-32-34 m con i f a doppia punta n° 5 mm con 1 capo di BabyAlpaca Silk e 1 capo di Kid-Silk (= 2 capi). Lavorare 4 coste, poi lavorare a m rasata. Inserire 1 segnapunti al centro sotto la manica. Quando il lavoro misura 6 cm, aumentare 1 m a ogni lato del segnapunti sotto la manica. Aumentare in questo modo ogni 4-3½-3½-4 cm per un totale di 7-9-10-10 volte = 44-48-52-54 m. Lavorare fino a quando il lavoro misura 35-40-44-48 cm, intrecciare. Lavorare l’altra manica. CONFEZIONE: Attaccare le maniche. |
||||||||||||||||||||||
Spiegazioni del diagramma |
||||||||||||||||||||||
|
||||||||||||||||||||||
 |
||||||||||||||||||||||
 |
||||||||||||||||||||||
 |
||||||||||||||||||||||
Avete terminato questo modello?Allora taggate le vostre foto con #dropspattern #alvinajacket o inviatele alla #dropsfan gallery. Avete bisogno di aiuto con questo modello?Troverete 24 video tutorial, una sezione per i commenti/domande e molto altro guardando il modello su www.garnstudio.com © 1982-2026 DROPS Design A/S. Ci riserviamo tutti i diritti. Questo documento, compreso tutte le sue sotto-sezioni, è protetto dalle leggi sul copyright. Potete leggere quello che potete fare con i nostri modelli alla fine di ogni modello sul nostro sito. |
||||||||||||||||||||||


Con oltre 40 anni di esperienza nel design di modelli di maglia e uncinetto, DROPS Design offre la più estesa collezione di modelli gratuiti su internet - tradotti in 17 lingue. Ad oggi vi possiamo fornire 324 cataloghi e 12290 modelli - 9561 dei quali sono tradotti in Italiano.
Ci stiamo impegnando molto per darvi il meglio che vi possiamo offrire in termini di maglia e uncinetto, ispirazioni e consigli così come filati di grande qualità ad un prezzo incredibile! Volete utilizzare i nostri modelli per qualcosa d'altro oltre al vostro uso personale? Potete leggere tutto ciò che è consentito nel testo sul Copyright in basso su tutte le pagine dei nostri modelli. Buon lavoro!
Lasciare un commento sul modello DROPS Children 27-12
Noi saremmo felici di ricevere i tuoi commenti e opinioni su questo modello!
Se vuoi fare una domanda, fai per favore attenzione a selezionare la categoria corretta nella casella qui sotto per velocizzare il processo di risposta. I campi richiesti sono indicati da *.