
Categorie popolari
State cercando un filato?


Commenti / Domande (85)
![]() Stefanie ha scritto:
Stefanie ha scritto:
Hallo, ich kenne mich beim Rumpfteil nicht aus. Da steht die 2 ersten Runden vom A.1-A.3 wiederholen, bis 8 cm erreicht sind. Soll da nicht die Runde wie oben beschrieben *-* wiederholt werden? Und müssen die 10 M in je 2 Runden abgenommen werden? Vielen Dank
29.08.2019 - 20:49DROPS Design ha risposto:
Liebe Stefanie, ja genau, zuerst stricken Sie wie von *-* wie beschrieben mit den 2 ersten Reihen in A.1-A.3 bis 8 cm erreicht sind, dann stricken Sie wie von *-* beschrieben aber jetzt mit den 2 letzten Reihen in A.1-A.3 - Es werden 2 M in jedem A.1 + 3 M in jedem A.2 abgenommen (= mit 2 li zusammen). Viel Spaß beims tricken!
30.08.2019 - 09:15
![]() GOSIA ha scritto:
GOSIA ha scritto:
Mam problem z zamknięciem oczek po skończeniu ściągaczu. Wyszło mi8 oczek zamiast 10. Rozmiar s
20.02.2019 - 23:16DROPS Design ha risposto:
Witaj Gosiu, napisz mi dokładniej, w którym to jest miejscu we wzorze.
21.02.2019 - 16:47
![]() Hanne Vinther ha scritto:
Hanne Vinther ha scritto:
Hej drops. Jeg undrer mig over, at ved str. S. Skal man slå 222 m op og det kommer til at blive 130 cm hvis den måde jeg regner med det. Så 222/17= 130 cm - hvor mønsteret siger 102 cm. Dvs. At der er 28 cm større end mønsteret.
20.02.2019 - 18:57DROPS Design ha risposto:
Hei Hanne. Strikkefastheten er oppgitt i glattstrikk, og de tallene du regner med er de som brukes når det strikkes vrangbord. Vrangbord er mye mer elastisk enn glattstrikk, og trekker seg naturlig mer sammen når den henger rett, Derfor strikkes det med fler masker i vrangborden - for at det ikke skal være en drastisk viddeforskjell mellom vrangborden og resten av bolen. Etter vrangborden feller du til 172 masker. Deler du dette på 1,7 får du litt over 101cm. God fornøyelse
27.02.2019 - 11:54Tini ha scritto:
Hola! No entiendo cómo se deben hacer las disminuciones una vez que la labor mide 10 cm. ¿En qué secciones debo aplicar el tip para disminuciones? ¿En los primeros 16 pts derechos al inicio de la vuelta?
14.12.2018 - 10:37DROPS Design ha risposto:
Hola Tini. Hay dos tipos de disminuciones: uno lo aplicamos a cada sección de 8 reveses ( hay cuatro secciones a lo largo de la vuelta), disminuyendo 1 punto trabajando 2 puntos juntos de revés. El otro tipo de disminución lo aplicamos al principio y al final de la secciones en punto jersey ( que son dos - uno en cada lateral). Estas disminuciones se trabajan según el Tip para las disminuciones explicado en el patrón.
15.12.2018 - 23:27Stavroula ha scritto:
Hello DROPS - team. I'd like to knit this pullover for my daughter and I need to order the yarn for it. But it doesn't seem to have any instructions about the size. I mean how to find the right size for her? There is this diagram in the end with some measurements but it doesn't say if and how much of positive ease there is (I assume there is some positive ease on this pullover), etc. could you please help me by giving me some clearer instructions about the size? Thank you in advance.
04.11.2018 - 13:20DROPS Design ha risposto:
Dear Mrs Stavroula, measure on of her jumper she likes and compare to the measurement in the chart below (taken flat from side to side - in cm) - you will then adjust how much "positive ease" you'd like the jumper to be for her - read more about sizing here. Happy knitting!
05.11.2018 - 09:33
![]() Ilene Toller ha scritto:
Ilene Toller ha scritto:
I am getting ready to knit the front and back of the pattern; however, I am confused about the direction to bind off 2 stitches for the armholes when at the end of the row because it leaves one stitch after the bind off. Should this be cut and start knitting each side separately basically knitting back and forth on the circular needle for each side? Thank you for your help!
06.10.2018 - 04:00DROPS Design ha risposto:
Dear Ilene, you re right, after you separate the stitches for back and front (at teh same time bind off the first couple of stitches to shape teh armhole, you have to cut the thread, move the yarn to the new first stitch of the row and knit the front and teh back separately, and flat (back and forth on the needle). Happy Knitting!
07.10.2018 - 23:10
![]() Jane Kyle ha scritto:
Jane Kyle ha scritto:
Hi! You've probably answered already in different languages, and I understand most of the French responses. However, can you please confirm to me that after the first two rounds you continue in using the section within the stars (*_*) to do the remains rounds of A1 to A3 for 8cm? It would match up with the stitches that I have on my needle. I'm assuming that I don't simply knit A1, A2, A3 all in a row for the entire round? I hope this makes sense lol. Thanks :)
23.09.2018 - 01:18DROPS Design ha risposto:
Dear Jane, yes, it does make sense,, and yes, you understand right. After the first 2 rounds, you knit what is described between the *-*, using the appropriate rows from teh diagrams. Happy knitting!
23.09.2018 - 23:18
![]() Saillet Deborah ha scritto:
Saillet Deborah ha scritto:
Bonjour, Je fais le pull en L. Après les 8 cm du début , je ne comprend pas comment faire des diminutions sur les 46m des cotés . Je ne comprend pas comment faire les diminutions de façon regulieres
16.09.2018 - 20:45DROPS Design ha risposto:
Bonjour Mme Saillet, vous trouverez ici comment répartir des diminutions. Bon tricot!
17.09.2018 - 09:34
![]() Moniqueboileau ha scritto:
Moniqueboileau ha scritto:
Je.comprends les.diminution après le 8 cm du début du dos et devant merci beaucoup
12.07.2018 - 22:22DROPS Design ha risposto:
Bonjour Mme Boileau, à 8 cm, vous tricotez les 2 derniers tours de A.1 - A.3 = vous diminuez 2 m dans chaque A.1, 3 m dans chaque A.2 et 5 m dans chaque A.3, en même temps sur ce même tour, diminuez 10-20 m (cf taille) à intervalles réguliers dans les mailles 24-72 m en côtes de chaque côté de A.1-A.3 (= début du tour + côté + fin du tour). Bon tricot!
13.07.2018 - 07:14
![]() Meriem ha scritto:
Meriem ha scritto:
Beste, ik ben deze trui aan het breien in xxl en ik heb een vraag over de mouwen. Hoeveel steken moet je op het einde overhouden? Hoeveel steken moet je dus op de laatste naald afkanten? Je moet breien tot 45 cm en dan 6 steken afkanten maar vanaf dan kan ik er niet meer goed aan uit... Je moet dan 3 keer 2 steken afkanten en dan 3 keer 1 steek afkanten, dan zijn er nog 55 steken over denk ik? Klopt dit? Hoe moet ik dan verder afkanten? Alvast bedankt voor uw antwoord.
17.02.2018 - 22:42DROPS Design ha risposto:
Bij een hoogte van 45 cm (op dat moment heb je 70 steken op de naald) kant je 6 steken af in het midden, daarna nog 3 x 2 steken en 3 x 1 steken, waardoor je 55 steken over houdt. Dan kan je steeds 2 steken af aan beide kanten tot het werk 54 cm meet. Hoeveel je daarna over houdt hang dus een beetje af van hoe je stekenverhouding in de hoogte is.
18.02.2018 - 14:00
|
||||||||||||||||||||||||||||
Snow Tracks#snowtrackssweater |
||||||||||||||||||||||||||||
 |
 |
|||||||||||||||||||||||||||
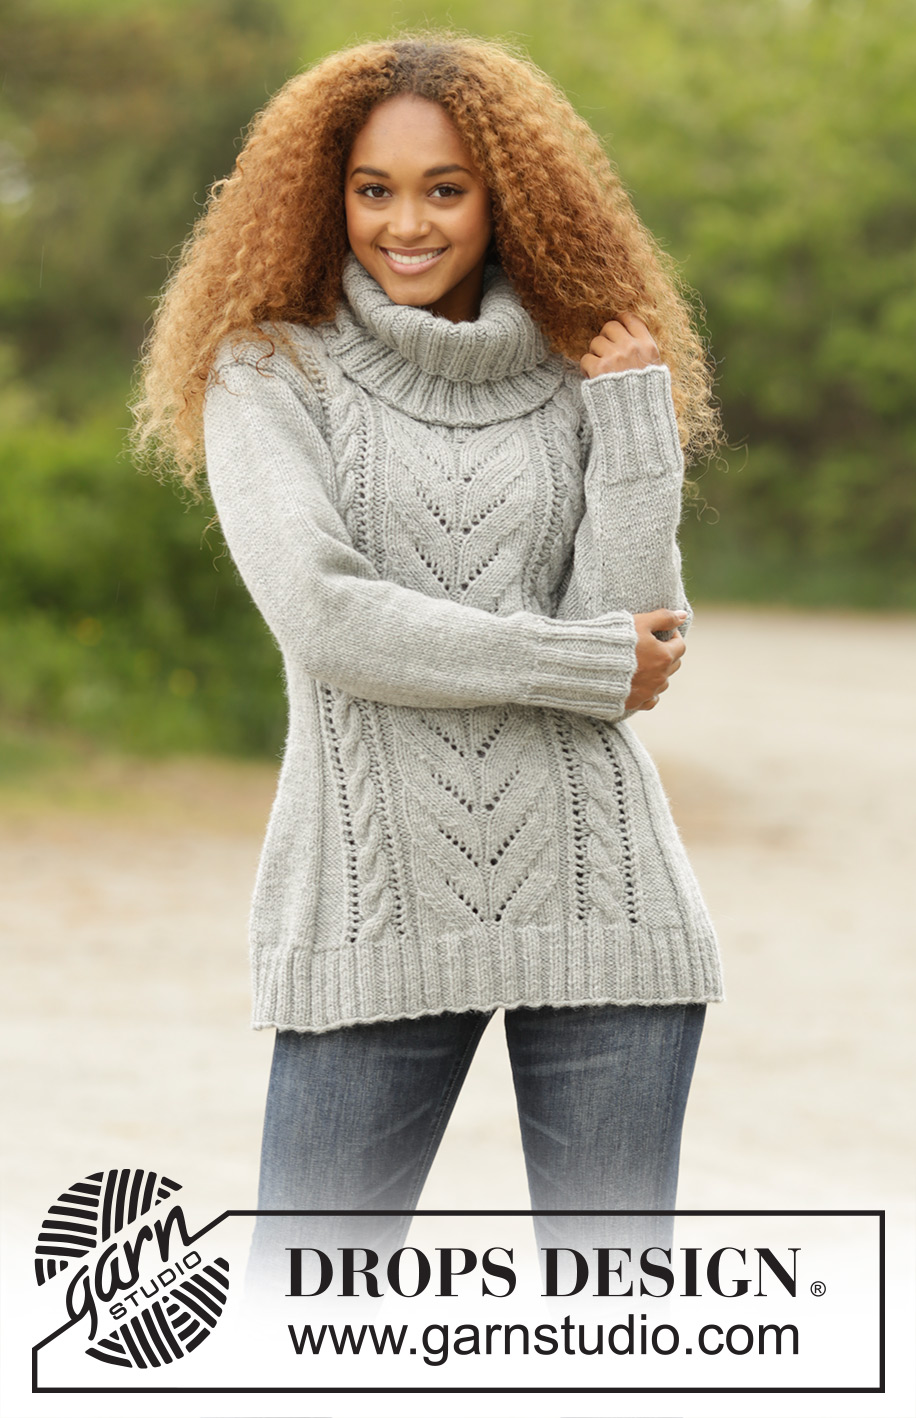
Maglione DROPS ai ferri, con trecce e collo separato, in "Nepal". Taglie: Dalla S alla XXXL.
DROPS 171-20 |
||||||||||||||||||||||||||||
|
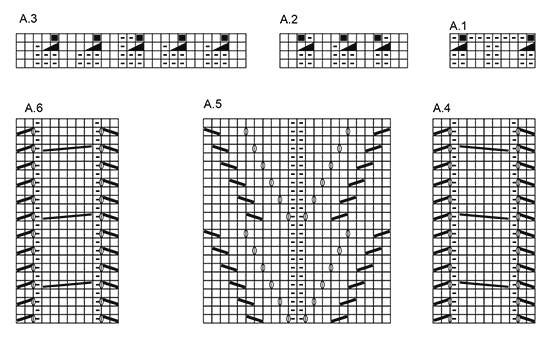
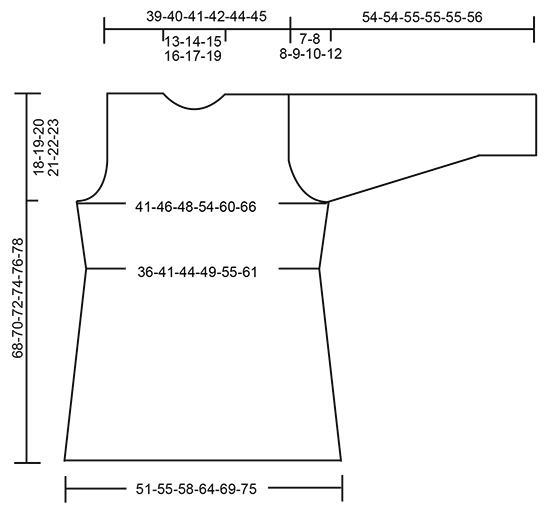
MOTIVO: Vedere i diagrammi da A.1 a A.6. SUGGERIMENTO PER LE DIMINUZIONI: Diminuire 1 m da ciascun lato dei gruppi di m lavorate a maglia rasata come segue: 1 m dir, passare 1 m a dir senza lavorarla, 1 m dir, accavallare la m passata sulla m lavorata, lavorare finché non rimangono 3 m, 2 m insieme a dir, 1 m dir. SUGGERIMENTO PER GLI AUMENTI: Per aumentare 1 m, fare 1 m gettata dopo la prima m e prima dell’ultima m lavorate a maglia rasata; nel corso del giro successivo, lavorare le m aumentate ritorte, per evitare che si formino dei buchi. PUNTO LEGACCIO (in tondo): Lavorare * 1 giro a dir, 1 giro a rov *, ripetere da *-*. 1 costa a legaccio = 2 giri. ---------------------------------------------------------- MAGLIONE Si lavora in tondo sui ferri circolari. DAVANTI e DIETRO: Avviare 222-238-254-286-302-318 m sui ferri circolari n° 4,5 con il filato Nepal. Lavorare 1 giro a dir. Proseguire come segue: * 1 m rov, coste 2 m dir / 2 m rov sulle 12-16-20-28-32-36 m successive, 2 m dir, diagramma A.1 (= 10 m), diagramma A.2 (= 15 m), 2 m rov, diagramma A.3 (= 27 m), 2 m rov, diagramma A.2, diagramma A.1, 2 m dir, coste 2 m rov / 2 m dir sulle 12-16-20-28-32-36 m successive, 1 m rov *, ripetere da *-* ancora 1 volta. RICORDARSI DI MANTENERE LA CORRETTA TENSIONE DEL LAVORO! Ripetere i primi 2 giri dei diagrammi A.1 - A.3 finché il lavoro non misura 8 cm. Lavorare ora gli ultimi 2 giri dei diagrammi A.1 - A.3 e, ALLO STESSO TEMPO, diminuire 10-10-14-20-18-16 m a intervalli regolari sulle 30-38-46-62-70-78 m lavorate a coste da ciascun lato = 172-188-196-216-236-256 m. Passare ai ferri circolari n° 5. Proseguire come segue: * 10-14-16-21-26-31 m dir, 8 m rov, diagramma A.4 (= 12 m), 2 m rov, diagramma A.5 (= 22 m), 2 m rov, diagramma A.6 (= 12 m), 8 m rov, 10-14-16-21-26-31 m dir *, ripetere da *-* ancora 1 volta. Quando il lavoro misura 10 cm, diminuire 1 m in ogni gruppo di 8 m lavorate a rov e diminuire 1 m da ciascun lato delle sezioni lavorate a maglia rasata - VEDERE IL SUGGERIMENTO PER LE DIMINUZIONI (= 8 m diminuite); ripetere queste diminuzioni ogni 4 cm, 6 volte in tutto, alternare le diminuzioni alla destra e alla sinistra dei gruppi di m lavorate a rov = 124-140-148-168-188-208 m. Quando il lavoro misura 34 cm, aumentare 1 m in ogni gruppo di m lavorate a rov in cui sono state fatte le diminuzioni prima, e 1 m da ciascun lato delle sezioni lavorate a maglia rasata (= 8 m aumentate) - VEDERE IL SUGGERIMENTO PER GLI AUMENTI; ripetere questi aumenti quando il lavoro misura 46-47-48-49-50-51 cm = 140-156-164-184-204-224 m. Quando il lavoro misura 50-51-52-53-54-55 cm, lavorare come segue sul diritto del lavoro: intrecciare le prime 2-3-3-3-3-3 m, lavorare le 66-72-76-86-96-106 m successive come prima, intrecciare le 4-6-6-6-6-6 m successive, lavorare le 66-72-76-86-96-106 m successive come prima e intrecciare le ultime 2-3-3-3-3-3 m. Lavorare ora ogni parte separatamente avanti e indietro sui ferri circolari. DIETRO: = 66-72-76-86-96-106 m. Proseguire con il motivo come prima, ALLO STESSO TEMPO, intrecciare da ciascun lato per gli scalfi ogni 2 ferri, come segue: Intrecciare 2 m 0-1-1-2-3-4 volte e 1 m 0-0-1-3-5-7 volte = 66-68-70-72-74-76 m. Proseguire seguendo il motivo come prima. Quando il lavoro misura 66-68-70-72-74-76 cm, intrecciare le 24-26-28-30-32-34 m centrali per lo scollo e finire ogni spalla separatamente. Al ferro successivo intrecciare 1 m per lo scollo = per ogni spalla rimangono 20 m. Intrecciare le m quando il lavoro misura 68-70-72-74-76-78 cm. DAVANTI: = 66-72-76-86-96-106 m. Proseguire con il motivo come prima e intrecciare per gli scalfi come indicato per il dietro = 66-68-70-72-74-76 m. Proseguire seguendo il motivo in questo modo. Quando il lavoro misura 60-62-64-66-68-70 cm, mettere in attesa su un ferma maglie le 18-20-22-24-26-28 m centrali per lo scollo e finire ogni spalla separatamente. Intrecciare ora per lo scollo ad ogni ferro 2 m 1 volta, 1 m 2 volte = per la spalla rimangono 20 m. Lavorare le m che non completano una intera ripetizione del motivo a maglia rasata. Intrecciare le m quando il lavoro misura 68-70-72-74-76-78 cm. MANICHE: Si lavorano in tondo sui ferri a doppia punta. Avviare 45-45-50-50-50-50 m sui ferri a doppia punta n° 4,5 con il filato Nepal. Lavorare 1 giro a dir. Proseguire a coste = 2 m dir / 3 m rov. Quando le coste misurano 10 cm, lavorare 1 giro a dir e, ALLO STESSO TEMPO, diminuire 11-9-12-10-10-8 m a intervalli regolari = 34-36-38-40-40-42 m. Passare ai ferri a doppia punta n° 5 e proseguire a maglia rasata. Inserire 1 segno all’inizio del giro. Quando il lavoro misura 11 cm, aumentare 1 m da ciascun lato del segno; aumentare ogni 4-3½-3-2½-2-1½ cm per un totale di 9-10-11-13-15-17 volte = 52-56-60-66-70-76 m. Quando il lavoro misura 47-47-47-46-45-44 cm (ATTENZIONE! Misure più corte nelle taglie più grandi perché l’arrotondamento della manica è più lungo e le spalle sono più larghe), intrecciare 6 m al centro, sotto la manica (= intrecciare le 3 m che precedono e le 3 m che seguono il segno); finire ora il lavoro avanti e indietro sui ferri. Intrecciare per l’arrotondamento delle maniche all’inizio di ogni ferro da ciascun lato, come segue: 2 m 3 volte e 1 m 0-1-1-2-3-5 volte; intrecciare poi 2 m da ciascun lato finché il lavoro non misura 53-53-54-54-54-55 cm; intrecciare 3 m da ciascun lato; intrecciare le rimanenti m. La manica misura 54-54-55-55-55-56 cm in tutto. COLLO: Con i ferri circolari corti n° 5 ed il filato Nepal, riprendere ca. da 64 a 86 m intorno allo scollo (comprese le maglie messe in attesa sul ferma maglie). Lavorare 2 coste a PUNTO LEGACCIO – vedere le spiegazioni sopra; intrecciare le m. COLLO SEPARATO: Avviare 108 m sui ferri circolari corti n° 4,5 con il filato Nepal. Lavorare 1 giro a dir. Proseguire a coste = 2 m dir / 2 m rov. Lavorare a coste per 25 cm, poi intrecciare le m lavorando a dir le m dir e a rov le m rov. CONFEZIONE: Cucire le spalle e montare le maniche. |
||||||||||||||||||||||||||||
Spiegazioni del diagramma |
||||||||||||||||||||||||||||
|
||||||||||||||||||||||||||||
 |
||||||||||||||||||||||||||||
 |
||||||||||||||||||||||||||||
Avete terminato questo modello?Allora taggate le vostre foto con #dropspattern #snowtrackssweater o inviatele alla #dropsfan gallery. Avete bisogno di aiuto con questo modello?Troverete 27 video tutorial, una sezione per i commenti/domande e molto altro guardando il modello su www.garnstudio.com © 1982-2026 DROPS Design A/S. Ci riserviamo tutti i diritti. Questo documento, compreso tutte le sue sotto-sezioni, è protetto dalle leggi sul copyright. Potete leggere quello che potete fare con i nostri modelli alla fine di ogni modello sul nostro sito. |
||||||||||||||||||||||||||||


Con oltre 40 anni di esperienza nel design di modelli di maglia e uncinetto, DROPS Design offre la più estesa collezione di modelli gratuiti su internet - tradotti in 17 lingue. Ad oggi vi possiamo fornire 324 cataloghi e 12290 modelli - 9561 dei quali sono tradotti in Italiano.
Ci stiamo impegnando molto per darvi il meglio che vi possiamo offrire in termini di maglia e uncinetto, ispirazioni e consigli così come filati di grande qualità ad un prezzo incredibile! Volete utilizzare i nostri modelli per qualcosa d'altro oltre al vostro uso personale? Potete leggere tutto ciò che è consentito nel testo sul Copyright in basso su tutte le pagine dei nostri modelli. Buon lavoro!
Lasciare un commento sul modello DROPS 171-20
Noi saremmo felici di ricevere i tuoi commenti e opinioni su questo modello!
Se vuoi fare una domanda, fai per favore attenzione a selezionare la categoria corretta nella casella qui sotto per velocizzare il processo di risposta. I campi richiesti sono indicati da *.