
Categorie popolari
State cercando un filato?


Commenti / Domande (44)
![]() Nina CH ha scritto:
Nina CH ha scritto:
Hello, This is my first project and I am sorry if my questions are silly. I tried to research first but found no help. 1. When knitting Yoke, do I use stocking stitch (one round K, next round P)? 2. I really don't understand increases. What does "K2 in next stitch" mean? I understood it as knit 2 stitches in one but then it's a decrease! I read a similar question below but don't understand. Appreciate your help!
24.03.2025 - 12:30DROPS Design ha risposto:
Hi Nina, The jumper is worked in the round to begin with, which means, for the stocking stitch, you knit all rounds. When you work back and forth later, for the split in each side, you knit from the right side and purl from the wrong side. Knit 2 in one stitch means you first knit 1 stitch in the front loop, then knit 1 stitch in the back loop of the same stitch so that 1 stitch becomes 2 (an increase). Happy knitting!
25.03.2025 - 06:48
![]() Kristine Bergsland ha scritto:
Kristine Bergsland ha scritto:
Hei, skulle gjerne sett flere bilder av denne modellen. Fra bakside, og et bedre bilde av hvordan den ser ut nederst. Vh. Kristine
25.02.2024 - 10:09
![]() Nora ha scritto:
Nora ha scritto:
Nora wrote a correction:: Oh no! I was doubling the 2 Xtra stitches for the body ineases, at each side of each PLACE MARKER instead of 4 inside the each body sections and 2 on each side of each sleeve section = 12 total.! That is why the raglan line did not line up !! :( I will have to unravel and only double the 2 stitches inside the body panes and only double one on the slee e sides.!!! Thank you for your patience. I just dont want to give up yet.
18.10.2023 - 22:15
![]() Nora ha scritto:
Nora ha scritto:
Oh no! I was doubling the 2 Xtra stitches for the body ineases, at each side of each!!! That is why the raglan line did not line up !! :( I will have to unravel and only double the 2 stitches inside the body panes only!!!
17.10.2023 - 20:55
![]() Nora ha scritto:
Nora ha scritto:
Thank you for your answer about the raglan increases! It helped :) Now, about the body increases. So there are 2 increases (1 on each side of the sleeve markers, totaling 8 stitches added for a certain number of rows per size. Then, it changes time only 2 increases on each side of the markers for a total of 4 increases, for a certain number of rows, correct?
16.10.2023 - 17:21DROPS Design ha risposto:
Dear Nora, correct the increases are done on a different rhythm on body and on sleeves, but you will increase either 2 sts or 1 stitch on body and only 2 st on each sleeve, so when increasing 2 sts on body you will increase 12 sts (2 sts at the beg of front/back piece + 2 sts at the end of front/back piece + 1 st at the beg of sleeves + 1 st at the end of sleeves). Then you will increase only 1 stitch at the beg + 1 st at th end of front/back piece (and still 1 st on each side of sleeve). Happy knitting!
17.10.2023 - 09:15
![]() Nora ha scritto:
Nora ha scritto:
I don't understand the body increases: Before 1st and 3rd marker: Work until 3 sts remain before marker, K 2 in next st, 1 YO, K 2. After 2nd and 4th marker: K 2, 1 YO, K 2 in next st. K2 in next stitch means that you k and k through the back loop? And add a nee stitch in addition to yhe YO?
14.10.2023 - 06:43DROPS Design ha risposto:
Dear Nora, yes, you knit 1 stitch in the front loop and 1 stitch in the back loop. And yes, you will have 2 new stitches for every marker (As shown in the RAGLAN BODY tip, you inc 2 sts on each marker). Happy knitting!
16.10.2023 - 00:28
![]() Jasmine L Copeland ha scritto:
Jasmine L Copeland ha scritto:
Hi it is unclear to me when to do inc 1 or inc 2 for the raglan body. I am knitting a small
18.03.2023 - 12:05DROPS Design ha risposto:
Dear Jasmine, the first 8 times (rounds) that you increase on the body, you will increase 2 stitches, before the 1st and 3rd markers and after the 2nd and 4th markers (as indicated in RAGLAN BODY). After having worked these increases 8 times, the next time you increase on the body you will increase only 1 stitch at each marker. You will continue with this increase 7 times in total (so 6 more times). Happy knitting!
19.03.2023 - 20:25
![]() Pat Lampron ha scritto:
Pat Lampron ha scritto:
Now I get it !!! Sorry, really dumb when it comes to math (and I’m knitting???) anyway it finally clicked after reading your explanation several times and the instructions a few dozen!!! One less sweater I have to rip out... thanks so much!!!
15.10.2020 - 18:31
![]() Pat Lampron ha scritto:
Pat Lampron ha scritto:
In answer to your question I’m working on a large and then will be making a medium...
15.10.2020 - 11:25DROPS Design ha risposto:
Dear Mrs Lampron, in size L you cast on 85 sts and increase 21 sts evenly = 106 sts - you then increase for raglan: 2 sts on each sleeve a total of 17 times = 2 x17x2 sleeves = 68 sts inc. Then on body: 4 sts x 12 x 2 (front/back) = 96 sts + 2 sts x 5 x 2 (front/back) = 20 sts = 106+68+96+20=290 sts. Hope this will help you!
15.10.2020 - 11:58
![]() Pat Lampron ha scritto:
Pat Lampron ha scritto:
I’m working on this pattern and numbers don’t seem to be adding up in regard to the increases - still working on the beginning before putting sleeve stitches on a holder. If I do the increases the number of times listed, the front and backs definitely don’t add up. Can you look at this and give me some clarification?
14.10.2020 - 21:37DROPS Design ha risposto:
Dear Mrs Lampron, sure we can explain you, just tell us which size you are working on.
15.10.2020 - 09:04
|
|
Weekend Getaway#weekendgetawaysweater |
|
|
|
|
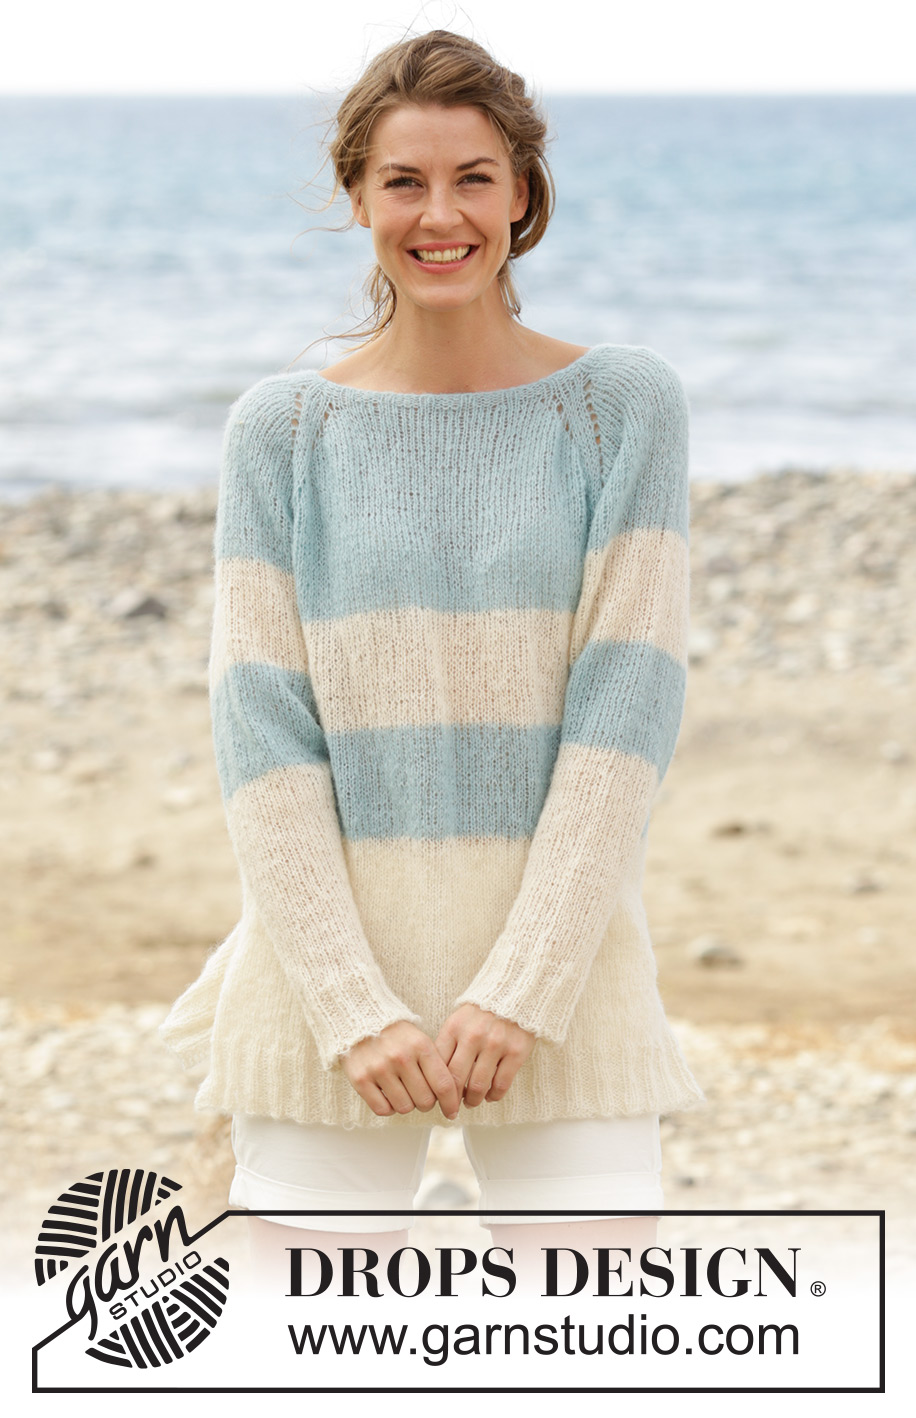
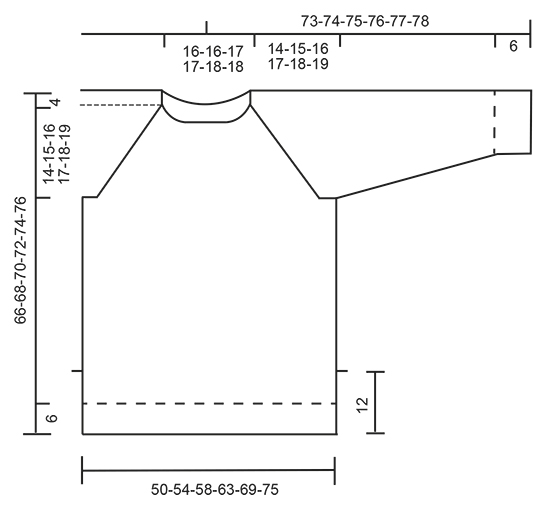
Maglia DROPS ai ferri, con raglan, spacchi ai lati e con strisce, lavorato dall’alto verso il basso (top down), in "Brushed Alpaca Silk". Taglie: Dalla S alla XXXL.
DROPS 169-7 |
|
|
PUNTO LEGACCIO (in tondo): Lavorare * 1 giro a dir e 1 giro a rov *, ripetere da *-*. 1 “costa” a legaccio = 2 giri PUNTO LEGACCIO (avanti e indietro sui ferri): Lavorare tutti i ferri a dir. 1 “costa” a legaccio = 2 ferri a dir. STRISCE: Lavorare le strisce sul davanti/dietro e sulle maniche, come segue: Lavorare 9-9-10-10-11-11 cm con il colore panna. Lavorare 9-9-10-10-11-11 cm con il colore verde oceano chiaro, finire con il colore panna. RAGLAN SUL DAVANTI / DIETRO: ATTENZIONE: Al giro successivo, lavorare tutte le m gettate a dir; si devono formare i buchi. Aumentare 2 m come segue: Prima del 1° e del 3° segno: Lavorare finché non rimangono 3 m prima del segno, lavorare la m successiva 2 volte a dir, 1 m gettata, 2 m dir. Dopo il 2° ed il 4° segno: 2 m dir, 1 m gettata, lavorare la m successiva 2 volte a dir. Poi aumentare 1 m come segue: Prima del 1° e del 3° segno: Lavorare finché non rimangono 2 m prima del segno, 1 m gettata, 2 m dir. Dopo il 2° ed il 4° segno: 2 m dir, 1 m gettata. RAGLAN SULLE MANICHE: Aumentare 1 m dopo il 1° e il 3° segno, come segue: 2 m dir, 1 m gettata. Aumentare 1 m prima del 2° e del 4° segno, come segue: Lavorare finché non rimangono 2 m prima del segno, 1 m gettata, 2 m dir. Al giro successivo, lavorare le m gettate a dir: si devono formare i buchi. SUGGERIMENTO PER LE DIMINUZIONI: Diminuire come segue, prima del segno: Lavorare finché non rimangono 3 m prima del segno, lavorare 2 m insieme a dir, 1 m dir. Diminuire come segue, dopo il segno: 1 m dir, passare 1 m a dir senza lavorarla, 1 m dir, accavallare la m passata sulla m lavorata. ---------------------------------------------------------- MAGLIA: Si lavora a maglia rasata in tondo, dall’alto verso il basso fino agli spacchi laterali; dividere poi il lavoro e proseguire avanti e indietro fino alla fine del lavoro. ATTENZIONE: Inizio dei giri = al centro, sul dietro. SPRONE: Avviare 80-80-85-85-90-90 m sui ferri circolari n° 4,5 con il colore verde oceano chiaro. Lavorare 1 giro a dir. Lavorare 4 giri a coste (= 2 m dir / 3 m rov). Passare ai ferri circolari n° 5 e lavorare 1 giro a maglia rasata e, ALLO STESSO TEMPO, aumentare 18-20-21-25-24-30 m in modo uniforme = 98-100-106-110-114-120 m. Inserire ora 4 segni nel lavoro come segue: Lavorare le prime 15-16-16-16-17-18 m (= metà dietro), inserire il 1° segno, lavorare le 18-18-20-22-22-24 m successive (= manica), inserire il 2° segno, lavorare le 31-32-33-33-35-36 m successive (= davanti), inserire il 3° segno, lavorare le 18-18-20-22-22-24 m successive (= manica), inserire il 4° segno, lavorare le rimanenti 16-16-17-17-18-18 m (= metà dietro). Al giro successivo, iniziare ad aumentare per il RAGLAN. ATTENZIONE: gli aumenti del raglan sul davanti e dietro sono diversi da quelli sulle maniche - VEDERE RAGLAN SUL DAVANTI/DIETRO e RAGLAN SULLE MANICHE. Aumentare come segue: Lavorare finché non rimangono 3 m prima del 1° segno, lavorare la m successiva 2 volte a dir, 1 m gettata, 4 m dir (il segno si trova al centro di queste m), 1 m gettata, lavorare finché non rimangono 2 m prima del 2° segno, 1 m gettata, 4 m dir (il segno si trova al centro di queste m), 1 m gettata, lavorare la m successiva 2 volte a dir, lavorare finché non rimangono 3 m prima del 3° segno, lavorare la m successiva 2 volte a dir, 1 m gettata, 4 m dir (il segno si trova al centro di queste m), 1 m gettata, lavorare finché non rimangono 2 m prima del 4° segno, 1 m gettata, 4 m dir (il segno si trova al centro di queste m), 1 m gettata, lavorare la m successiva 2 volte a dir, lavorare le rimanenti m del giro. RICORDARSI LA TENSIONE DEL LAVORO! Ripetere questi aumenti ogni 2 giri come segue: sulle maniche: altre 14-15-16-17-19-20 volte (= 15-16-17-18-20-21 volte in tutto); sul davanti / dietro: aumentare ancora 2 m altre 7-9-11-14-16-20 volte (= 8-10-12-15-17-21 volte in tutto) e poi aumentare 1 m 7-6-5-3-3-0 volte. Terminati tutti gli aumenti, ci sono 250-268-290-314-342-372 m e il lavoro misura 14-15-16-17-18-19 cm dallo scollo al centro sul davanti verso il basso. Lavorare ora come segue: Lavorare le prime 38-42-45-49-54-60 m (= metà dietro), mettere in attesa su un ferma maglie le 48-50-54-58-62-66 m successive (= manica), avviare 8 m sotto la manica, lavorare le 77-84-91-99-109-120 m successive a dir (= davanti), mettere in attesa su un ferma maglie le 48-50-54-58-62-66 m successive (= manica), avviare 8 m sotto la manica, lavorare le rimanenti 39-42-46-50-55-60 m (= metà dietro). DA ADESSO IN AVANTI MISURARE IL LAVORO DA QUESTO PUNTO. DAVANTI E DIETRO: Ci sono ora 170-184-198-214-234-256 m. Proseguire in tondo a maglia rasata e a STRISCE - vedere le spiegazioni sopra. Quando il lavoro misura 35-36-37-38-39-40 cm, lavorare come segue: 39-43-46-50-55-61 m a maglia rasata, 6 m a PUNTO LEGACCIO - vedere le spiegazioni sopra, 79-86-93-101-111-122 m a maglia rasata, 6 m a punto legaccio, lavorare le restanti 40-43-47-51-56-61 m a maglia rasata. Proseguire in questo modo finché non sono state lavorate 2 coste a punto legaccio sulle 6 m ai lati (= m sopra agli spacchi laterali). Dividere ora il lavoro per il davanti e per il dietro, come segue: Lavorare le prime 42-46-49-53-58-64 m come prima (quindi a maglia rasata con 3 m a punto legaccio sul lato), girare e lavorare il ferro di ritorno sulle 85-92-99-107-117-128 m (lavorare le prime 3 m e le ultime 3 m a punto legaccio) = dietro. Mettere in attesa su un ferma maglie le rimanenti 85-92-99-107-117-128 m per il davanti. Lavorare le m sui ferri avanti e indietro finché il lavoro non misura 42-43-44-48-46-47 cm. Al ferro successivo sul diritto del lavoro, passare ai ferri circolari n° 4,5 e, allo stesso tempo, aumentare 13-16-19-21-21-25 m in modo uniforme (non aumentare sulle prime e sulle ultime 3 m) = 98-108-118-128-138-153 m. Lavorare 1 ferro sul rovescio del lavoro come prima. Proseguire a coste (2 m dir / 3 m rov) con 3 m a punto legaccio da ciascun lato. ATTENZIONE: Iniziare e finire le coste con 2 m dir prima e dopo le 3 m a punto legaccio ai lati. Quando le coste misurano 6 cm, intrecciare le m lavorando a dir le m dir e a rov le m rov. Il lavoro misura 66-68-70-72-74-76 cm in tutto dalla spalla. Riportare sui ferri di lavoro le m messe in attesa sul ferma maglie e lavorare come indicato per il dietro. MANICHE: Lavorare le maniche a maglia rasata in tondo sui ferri a doppia punta. Ci sono 48-50-54-58-62-66 m per ogni manica. Riportare sui ferri a doppia punta n° 5 le m messe in attesa sul ferma maglie e avviare 8 nuove m sotto la manica = 56-58-62-66-70-74 m. Lavorare in tondo, a maglia rasata e a strisce come indicato per il davanti e dietro e, ALLO STESSO TEMPO, inserire un segno al centro delle nuove m sotto la manica (quindi 4 nuove m prima e 4 nuove m dopo il segno). DA ADESSO IN AVANTI MISURARE IL LAVORO DA QUESTO PUNTO! Quando il lavoro misura 4 cm, diminuire 1 m da ciascun lato del segno - VEDERE IL SUGGERIMENTO PER LE DIMINUZIONI. Ripetere queste diminuzioni ca. ogni 4-4-3-3-2½-2½ cm altre 10-10-12-13-14-15 volte = 34-36-36-38-40-42 m. Quando la manica misura 45-45-45-45-44-44 cm (ATTENZIONE: misure più corte per le taglie più grandi perché lo sprone è più lungo), passare ai ferri a doppia punta n° 4,5 e aumentare 6-4-9-7-5-8 m in modo uniforme al giro successivo = 40-40-45-45-45-50 m. Lavorare a coste = 2 m dir / 3 m rov per 6 cm. Quando la manica misura 51-51-51-51-50-50 cm, intrecciare le m lavorando a dir le m dir e a rov le m rov. Lavorare l’altra manica in modo uguale. CONFEZIONE: Cucire le aperture sotto le maniche. |
|
 |
|
Avete terminato questo modello?Allora taggate le vostre foto con #dropspattern #weekendgetawaysweater o inviatele alla #dropsfan gallery. Avete bisogno di aiuto con questo modello?Troverete 27 video tutorial, una sezione per i commenti/domande e molto altro guardando il modello su www.garnstudio.com © 1982-2026 DROPS Design A/S. Ci riserviamo tutti i diritti. Questo documento, compreso tutte le sue sotto-sezioni, è protetto dalle leggi sul copyright. Potete leggere quello che potete fare con i nostri modelli alla fine di ogni modello sul nostro sito. |


Con oltre 40 anni di esperienza nel design di modelli di maglia e uncinetto, DROPS Design offre la più estesa collezione di modelli gratuiti su internet - tradotti in 17 lingue. Ad oggi vi possiamo fornire 324 cataloghi e 12290 modelli - 9561 dei quali sono tradotti in Italiano.
Ci stiamo impegnando molto per darvi il meglio che vi possiamo offrire in termini di maglia e uncinetto, ispirazioni e consigli così come filati di grande qualità ad un prezzo incredibile! Volete utilizzare i nostri modelli per qualcosa d'altro oltre al vostro uso personale? Potete leggere tutto ciò che è consentito nel testo sul Copyright in basso su tutte le pagine dei nostri modelli. Buon lavoro!
Lasciare un commento sul modello DROPS 169-7
Noi saremmo felici di ricevere i tuoi commenti e opinioni su questo modello!
Se vuoi fare una domanda, fai per favore attenzione a selezionare la categoria corretta nella casella qui sotto per velocizzare il processo di risposta. I campi richiesti sono indicati da *.