
Categorie popolari
State cercando un filato?


Commenti / Domande (205)
![]() Sandra ha scritto:
Sandra ha scritto:
I read what you said about the sleeve but im still confused. where do you start doing the double stitches for the sleeve, is it on the chain you make , or do i chain from a7, or what ? help pleaseeeeee.
05.09.2019 - 23:47DROPS Design ha risposto:
Dear Sandra, sleeves are worked separately from body; you first crochet A.7 = 3 chains, 1 sl st in 1st ch then work back and forth following diagram: on 1st row you work 7 dc in the chain-ring, then on 2nd row you work (2 dc in 1st dc, 1 dc in next dc) x 3 and finish with 2 dc in last dc, continue like this working A.7 back and forth. Happy crocheting!
06.09.2019 - 08:24
![]() Sandra ha scritto:
Sandra ha scritto:
When do you start working under the sleeve whole section
01.09.2019 - 21:46DROPS Design ha risposto:
Dear Sandra, I'm afraid I don't get your question here. Sleeves are worked separately from body (circle) back and forth with a seam. For the section after armhole (chains) have been worked, see previous answers. Happy crocheting!
02.09.2019 - 11:02
![]() Sandra ha scritto:
Sandra ha scritto:
Does a4 go under arm hole or over?
31.08.2019 - 21:04DROPS Design ha risposto:
Dear Sandra, you will work A.4 over the last row in A.3 = in the stitches from A.3 + in the chain-spaces for amrholes (so that there are 2 holes for each sleeve). Happy crocheting!
02.09.2019 - 10:16
![]() Sandra ha scritto:
Sandra ha scritto:
Ok I am having issues with the last part of the xxl size chart. It says to work a4 24 times but the arm holes are on that row. So what do I do?
30.08.2019 - 18:00DROPS Design ha risposto:
Dear Sandra, you work the 5th row in A.3 shaping the armholes at the same time, then on next round, work A.4, ie repeat diagram a total of 24 times in width in the round , ie in the stitches from 5th row on A.3 as well as over the ch-spaces for the armholes = there are 48 ch-spaces in total at the end of 1st row in A.4. Work A.4 1 time in height. Happy crocheting!
02.09.2019 - 08:29
![]() Sandra ha scritto:
Sandra ha scritto:
But there are no spaces in the last row of a3 ?
30.08.2019 - 16:47Sandra ha risposto:
Never mind i figured out
30.08.2019 - 17:54
![]() Sandra ha scritto:
Sandra ha scritto:
I am having trouble understanding the round when you start doing size for arm hole for the xxxl it is confusing. Is there away to understanding it better?
29.08.2019 - 23:56DROPS Design ha risposto:
Dear Sandra, work the 5th row in A.3 as explained in the written pattern: work from *-* a total of 25 times, then 1 st in next st, chain 30 and skip the next 15 sts+15 chains (= hole for the sleeve), work from *-* a total of 40 times, 1 st in next chain, repeat armhole = 30 ch, skip next 15 sts + 15 chains and finish round wiht 1 sl st in 3rd ch from beg of round. On next round you will repeat A.4 a total of 24 times in width, crocheting in the stitches from A.3 as well as in the chains. Happy crocheting!
30.08.2019 - 09:39
![]() Sandra ha scritto:
Sandra ha scritto:
Is there a written version somewhere. I don't understand the diagram pattern.
27.08.2019 - 23:11DROPS Design ha risposto:
Dear Sandra, there are only diagrams to this pattern, you will find here how to read crochet diagrams. Happy crocheting!
28.08.2019 - 08:55
![]() Rina ha scritto:
Rina ha scritto:
How can I contact a store and show them? I bought my yarn from Lindehobby do I send them pictures of my project and show them?
26.08.2019 - 17:35DROPS Design ha risposto:
Dear Rina, yes, you can send them pictures per mail this might help them to help you showing your work, it will be easier for them to find a solution seeing your sleeves. Happy crocheting!
27.08.2019 - 09:02
![]() Rina ha scritto:
Rina ha scritto:
Hi, When I finished both sleeves and tried to sew them into the arm hole circle the left one looks ok but the right one has the 3 chain line (the 3 chain starter I mean) in front which looks a bit odd I think it should be at the back. Are both left and right arm start the same way when joining with the cap? I am not sure what to do as I followed exactly and it came out nice on the left arm. It's just the right arm that looks like it's done the other way.
26.08.2019 - 15:28DROPS Design ha risposto:
Dear Rita, sleeves should be both the same, not sure how far we can help - you can maybe try to sew them so that there is no difference between both? Do not hesitate to show your store your work (even per mail), they might find the best solution looking at your pieces. Happy crocheting!
26.08.2019 - 16:20
![]() UchihaK ha scritto:
UchihaK ha scritto:
Hello, I am doing the L/XL pattern but I am stuck on A.3 I have finished A.3 in one height but the diameter is 36cm so I repeated the first round once more(the treble crochet) which I am not sure if it is correct but I have reached 38cm in diameter. Do I stop and do the armhole (if yes how do I proceed) or do I continue 2nd and 3rd round again for A.3 then do the armhole?
12.08.2019 - 02:03DROPS Design ha risposto:
Dear Mrs UchihaK, is your tension in height correct? Do you have the correct crochet tension in both width and height? It would be a better idea to get and keep the gauge to be sure you will get the right measurements. Happy crocheting!
12.08.2019 - 08:50
|
||||||||||||||||||||||||||||||||||||||||||||||||||||||||||
Sea Glass#seaglassjacket |
||||||||||||||||||||||||||||||||||||||||||||||||||||||||||
 |
 |
|||||||||||||||||||||||||||||||||||||||||||||||||||||||||
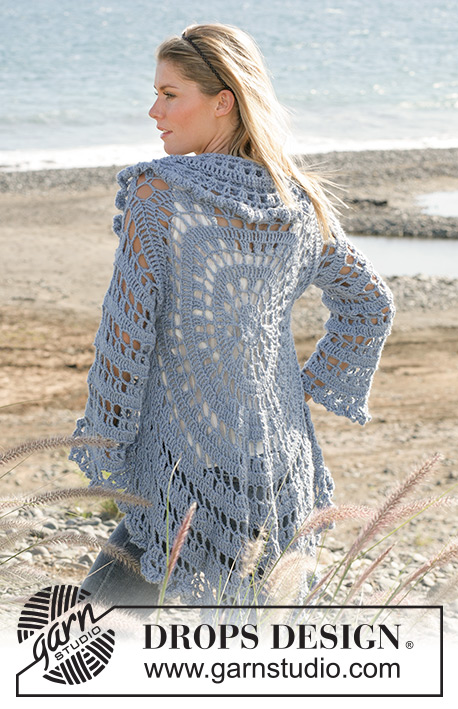
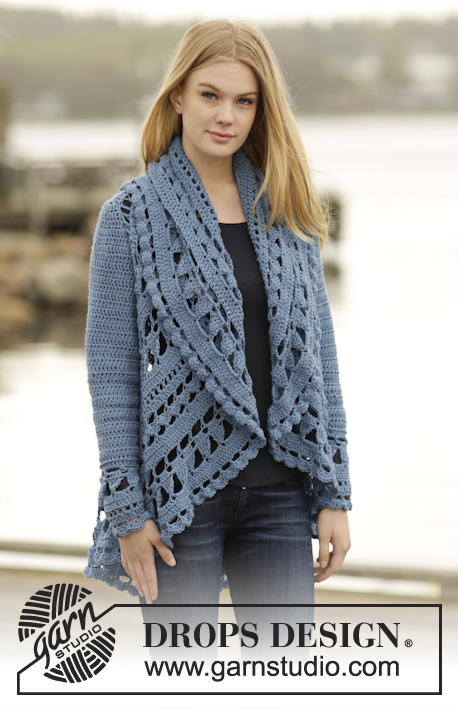
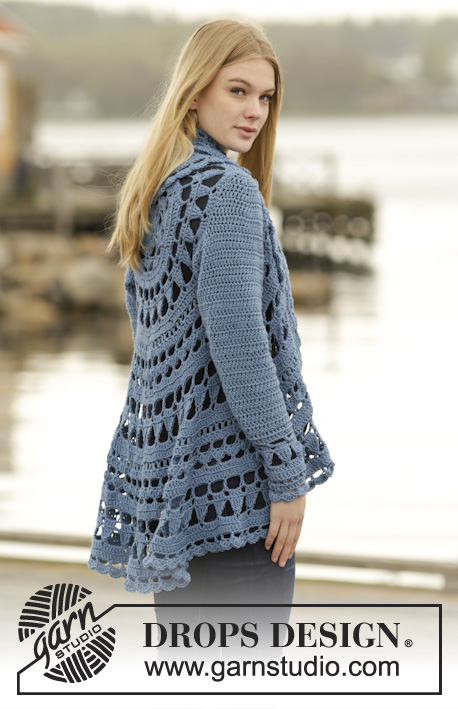
Cardigan DROPS lavorato all’uncinetto in tondo con motivo traforato in DROPS Merino Extra Fine o Sky. Taglie: S - XXXL.
DROPS 164-16 |
||||||||||||||||||||||||||||||||||||||||||||||||||||||||||
|
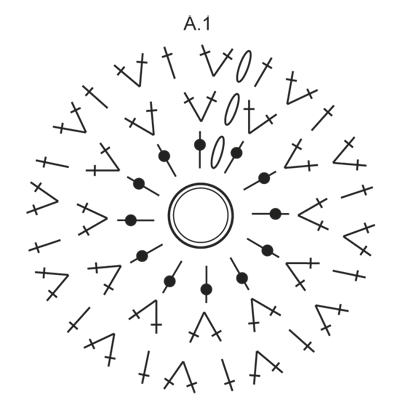
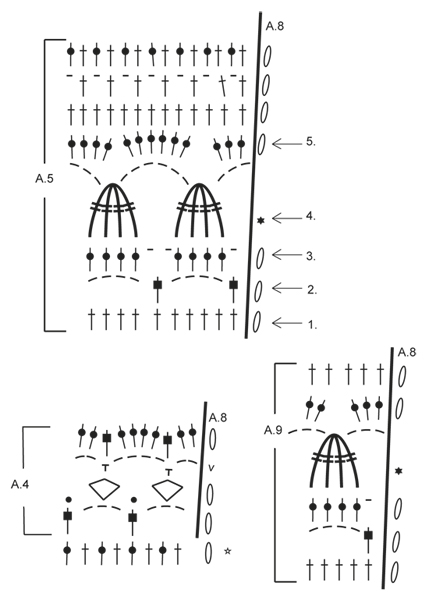
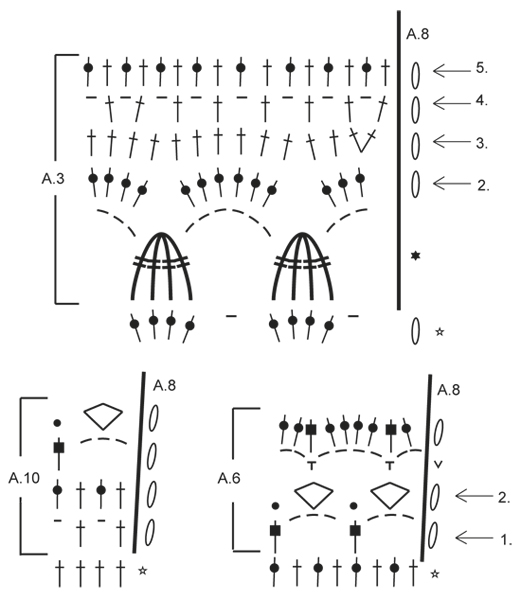
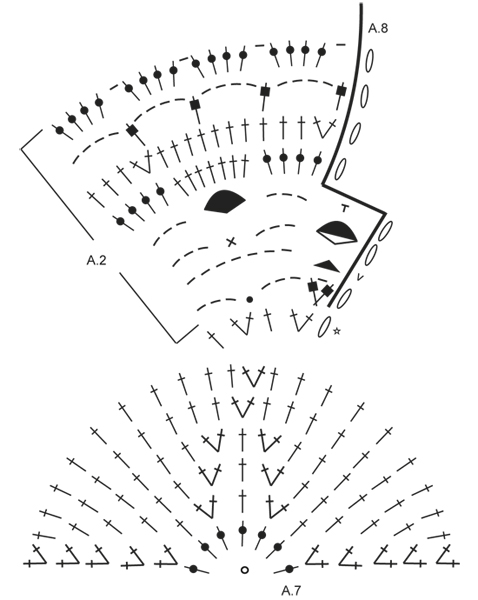
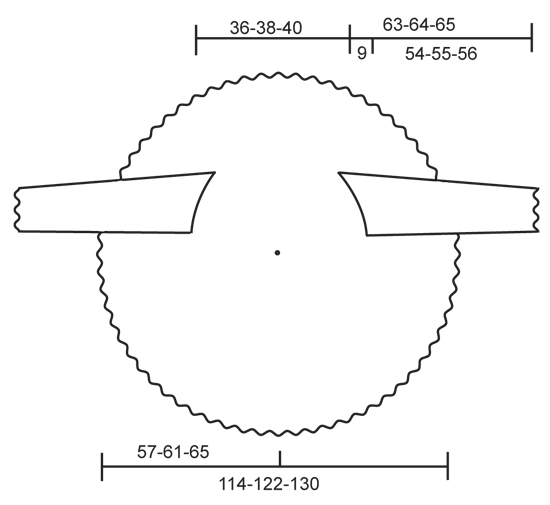
INFORMAZIONI PER IL LAVORO: Iniziare ogni giro a m.a con 3 cat e finire con 1 m.bss nella 3° cat all’inizio del giro, la cat non sostituisce la 1° m.a. Iniziare ogni riga a m.a con 3 cat. SUGGERIMENTO PER LE DIMINUZIONI: Diminuire 1 m.a lavorando le 2 m.a successive insieme come segue: lavorare 1 m.a ma aspettare con l’ultimo passaggio (= 2 m sull’uncinetto), poi lavorare la m.a successiva ma sull’ultimo passaggio, far passare il filo attraverso tutte e 3 le m sull’uncinetto. MOTIVO: Vedere i diagrammi A.1-A.10. Il diagramma A.8 mostra come inizia e finisce il giro. NOTA: Nei diagrammi A.2-A.4, A.6 e A.10 il 1° giro del diagramma è l’ultimo giro del diagramma precedente, non viene lavorato ma mostra come continuare. ---------------------------------------------------------- CERCHIO: Avviare 5 cat con l’uncinetto n° 5 mm con Merino Extra Fine o Sky e formare 1 anello con 1 m.bss nella 1° cat. Poi lavorare A.1 come segue: GIRO 1: lavorare 3 cat – LEGGERE LE INFORMAZIONI PER IL LAVORO, 12 m.a nell’anello di cat, finire con 1 m.bss nella 3° cat. GIRO 2: lavorare 2 m.a nel filo dietro di ogni m.a = 24 m.a. GIRO 3: lavorare * 2 m.a nel filo dietro della 1°/successiva m.a, 1 m.a nel filo dietro della m.a successiva *, ripetere *-* per tutto il giro = 36 m.a. FARE ATTENZIONE ALLA TENSIONE DEL LAVORO! Poi lavorare A.2 6 volte in totale sul giro. NOTA: A.8 nello stesso diagramma mostra come inizia e finisce ogni giro. Fare attenzione se la m.a viene lavorata nel filo dietro, nella m o attorno alla m (applicato a tutti i diagrammi). Quando A.2 è stato lavorato 1 volta in verticale, ci sono 96 m.a e 24 cat sul giro (= 120 m in totale). Il lavoro misura circa 28 cm in diametro. Poi lavorare A.3 12 volte in totale sul giro. Quando sono stati lavorati 2-3-4 giri di A.3 (il cerchio misura circa 36-38-40 cm in diametro), ci sono 156-168-192 m sul giro (= 156-168-96 m.a e 0-0-96 cat). Ora lavorare gli scalfi per le diverse taglie: TAGLIA S/M: Il giro ora si sposta dal diagramma a causa dello scalfo. Lavorare come segue: Lavorare il 3° giro di A.3 come segue (tutte le m.a su questo giro sono lavorate nel filo dietro della m.a): lavorare 3 cat, * 2 m.a nella 1° m.a, 1 m.a in ognuna delle 8 m.a successive *, ripetere *-* altre 4 volte, 26 cat, saltare 26 m.a (= scalfo), ripetere *-* 6 volte in totale, 1 m.a in ognuna delle 5 m.a successive e ALLO STESSO TEMPO aumentare 1 m.a, 26 cat, saltare 26 m.a (= scalfo), finire con 1 m.bss nella 3° cat dall’inizio del giro = 116 m.a (= 26 cat per ogni manica, 168 m in totale). Lavorare il 4° giro in A.3 come segue (tutte le m.a lavorate a m.a vengono lavorate nel filo dietro su questo giro): lavorare 3 cat, ** 1 m.a nella 1°/successiva m.a/cat, * 1 m.a nella successiva m.a/cat, 1 cat, saltare 1 m.a/cat *, ripetere *-* altre 4 volte, 1 m.a nella successiva m.a/cat, 1 cat, 1 m.a nella successiva m.a/cat, 1 cat, saltare 1 m.a/cat **, ripetere **-** altre 11 volte, lavorare in questo modo anche sugli archi di cat (= manica), finire con 1 m.bss nella 3° cat all’inizio del giro = 96 m.a e 96 cat (= 192 m in totale). Poi lavorare A.3 come prima. Quando A.3 è stato lavorato 1 volta in verticale, ci sono 192 m.a sul giro. Poi lavorare A.4 24 volte in totale sul giro. TAGLIA L/XL: Il giro ora si sposta dal diagramma a causa dello scalfo. Lavorare come segue: Lavorare il 4° giro di A.3 come segue (tutte le m.a lavorate a m.a sono lavorate nel filo dietro della m.a su questo giro): lavorare 3 cat, ** 1 m.a nella 1°/successive m.a, 1 cat, * 1 m.a nella m.a successiva, 1 cat, saltare 1 m.a *, ripetere *-* altre 4 volte, 1 m.a nella m.a successiva, 1 cat, 1 m.a nella m.a successiva, 1 cat, saltare 1 m.a **, ripetere **-** altre 2 volte, lavorare 1 m.a nella m.a successiva, 1 cat, 1 m.a nella m.a successiva, 1 cat, saltare 1 m.a, 1 m.a nella m.a successiva, 1 cat, saltare 1 m.a, 1 m.a nella m.a successiva, lavorare 28 cat, saltare 28 m.a (= scalfo), ripetere **-** 4 volte in totale, lavorare 1 m.a nella m.a successiva, 1 cat, 1 m.a nella m.a successiva, 1 cat, saltare 1 m.a, 1 m.a nella m.a successiva, * 1 cat, saltare 1 m.a, 1 m.a nella m.a successiva *, ripetere *-* un’altra volta, lavorare 28 cat, saltare 28 m.a (= scalfo), finire con 1 m.bss nella 3° cat dall’inizio del giro = 65 m.a e 119 cat (= 28 cat per ogni manica, 184 m in totale). Lavorare il 5° giro in A.3 come segue (tutte le m.a lavorate a m.a, sono lavorate nel filo dietro della m su questo giro): lavorare 1 m.a in ogni m.a e 1 m.a in ogni cat. Sugli archi di cat per ogni manica lavorare come segue: lavorare * 1 m.a in ognuna delle prime 6 cat, 2 m.a nella cat successiva *, ripetere *-* altre 3 volte, finire con 1 m.bss nella 3° cat all’inizio del giro = 192 m.a. Continuare a lavorare il diagramma A.3. Quando A.3 è stato lavorato 1 volta in verticale, ci sono 192 m.a sul giro. Poi lavorare A.4 24 volte in totale sul giro. TAGLIA XXL/XXXL: Il giro ora si sposta dal diagramma a causa dello scalfo. Lavorare come segue: Lavorare il 5° giro di A.3 come segue (tutte le m.a lavorate a m.a, sono lavorate nel filo dietro su questo giro): lavorare 3 cat, * 1 m.a nella 1°/successive m.a, 1 m.a attorno alla cat successiva *, ripetere *-* altre 24 volte, 1 m.a nella m.a successiva, 30 cat, saltare 15 m.a e 15 cat (= 30 m in totale) per lo scalfo, * lavorare 1 m.a attodno alla cat successiva, 1 m.a nella m.a successiva *, ripetere *-* altre 39 volte, 1 m.a attorno alla cat successiva, 30 cat, saltare le ultime 15 m.a e 15 cat (= scalfo), finire con 1 m.bss nella 3° cat all’inizio del giro = 132 m.a e 30 cat per ogni manica (= 192 m in totale). Poi lavorare A.4 24 volte in totale sul giro. Lavorare il 1° giro come segue: lavorare 3 cat, * 3 cat, saltare 3 m.a/cat, 1 m.a nella m.a/cat successive, saltare 3 m.a/cat, 1 m.a nella m.a/cat successiva *, ripetere *-* altre 23 volte, lavorare in questo modo anche sugli archi di cat (= maniche), finire con 1 m.bss nella 3° cat all’inizio del giro = 48 archi di cat. TUTTE LE TAGLIE: Quando A.4 è stato lavorato 1 volta in verticale, ci sono 240 m.a sul giro. Il lavoro misura circa 54 cm in diametro. Poi lavorare A.5 24 volte in totale sul giro. Quando A.5 è stato lavorato 1 volta in verticale, ci sono 336 m.a sul giro. Il lavoro misura circa 76 cm in diametro. Poi lavorare A.6 42 volte in totale sul giro e ALLO STESSO TEMPO sull’ultimo giro di A.6 aumentare 2 m.a in modo uniforme lavorando 2 m.a nella stessa m.b., o lavorare 1 m.a. in più attorno ad un arco di catenelle. Quando A.6 è stato lavorato 1 volta in verticale, ci sono 380 m.a sul giro. Poi lavorare A.5 38 volte in totale sul giro come segue nelle diverse taglie: TAGLIA S/M: Lavorare 5 giri di A.5 = 494 m.a. Poi lavorare 1 m.a nel filo dietro di ogni m.a e ALLO STESSO TEMPO aumentare 42 m.a in modo uniforme (aumentare circa 1 m.a ogni 12° m.a) = 536 m.a sul giro. Il lavoro ora misura circa 110 cm in diametro. Poi lavorare A.6 67 volte in totale sul giro. Affrancare quando sono stati lavorati i primi 2 giri di A.6. Il lavoro misura circa 114 cm in diametro. TAGLIA L/XL: Lavorare A.5. Quando A.5 è stato lavorato 1 volta in verticale, ci sono 532 m sul giro. Poi lavorare 1 m.a nel filo dietro di ogni m.a e ALLO STESSO TEMPO aumentare 36 m.a in modo uniforme (aumentare circa 1 m.a ogni 15° m.a) = 568 m.a sul giro. Il lavoro ora misura circa 118 cm in diametro. Poi lavorare A.6 71 volte in totale sul giro. Affrancare quando sono stati lavorati i primi 2 giri di A.6. Il lavoro misura circa 122 cm in diametro. TAGLIA XXL/XXXL: Lavorare A.5. Quando A.5 è stato lavorato 1 volta in verticale, ci sono 532 m sul giro. Poi lavorare 1 m.a nel filo dietro di ogni m.a e ALLO STESSO TEMPO aumentare 36 m.a in modo uniforme (aumentare circa 1 m.a ogni 15° m.a) = 568 m.a sul giro. Il lavoro ora misura circa 118 cm in diametro. Poi lavorare A.6 71 volte in totale sul giro. Il lavoro misura circa 125 cm in diametro. Lavorare 1 giro a m.a nel filo dietro di ogni m.a e ALLO STESSO TEMPO aumentare 9 m.a in modo uniforme = 648 m.a. Lavorare A.6 81 volte in totale sul giro. Affrancare quando sono stati lavorati i primi 2 giri di A.6. Il lavoro misura circa 130 cm in diametro. MANICA: Lavorata avanti e indietro, dall’alto in basso (top down). Per prima cosa lavorare l’arrotondamento per la manica. Lavorare A.7 – ricordarsi delle INFORMAZIONI PER IL LAVORO. Quando A.7 è stato lavorato 1 volta, ci sono 25 m.a sul giro. Affrancare. Lavorare 14-16-18 cat lasse, poi lavorare 1 m.a in ogni m.a di A.7, finire con 17-19-21 cat (comprese 3 cat con cui girare). Inserire 1 segnapunti nel lavor, ORA MISURARE IL LAVORO DA QUI. Lavorare 1 m.a nella 4° m.a dall’uncinetto, 1 m.a in ognuna delle 13-15-17 cat successive, 1 m.a in ogni m.a, 1 m.a in ogni cat = 53-57-61 m.a. Poi lavorare 1 m.a in ogni m.a. Quando il lavoro misura 4 cm, diminuire 1 m.a a ogni lato del lavoro lavorando insieme le prime 2 e le ultime 2 m.a (= 2 m.a diminuite) – LEGGERE IL SUGGERIMENTO PER LE DIMINUZIONI! Ripetere le diminuzioni ogni 3-3-3½ cm altre 10-10-9 volte = 31-35-41 m.a. Quando il lavoro misura 38-39-40 cm, lavorare in tondo come segue: lavorare A.9 6-7-8 volte in totale sul giro e ALLO STESSO TEMPO sul 1° giro diminuire 1-0-1 m.a = 30-35-40 m.a. Sull’ultimo giro in A.9 diminuire 2-3-4 m.a in modo uniforme = 28-32-36 m.a. Poi lavorare A.10 7-8-9 volte in totale sul giro. Affrancare quando A.10 è stato lavorato 1 volta in verticale. Il lavoro misura circa 63-64-65 cm in totale. Lavorare un’altra manica nello stesso modo. CONFEZIONE: Cucire le maniche a cerchio nel filo più esterno delle m di vivagno. Cucire i margini sotto le braccia. |
||||||||||||||||||||||||||||||||||||||||||||||||||||||||||
Spiegazioni del diagramma |
||||||||||||||||||||||||||||||||||||||||||||||||||||||||||
|
||||||||||||||||||||||||||||||||||||||||||||||||||||||||||
 |
||||||||||||||||||||||||||||||||||||||||||||||||||||||||||
 |
||||||||||||||||||||||||||||||||||||||||||||||||||||||||||
 |
||||||||||||||||||||||||||||||||||||||||||||||||||||||||||
 |
||||||||||||||||||||||||||||||||||||||||||||||||||||||||||
 |
||||||||||||||||||||||||||||||||||||||||||||||||||||||||||
Avete terminato questo modello?Allora taggate le vostre foto con #dropspattern #seaglassjacket o inviatele alla #dropsfan gallery. Avete bisogno di aiuto con questo modello?Troverete 11 video tutorial, una sezione per i commenti/domande e molto altro guardando il modello su www.garnstudio.com © 1982-2026 DROPS Design A/S. Ci riserviamo tutti i diritti. Questo documento, compreso tutte le sue sotto-sezioni, è protetto dalle leggi sul copyright. Potete leggere quello che potete fare con i nostri modelli alla fine di ogni modello sul nostro sito. |
||||||||||||||||||||||||||||||||||||||||||||||||||||||||||


Con oltre 40 anni di esperienza nel design di modelli di maglia e uncinetto, DROPS Design offre la più estesa collezione di modelli gratuiti su internet - tradotti in 17 lingue. Ad oggi vi possiamo fornire 324 cataloghi e 12290 modelli - 9561 dei quali sono tradotti in Italiano.
Ci stiamo impegnando molto per darvi il meglio che vi possiamo offrire in termini di maglia e uncinetto, ispirazioni e consigli così come filati di grande qualità ad un prezzo incredibile! Volete utilizzare i nostri modelli per qualcosa d'altro oltre al vostro uso personale? Potete leggere tutto ciò che è consentito nel testo sul Copyright in basso su tutte le pagine dei nostri modelli. Buon lavoro!
Lasciare un commento sul modello DROPS 164-16
Noi saremmo felici di ricevere i tuoi commenti e opinioni su questo modello!
Se vuoi fare una domanda, fai per favore attenzione a selezionare la categoria corretta nella casella qui sotto per velocizzare il processo di risposta. I campi richiesti sono indicati da *.