
Categorie popolari
State cercando un filato?


Commenti / Domande (98)
![]() Monique Anchelin Flageul ha scritto:
Monique Anchelin Flageul ha scritto:
Perdón, hago una rectificación, solo me queda duda por las medidas de las mangas Gracias
22.11.2019 - 22:21
![]() Monique Anchelin Flageul ha scritto:
Monique Anchelin Flageul ha scritto:
Tengo bastante confusión con las medidas en cm del patrón para la talla 3 años. Con el cuerpo nos dicen de menguar y dejar en espera la labor a 25 cm total de la labor pero eso no corresponde a los cm del dibujo del patrón.IgIualmente para las mangas, nos dicen de menguar a 29cm de la labor si miramos el dibujo indica 24cm.... Gracias
22.11.2019 - 22:19
![]() Monique Anchelin Flageul ha scritto:
Monique Anchelin Flageul ha scritto:
¿Que significa MP en las explicaciones? Gracias
12.11.2019 - 16:47DROPS Design ha risposto:
Hola Monique. MP significa marcapuntos.
12.11.2019 - 17:33
![]() Brigitte BOSS ha scritto:
Brigitte BOSS ha scritto:
Ist das Rapport Muster beidseitig also auch auf dem Rücken
04.11.2019 - 23:11DROPS Design ha risposto:
Liebe Frau Boss, ja genau, das Muster (= A.1, A.2 und dann A.3) wird auf die mittleren Maschen am Vorder- bzw am Rücktenteil gestrickt. Viel Spaß beim stricken!
05.11.2019 - 08:51
![]() Anonym ha scritto:
Anonym ha scritto:
Hei! Jeg forstår ikke hvordan jeg skal felle til hals i denne oppskriften. Skal jeg felle i begynnelsen og slutten av hver pinne eller felle i begynnelsen av pinnen, snu arbeidet og felle i begynnelsen av neste pinne? Hva mener dere med «videre felles til hals på beg av hver p i hver side slik: fell av 2 m 1-1-1-2-2 ganger og 1 m 1-2-2-2-2 ganger» strikker i strl 3/4 år.
16.10.2019 - 12:07DROPS Design ha risposto:
Hej, ja det stemmer, du feller i begyndelsen af hver pind, altså hver gang du snur arbejdet. Først 2 m 1 gang i hver side og så 1 maske 2 gange i hver side. God fornøjelse!
16.10.2019 - 16:10
![]() Veronique Preston ha scritto:
Veronique Preston ha scritto:
For the yoke, after doing the bind offs and have 70sts on needle when changing to 3.5mm needles it says 104 sts... Well from the 70 left on needle + 26 from st holder, I only have 96sts on my needle.. where do I get the additional 8sts? Also, for the raglan it says to do DCs 16 times and then 3 more times consecutively but in order to get the 70 sts at the end I had to do 3 more DCs before reaching the neckline. Please add it to the pattern for future knitters?
14.09.2019 - 23:53DROPS Design ha risposto:
Dear Mrs Preston, you decrease 8 stitches a total of 16 times on every other round + 3-5 times on every round (= 152-168 sts dec for raglan) and for neck, you slip 26 sts for the neck on a thread + cast off for neck on each side 2 sts 1 time and 1 stitch 2 times (= 26+ 4 sts x 2 sides = 34 sts for neck), there should be 256-272 at the beg of yoke - 152-168 sts dec for raglan - 34-34 sts dec for neck = 70 sts remain for raglan and for neck. You then pick up 34 sts (= the 26 sts from thread + 8 sts on each side) = 104 sts for neck. Happy knitting!
16.09.2019 - 10:02
![]() Tara Schanssema ha scritto:
Tara Schanssema ha scritto:
Volgens mij klopt dit patroon niet..ik heb nu een pand gebreid en ziet er anders uit.. ook goed..maar niet hetzlefde
25.08.2019 - 20:20
![]() Seemal ha scritto:
Seemal ha scritto:
Can someone post a video on how to start tbe first line of tbe cable design.Its a little confusing.
12.02.2019 - 14:59DROPS Design ha risposto:
Hi Seemal, I can write the first line for you (row 3 in A.3 which is from the right side and read from right to left): K1, P1, place 3 stitches on cable needle behind piece, K3 and K3 from cable needle, P1, K3, P1, place 2 stitches on cable needle behind piece, K2 and K2 from cable needle, P6, place 3 stitches on cable needle behind piece, K3 and K3 from cable needle, P6, place 2 stitches on cable needle behind piece, K2 and K2 from cable needle, P1, K3, P1, place 3 stitches on cable needle behind piece, K3 and K3 from cable needle, P1, K1. Hope this helps and happy knitting!
13.02.2019 - 08:02
![]() Rushd Nakade ha scritto:
Rushd Nakade ha scritto:
Am wondering after joining sleeves with body , how to do back n forth with pattern as after raglan decrease started it will close all opening n it has to be worked on round right? please correct if am doing something wrong
21.01.2019 - 13:24DROPS Design ha risposto:
Dear Mrs Rushd, after you have slipped the sts from neck on front piece on a thread, jusst continue back and forth (make sure that the cable rows will still be worked from RS) starting rows now from neck and decreasing as before for raglan cast off for neck as explain for the size at the beg of every row both from RS and from WS (= each side of the middle sts for neck). Happy knitting!
21.01.2019 - 16:22
![]() Rushd ha scritto:
Rushd ha scritto:
Nice pattern
18.01.2019 - 19:00
|
|||||||||||||||||||||||||||||||
Lucky Jack#luckyjacksweater |
|||||||||||||||||||||||||||||||
 |
 |
||||||||||||||||||||||||||||||
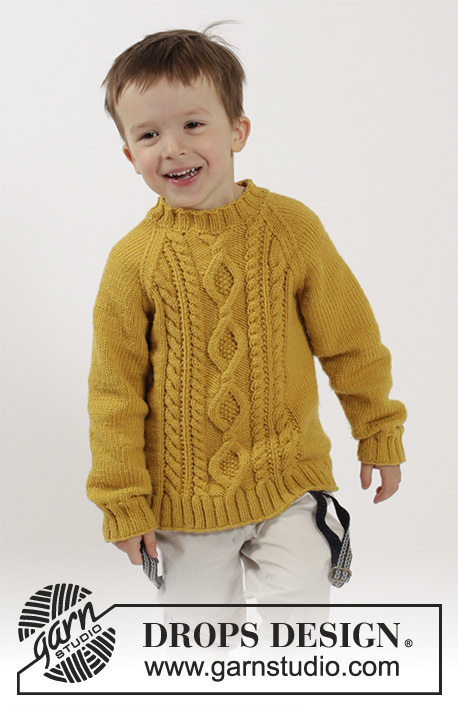
Maglione lavorato ai ferri con raglan e trecce in DROPS Merino Extra Fine. Taglie: 2 - 10 anni.
DROPS Children 26-3 |
|||||||||||||||||||||||||||||||
|
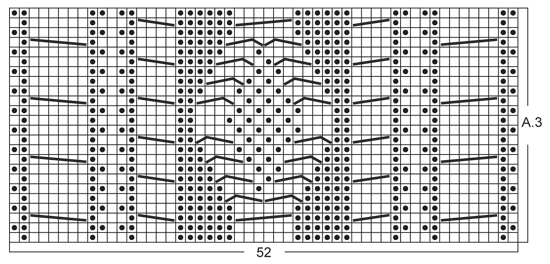
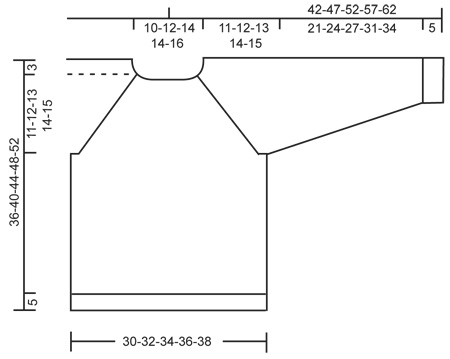
MOTIVO: Vedere i diagrammi A.1-A.3. I diagrammi mostrano tutti i f del motivo visti dal diritto del lavoro. RAGLAN: Diminuire per il raglan a ogni lato del segnapunti in ogni punto di passaggio tra le maniche e il corpo. DIMINUIRE COME SEGUE DAL DIRITTO DEL LAVORO: Iniziare 3 m prima del segnapunti e lavorare 2 m insieme a dir, 2 m dir (il segnapunti è tra queste 2 m), passare 1 m a dir senza lavorarla, 1 m dir, accavallare la m passata sopra quella appena lavorata (= 2 diminuzioni). DIMINUIRE COME SEGUE DAL ROVESCIO DEL LAVORO: Iniziare 3 m prima del segnapunti e lavorare 2 m insieme a rov ritorto, 2 m rov (il segnapunti è tra queste 2 m) e lavorare 2 m insieme a rov (= 2 diminuzioni). ---------------------------------------------------------- CORPO: Lavorato in tondo con i f circolari. Avviare 184-200-208-216-224 m con i f circolari n° 3,5 mm con Merino Extra Fine. Lavorare 1 giro dir. Lavorare il giro successivo come segue: TAGLIE 2 + 3/4 + 7/8 ANNI: 1 m dir, * 2 m rov, 2 m dir *, ripetere *-* 4-5-6 volte in totale, lavorare a coste secondo il diagramma A.1 sulle 58 m successive (= centro davanti), * 2 m dir, 2 m rov *, ripetere *-* 8-10-12 volte in totale, 2 m dir, lavorare a coste secondo il diagramma A.1 sulle 58 m successive (= centro dietro), * 2 m dir, 2 m rov *, ripetere *-* 4-5-6 volte in totale e finire con 1 m dir. TAGLIE 5/6 + 9/10 ANNI: 1 m rov, * 2 m dir, 2 m rov *, ripetere *-* 5-6 volte in totale, 2 m dir, lavorare a coste seguendo il diagramma A.1 sulle 58 m successive (= centro davanti), * 2 m dir, 2 m rov *, ripetere *-* 11-13 volte in totale, 2 m dir, lavorare a coste seguendo il diagramma A.1 sulle 58 m successive (= centro dietro), * 2 m dir, 2 m rov *, ripetere *-* 5-6 volte in totale e finire con 2 m dir e 1 m rov. Continuare le coste in questo modo fino a quando il lavoro misura 5 cm. Passare ai f circolari n° 4 mm e lavorare il giro successivo come segue PER TUTTE LE TAGLIE: lavorare a dir le prime 17-21-23-25-27 m e allo stesso modo distribuire 3-5-5-5-5 diminuzioni in modo uniforme su queste m, lavorare e diminuire seguendo A.2 sulle 58 m successive, lavorare a dir sulle 34-42-46-50-54 m successive e allo stesso tempo distribuire 6-10-10-10-10 diminuzioni in modo uniforme su queste m, lavorare e diminuire secondo A.2 sulle 58 m successive, lavorare le ultime 17-21-23-25-27 m a dir e allo stesso tempo distribuire 3-5-5-5-5 diminuzioni in modo uniforme su queste m. Alla fine di A.2, ci sono 160-168-176-184-192 m sul f. Lavorare il giro successivo come segue: 14-16-18-20-22 m a m rasata, lavorare il motivo secondo il diagramma A.3 (= 52 m), 28-32-36-40-44 m a m rasata, lavorare il motivo secondo il diagramma A.3 (= 52 m) e finire con 14-16-18-20-22 m a m rasata. Continuare il motivo in questo modo. FARE ATTENZIONE ALLA TENSIONE DEL LAVORO! Quando il lavoro misura 22-25-28-31-34 cm, lavorare il giro successivo come segue: intrecciare 3 m per lo scalfo, lavorare le 74-78-82-86-90 m successive come prima (= davanti), intrecciare 6 m per lo scalfo, lavorare le 74-78-82-86-90 m successive come prima (= dietro) e intrecciare le ultime 3 m per lo scalfo. Mettere il lavoro da parte e lavorare le maniche. MANICA: Lavorata in tondo con i f a doppia punta. Avviare 32-36-40-44-44 m con i f a doppia punta n° 3,5 mm con Merino Extra Fine. Lavorare 1 giro dir. Poi lavorare a coste = 2 m dir/2 m rov fino a quando il lavoro misura 5 cm. Passare ai f a doppia punta n° 4 mm e lavorare a m rasata. Quando il lavoro misura 6-8-8-8-7 cm, aumentare 2 m al centro sotto la manica. Ripetere gli aumenti ogni 2-2-2½-2½-2½ cm per un totale di 10-10-10-11-13 volte = 52-56-60-66-70 m. Quando il lavoro misura 26-29-32-36-39 cm, intrecciare le 6 m centrali al centro sotto la manica = 46-50-54-60-64 m rimaste sul f. Mettere il lavoro da parte e lavorare l’altra manica. SPRONE: Trasferire le maniche sullo stesso f circolare del corpo dove sono state intrecciate le m per gli scalfi (senza prima lavorarle) = 240-256-272-292-308 m sul f. Inserire 1 segnapunti in tutti i punti di passaggio tra le maniche e il corpo = 4 segnapunti. Continuare in tondo a m rasata e con il motivo come prima. ALLO STESSO TEMPO sul 1° giro diminuire per il RAGLAN in ogni punto di passaggio tra il corpo e le maniche – leggere la spiegazione sopra (= 8 diminuzioni). Ripetere le diminuzioni per il raglan a giri alterni per un totale di 14-16-16-17-17 volte e poi su ogni giro per un totale di 3-3-5-7-9 volte. ALLO STESSO TEMPO quando il lavoro misura 32-35-39-42-46 cm, trasferire le 28-26-26-20-20 m centrali al centro davanti su un fermamaglie per il collo (lavorare le m prima di trasferirle su un fermamaglie). Poi finire avanti e indietro sui f circolari dal centro davanti e intrecciare per il collo all’inizio di ogni f a ogni lato come segue: intrecciare 2 m 1-1-1-2-2 volte e 1 m 1-2-2-2-2 volte. Alla fine di tutte le diminuzioni per il raglan e gli intrecci per il collo, rimangono 70-70-70-68-68 m sul f. BORDO DEL COLLO: Dal diritto del lavoro con i f circolari n° 3,5 mm riprendere circa 104-104-104-100-100 m attorno al collo (comprese le m sul fermamaglie sul davanti). Lavorare 1 giro rov. Poi lavorare 1 giro dir e allo stesso tempo diminuire in modo uniforme a 60-68-76-80-88 m. Poi lavorare a coste = 2 m dir/2 m rov per 3 cm, poi intrecciare con dir su dir e rov su rov. CONFEZIONE: Cucire le aperture sotto le maniche. |
|||||||||||||||||||||||||||||||
Spiegazioni del diagramma |
|||||||||||||||||||||||||||||||
|
|||||||||||||||||||||||||||||||
 |
|||||||||||||||||||||||||||||||
 |
|||||||||||||||||||||||||||||||
 |
|||||||||||||||||||||||||||||||
Avete terminato questo modello?Allora taggate le vostre foto con #dropspattern #luckyjacksweater o inviatele alla #dropsfan gallery. Avete bisogno di aiuto con questo modello?Troverete 28 video tutorial, una sezione per i commenti/domande e molto altro guardando il modello su www.garnstudio.com © 1982-2026 DROPS Design A/S. Ci riserviamo tutti i diritti. Questo documento, compreso tutte le sue sotto-sezioni, è protetto dalle leggi sul copyright. Potete leggere quello che potete fare con i nostri modelli alla fine di ogni modello sul nostro sito. |
|||||||||||||||||||||||||||||||


Con oltre 40 anni di esperienza nel design di modelli di maglia e uncinetto, DROPS Design offre la più estesa collezione di modelli gratuiti su internet - tradotti in 17 lingue. Ad oggi vi possiamo fornire 324 cataloghi e 12290 modelli - 9561 dei quali sono tradotti in Italiano.
Ci stiamo impegnando molto per darvi il meglio che vi possiamo offrire in termini di maglia e uncinetto, ispirazioni e consigli così come filati di grande qualità ad un prezzo incredibile! Volete utilizzare i nostri modelli per qualcosa d'altro oltre al vostro uso personale? Potete leggere tutto ciò che è consentito nel testo sul Copyright in basso su tutte le pagine dei nostri modelli. Buon lavoro!
Lasciare un commento sul modello DROPS Children 26-3
Noi saremmo felici di ricevere i tuoi commenti e opinioni su questo modello!
Se vuoi fare una domanda, fai per favore attenzione a selezionare la categoria corretta nella casella qui sotto per velocizzare il processo di risposta. I campi richiesti sono indicati da *.