
Categorie popolari
State cercando un filato?


Commenti / Domande (139)
![]() Martine ha scritto:
Martine ha scritto:
Merci beaucoup. J'ai compris, mais je voudrais savoir si il est obligatoire pour ce modèle de faire la réhausse dos..je ne la vois pas sur la photo du modèle. Existe 'il une vue du dos au niveau de l'encolure pour que je me rende compte de l'effet visuel? Encore merci ;-)
24.03.2020 - 19:08DROPS Design ha risposto:
Bonjour Martine, la réhausse encolure dos permet simplement au pull d'être plus haut dans le dos que devant, autrement dit il permet de former une "vraie" encolure devant. Vous pouvez tout à fait ne pas la faire, l'encolure dos et devant seront alors identiques. Bon tricot!
25.03.2020 - 09:30
![]() Richard ha scritto:
Richard ha scritto:
Hello again. Sorry to trouble you. I have knitted 30 sts using double pointed needles. Then I have followed the pattern:- YO, slip 1 st, knit 2 sts tog, psso...Repeat to end. But when I count the stitches, I only have 21! What am I doing wrong. Tell me, the markers 4 total), are only placed on the sleeves (first & last st itch respectively) - that is correct! I hope you all are keeping clear of the dreadful environment, that the whole World is now facing. Thank you. Richard.
24.03.2020 - 16:23DROPS Design ha risposto:
Dear Richard, yes that's right, the marker is in the first stitch on sleeve (= middle stitch in A.3 at the beg of sleeve) + marker in the last st on sleeve (= middle stitch in A.3 at the end of sleeve), in between you should have (in L): 74 sts between both markers, then you will work A.3 (= 1st + 2nd st on sleeve = 1st + 2nd sleeve A.3), dec 1, K70, dec 1, A.3 (=1st +2nd st in A.3 = next to last st + last st on sleeve = the one with the marker + the one before marker). Hope this will help :)
24.03.2020 - 17:45
![]() Martine ha scritto:
Martine ha scritto:
Bonjour J'ai bien avancé sur ce modèle et j'en suis à la fin du diagramme A5. Il faut donc commencer la réhausse dos mais je ne comprends pas comment il faut faire...Mon fil est à la fin du tour sur 1 des aiguilles (je travaille avec 4 aiguilles en rond) comment faire pour commencer milieu dos? et du coup on travaille comme à 2 aiguilles donc 1 rg endroit, 1 rg envers? Merci beaucoup de m'éclairer...j'espère que vous pourrez le faire malgré le confinement.. Cordialement.
24.03.2020 - 15:42DROPS Design ha risposto:
Bonjour Martine, vous pouvez poser votre ouvrage à plat pour trouver le milieu dos, enfilez les mailles en attente sur un fil ou sur une aiguille circulaire si c'est plus simple pour vous. Ensuite vous tricotez en rangs donc à partir du milieu dos: 1 rang sur l'endroit jusqu'à ce qu'il reste 14 à 20 m avant le marqueur du milieu devant, tournez et tricotez sur l'envers jusqu'à ce qu'il reste 14 à 20 m de l'autre côté du marqueur du milieu devant (= vous aurez donc 28 à 40 m non tricotées au milieu devant), tournez et continuez ainsi en rangs raccourcis. cf vidéo. Bon tricot!
24.03.2020 - 17:02
![]() Richard ha scritto:
Richard ha scritto:
Hi again. Thanks for the reply. I will knit a test piece (of 40 sts) then proceed as if it were the sleeve. Then when I have knitted the sts I should be able to count the sts easily, to see if I have the right number. But where I am confused, the A3 pattern chart shows that 12 rounds are used! That means 12 rounds (where the YO makes holes, yet the holes do not show in the picture of the pattern. Or are they & I just cannot see them! Thank you. Richard.
23.03.2020 - 13:10DROPS Design ha risposto:
Since you will work 8 dec round every 4th round = you will work a total of 32 rounds with A.3, ie always 1 round with hole/1 round knitting all stitches. Happy knitting!
23.03.2020 - 13:39
![]() Richard ha scritto:
Richard ha scritto:
Hi again. Thanks for the reply. I will knit a test piece (of 40 sts) then proceed as if it were the sleeve. Then when I have knitted the sts I should be able to count the sts easily, to see if I have the right number. But where I am confused, the A3 pattern chart shows that 12 rounds are used! That means 12 rounds (where the YO makes holes, yet the holes do not show in the picture of the pattern. Or are they & I just cannot see them! Thank you. Richard.
23.03.2020 - 13:08DROPS Design ha risposto:
Dear Richard, there are just a few raglan rounds (8 decrease round on every 4th round in size L), that's why we cannot see them on the picture, they are coming before the round yoke part. But I made a mistake on previous answer, you should work 68 sts between decreases on sleeve (just always make sure the stitch with marker is the one in the middle of A.3 and that you decrease 1 stitch before + after A.3 so that your total number of sts should be then right after all raglan decreases = 308 sts. Happy knitting!
23.03.2020 - 13:38
![]() Richard ha scritto:
Richard ha scritto:
Hello. When I begin to knit the round, starting with the left sleeve (which has 76 sts); I should have 74sts (dec 1st at each end); but I have many less! This is always the case when I have tried (on two occassions). I bought the wool from a supplier in Denmark... Thanks. Richard.
23.03.2020 - 11:52DROPS Design ha risposto:
Dear Richard, not sure why you don't have, theh 74 sts now ... you should have 1 st from back piece, 1 st from sleeve (= with marker), 1 st from sleeve = 3 sts in A.3 dec to 1 with 1 yarn over before (= belongs to back piece) + 1 yarn over after (= belongs to sleeve), decrease 1 stitch then work until 5 sts remain before next marker = 72 sts decrease 1 st and work A.3. Happy knitting!
23.03.2020 - 12:41
![]() Richard ha scritto:
Richard ha scritto:
Thank you. I will try once more, as you say, but I may have to send you pictures of my work! I have tried , twice with the left sleeve & each time, I have many less sts than I should have (74)! Richard.
23.03.2020 - 10:02DROPS Design ha risposto:
Dear Richard, you cannot upload pictures here but you can send some to the store where you bought the yarn :) When you say you have 74 sts left, which piece does it match?
23.03.2020 - 11:42
![]() Richard ha scritto:
Richard ha scritto:
Hi, it's me again (at least I keep you busy :>) I'm still struggling! I have slipped the last st. from the back, so it is the first st. on the left sleeve. I've put a marker between this st & the first st of the sleeve. (transition between the back & the sleeve). Please tell me what I should do, now. I've tried various ways & end up with many less stitches than I should have (74)! The 'Lemon Parfait' that I finished recently for a woman of 84, was brilliant.
21.03.2020 - 18:08DROPS Design ha risposto:
Dear Richard, you now work A.3 at the transition of piece for raglan lines and decrease 1 stitch on each side of A.3: start with the last st on back piece on left needle, then make YO, dec, YO (= A.3), decrease 1 st for raglan, *work until 3 sts remain before next st with marker, decrease, and work YO, dec, YO (= A.3), decrease* repeat from *-* on each marker and finish round with 1 decrease (end of back piece), just before the first A.3 of the round. Hope this helps. You can also show your work to your store (even by mail), they could have a look at your piece and help you further if required. Happy knitting!
23.03.2020 - 09:37
![]() Richard ha scritto:
Richard ha scritto:
Yes - This is Richard.... Thanks a million - I live in the UK.
20.03.2020 - 16:13
![]() Richard ha scritto:
Richard ha scritto:
Thanks a million. Richard.
20.03.2020 - 16:11
|
|||||||||||||||||||
Nordic Summer#nordicsummersweater |
|||||||||||||||||||
 |
 |
||||||||||||||||||
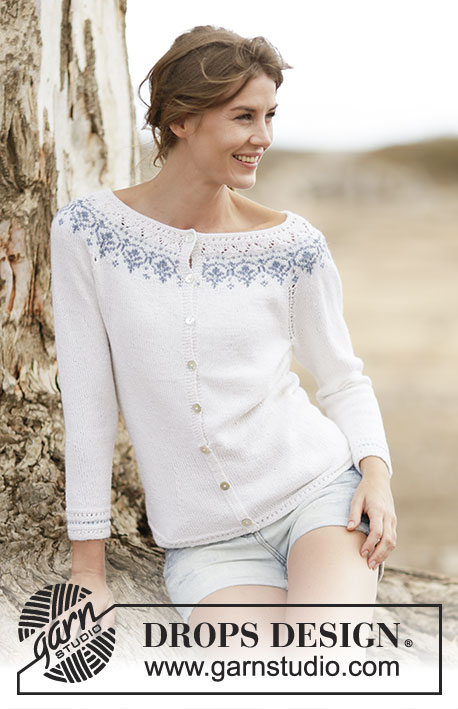
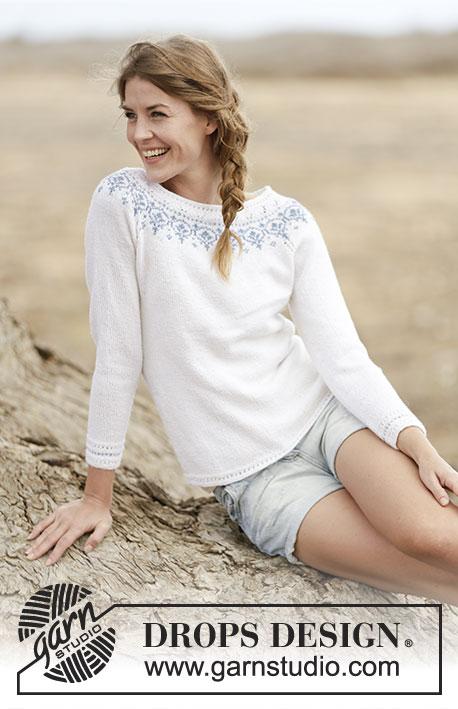
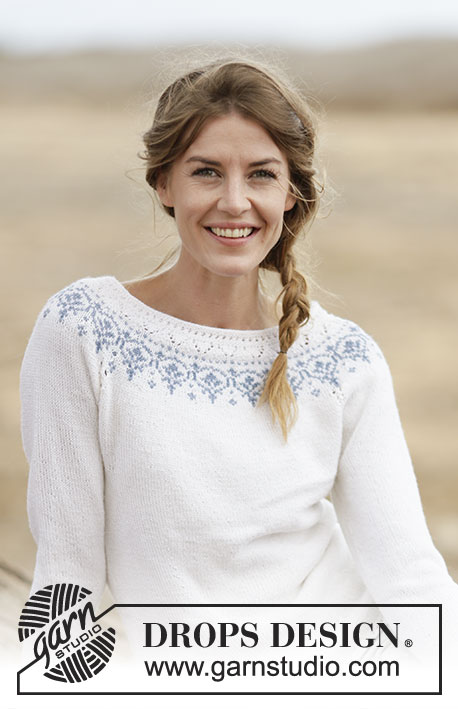
Maglione DROPS lavorato ai ferri con raglan e sprone rotondo in ”BabyMerino”. Taglie: S - XXXL.
DROPS 161-33 |
|||||||||||||||||||
|
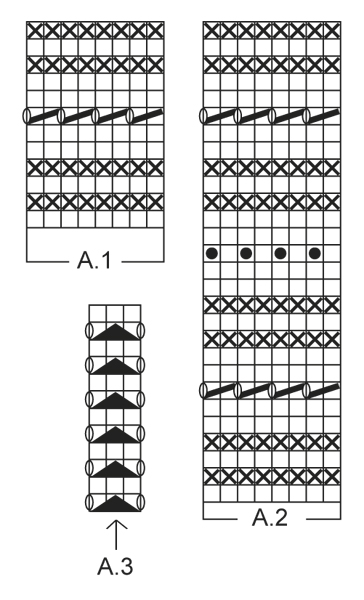
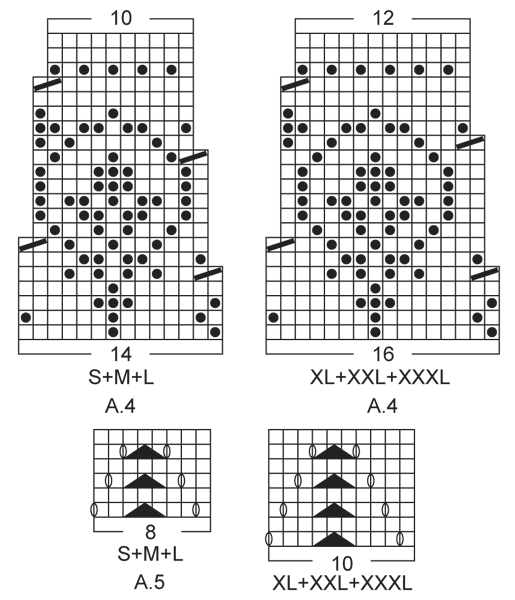
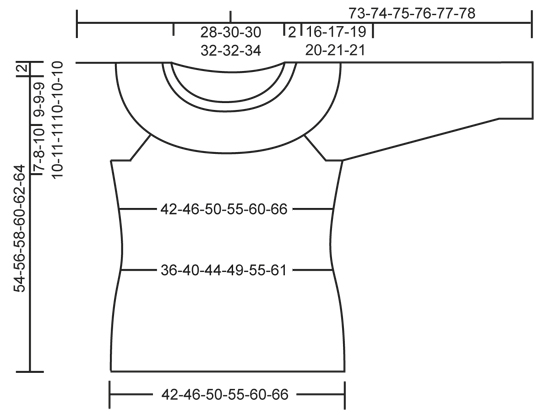
MOTIVO: Vedere i diagrammi A.1-A.5. VITA: Diminuire per la vita all'altezza dei 4 segnapunti. Diminuire come segue dopo il 1° e 3° segnapunti: 2 m insieme a dir. Diminuire come segue quando rimangono 2 m prima del 2° e 4° segnapunti: passare 1 m a dir senza lavorarla, 1 m dir, accavallare la m passata sopra quella appena lavorata. SUGGERIMENTO PER GLI AUMENTI: Aumentare per la vita all'altezza dei 4 segnapunti come segue: fare 1 gettato dopo il 1° e 3° segnapunti e prima del 2° e 4° segnapunti. Sul giro successivo lavorare i gettati a dir ritorto per evitare buchi. RAGLAN: Diminuire per il raglan a ogni lato di A.3 in ogni punto di passaggio tra le maniche e il corpo. Diminuire come segue dopo A.3: passare 1 m a dir senza lavorarla, 1 m dir, accavallare la m passata sopra quella appena lavorata. Diminuire come segue 2 m prima di A.3: lavorare 2 m insieme a dir. ---------------------------------------------------------- CORPO: Lavorato in tondo con i f circolari. Avviare 200-220-240-264-288-316 m con i f circolari n° 2,5 mm con il bianco. Lavorare il motivo secondo il diagramma A.1. Quando A.1 è stato lavorato 1 volta in verticale, passare ai f circolari n° 3 mm. Poi lavorare a m rasata. FARE ATTENZIONE ALLA TENSIONE DEL LAVORO! Quando il lavoro misura 8-8-8-8-10-10 cm, inserire 4 segnapunti nel lavoro come segue: Inserire il 1° segnapunti dopo le prime 24-28-31-36-42-48 m, il 2° segnapunti dopo le 52-54-58-60-60-62 m successive, il 3° segnapunti dopo le 48-56-62-72-84-96 m successive e il 4° segnapunti dopo le 52-54-58-60-60-62 m successive (24-28-31-36-42-48 m rimaste sul f dopo l'ultimo segnapunti). Poi diminuire per la VITA all'altezza dei 4 segnapunti – leggere la spiegazione sopra (= 4 diminuzioni). Ripetere le diminuzioni ogni 4 giri 7-7-7-7-6-6 volte in totale = 172-192-212-236-264-292 m. Quando il lavoro misura 22 cm per tutte le taglie, aumentare dopo il 1° e 3° segnapunti e prima del 2° e 4° segnapunti – LEGGERE IL SUGGERIMENTO PER GLI AUMENTI (= 4 aumenti). Ripetere gli aumenti ogni 4-4-6-6-8-8 giri 7-7-7-7-6-6 volte in totale = 200-220-240-264-288-316 m. Continuare a lavorare fino a quando il lavoro misura 38-39-39-40-41-43 cm. Lavorare il giro successivo come segue: intrecciare 5-5-5-6-6-6 m per lo scalfo, lavorare 90-100-110-120-132-146 m a m rasata (= davanti), intrecciare 10-10-10-12-12-12 m per lo scalfo, lavorare 90-100-110-120-132-146 m a m rasata (= dietro) e intrecciare le ultime 5-5-5-6-6-6 m per lo scalfo. Mettere il lavoro da parte e lavorare le maniche. MANICA: Lavorata in tondo con i ferri a doppia punta. Avviare 56-56-58-60-62-64 m con i ferri a doppia punta n° 2,5 mm con il bianco. Lavorare il motivo secondo il diagramma A.2. Quando A.2 è stato lavorato 1 volta in verticale, passare ai ferri a doppia punta n° 3 mm. Inserire 1 segnapunti all'inizio del giro (= centro sotto la manica) e lavorare a m rasata. Quando il lavoro misura 8 cm, aumentare 2 m al centro sotto la manica. Ripetere gli aumenti ogni 9-7-7-6-6-5 giri 12-14-14-16-16-17 volte in totale = 80-84-86-92-94-98 m. Quando il lavoro misura 41-40-39-38-38-38 cm (NOTA: misure più piccole nelle taglie più grandi a causa dell'arrotondamento della manica più lungo e della maggiore ampiezza delle spalle), intrecciare le 10-10-10-12-12-12 m centrali sotto la manica (cioè intrecciare 5-5-5-6-6-6 m a ogni lato del segnapunti) = 70-74-76-80-82-86 m rimaste sul f. Mettere il lavoro da parte e lavorare l'altra manica. SPRONE: Trasferire le maniche sullo stesso f circolare del corpo come segue: Continuare con il bianco e lavorare le m della 1° manica e ALLO STESSO TEMPO inserire 1 segnapunti nella 1° m e 1 segnapunti nell'ultima m della manica, lavorare le m del davanti, lavorare le m dell'altra manica e ALLO STESSO TEMPO inserire 1 segnapunti nella 1° m e 1 segnapunti nell'ultima m sulla manica e lavorare le m del dietro = 320-348-372-400-428-464 m sul f e 4 segnapunti nel lavoro. Poi lavorare a m rasata in tondo e ALLO STESSO TEMPO lavorare A.3 in ogni punto di passaggio tra il corpo e le maniche (la freccia nel diagramma dovrebbe combaciare con la m con il segnapunti). ALLO STESSO TEMPO diminuire per il RAGLAN a ogni lato di A.3 in ogni punto di passaggio tra il corpo e le maniche – leggere la spiegazione sopra (= 8 diminuzioni). Ripetere le diminuzioni per il raglan ogni 4 giri 6-7-8-8-9-9 volte in totale = 272-292-308-336-356-392 m. Dopo l'ultima diminuzione lavorare 1 giro dir e ALLO STESSO TEMPO distribuire 20-26-28-32-36-40 diminuzioni in modo uniforme = 252-266-280-304-320-352 m sul f. Poi lavorare il motivo in tondo seguendo il diagramma A.4 e ALLO STESSO TEMPO diminuire come indicato nel diagramma - scegliere il diagramma per la taglia corretta. Quando A.4 è stato lavorato 1 volta in verticale, ci sono 180-190-200-228-240-264 m sul f. Lavorare 1 giro con il bianco e ALLO STESSO TEMPO distribuire 4-6-8-28-30-44 diminuzioni in modo uniforme = 176-184-192-200-210-220 m. Ora lavorare il motivo seguendo il diagramma A.5 – scegliere il diagramma per la taglia corretta. Alla fine di A.5, lavorare un'alzata sul dietro del collo. Inserire 1 segnapunti al centro davanti. Iniziare al centro dietro e lavorare a dir (con il bianco) fino a quando rimangono 14-14-16-16-18-20 m prima del segnapunti. Girare, lavorare a dir fino a quando rimangono 14-14-16-16-18-20 m prima del segnapunti dall'altro lato. Girare, lavorare a dir fino a quando rimangono 30-30-34-34-38-42 m prima del segnapunti. Girare, lavorare a dir fino a quando rimangono 30-30-34-34-38-42 m prima del segnapunti dall'altro lato. Girare, lavorare a dir fino a quando rimangono 46-46-52-52-58-64 m prima del segnapunti. Girare, lavorare a dir fino a quando rimangono 46-46-52-52-58-64 m prima del segnapunti dall'altro lato. Girare, lavorare a dir fino a quando rimangono 62-62-70-70-76-86 m prima del segnapunti. Girare, lavorare a dir fino a quando rimangono 62-62-70-70-76-86 m prima del segnapunti dall'altro lato. Girare e lavorare a dir fino all'inizio del giro. BORDO DEL COLLO: Passare ai f circolari n° 2,5 mm e lavorare il motivo in tondo su tutte le m secondo il diagramma A.1, ALLO STESSO TEMPO distribuire 30-28-36-34-44-44 diminuzioni in modo uniforme = 146-156-156-166-166-176 m. Quando A.1 è stato lavorato 1 volta in modo verticale, intrecciare senza stringere a dir. CONFEZIONE: Cucire le aperture sotto le maniche. |
|||||||||||||||||||
Spiegazioni del diagramma |
|||||||||||||||||||
|
|||||||||||||||||||
 |
|||||||||||||||||||
 |
|||||||||||||||||||
 |
|||||||||||||||||||
Avete terminato questo modello?Allora taggate le vostre foto con #dropspattern #nordicsummersweater o inviatele alla #dropsfan gallery. Avete bisogno di aiuto con questo modello?Troverete 30 video tutorial, una sezione per i commenti/domande e molto altro guardando il modello su www.garnstudio.com © 1982-2026 DROPS Design A/S. Ci riserviamo tutti i diritti. Questo documento, compreso tutte le sue sotto-sezioni, è protetto dalle leggi sul copyright. Potete leggere quello che potete fare con i nostri modelli alla fine di ogni modello sul nostro sito. |
|||||||||||||||||||


Con oltre 40 anni di esperienza nel design di modelli di maglia e uncinetto, DROPS Design offre la più estesa collezione di modelli gratuiti su internet - tradotti in 17 lingue. Ad oggi vi possiamo fornire 324 cataloghi e 12290 modelli - 9561 dei quali sono tradotti in Italiano.
Ci stiamo impegnando molto per darvi il meglio che vi possiamo offrire in termini di maglia e uncinetto, ispirazioni e consigli così come filati di grande qualità ad un prezzo incredibile! Volete utilizzare i nostri modelli per qualcosa d'altro oltre al vostro uso personale? Potete leggere tutto ciò che è consentito nel testo sul Copyright in basso su tutte le pagine dei nostri modelli. Buon lavoro!
Lasciare un commento sul modello DROPS 161-33
Noi saremmo felici di ricevere i tuoi commenti e opinioni su questo modello!
Se vuoi fare una domanda, fai per favore attenzione a selezionare la categoria corretta nella casella qui sotto per velocizzare il processo di risposta. I campi richiesti sono indicati da *.