
Categorie popolari
State cercando un filato?


Commenti / Domande (139)
![]() Richard ha scritto:
Richard ha scritto:
Thanks for the prompt reply, given the current crisis. I've looked at the video link, but regrettably, there is no sound. I'll 'Google' it & see if I can find another link. All the best. Richard.
03.04.2020 - 11:34DROPS Design ha risposto:
Dear Richard, our videos do not have sounds because we are a worldwide company and our videos are watched by people around the world, speaking different languages, many of whom do not understand English. That's why we always recommend to follow written pattern/read the text/explanations at the same time. Happy knitting!
03.04.2020 - 11:48
![]() Richard ha scritto:
Richard ha scritto:
Hi everyone. Having completed the raglan stage of the garment, I now have to decrease evenly for the next round, as follows:- I have 308 sts/28 sts = 11. Do I knits every 10th st & 11th st together OR 11th st & 12th st together??When A5 has been worked, can you explain what is meant when you say "work an elevation in the back of the neck"? Otherwise, I am doing fine & expect to complete the garment during the next few days. Be sure to keep away from Coronavirus. Good luck.
03.04.2020 - 11:11DROPS Design ha risposto:
Dear Richard, work the 10th and 11 th st tog a total of 28 times (= 28x11=308 sts, you then have: 28 x 10 = 280 sts). This video shows how to make an elevation on mid back of a jumper (worked here top down but the idea is the same), you will work extra rows with short rows on the back of piece only so that the neckline on back piece is higher than the neckline on front piece. Happy knitting!
03.04.2020 - 11:27
![]() Kara ha scritto:
Kara ha scritto:
I’m getting ready to cast on but not sure about which size to select. The finished sizing doesn’t make any sense. Are the numbers given for a flat piece? I’m not sure how you measure the bust. Thank you
01.04.2020 - 18:12DROPS Design ha risposto:
Dear Kara, correct, measurements are always taken flat from side to side - compare a similar garment you have and like the shape to find out the matching size. Read more about sizing here. Happy knitting!
02.04.2020 - 07:50
![]() Richard ha scritto:
Richard ha scritto:
To all the Drops team, Hi all, I am such an idiot! This morning I questioned myself, once again, "where was I going wrong"? I was trying to knit 'A3' for the total 76 stitches of the sleeve! It suddenly came to me, that 'A3' was ONLY kitted either side of the transitions, between the sleeve & the body :>) So, the completed garment will show 1 hole, running the length of the Raglan decreases, of the sleev & the body... Thank you.
29.03.2020 - 11:50DROPS Design ha risposto:
Dear Richard, glad to see you found out how to work A.3 :) Thanks for your feedback and enjoy the rest of the jumper - come back if necessary! Happy knitting!
30.03.2020 - 09:38
![]() Richard ha scritto:
Richard ha scritto:
Hi, again. I will try again, but using double-pointed needles with 20 sts cast on, as follows:- I have placed a marker 5 sts along & now knitted 2sts tog. The remaining 3 sts are the 'A3' I continue as follows:- Y.O. - slip 1 st. - knit 2 sts tog. - psso. At this stage all is correct! - I have 4 sts. before the marker. But if I continue to knit in A3 (Y.O. - slip 1 st. - knit 2 sts tog. - psso). I do not have 7 sts. - I HAVE ONLY 6 STS! Help. Richard.
28.03.2020 - 14:48
![]() Brigitte Veerman ha scritto:
Brigitte Veerman ha scritto:
Ik begrijp niet helemaal hoe de ronding gebreid moet worden op het achterpand voor de hals. Waar moet ik de markeerder middenvoor zetten. Ook de mouwen staan op de rondbreinaald. In totaal heb je 184 steken. Dus 2x92 st. Dus midden is steek 45 of 46. Maar dat lijkt mij niet middenvoor. Eerste stuk is mouw. Moet je dan gewoon middenachter aanhechten en breien tot middenvoor. Tot 14 st voor markeerder. En dan omdraaien terugbreien voorbij middenachter tot 14 st voor markeerder?
28.03.2020 - 00:01DROPS Design ha risposto:
Dag Brigitte,
Nadat het telpatroon op de pas klaar is, kun je een verhoging op het achterpand breien in de vorm van verkorte toeren. Voordat je de mouwen en de panden op één rondbreinaald zet, heb je 100 steken op het voorpand en 100 steken op het achterpand. In het midden van deze 100 steken is midden voor/midden achter. Daar kun je dus een markeerder zetten en doortrekken naar boven. Voor de verhoging midden achter brei je verkorte toeren zoals aangegeven in de beschrijving.
29.03.2020 - 12:04
![]() Richard ha scritto:
Richard ha scritto:
Thank you for your response. Good luck. Richard
27.03.2020 - 10:20
![]() Richard ha scritto:
Richard ha scritto:
Good morning/afternoon. Once again, I am struggling! I understand that the first & last stitches will have the markers & that their are 74 stitches between the two markers. Do I knit AFTER the first marker (Y.O. - slip 1 st - k 2 tog - psso ). But at what stage do I do the raglan decease? It is difficult knitting the sleeve in, as they are 'bunched' together. Alternatively, if I disregarded A3 all-together (no holes in garment), I could continue as the pattern, up to the yoke.
27.03.2020 - 09:22DROPS Design ha risposto:
Dear Richard, the raglan decreases are worked on each side of each A.3 = k2 tog, (A.3 = yo, slip 1 as if to K, K2 tog, psso, YO), slip 1 as if to K, K1, psso- if you choose to not work A.3, just remember to work the raglan decreases so that you get the correct number of stitches for the circular yoke. Happy knitting!
27.03.2020 - 10:11
![]() Richard ha scritto:
Richard ha scritto:
Good morning. Hope you are all well. thank you for the last reply. So, tell me, Is it correct that the last stitch of the back is the first stitch of the left sleeve (which is the middle stitch of A3)? So, do I knit YO "BEFORE this last stitch" or AFTER it?? I have knitted quite a few of your patterns, but this part has given me the greatest problem... Help. Thank you, Richard.
26.03.2020 - 10:06DROPS Design ha risposto:
Dear Richard, the last st on back piece will be the last st on A.3 (at the transition of left sleeve and back piece), ie: sleeve, A.3 (= next to last st on sleeve + last st on sleeve = the one with the marker + 1st st on back piece), back piece. So that these 3 st will be worked as follows in A.3: YO, slip next to last st on sleeve, work tog st with marker + next st, psso (= 1 st remains), YO = there are now 3 sts (1 yarn over, 1 st, 1 yarn over) and the marker is still in the mid st (= the dec). Same should happen on other transitions, ie the middle st in each A.3 should be the st with the marker = the first or last stitch on sleeves. Hope this helps :)
26.03.2020 - 10:33
![]() Marisa ha scritto:
Marisa ha scritto:
Bonjour, est-il possible de faire ce pull avec une encolure moins ouverte (pour qu’on ne voit pas le t-shirt, je porte toujours un sous mes pulls) ? Merci d’avance !
25.03.2020 - 15:08DROPS Design ha risposto:
Bonjour Marisa, vous pouvez essayer de modifier un peu l'encolure, mais le résultat sera automatiquement différent - n'hésitez pas à contacter votre magasin, même par mail ou téléphone, pour toute assistance personnalisée. Retrouvez tous nos modèles de pulls tricotés de bas en haut ici. Bon tricot!
25.03.2020 - 17:17
|
|||||||||||||||||||
Nordic Summer#nordicsummersweater |
|||||||||||||||||||
 |
 |
||||||||||||||||||
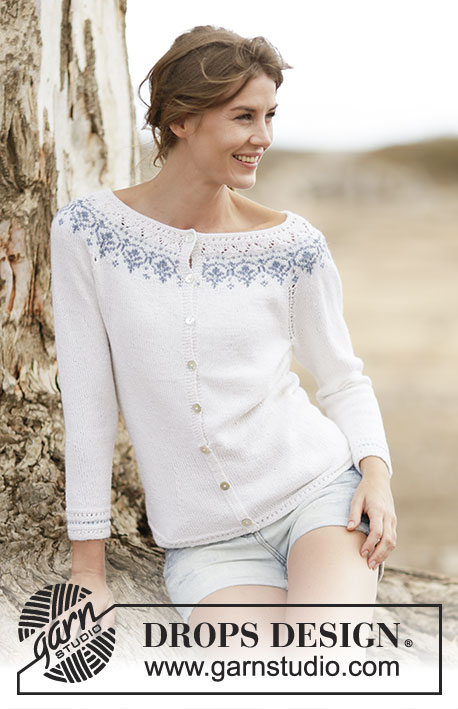
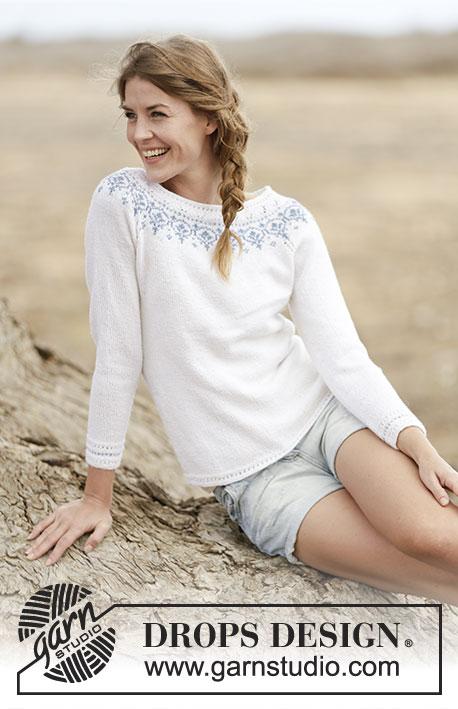
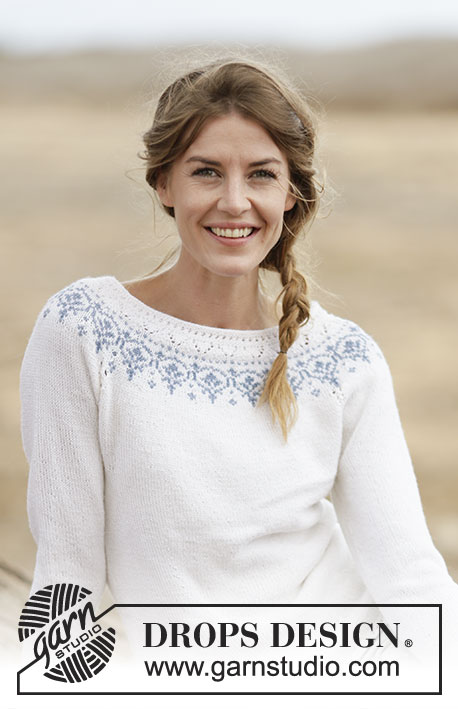
Maglione DROPS lavorato ai ferri con raglan e sprone rotondo in ”BabyMerino”. Taglie: S - XXXL.
DROPS 161-33 |
|||||||||||||||||||
|
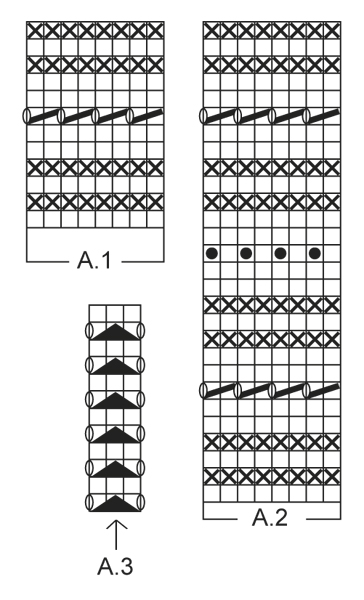
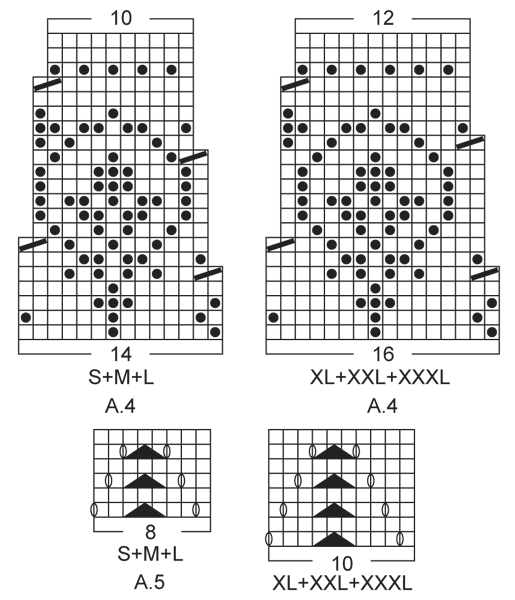
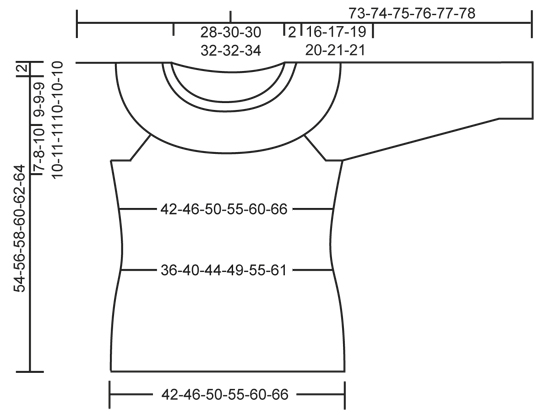
MOTIVO: Vedere i diagrammi A.1-A.5. VITA: Diminuire per la vita all'altezza dei 4 segnapunti. Diminuire come segue dopo il 1° e 3° segnapunti: 2 m insieme a dir. Diminuire come segue quando rimangono 2 m prima del 2° e 4° segnapunti: passare 1 m a dir senza lavorarla, 1 m dir, accavallare la m passata sopra quella appena lavorata. SUGGERIMENTO PER GLI AUMENTI: Aumentare per la vita all'altezza dei 4 segnapunti come segue: fare 1 gettato dopo il 1° e 3° segnapunti e prima del 2° e 4° segnapunti. Sul giro successivo lavorare i gettati a dir ritorto per evitare buchi. RAGLAN: Diminuire per il raglan a ogni lato di A.3 in ogni punto di passaggio tra le maniche e il corpo. Diminuire come segue dopo A.3: passare 1 m a dir senza lavorarla, 1 m dir, accavallare la m passata sopra quella appena lavorata. Diminuire come segue 2 m prima di A.3: lavorare 2 m insieme a dir. ---------------------------------------------------------- CORPO: Lavorato in tondo con i f circolari. Avviare 200-220-240-264-288-316 m con i f circolari n° 2,5 mm con il bianco. Lavorare il motivo secondo il diagramma A.1. Quando A.1 è stato lavorato 1 volta in verticale, passare ai f circolari n° 3 mm. Poi lavorare a m rasata. FARE ATTENZIONE ALLA TENSIONE DEL LAVORO! Quando il lavoro misura 8-8-8-8-10-10 cm, inserire 4 segnapunti nel lavoro come segue: Inserire il 1° segnapunti dopo le prime 24-28-31-36-42-48 m, il 2° segnapunti dopo le 52-54-58-60-60-62 m successive, il 3° segnapunti dopo le 48-56-62-72-84-96 m successive e il 4° segnapunti dopo le 52-54-58-60-60-62 m successive (24-28-31-36-42-48 m rimaste sul f dopo l'ultimo segnapunti). Poi diminuire per la VITA all'altezza dei 4 segnapunti – leggere la spiegazione sopra (= 4 diminuzioni). Ripetere le diminuzioni ogni 4 giri 7-7-7-7-6-6 volte in totale = 172-192-212-236-264-292 m. Quando il lavoro misura 22 cm per tutte le taglie, aumentare dopo il 1° e 3° segnapunti e prima del 2° e 4° segnapunti – LEGGERE IL SUGGERIMENTO PER GLI AUMENTI (= 4 aumenti). Ripetere gli aumenti ogni 4-4-6-6-8-8 giri 7-7-7-7-6-6 volte in totale = 200-220-240-264-288-316 m. Continuare a lavorare fino a quando il lavoro misura 38-39-39-40-41-43 cm. Lavorare il giro successivo come segue: intrecciare 5-5-5-6-6-6 m per lo scalfo, lavorare 90-100-110-120-132-146 m a m rasata (= davanti), intrecciare 10-10-10-12-12-12 m per lo scalfo, lavorare 90-100-110-120-132-146 m a m rasata (= dietro) e intrecciare le ultime 5-5-5-6-6-6 m per lo scalfo. Mettere il lavoro da parte e lavorare le maniche. MANICA: Lavorata in tondo con i ferri a doppia punta. Avviare 56-56-58-60-62-64 m con i ferri a doppia punta n° 2,5 mm con il bianco. Lavorare il motivo secondo il diagramma A.2. Quando A.2 è stato lavorato 1 volta in verticale, passare ai ferri a doppia punta n° 3 mm. Inserire 1 segnapunti all'inizio del giro (= centro sotto la manica) e lavorare a m rasata. Quando il lavoro misura 8 cm, aumentare 2 m al centro sotto la manica. Ripetere gli aumenti ogni 9-7-7-6-6-5 giri 12-14-14-16-16-17 volte in totale = 80-84-86-92-94-98 m. Quando il lavoro misura 41-40-39-38-38-38 cm (NOTA: misure più piccole nelle taglie più grandi a causa dell'arrotondamento della manica più lungo e della maggiore ampiezza delle spalle), intrecciare le 10-10-10-12-12-12 m centrali sotto la manica (cioè intrecciare 5-5-5-6-6-6 m a ogni lato del segnapunti) = 70-74-76-80-82-86 m rimaste sul f. Mettere il lavoro da parte e lavorare l'altra manica. SPRONE: Trasferire le maniche sullo stesso f circolare del corpo come segue: Continuare con il bianco e lavorare le m della 1° manica e ALLO STESSO TEMPO inserire 1 segnapunti nella 1° m e 1 segnapunti nell'ultima m della manica, lavorare le m del davanti, lavorare le m dell'altra manica e ALLO STESSO TEMPO inserire 1 segnapunti nella 1° m e 1 segnapunti nell'ultima m sulla manica e lavorare le m del dietro = 320-348-372-400-428-464 m sul f e 4 segnapunti nel lavoro. Poi lavorare a m rasata in tondo e ALLO STESSO TEMPO lavorare A.3 in ogni punto di passaggio tra il corpo e le maniche (la freccia nel diagramma dovrebbe combaciare con la m con il segnapunti). ALLO STESSO TEMPO diminuire per il RAGLAN a ogni lato di A.3 in ogni punto di passaggio tra il corpo e le maniche – leggere la spiegazione sopra (= 8 diminuzioni). Ripetere le diminuzioni per il raglan ogni 4 giri 6-7-8-8-9-9 volte in totale = 272-292-308-336-356-392 m. Dopo l'ultima diminuzione lavorare 1 giro dir e ALLO STESSO TEMPO distribuire 20-26-28-32-36-40 diminuzioni in modo uniforme = 252-266-280-304-320-352 m sul f. Poi lavorare il motivo in tondo seguendo il diagramma A.4 e ALLO STESSO TEMPO diminuire come indicato nel diagramma - scegliere il diagramma per la taglia corretta. Quando A.4 è stato lavorato 1 volta in verticale, ci sono 180-190-200-228-240-264 m sul f. Lavorare 1 giro con il bianco e ALLO STESSO TEMPO distribuire 4-6-8-28-30-44 diminuzioni in modo uniforme = 176-184-192-200-210-220 m. Ora lavorare il motivo seguendo il diagramma A.5 – scegliere il diagramma per la taglia corretta. Alla fine di A.5, lavorare un'alzata sul dietro del collo. Inserire 1 segnapunti al centro davanti. Iniziare al centro dietro e lavorare a dir (con il bianco) fino a quando rimangono 14-14-16-16-18-20 m prima del segnapunti. Girare, lavorare a dir fino a quando rimangono 14-14-16-16-18-20 m prima del segnapunti dall'altro lato. Girare, lavorare a dir fino a quando rimangono 30-30-34-34-38-42 m prima del segnapunti. Girare, lavorare a dir fino a quando rimangono 30-30-34-34-38-42 m prima del segnapunti dall'altro lato. Girare, lavorare a dir fino a quando rimangono 46-46-52-52-58-64 m prima del segnapunti. Girare, lavorare a dir fino a quando rimangono 46-46-52-52-58-64 m prima del segnapunti dall'altro lato. Girare, lavorare a dir fino a quando rimangono 62-62-70-70-76-86 m prima del segnapunti. Girare, lavorare a dir fino a quando rimangono 62-62-70-70-76-86 m prima del segnapunti dall'altro lato. Girare e lavorare a dir fino all'inizio del giro. BORDO DEL COLLO: Passare ai f circolari n° 2,5 mm e lavorare il motivo in tondo su tutte le m secondo il diagramma A.1, ALLO STESSO TEMPO distribuire 30-28-36-34-44-44 diminuzioni in modo uniforme = 146-156-156-166-166-176 m. Quando A.1 è stato lavorato 1 volta in modo verticale, intrecciare senza stringere a dir. CONFEZIONE: Cucire le aperture sotto le maniche. |
|||||||||||||||||||
Spiegazioni del diagramma |
|||||||||||||||||||
|
|||||||||||||||||||
 |
|||||||||||||||||||
 |
|||||||||||||||||||
 |
|||||||||||||||||||
Avete terminato questo modello?Allora taggate le vostre foto con #dropspattern #nordicsummersweater o inviatele alla #dropsfan gallery. Avete bisogno di aiuto con questo modello?Troverete 30 video tutorial, una sezione per i commenti/domande e molto altro guardando il modello su www.garnstudio.com © 1982-2026 DROPS Design A/S. Ci riserviamo tutti i diritti. Questo documento, compreso tutte le sue sotto-sezioni, è protetto dalle leggi sul copyright. Potete leggere quello che potete fare con i nostri modelli alla fine di ogni modello sul nostro sito. |
|||||||||||||||||||


Con oltre 40 anni di esperienza nel design di modelli di maglia e uncinetto, DROPS Design offre la più estesa collezione di modelli gratuiti su internet - tradotti in 17 lingue. Ad oggi vi possiamo fornire 324 cataloghi e 12290 modelli - 9561 dei quali sono tradotti in Italiano.
Ci stiamo impegnando molto per darvi il meglio che vi possiamo offrire in termini di maglia e uncinetto, ispirazioni e consigli così come filati di grande qualità ad un prezzo incredibile! Volete utilizzare i nostri modelli per qualcosa d'altro oltre al vostro uso personale? Potete leggere tutto ciò che è consentito nel testo sul Copyright in basso su tutte le pagine dei nostri modelli. Buon lavoro!
Lasciare un commento sul modello DROPS 161-33
Noi saremmo felici di ricevere i tuoi commenti e opinioni su questo modello!
Se vuoi fare una domanda, fai per favore attenzione a selezionare la categoria corretta nella casella qui sotto per velocizzare il processo di risposta. I campi richiesti sono indicati da *.