
Categorie popolari
State cercando un filato?


Commenti / Domande (68)
![]() Amy ha scritto:
Amy ha scritto:
To whom it may concern: I was wondering when I am knitting the 12 stitches do I knit both ends of the row in garter stitch or just the last stitch of the row. Thank you in advance for your help Amy
31.10.2015 - 16:27DROPS Design ha risposto:
Dear Amy, when you are working the 12 sts for mid upper part, work the 1st and last st in garter st. See also the video in previous answer. Happy knitting!
31.10.2015 - 18:20
![]() Amy ha scritto:
Amy ha scritto:
To whom it may concern: The problem I am having is I have the 10 stitches on my needle for the top portion of the slipper but when I reach the 7 cm am I suppose to increase on those 10 stitches to reach the number 61 stitches that I need or do I start increasing after after the 7 cm. It says to pick up 12 stitches after I reach the 7 cm on either side of the edge stitch. That is where I am having the problem. Thank you again for your help
29.10.2015 - 04:56DROPS Design ha risposto:
Dear Amy, after you have worked the 7 cm over the mid sts, and 10 sts left, pick up 12 sts along both side of the upper foot (along right side of the middle part + along left side of the middle part) + slip sts from thread back on needle = you have a total of 61 sts on needle and your work looks like as in video, time code 5:18 approx. Happy knitting!
29.10.2015 - 09:32
![]() Amy ha scritto:
Amy ha scritto:
To whom it may concern: I am still confused as to how many rows I need because there is no explanation for when I go to start the pattern 2 portion of the slipper part and how many increases I need to reach the required amount of sts as well. I tried to watch the video but it was hard to follow when the sped up the knitting part. Thank you again for your help Amy
28.10.2015 - 16:04DROPS Design ha risposto:
Dear Amy, wijth pattern 2 portion of the slipper part, do you mean the edge around leg? Work first 4 ridges in garter st (= 8 K rows) but on the 8th K row increase 6 sts evenly - see here how to increase evenly. Then work following A.1 until 35-38 cm, work 4 ridges (8 K rows), but on the 1st of these 8 rows, decrease 6 sts evenly. Happy knitting!
28.10.2015 - 18:26
![]() Amy ha scritto:
Amy ha scritto:
Amy 25.10.2015 kl. 00:38: To whom it may concern: I am currently working on the slipper boot pattern and am wondering how I am suppose to do the heel of the slipper when it doesn't say how many rows to do it just say to work back and forth on the needles. If you could let me know it would be appreciated Thank you in advance for your help
25.10.2015 - 15:33
![]() Amy ha scritto:
Amy ha scritto:
To whom it may concern: I am currently working on the slipper boot pattern and am wondering how I am suppose to do the heel of the slipper when it doesn't say how many rows to do it just say to work back and forth on the needles. If you could let me know it would be appreciated Thank you in advance for your help
25.10.2015 - 00:38
![]() Yvonne ha scritto:
Yvonne ha scritto:
Kan ik de slof ook op 2 pennen breien ?
10.06.2015 - 23:26DROPS Design ha risposto:
Hoi Yvonne. Nee, enkele delen van deze slof worden in de rondte gebreid.
11.06.2015 - 13:44
![]() Trudy ha scritto:
Trudy ha scritto:
I guess I did not make myself clear. I understand about putting the stitches back on the needles, although I am not sure if we are using three now or four. If we are using four - then I need to know how many stitches are put onto the fourth needle which would be the heal area of the boot.
12.04.2015 - 17:54DROPS Design ha risposto:
Dear Trudy, distribute the sts on 4 needle or as in the video, making sure the markers are on the correct places. Happy knitting!
13.04.2015 - 09:32
![]() Elaine Langille ha scritto:
Elaine Langille ha scritto:
I don't understand "knit over knit" and "purl over purl" I watched the video, but still didn't know how to do it
11.02.2015 - 03:56DROPS Design ha risposto:
Dear Mrs Langille, you work pattern 2 over the 12 sts as follows from RS: 1 edge st in garter st, *K2,P2* over the next 10 sts and finish with 1 edge st in garter st. On next row from WS work 1 edge st in garter st, *P2/K2* over the next 2 sts, 1 edge st in garter st. Happy knitting!
11.02.2015 - 09:14
![]() M Damen ha scritto:
M Damen ha scritto:
Een opmerking niet over de sloffen maar over de gebruikte taal. gecontroleerd is met 1 L niet met 2. Deze fout staat al enkele jaren bij ieder patroon.
04.01.2015 - 20:21Dianne Perrin ha scritto:
Drops 158-47 pattern no an-025 I do not understand the directions for A.1 which is the first row and which x box is a p from rs and which x box is k from ws and which blank box is k from rs and which blank box is p from ws
16.12.2014 - 07:15DROPS Design ha risposto:
Dear Mrs Perrin, please click here to read more about diagrams. Row 1 = K5, (P2, K2) repeat (to) a total of 5 times, K3. Row2= K3, (P2, K2) repeat (to) a total of 5 times, P2, K3. Happy knitting!
16.12.2014 - 09:58
|
|||||||
One Step Ahead#onestepaheadslippers |
|||||||
 |
 |
||||||
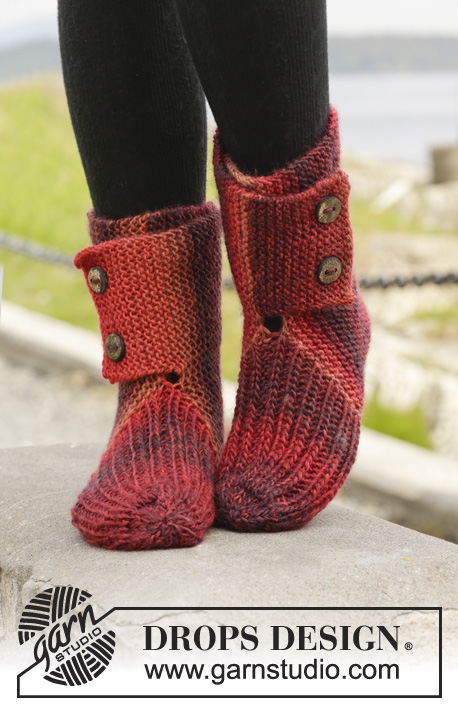
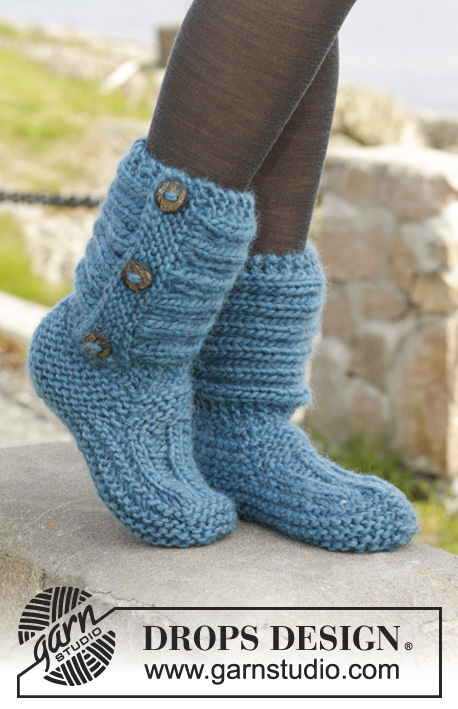
Pantofole DROPS ai ferri, a punto legaccio e coste, in "Andes". Taglie: Dalla 35 alla 42.
DROPS 158-47 |
|||||||
|
PUNTO LEGACCIO (in tondo sui ferri a doppia punta): * 1 giro a dir, 1 giro a rov *, ripetere da *-*. 1 “costa” a legaccio = 2 giri. PUNTO LEGACCIO (avanti e indietro sui ferri): Lavorare tutti i ferri a dir. 1 “costa” a legaccio = 2 ferri a dir. MOTIVO: Vedere il diagramma A.1. MOTIVO 2: Ferro 1(= diritto del lavoro): * 2 m dir, 2 m rov *, ripetere da *-* finché non rimangono 2 m, 2 m dir. Ferro 2 (= rovescio del lavoro): lavorare a dir le m dir e a rov le m rov. Ripetere il ferro 2. ---------------------------------------------------------- PANTOFOLE: Lavorare prima il bordo nella parte inferiore della gamba, proseguire con il piede. Finire con il bordo intorno alla gamba. GAMBA: Avviare 37-37-39 m sui ferri a doppia punta n° 6 con il filato Andes. Lavorare a PUNTO LEGACCIO in tondo - vedere le spiegazioni sopra - finché il lavoro non misura ca. 4 cm, finire dopo 1 giro a rov. RICORDARSI LA TENSIONE DEL LAVORO! PIEDE: Lavorare ora avanti e indietro Tenere ora le prime 10 m sui ferri, mettere in attesa su un ferma maglie le rimanenti 27-27-29 m. Lavorare ora le 10 m della parte centrale seguendo il MOTIVO 2 – vedere le spiegazioni sopra – ALLO STESSO TEMPO, alla fine dei 2 ferri successivi, avviare 1 m vivagno (lavorare la m vivagno a PUNTO LEGACCIO - vedere le spiegazioni sopra) = 12 m. Quando la parte centrale misura 7-8½-10 cm, diminuire 1 m vivagno da ciascun lato = 10 m. Riportare ora sui ferri di lavoro, le m messe in attesa sul ferma maglie e riprendere 12-14-16 m da ciascun lato della parte centrale (a 1 m dai bordi) = 61-65-71 m. DA ADESSO IN AVANTI, MISURARE IL LAVORO DA QUESTO PUNTO ! Inserire 1 segno al centro delle 10 m della parte centrale (= parte anteriore, verso la punta del piede) e 1 segno nella m del tallone, sul dietro: ci sono 30-32-35 m, tra i segni, da ciascun lato. Proseguire ora in tondo a punto legaccio. Quando il lavoro misura 2 cm, lavorare, ogni 2 giri, 2 m insieme a dir da ciascun lato di ogni segno (= 4 m in meno ad ogni giro). Proseguire queste diminuzioni finché il lavoro non misura 5-5-6 cm. Intrecciare le rimanenti m. Cucire sotto il piede nell’asola più esterna delle m per evitare una cucitura troppo spessa. BORDO DELLA GAMBA: Si lavora avanti e indietro sui ferri. Avviare 22 m sui ferri n° 6 con il filato Andes. Lavorare 4 coste a legaccio; ALLO STESSO TEMPO, nel corso dell’ultimo ferro, aumentare 6 m in modo uniforme = 28 m. Lavorare seguendo il diagramma A.1 (= 28 m) finché il lavoro non misura ca.35-36-38 cm. Lavorare 4 coste a legaccio; ALLO STESSO TEMPO, durante il 1° ferro, diminuire 6 m in modo uniforme = 22 m. Intrecciare le m. Sovrapporre il bordo di avvio delle m al bordo di chiusura e attaccare 3 bottoni come decorazione, nelle coste a legaccio della gamba. CONFEZIONE: Cucire il bordo della gamba al ferro di avvio della gamba (quindi le m avviate per la gamba, all’inizio delle spiegazioni). Disporre il bordo in modo che i bottoni si trovino sul lato esterno della pantofola, con l’apertura sul dietro, lato tallone - cucire sul rovescio del lavoro per avere una cucitura invisibile. Lavorare una seconda pantofola in modo uguale. Assicurarsi che l’apertura del bordo sia sull’altro lato. |
|||||||
Spiegazioni del diagramma |
|||||||
|
|||||||
 |
|||||||
Avete terminato questo modello?Allora taggate le vostre foto con #dropspattern #onestepaheadslippers o inviatele alla #dropsfan gallery. Avete bisogno di aiuto con questo modello?Troverete 18 video tutorial, una sezione per i commenti/domande e molto altro guardando il modello su www.garnstudio.com © 1982-2026 DROPS Design A/S. Ci riserviamo tutti i diritti. Questo documento, compreso tutte le sue sotto-sezioni, è protetto dalle leggi sul copyright. Potete leggere quello che potete fare con i nostri modelli alla fine di ogni modello sul nostro sito. |
|||||||


Con oltre 40 anni di esperienza nel design di modelli di maglia e uncinetto, DROPS Design offre la più estesa collezione di modelli gratuiti su internet - tradotti in 17 lingue. Ad oggi vi possiamo fornire 324 cataloghi e 12290 modelli - 9561 dei quali sono tradotti in Italiano.
Ci stiamo impegnando molto per darvi il meglio che vi possiamo offrire in termini di maglia e uncinetto, ispirazioni e consigli così come filati di grande qualità ad un prezzo incredibile! Volete utilizzare i nostri modelli per qualcosa d'altro oltre al vostro uso personale? Potete leggere tutto ciò che è consentito nel testo sul Copyright in basso su tutte le pagine dei nostri modelli. Buon lavoro!
Lasciare un commento sul modello DROPS 158-47
Noi saremmo felici di ricevere i tuoi commenti e opinioni su questo modello!
Se vuoi fare una domanda, fai per favore attenzione a selezionare la categoria corretta nella casella qui sotto per velocizzare il processo di risposta. I campi richiesti sono indicati da *.