
Categorie popolari
State cercando un filato?


Commenti / Domande (30)
![]() Dorothee ha scritto:
Dorothee ha scritto:
Hi, Where does the back shaping/elevation start? At the beginning of the back stitches row or in the middle? Thank you.
24.02.2026 - 15:30DROPS Design ha risposto:
Hi Dorothee, The elevation short rows begin at the beginning of the row, then stop short as described before the end of the row where you turn, work back and stop short before the beginning of the row, turn again, etc.. Regards, Dops Team.
25.02.2026 - 07:01
![]() Dorothee ha scritto:
Dorothee ha scritto:
Thank you for responding so quickly to my short row question. So to clarify: do I start working my 9 stitches in the back from the middle of the row (at the 26 stitch mark -I have 52 stitches on each side-) or at the very beginning of the back stitch row? Thank you again.
24.02.2026 - 07:47
![]() Dorothee ha scritto:
Dorothee ha scritto:
Hello, I am confused on how to do the elevation in the back for size 6/9 months. Am I understanding correctly: I knit in rib 9 stitches on the back side, I turn my work and knit 26 stitches -which means that I will be knitting 17 stitches from the front?-, and so on? So the short rows are happening on both the back and front stitches; correct? Thank you I knit
24.02.2026 - 06:32DROPS Design ha risposto:
Hi Dorothee, Yes, the short rows will be across some of the front piece as the short rows get longer. This gives a gradual shaping to the elevation at the back. Regards, Drops Team.
24.02.2026 - 06:42
![]() Harim ha scritto:
Harim ha scritto:
So got to the first leg yay! What i dont understand is once ive finished one leg, the working yarn will be at the ankle. How do I start the new leg? Do i need to cut the yarn from the finished first leg and then start the second leg with a fresh working yarn? Is there a video I could watch to help? Many thanks! Harim
14.02.2026 - 23:28DROPS Design ha risposto:
Hei Harim, Yes, you need to cut the working yarn and begin the second leg with a new strand. We do not have a video for this pattern sadly. Regards, Drops team.
16.02.2026 - 06:55
![]() Petra Manuela ha scritto:
Petra Manuela ha scritto:
Hallo, ich wollte nochmals nachfragen, ob Sie diese Fragen noch betreuen. Mir ist aufgefallen, dass manchmal keine Antwort kommt. Meine Frage ist, warum muss ich nach 3/4 verkürzten Reihen plötzlich beim Wenden jeweils 6/8 M mehr stricken soll, das gibt ja ein riesiges Loch. Meinten Sie alt 6/8 mal jeweils 1 Masche? Vielen Dank für Ihre Rückantwort
11.09.2025 - 14:22DROPS Design ha risposto:
Liebe Manuela, das Loch können Sie vermeiden, indem Sie den Faden anziehen oder mit der Technik "German Short Rows" stricken, die Sie in unseren Videos finden. Sie stricken nach jedem Wenden 6 bzw. 8 Maschen mehr, das ist vom Beginn der verkürzten Reihen so, Sie setzen die beschriebenen Reihen wie begonnen fort. Gutes Gelingen weiterhin!
17.09.2025 - 09:56
![]() Petra ha scritto:
Petra ha scritto:
Ich verstehe zu Beginn bei den verkürzten Reihen für die hintere Hose nicht, wo diese anfangen soll(rückwärtige Mitte?) und wie ich dann nach den ersten verkürzten Zunahmen am zu Ende beim Wenden jeweils 6/8 .. mehr stricken soll ? beziehungsweise wie ich dann diese am Ende in die gesamte Runde einfügen kann . Bei mir entstehen riesige Löcher. Leider finde ich die Anleitung sehr unverständlich. Bitte erklären Sie mir diese besser
09.09.2025 - 23:43DROPS Design ha risposto:
Liebe Petra, die verkürzten Reihen beginnen an der hinteren Mitte und werden wie in diesem Video gestrickt, dh immer mehr Maschen am Ende jeder Reihe stricken, bis die gewünschte Maschenanzahl gestrickt wird; Hier finden Sie Technik für verkürzten Reihen, um Löcher zu vermeiden. Viel Spaß beim Stricken!
05.11.2025 - 08:17
![]() Zwenny ha scritto:
Zwenny ha scritto:
Ik begrijp twee stappen niet goed: ik heb google gebrobeerd maar kon de antwoorden niet vinden. 1: hoe zet je steken over van een smallere rondbreinaald naar een brede? (ik zou dat graag willen zien in een video) 2: Dan, na het wisselen moet er een ronding gebreid worden. Ik begrijp niet goed hoe ik dat moet doen terwijl ik boordsteek moet houden. Sommigen leggen uit dat je een extra steek breit, maar dan ben ik de tel kwijt als het gaat om de boorsteek.
05.07.2025 - 12:59
![]() Monica ha scritto:
Monica ha scritto:
Hi, I do not understand the beginning of the pants. The pattern say "When rib measures 3 cm....work an elevation in the back as follows.... What I do not understand is , in fact the pattern diagram shows for , in my case 22 cm. My question is , as I can not see the back of the pants, where to start the elevation after 3 cm or after 22 cm? Thank you for your kind answer!
24.05.2025 - 12:38DROPS Design ha risposto:
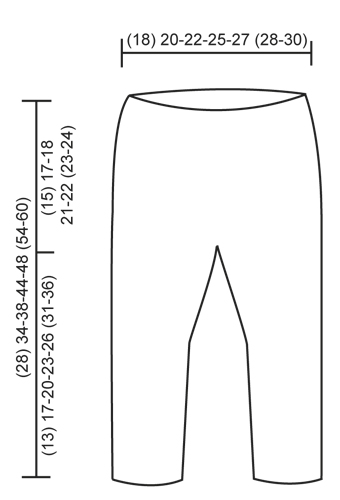
Dear Monica, the pants are worked from the top and down and the measurements are always in length. First we work a small rib edge for 3cm and then we make a slightly longer back side of the pants so that it better fits. This elevation at the back has to be worked at the beginning and it's not shown in the size chart; the size chart only indicated the width of the upper part of the pants, the length of the upper part of the pants before dividing for each leg, the length of the legs and the length of the complete pants. So the elevantion is worked when the upper part measures 3cm. Happy knitting!
25.05.2025 - 13:56
![]() Kim ha scritto:
Kim ha scritto:
I do not know how to do the increase stitches and still maintain the rib pattern. Would you be able to supply more detail (row by row, for a couple of rows) please?
09.05.2025 - 00:47DROPS Design ha risposto:
Dear Kim, you will incorporate the new stitches into the rib as before, so that you will have first: K2, P2, K1 (inc), K2 (middle sts), K1 (inc), P2, K2 , then K2, P2, K2 (2 first inc), K2 (mid sts), K2 (2 first inc), P2, K2; then K2, P2, K2, P1 (3rd inc), K2 (mid sts), P1 (inc), K2, P2, K2; and on 4th inc: K2, P2, K2, P2 (3rd+4th inc), K2 (mid sts), P2 (3rd + 4th inc), K2, P2, K2. Continue like this. See also how to increase in rib K2/P2 in, this video (for another pattern/another way of increase but new stitches will be worked in rib). Happy knitting!
09.05.2025 - 07:58
![]() Katharina ha scritto:
Katharina ha scritto:
Gerade von der Nadel gehüpft. Wenn man nicht zu viel nachdenkt, stricken sich auch die Zunahmen quasi von alleine. Durch das ziemlich elastische Muster verzeiht dieses Modell auch moderate Abweichungen in der Maschenprobe. Sockenwolle funktioniert auch gut.
08.04.2022 - 13:26
|
|
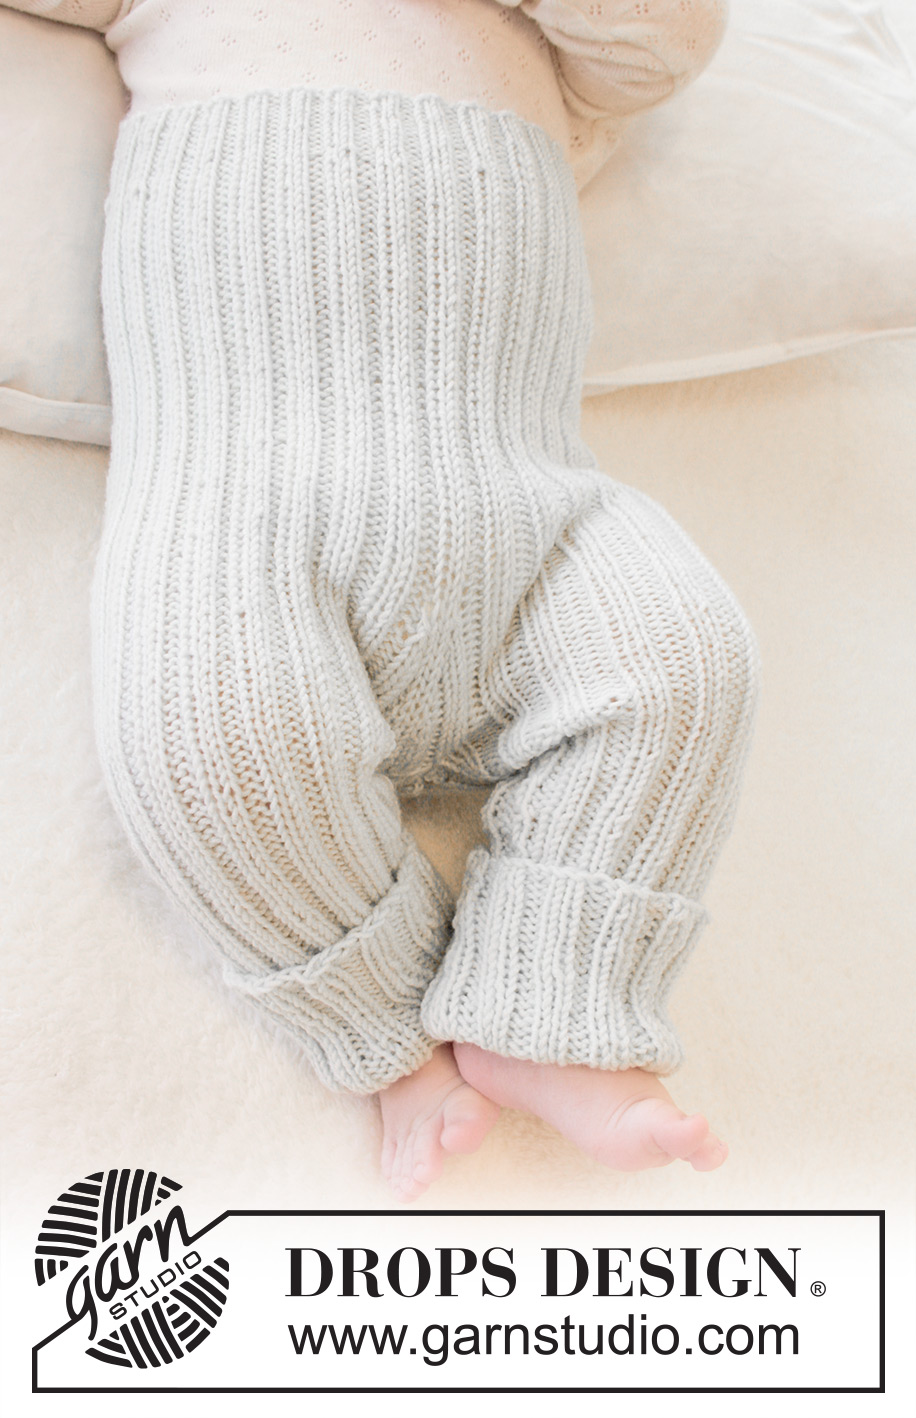
First Impression Pants#firstimpressionpants |
|
|
|
|
Pantaloni per neonati lavorati ai ferri a coste in DROPS BabyMerino. Taglie: (prematuri) - 4 anni.
DROPS Baby 25-27 |
|
|
SUGGERIMENTO PER GLI AUMENTI: Aumentare a ogni lato delle 2 m dir lavorando 1 gettato. Sul giro successivo lavorare i gettati a ritorto (cioè lavorare nel filo dietro della m) per evitare buchi. Lavorare le m aumentate a coste, cioè lavorare a dir le prime 2 m aumentate, e a rov le 2 m successive etc. SUGGERIMENTO PER LE DIMINUZIONI: Lavorare fino a quando rimangono 3 m prima del segnapunti, lavorare 2 m insieme (a coste), lavorare 2 m (il segnapunti è tra queste 2 m) e poi lavorare 2 m insieme a ritorto (a coste). --------------------------------------------------------- PANTALONI: Lavorati in tondo, dall’alto verso il basso. I giri iniziano al centro dietro. Avviare (88) 96-104-120-128 (136-144) m con i f circolari n° 2,5 mm con Baby Merino. Inserire 1 segnapunti all’inizio del giro (= centro dietro) e 1 segnapunti dopo (44) 48-52-60-64 (68-72) m (= centro davanti). Lavorare a coste dal centro dietro come segue: 1 m dir, * 2 m rov, 2 m dir *, ripetere *-*, finire con 2 m rov, 1 m dir. Quando le coste misurano 3 cm, passare ai f circolari n° 3 mm. Ora lavorare un’alzata sul dietro come segue: lavorare (7) 7-9-9-9 (9-9) m a coste, girare, tirare il filo, lavorare (14) 14-18-18-18 (18-18) m a coste, girare, tirare il filo, lavorare (20) 20-26-26-26 (26-26) m a coste, girare, tirare il filo, lavorare (26) 26-34-34-34 (34-34) m a coste. Continuare in questo modo lavorando (6) 6-8-8-8 (8-8) m in più a ogni giro fino a quando è stato lavorate un totale di (50) 50-66-66-82 (82-82) m. Girare, continuare a coste in tondo su tutte le m. Quando il lavoro misura (10) 12-13-16-15 (16-17) cm al centro davanti, aumentare 1 m a ogni lato delle 2 m centrali davanti e dietro – leggere il SUGGERIMENTO PER GLI AUMENTI (= 4 aumenti). Ripetere gli aumenti a giri alterni altre (7) 7-7-7-11 (11-11) volte (= (8) 8-8-8-12 (12-12) aumenti in totale) = (120) 128-136-152-176 (184-192) m. Intrecciare (12) 12-12-12-16 (16-16) m al centro davanti e al centro dietro. I lavoro misura (15) 17-18-21-22 (23-24) cm , Finire ogni gamba in modo separato, trasferire le m per una gamba su un fermamaglie. GAMBA: = (48) 52-56-64-72 (76-80) m. Distribuire le m su 4 f a doppia punta n° 3 mm e continuare a coste in tondo – inserire 1 segnapunti all’interno della gamba. Quando la gamba misura 2 cm, diminuire 1 m a ogni lato del segnapunti – LEGGERE IL SUGGERIMENTO PER LE DIMINUZIONI. Ripetere le diminuzioni ogni (4) 6-6-4-4 (6-6) giri altre (3) 3-3-7-7 (7-7) volte (= (4) 4-4-8-8 (8-8) diminuzioni in totale) = (40) 44-48-48-56 (60-64) m. Quando la gamba misura circa (13) 17-20-23-26 (31-36) cm (o la lunghezza desiderata), intrecciare senza stringere con dir su dir e rov su rov. Trasferire le m dall’altra gamba sui f di lavoro e lavorare come la prima gamba. CONFEZIONE: Cucire le (12) 12-12-12-16 (16-16) m che sono state intrecciate tra le gambe. |
|
 |
|
Avete terminato questo modello?Allora taggate le vostre foto con #dropspattern #firstimpressionpants o inviatele alla #dropsfan gallery. Avete bisogno di aiuto con questo modello?Troverete 25 video tutorial, una sezione per i commenti/domande e molto altro guardando il modello su www.garnstudio.com © 1982-2026 DROPS Design A/S. Ci riserviamo tutti i diritti. Questo documento, compreso tutte le sue sotto-sezioni, è protetto dalle leggi sul copyright. Potete leggere quello che potete fare con i nostri modelli alla fine di ogni modello sul nostro sito. |


Con oltre 40 anni di esperienza nel design di modelli di maglia e uncinetto, DROPS Design offre la più estesa collezione di modelli gratuiti su internet - tradotti in 17 lingue. Ad oggi vi possiamo fornire 324 cataloghi e 12290 modelli - 9561 dei quali sono tradotti in Italiano.
Ci stiamo impegnando molto per darvi il meglio che vi possiamo offrire in termini di maglia e uncinetto, ispirazioni e consigli così come filati di grande qualità ad un prezzo incredibile! Volete utilizzare i nostri modelli per qualcosa d'altro oltre al vostro uso personale? Potete leggere tutto ciò che è consentito nel testo sul Copyright in basso su tutte le pagine dei nostri modelli. Buon lavoro!
Lasciare un commento sul modello DROPS Baby 25-27
Noi saremmo felici di ricevere i tuoi commenti e opinioni su questo modello!
Se vuoi fare una domanda, fai per favore attenzione a selezionare la categoria corretta nella casella qui sotto per velocizzare il processo di risposta. I campi richiesti sono indicati da *.