
Categorie popolari
State cercando un filato?


Commenti / Domande (237)
![]() Leyla ha scritto:
Leyla ha scritto:
Hallo, eine Frage: Werden die Markierungen jeweils in die nächste Reihe übernommen und wenn ja, wie? Wenn nein, woher weiß ich wo ich in der nächsten Hin Reihe abnehmen muss?
12.03.2019 - 21:04DROPS Design ha risposto:
Liebe Leyla, ja die Markierungen sollen jeweils in die nächste Reihe übernommen werden, dh bis Ab- bzw Zunahmen fertig sind. Viel Spaß beim stricken!
13.03.2019 - 08:05
![]() Sonja ha scritto:
Sonja ha scritto:
Genau nach Anleitung war sie bei mir auch zu klein. Ich stricke aber auch recht eng. Die Quintessenz: Für ein Kind von 1 Jahr war bei mir die größte Größe mit 141 Maschen stimmig. Zusätzlich habe ich die Anzahl der Ab- und Zunahmen in den geplanten 6 Hinreihen auf 12 verdoppelt und dann hat es perfekt gepasst. Für unsere Große mit 2 1/2 Jahren habe ich 151 Maschen angeschlagen, Markierung auf 2/30/59/76/92/122/150 gesetzt und anstatt der 6 Hinreihen Ab-und Zunahme 16 Hinreihen.
12.03.2019 - 10:03DROPS Design ha risposto:
Liebe Sonja, beachten Sie, daß Ihre Maschenprobe stimmt, dh hier sollten Sie 26 M. x 34 R. glatt gestrickt = 10 x 10 cm. Wenn für 10 cm mehr Maschen als in der Maschenprobe angegeben benötigt werden, zu einer dickeren Nadelstärke wechseln. Viel Spaß beim stricken!
12.03.2019 - 10:12
![]() Bev Bayley-smith ha scritto:
Bev Bayley-smith ha scritto:
Can I use Debbie Bliss baby cashmerino yarn?
08.03.2019 - 15:44DROPS Design ha risposto:
Dear Bev, these patterns are written especially for DROPS yarns. We are sorry but cannot advise you about yarns made by other manufacturer. However, you should always make a swatch and check your gauge if you decide to substitute. Happy Knitting!
10.03.2019 - 16:54
![]() LINDA CLARK ha scritto:
LINDA CLARK ha scritto:
I did end up by making this hat in the round and just eliminated the 2 extra edge stitches allowed in the knitted flat pattern. It worked out well.
13.01.2019 - 23:05
![]() Linda Clark ha scritto:
Linda Clark ha scritto:
Do you think it would be possible to work this pattern in the round? I would rather not have a seam at the back of the hat. In reading the pattern instructions, I think I could by knitting all rounds and only making increases and decreases every other round....also decrease cast on sts by 2 as I would not have to allow for "edge" stitches. What do you think?
04.01.2019 - 20:25DROPS Design ha risposto:
Dear Mrs Clark, this could probably work - make sure to place the markers on the right places, but just remember when the designer writes a pattern back and forth, there must be some reason and it can be a good idea to follow the instructions. Happy knitting!
07.01.2019 - 09:06
![]() Emily De Vinck ha scritto:
Emily De Vinck ha scritto:
Hi there, I see that the edge around the face appears to be 3-4 rows of purl stitches. However, I don’t see any instruction to purl on the RS. How do I get this purl edge? Is this edge actually the 8 garter stitch rows in the beginning? At the beginning for K8 rows, does that mean knit in stockinette for 8 rows to get garter stitch rows?
02.12.2018 - 00:13DROPS Design ha risposto:
Dear Mrs De Vinck, you start the hat working 8 K rows, this will give you 4 ridges in garter stitch and then continue working in stockinette stitch. Happy knitting!
03.12.2018 - 09:10
![]() Berit Hansson ha scritto:
Berit Hansson ha scritto:
Detta är en jättefin mössa. Stickade den till barnbarnet i st 6/9 mån. Väldigt fin modell och den passade bra. Nu ville mamman till barnbarnet att jag skulle sticka en i större storlek så det blev en 2 år. Den blev på tok för liten och barnbarnet är bara 7 mån.Passade bra runt om, men var ju alldeles för kort. Enligt mönstret blir ju alla mössor ungefär lika höga och det måste ju vara fel. Huvudet växer ju både runt och på höjden.
09.11.2018 - 22:53
![]() Aino ha scritto:
Aino ha scritto:
Liebes Drops Team. Mache ich die Zu und Abnahmen in jeder Hinreihe (nach meinem Verständnis zu und Aubnahmen machen, Rückreihe stricken und dann wieder zu und aubnahmen) oder in jeder 2. Hinreihe (zu und Aubnahmen machen, rückreihe, hinreihe, rückreihe stricken und dann wieder zu und Abnahme) ? Danke Lg Aino
21.10.2018 - 23:04DROPS Design ha risposto:
Liebe Aino, die Zu- und Abnahmen werden in jeder 2. Reihe gestrickt = in jeder Hinreihe. Dann werden die Abnahmen auch in jeder 2. Reihe = in jeder Hinreihe gestrickt. Viel Spaß beim stricken!
22.10.2018 - 10:01
![]() Pagano Agnès ha scritto:
Pagano Agnès ha scritto:
Bonjour , pour terminer le bonnet je n\'ai pas le même rendu que sur la photo. la pointe est plus courte. Faut-il commencer les diminutions de chaque coté avant la fin des diminutions de part et d\'autre de la maille centrale des marqueurs 2,4 et 6 ? merci de votre réponse . agnès
06.10.2018 - 18:19DROPS Design ha risposto:
Bonjour Agnès, vous diminuez et augmentez comme indiqué d'abord 6 fois au total tous les 2 rangs, puis vous n'augmentez plus mais diminuez seulement tous les 2 rangs aux marqueurs 2, 4 et 6 jusqu'à ce qu'il reste 15 m. (pensez à bien vérifier votre échantillon en hauteur). Bon tricot!
08.10.2018 - 10:12
![]() Lena S Gille ha scritto:
Lena S Gille ha scritto:
Jättefin mössa, men den blir så pytteliten, jag stickar normal fasthet. Fick göra om hela mössan o sticka största storleken till en tre månaders baby. Använde drops alpacka mix st 2,5 eller 3, minns inte riktigt
22.09.2018 - 15:21
|
|
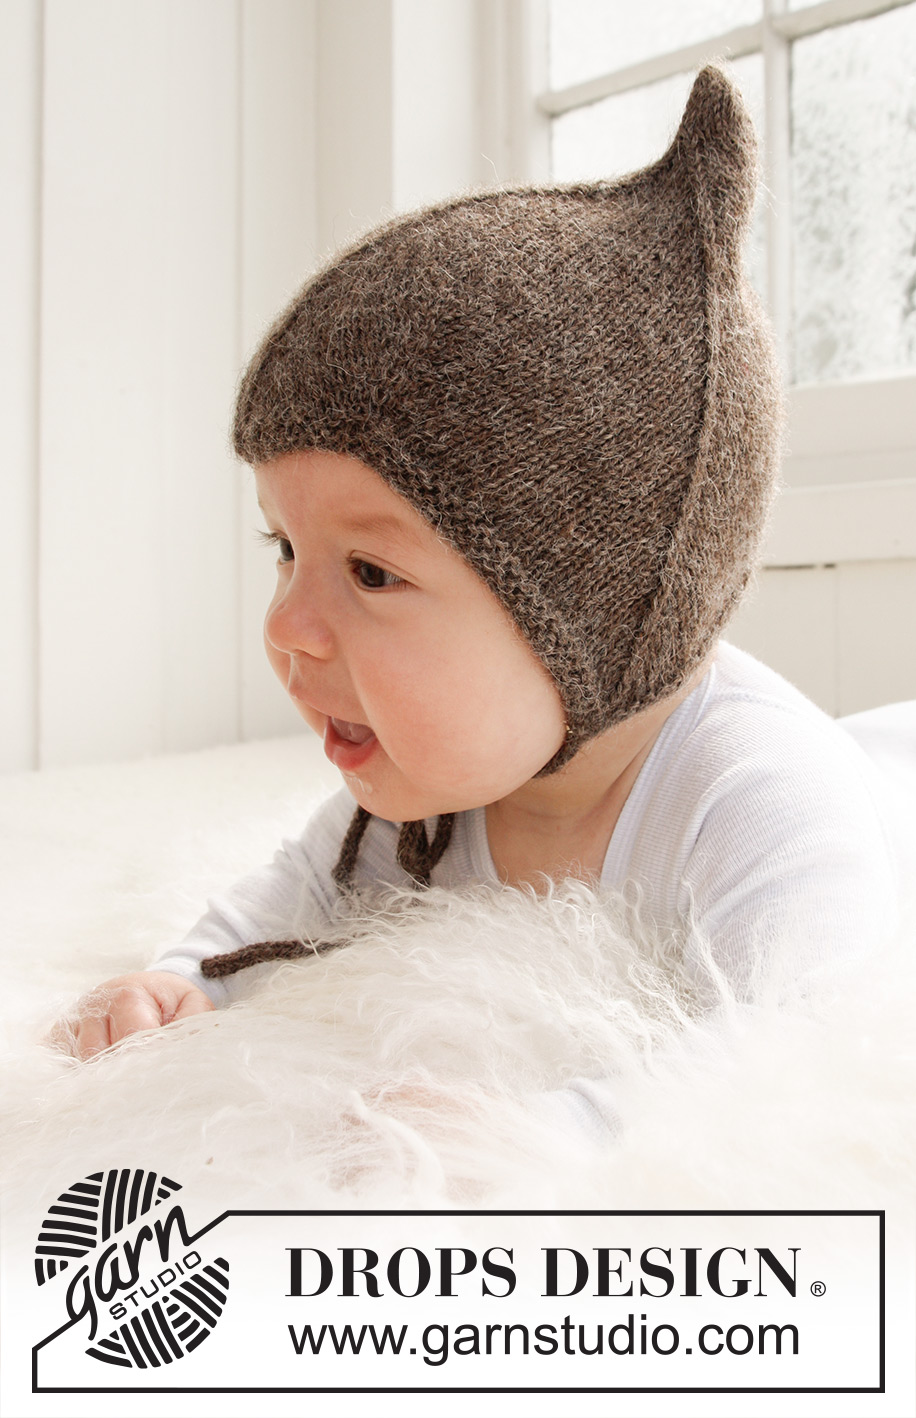
Alladin#alladinhat |
|
|
|
|
Cappello lavorato ai ferri per per neonati e bambini in DROPS Alpaca.
DROPS Baby 21-34 |
|
|
SUGGERIMENTO PER GLI AUMENTI: Tutti gli aumenti vengono effettuati sul diritto del lavoro. Aumentare 1 m prima e dopo la m con il segno, inserendo 1 m gettata. Al giro successivo, lavorare la m gettata a rovescio ritorto (prendere la m nell’asola posteriore e non in quella anteriore) per evitare che si formi un buco. SUGGERIMENTO PER LE DIMINUZIONI: Tutte le diminuzioni vengono effettuate sul diritto del lavoro. Diminuire 1 m da ciascun lato della m con il segno. Iniziare 1 m prima della m con il segno. Passare 1 m sul ferro ausiliario dietro il lavoro, passare 1 m senza lavorarla (= m con il segno), lavorare insieme a dir la m successiva e la m sul fermamaglie, accavallare la m passata sulle m lavorate. -------------------------------------------------------- BERRETTO: Si lavora avanti e indietro sui ferri. Avviare 117-123-129 (135-141) m (compresa 1 m vivagno da ciascun lato) sui ferri n° 2,5 con il filato Alpaca. Lavorare 8 ferri a dir (1° ferro = diritto del lavoro). Inserire 7 segni nel lavoro sul diritto del lavoro, come segue: 1° segno nella 2a m, 2° segno nella 24a-25a-26a (27a-28a) m, 3° segno nella 48a-50a-52a (54a-56a) m, 4° segno nella 59a-62a-65a (68a-71a) m, 5° segno nella 70a-74a-78a (82a-86a) m, 6° segno nella 94a-99a-104a (109a-114a) m, e il 7° segno nella penultima m sul ferro. Proseguire a maglia rasata con 1 m vivagno a punto legaccio da entrambi i lati – ALLO STESSO TEMPO, durante il primo ferro, iniziare ad aumentare e a diminuire – vedere il SUGGERIMENTO PER GLI AUMENTI e il SUGGERIMENTO PER LE DIMINUZIONI sopra – ogni 2 ferri come segue: Aumentare 1 m dopo il 1° segno. Diminuire 1 m da ciascun lato del 2° segno. Aumentare 1 m da ciascun lato del 3° segno. Diminuire 1 m da ciascun lato del 4° segno. Aumentare 1 m da ciascun lato del 5° segno. Diminuire 1 m da ciascun lato del 6° segno. Aumentare 1 m prima del 7° segno. Proseguire ad aumentare e a diminuire sul diritto del lavoro ogni 2 ferri (cioè su ogni ferro dal diritto del lavoro) per un totale di 6 volte. Il lavoro misura circa 6 cm dal bordo di avvio – se la tensione in altezza non è corretta potete lavorare come prima con gli aumenti/diminuzioni. Diminuire poi, ogni 2 ferri sul diritto del lavoro, da ciascun lato del 2°, 4° e 6° segno finché sul ferro non rimangono 15 m (= 17-18-19 (20-21 volte). Il lavoro misura ca. 16-17-17 (18-19) cm dalla punta inferiore fino al 2° o al 6° segno = paraorecchie. Lavorare il ferro successivo sul diritto del lavoro come segue: 1 m a dir, 2 m insieme a dir, 9 m a dir, 2 m insieme a dir, 1 m a dir = 13 m. Ripetere le diminuzioni da ciascun lato su tutti i ferri (sul rovescio del lavoro lavorare insieme a rov le 2 m che precedono e che seguono la m vivagno) finché non rimangono 5 m. Sull'ultimo ferro dal rovescio del lavoro lavorare 1 maglia di vivagno, 3 maglie insieme a rovescio e lavorare 1 maglia di vivagno. Far passare il filo attraverso le maglie rimaste. CONFEZIONE: Cucire il berretto insieme al centro sul dietro, all’interno della m vivagno. La punta centrale delle 3 punte sul ferro di avvio va posizionata davanti, sulla fronte. CORDONCINO: Avviare 4 m sui ferri n° 2,5. Lavorare come segue: * 1 m a dir, portare il filato sul davanti del lavoro (verso di voi), passare 1 m a rov senza lavorarla, portare il filo sul dietro del lavoro (lontano da voi) *, ripetere da *-* ancora 1 volta, per tutti i ferri. In questo modo si forma un cordoncino tondo. Chiudere le m quando il cordoncino misura ca. 20-22-24 (26-28) cm. Lavorare un secondo cordoncino uguale. Cucire un cordoncino sulla punta di ciascuno dei due paraorecchie. |
|
Avete terminato questo modello?Allora taggate le vostre foto con #dropspattern #alladinhat o inviatele alla #dropsfan gallery. Avete bisogno di aiuto con questo modello?Troverete 17 video tutorial, una sezione per i commenti/domande e molto altro guardando il modello su www.garnstudio.com © 1982-2026 DROPS Design A/S. Ci riserviamo tutti i diritti. Questo documento, compreso tutte le sue sotto-sezioni, è protetto dalle leggi sul copyright. Potete leggere quello che potete fare con i nostri modelli alla fine di ogni modello sul nostro sito. |


Con oltre 40 anni di esperienza nel design di modelli di maglia e uncinetto, DROPS Design offre la più estesa collezione di modelli gratuiti su internet - tradotti in 17 lingue. Ad oggi vi possiamo fornire 325 cataloghi e 12298 modelli - 9569 dei quali sono tradotti in Italiano.
Ci stiamo impegnando molto per darvi il meglio che vi possiamo offrire in termini di maglia e uncinetto, ispirazioni e consigli così come filati di grande qualità ad un prezzo incredibile! Volete utilizzare i nostri modelli per qualcosa d'altro oltre al vostro uso personale? Potete leggere tutto ciò che è consentito nel testo sul Copyright in basso su tutte le pagine dei nostri modelli. Buon lavoro!
Lasciare un commento sul modello DROPS Baby 21-34
Noi saremmo felici di ricevere i tuoi commenti e opinioni su questo modello!
Se vuoi fare una domanda, fai per favore attenzione a selezionare la categoria corretta nella casella qui sotto per velocizzare il processo di risposta. I campi richiesti sono indicati da *.