
Categorie popolari
State cercando un filato?


Commenti / Domande (237)
![]() Susanne ha scritto:
Susanne ha scritto:
Müssen für die Markierungen die Randmaschen mitgezählt werden oder werden diese ausgeschlossen??
17.12.2012 - 22:07DROPS Design ha risposto:
Liebe Susanne, bei unseren Anleitungen werden die Randmaschen immer mitgezählt, wenn nichts anderes erwähnt ist.
18.12.2012 - 07:27
![]() Molly ha scritto:
Molly ha scritto:
Hi, Just making sure you received my previous question: "Then dec on each side of the 2nd, 4th, 6th markers until 15 sts remain." Does this mean I'm to continue in stockinette stitch? Decreasing on BOTH RS/WS? And approx. how many rows will I knit until 15 sts remain? Thanks!
14.12.2012 - 11:46DROPS Design ha risposto:
Dear Molly, you will dec on each side of the 2nd, 4th and 6th markers from RS until 15 sts remain. Happy knitting !
14.12.2012 - 14:15
![]() Molly ha scritto:
Molly ha scritto:
Hi, Needing more clarification (ha!)... "Then dec on each side of the 2nd, 4th, 6th markers until 15 sts remain." Am I to continue in stockinette stitch for this part? While decreasing on both RS/WS? And approx. how many rows will I knit until 15 sts remain? Thanks!
12.12.2012 - 23:34
![]() Molly ha scritto:
Molly ha scritto:
Where the increase tip reads: "On next round P YO twisted...", what exactly is the "next round?" Thanks!
09.12.2012 - 00:30DROPS Design ha risposto:
Dear Molly, you inc from RS with a YO, on next row = from WS you will work the YO twisted (= into back of loop) to avoid holes. Happy knitting !
09.12.2012 - 22:05
![]() Molly ha scritto:
Molly ha scritto:
...and is the 9th row worked in knit or purl (for continuing in stockinette)? Thanks!
09.12.2012 - 00:28DROPS Design ha risposto:
Dear Molly, you work in st st (after the K8 rows from the start), first row = RS, so 1st, 3rd, 5th, 7th .... will be from RS = K and all even rows 2,4,6, 8 ... will be P from WS. happy knitting !
09.12.2012 - 22:04
![]() Molly ha scritto:
Molly ha scritto:
Hi, Am I correct that the increase/decrease work happens together on the 9th, 11th, 13th, 15th, 17th, 19th rows and not on the even number rows (10th, 12th, etc.)? Thanks!
09.12.2012 - 00:21DROPS Design ha risposto:
Dear Molly, yes you are correct : you start ind/dec on 1st row from RS, and repeat every other row, so that they will always be on uneven numbered rows= from RS. Happy Knitting !
09.12.2012 - 22:01
![]() Molly ha scritto:
Molly ha scritto:
Thank you!! This is very helpful :)
03.12.2012 - 12:17
![]() Molly ha scritto:
Molly ha scritto:
Hi, Another part I'm confused about is: "At the same time on 1st row begin to increase and decrease on every other row..." Does this mean I'm to start increasing and decreasing on the very 1st row of the entire project, or after the first 8 rows (starting on the 9th row effectively)? Thanks - Molly
02.12.2012 - 17:18DROPS Design ha risposto:
Dear Molly, you will start with inc/dec on the 9th row of the whole hat, ie, after the K8 rows. Happy knitting !
03.12.2012 - 09:27
![]() Molly ha scritto:
Molly ha scritto:
Hi, I'm sorry, I don't know what you mean by "insert markers seen from RS". Does this mean that the markers are to be placed on the RS needle itself? And at what point am I to place the markers? Am I to knit 8 rows (garter stitch?) before inserting the markers? Thank you again for your help!! Molly
02.12.2012 - 17:18DROPS Design ha risposto:
Dear Molly, you first work 8 rows K (1st row = RS), after the K8 rows, place markers when sts are on the left needle, and start first row from RS as indicated. Happy knitting!
03.12.2012 - 09:26
![]() Molly ha scritto:
Molly ha scritto:
Are all the markers meant to be placed on the RS needle or into the knit work itself? Also, I'm very confused about how the increasing and decreasing is supposed to work in this pattern. Any helps would be greatly appreciated!! Molly
30.11.2012 - 17:39DROPS Design ha risposto:
Dear Molly, insert markers seen from RS, without working them. Please note both tips at the beginning of the pattern to know how to increase and how to decrease. Happy knitting!
01.12.2012 - 11:22
|
|
Alladin#alladinhat |
|
|
|
|
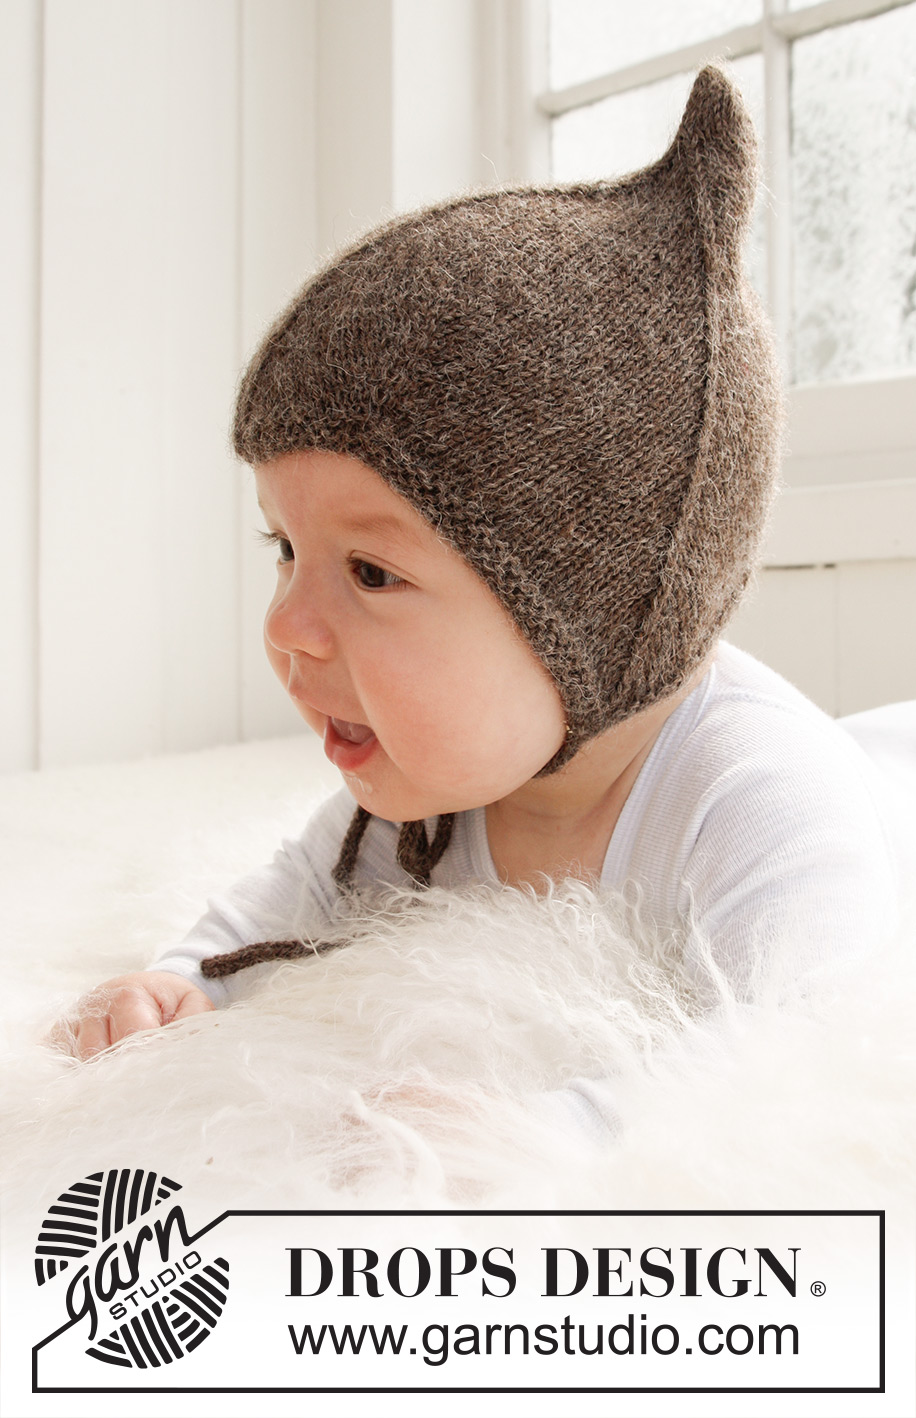
Cappello lavorato ai ferri per per neonati e bambini in DROPS Alpaca.
DROPS Baby 21-34 |
|
|
SUGGERIMENTO PER GLI AUMENTI: Tutti gli aumenti vengono effettuati sul diritto del lavoro. Aumentare 1 m prima e dopo la m con il segno, inserendo 1 m gettata. Al giro successivo, lavorare la m gettata a rovescio ritorto (prendere la m nell’asola posteriore e non in quella anteriore) per evitare che si formi un buco. SUGGERIMENTO PER LE DIMINUZIONI: Tutte le diminuzioni vengono effettuate sul diritto del lavoro. Diminuire 1 m da ciascun lato della m con il segno. Iniziare 1 m prima della m con il segno. Passare 1 m sul ferro ausiliario dietro il lavoro, passare 1 m senza lavorarla (= m con il segno), lavorare insieme a dir la m successiva e la m sul fermamaglie, accavallare la m passata sulle m lavorate. -------------------------------------------------------- BERRETTO: Si lavora avanti e indietro sui ferri. Avviare 117-123-129 (135-141) m (compresa 1 m vivagno da ciascun lato) sui ferri n° 2,5 con il filato Alpaca. Lavorare 8 ferri a dir (1° ferro = diritto del lavoro). Inserire 7 segni nel lavoro sul diritto del lavoro, come segue: 1° segno nella 2a m, 2° segno nella 24a-25a-26a (27a-28a) m, 3° segno nella 48a-50a-52a (54a-56a) m, 4° segno nella 59a-62a-65a (68a-71a) m, 5° segno nella 70a-74a-78a (82a-86a) m, 6° segno nella 94a-99a-104a (109a-114a) m, e il 7° segno nella penultima m sul ferro. Proseguire a maglia rasata con 1 m vivagno a punto legaccio da entrambi i lati – ALLO STESSO TEMPO, durante il primo ferro, iniziare ad aumentare e a diminuire – vedere il SUGGERIMENTO PER GLI AUMENTI e il SUGGERIMENTO PER LE DIMINUZIONI sopra – ogni 2 ferri come segue: Aumentare 1 m dopo il 1° segno. Diminuire 1 m da ciascun lato del 2° segno. Aumentare 1 m da ciascun lato del 3° segno. Diminuire 1 m da ciascun lato del 4° segno. Aumentare 1 m da ciascun lato del 5° segno. Diminuire 1 m da ciascun lato del 6° segno. Aumentare 1 m prima del 7° segno. Proseguire ad aumentare e a diminuire sul diritto del lavoro ogni 2 ferri (cioè su ogni ferro dal diritto del lavoro) per un totale di 6 volte. Il lavoro misura circa 6 cm dal bordo di avvio – se la tensione in altezza non è corretta potete lavorare come prima con gli aumenti/diminuzioni. Diminuire poi, ogni 2 ferri sul diritto del lavoro, da ciascun lato del 2°, 4° e 6° segno finché sul ferro non rimangono 15 m (= 17-18-19 (20-21 volte). Il lavoro misura ca. 16-17-17 (18-19) cm dalla punta inferiore fino al 2° o al 6° segno = paraorecchie. Lavorare il ferro successivo sul diritto del lavoro come segue: 1 m a dir, 2 m insieme a dir, 9 m a dir, 2 m insieme a dir, 1 m a dir = 13 m. Ripetere le diminuzioni da ciascun lato su tutti i ferri (sul rovescio del lavoro lavorare insieme a rov le 2 m che precedono e che seguono la m vivagno) finché non rimangono 5 m. Sull'ultimo ferro dal rovescio del lavoro lavorare 1 maglia di vivagno, 3 maglie insieme a rovescio e lavorare 1 maglia di vivagno. Far passare il filo attraverso le maglie rimaste. CONFEZIONE: Cucire il berretto insieme al centro sul dietro, all’interno della m vivagno. La punta centrale delle 3 punte sul ferro di avvio va posizionata davanti, sulla fronte. CORDONCINO: Avviare 4 m sui ferri n° 2,5. Lavorare come segue: * 1 m a dir, portare il filato sul davanti del lavoro (verso di voi), passare 1 m a rov senza lavorarla, portare il filo sul dietro del lavoro (lontano da voi) *, ripetere da *-* ancora 1 volta, per tutti i ferri. In questo modo si forma un cordoncino tondo. Chiudere le m quando il cordoncino misura ca. 20-22-24 (26-28) cm. Lavorare un secondo cordoncino uguale. Cucire un cordoncino sulla punta di ciascuno dei due paraorecchie. |
|
Avete terminato questo modello?Allora taggate le vostre foto con #dropspattern #alladinhat o inviatele alla #dropsfan gallery. Avete bisogno di aiuto con questo modello?Troverete 17 video tutorial, una sezione per i commenti/domande e molto altro guardando il modello su www.garnstudio.com © 1982-2026 DROPS Design A/S. Ci riserviamo tutti i diritti. Questo documento, compreso tutte le sue sotto-sezioni, è protetto dalle leggi sul copyright. Potete leggere quello che potete fare con i nostri modelli alla fine di ogni modello sul nostro sito. |


Con oltre 40 anni di esperienza nel design di modelli di maglia e uncinetto, DROPS Design offre la più estesa collezione di modelli gratuiti su internet - tradotti in 17 lingue. Ad oggi vi possiamo fornire 325 cataloghi e 12298 modelli - 9569 dei quali sono tradotti in Italiano.
Ci stiamo impegnando molto per darvi il meglio che vi possiamo offrire in termini di maglia e uncinetto, ispirazioni e consigli così come filati di grande qualità ad un prezzo incredibile! Volete utilizzare i nostri modelli per qualcosa d'altro oltre al vostro uso personale? Potete leggere tutto ciò che è consentito nel testo sul Copyright in basso su tutte le pagine dei nostri modelli. Buon lavoro!
Lasciare un commento sul modello DROPS Baby 21-34
Noi saremmo felici di ricevere i tuoi commenti e opinioni su questo modello!
Se vuoi fare una domanda, fai per favore attenzione a selezionare la categoria corretta nella casella qui sotto per velocizzare il processo di risposta. I campi richiesti sono indicati da *.