
Categorie popolari
State cercando un filato?


Commenti / Domande (272)
![]() Confused ha scritto:
Confused ha scritto:
Hi! Am currently stuck at the point where instructed :"Now slip the 24-24-26 (28-28) band sts towards mid front on a stitch holder. Then cast on 2 new sts at the end of row from RS (towards neck)" Where are the 2 new sts to be added? Between the 24 band(garter) sts and the stocking sts? Or right at the beginning of the 24 band sts? Instructions say "towards neck" but the 24 sts are on stitch holder... Are these extra sts to be worked in garter or stocking sts? Thank you
07.06.2025 - 13:26DROPS Design ha risposto:
Dear Confused, you cast on at the very end of the row from the right side, next to where you placed the 24 sts on the stitch holder. So on the side where you moved stitches for the neck you will now cast on 2 stitches. The 24 stitches are later used for the hood, while the back will be worked over the stitches on the needles, including the stitches newly cast on. These stitches are worked in stocking stitch. Happy knitting!
08.06.2025 - 15:15
![]() Em ha scritto:
Em ha scritto:
I really appreciate all the lovely free patterns, but I’m really struggling to understand this one. The pattern says “ Cast on 43-47-51 (56-59) sts (incl 1 edge st in the side and 24-24-26 (28-28) band sts ”. As I am knitting the second size, would I cast on 47 sts total or do I cast on 47+1+24 for a total of 72 sts? I began by simply casting on 47 sts but after knitting for a bit, the resulting piece of knitting looks much too small (although my gauge matches the pattern). Thank you!
25.02.2025 - 13:58DROPS Design ha risposto:
Dear Em, you should cast on 47 stitches only, the 24 sts for the front band stiches are already included in the number of stitches, so that you will work the bottom ridges: 23 sts stocking stitch and 24 stitches garter stitch, seen from RS. Make sure to keep same tension as swatch. Happy knitting!
26.02.2025 - 10:37
![]() Mindy ha scritto:
Mindy ha scritto:
Also, is the edge stitch a garter stitch? I don't see it explained anywhere in the pattern. Thanks!
17.12.2024 - 18:05DROPS Design ha risposto:
Dear Mindy, you can work the edge stitch on the side(s) in garter stitch if you want; but there is no extra edge stitch, the edge stitches are included in the number of stitches to cast on. Happy knitting!
20.12.2024 - 08:16
![]() Mindy ha scritto:
Mindy ha scritto:
Hello! I love your patterns and am excited to start this one! Question: You don't state whether the odd or even rows are right side or wrong side, at the start. So how do I know, after knitting the 6 garter stitch rows, whether the next row is a RS or WS to start the stockinette section? Thanks for your help!
17.12.2024 - 17:47DROPS Design ha risposto:
Hi Mindy, The first row after the ridges in garter stitch is from the right side. So all the odd rows onwards are from the right side. Happy Christmas!
18.12.2024 - 07:05
![]() Ann ha scritto:
Ann ha scritto:
In the Drops Buttercup baby jacket, what does 'after every other cm mean? Is that every alternate cm or is it after every following cm ? This instruction is in the jacket front and in the hat where it will make a definite difference whether it's after every cm or after two cms. Thank you in advance. Your answer to my question on 28.10 was very clear and helpful. Thank for your answer.
28.11.2024 - 18:26DROPS Design ha risposto:
Dear Ann, it means you will alternate. So you work the short rows, then work 1cm normally, work short rows again, now work 2cm normally, work short rows, then work 1cm normally, e.t.c. Happy knitting!
07.12.2024 - 19:09
![]() Ann Stevens ha scritto:
Ann Stevens ha scritto:
Drops buttercup baby jacket; a further question. When piece measures 19---30 cm, then repeat short rows every other cm. until finished measurements. Does every other cm mean alternate centimetres, so after two cm do two short rows? Or do you mean after each cm do the short rows? Thank you. Ann Stevens
15.11.2024 - 07:15
![]() Ann Stevens ha scritto:
Ann Stevens ha scritto:
Drops Buttercup baby jacket. Still confused. Left front; ready to start short rows. Wrong side facing, knit band garter stitches, then turn and knit back to front edge. Second row is knit all the way across to side edge. Is that the two rows in garter stitch? Then continue in pattern for another 4cm and repeat short rows etc. etc. please help.
28.10.2024 - 19:36DROPS Design ha risposto:
Dear Mrs Stevens, starting from WS knit the first 24-28 (see size) stitches (front band); turn (leaving the remaining stitches unworked) and work these stitches from RS ; turn and work now the first 12-14 sts only, turn (leaving the remaining sts unworked), and work these stitches from RS, turn and work now all stitches as before. You have worked 4 rows for short rows; repeat on every 4th cm (and then on every 2nd cm). Happy knitting!
29.10.2024 - 08:59
![]() Carol ha scritto:
Carol ha scritto:
Buttercup sweater. Short rows. Very confusing for me. Do you garter st the band, then turn, then knit row back? Then is work 2 garter rows only over outermost 12 sets part of the short row? I know how to do short rows but can’t figure this out the way it’s written. HELP!
05.06.2024 - 01:49DROPS Design ha risposto:
Dear Carol, yes, when you knit the short rows, you knit the band stitches, turn, knit back, turn at the edge, and then knit the whole row. HERE is a video that might help you. Happy Knitting!
05.06.2024 - 02:03
![]() Reta Warren ha scritto:
Reta Warren ha scritto:
Can you knittering in wool
12.04.2024 - 05:51
![]() Mariagrazia ha scritto:
Mariagrazia ha scritto:
Ho realizzato il cardigan e le scarpine per una bimba di pochi mesi, seguendo le istruzioni, e il risultato è veramente bello. Per quanto abbia tenuto ben stretto il filo, purtroppo i buchi ai giri di ritorno con i ferri accorciati sono molto visibili, e un po' rovinano l'estetica del cardigan. Apprezzo comunque la morbidezza che il capo ha acquistato proprio con la tecnica dei ferri accorciati,darebbe bello trovare una soluzione all'inconveniente. Grazie
15.10.2023 - 20:37
|
|
Buttercup#buttercupset |
|
 |
 |
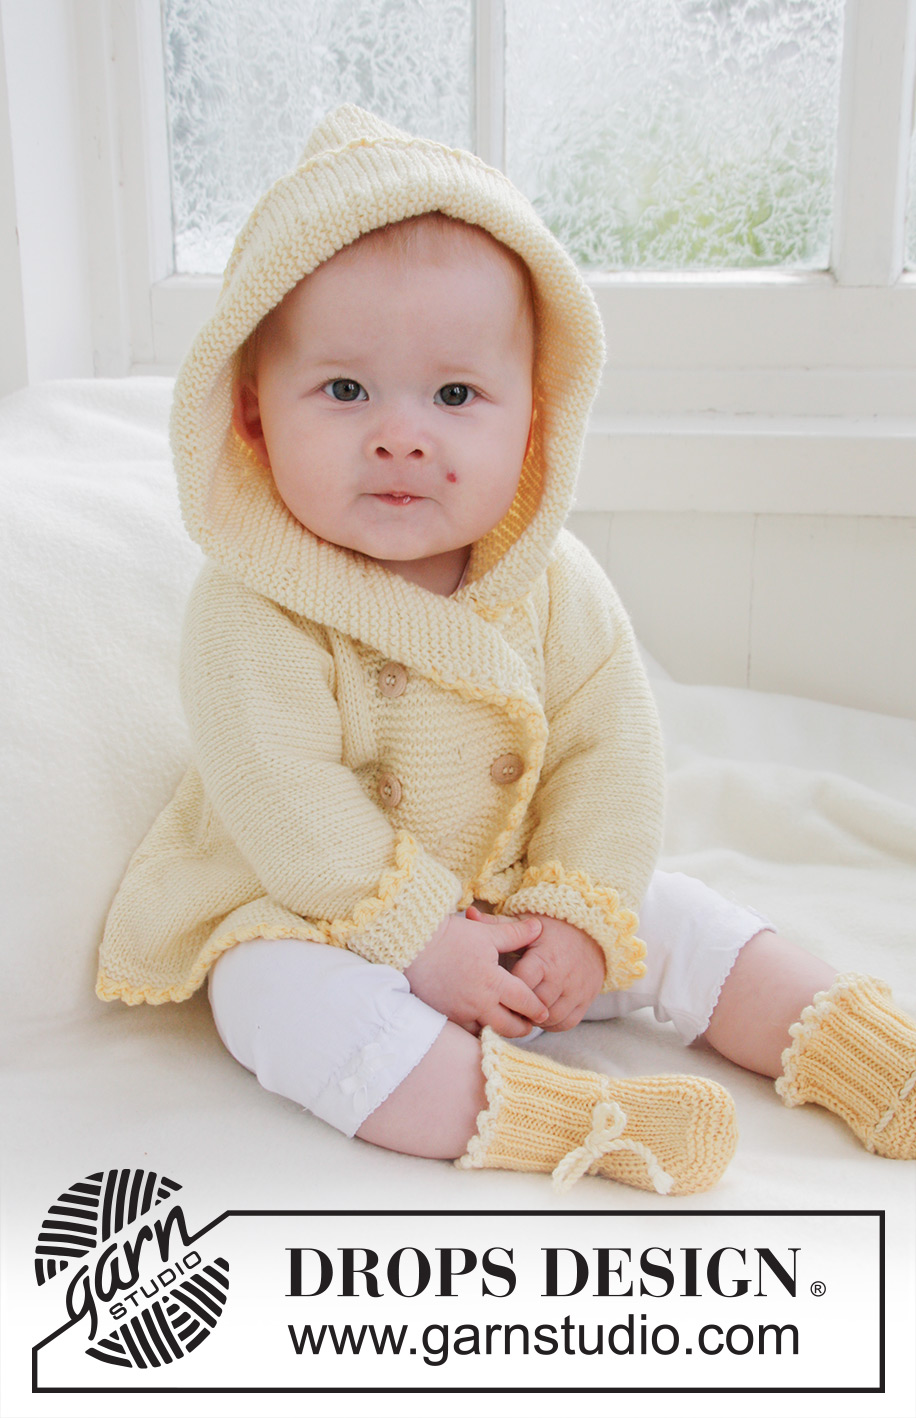
Cardigan lavorato ai ferri con cappuccio e scarpine per neonati e bambini in DROPS BabyMerino.
DROPS Baby 21-1 |
|
|
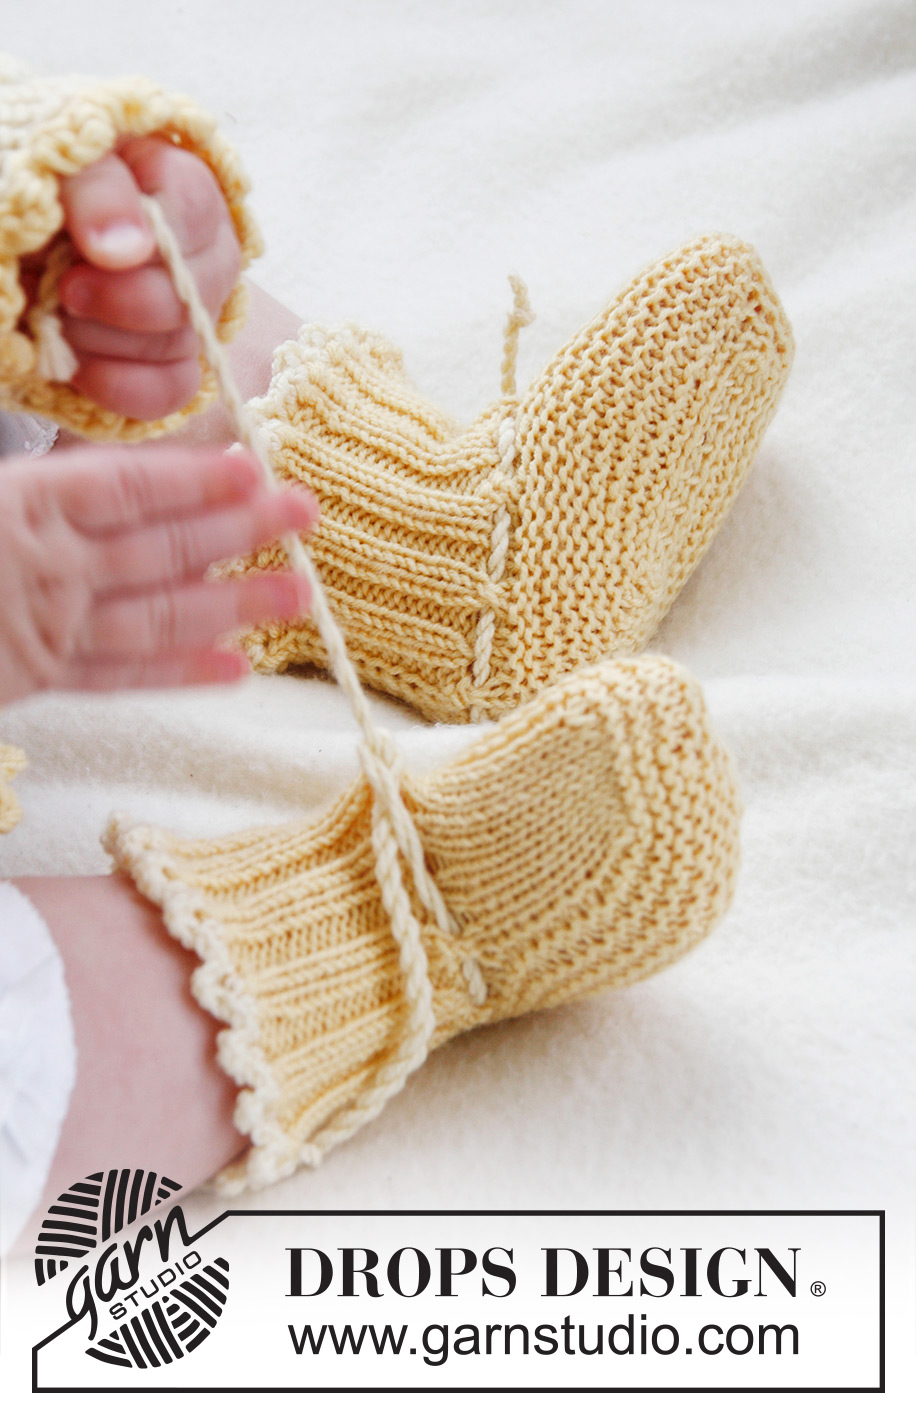
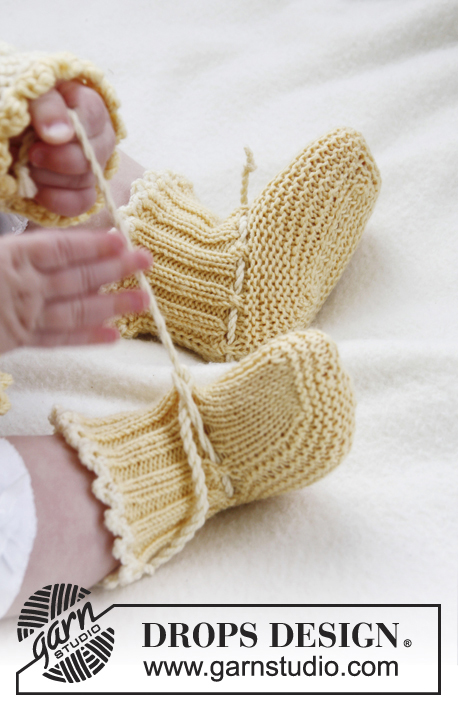
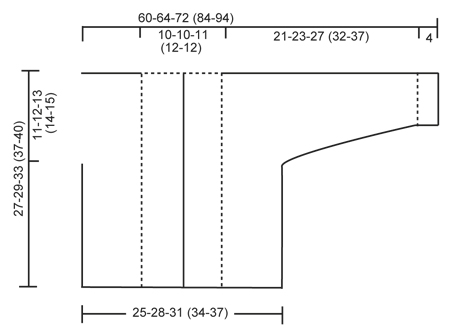
---------------------------------------------------------- PUNTO LEGACCIO (avanti e indietro sui ferri): Lavorare tutti i ferri a dir. FERRI ACCORCIATI: * Lavorare 2 ferri a punto legaccio sulle 24-24-26 (28-28) m del bordo davanti, lavorare 2 ferri a punto legaccio solo sulle prime 12-12-13 (14-14) m. ATTENZIONE: Quando si gira il lavoro nel corso del ferro, passare la prima m senza lavorarla, stringere il filo e proseguire come prima. Questo serve per evitare che si formino dei buchi tra le m *. ASOLE: La giacca è a doppia petto. Chiudere per le 4 asole sul bordo davanti destro. 1 ASOLA = lavorare insieme a dir la 4° e la 5° m dall'inizio del bordo, fare 1 m gettata. Nel corso dello stesso ferro, lavorare insieme a dir la 5° e la 4° m prima della fine del bordo davanti e fare 1 m gettata. Chiudere per le 2 asole quando il lavoro misura: TAGLIA 1/3 MESI: 14 e 19 cm TAGLIA 6/9 MESI: 16 e 21 cm TAGLIA 12/18 MESI: 18 e 24 cm TAGLIA 2 ANNI: 20 e 27 cm TAGLIA 3/4 ANNI: 22 e 30 cm ---------------------------------------------------------- GIACCA: Si lavora avanti e indietro sui ferri circolari. Cominciare dal davanti, avviare le m per le maniche e lavorare fino alla spalla. Lavorare l'altro davanti, riprendere i due davanti insieme e lavorare il dietro dall’alto verso il basso. DAVANTI SINISTRO: LEGGERE TUTTE LE SPIEGAZIONI SEGUENTI PRIMA DI CONTINUARE! Avviare 43-47-51 (56-59) m (compresa 1 m vivagno al lato e 24-24-26 (28-28) m per il bordo al centro) con i ferri n° 2,5 e il filato Baby Merino. Lavorare 6 ferri a PUNTO LEGACCIO - vedere le spiegazioni sopra. Passare ai ferri circolari n° 3 e lavorare a maglia rasata; lavorare sempre le 24-24-26 (28-28) m del bordo centrale a punto legaccio. Quando il lavoro misura 4 cm, lavorare a FERRI ACCORCIATI - vedere le spiegazioni sopra (1° ferro = rovescio del lavoro). Ripetere da *-* 1 volta ogni 4 cm finché il lavoro non misura 19-21-24 (27-30) cm, poi ripetere da *-* 1 volta ogni 2 cm fino alla fine del lavoro. ALLO STESSO TEMPO, quando il lavoro misura 16-17-20 (23-25) cm, avviare le nuove m per la manica alla fine di ogni ferro sul rovescio del lavoro (dal lato della manica) come segue: 6 m per 2-2-3 (3-3) volte, 8 m per 1-1-1 (2-3) volta e 21-22-22 (25-26) m per 1 volta = per la spalla / manica ci sono 84-89-99 (115-127) m. Lavorare le m aumentate a maglia rasata. Terminati tutti gli aumenti, proseguire lavorando a maglia rasata e a punto legaccio come prima e ALLO STESSO TEMPO lavorare a punto legaccio le 10 m del bordo della manica. Quando il lavoro misura 27-29-33 (37-40) cm, inserire un segno = centro in alto della spalla. Mettere in attesa le 24-24-26 (28-28) m del bordo centrale su un fermamaglie. Avviare poi 2 nuove m alla fine del ferro sul diritto del lavoro (verso il collo); ripetere questi aumenti al ferro successivo, sul diritto, verso il collo = sul ferro ci sono 64-69-77 (91-103) m. Lavorare 1 ferro a dir sul rovescio del lavoro. Mettere tutte le m in attesa su un fermamaglie. DAVANTI DESTRO: Avviare e lavorare come il davanti sinistro, ma in senso inverso. Inoltre, chiudere per le asole sul bordo - vedere le spiegazioni sopra. ATTENZIONE! Mettere le m in attesa su un fermamaglie dopo l'ultimo ferro con gli aumenti, lato collo (ultimo ferro = rovescio del lavoro). DIETRO: Lavorare le m del davanti sinistro con il ferro circolare, avviare 16-16-18 (20-20) nuove m (= collo sul dietro) e lavorare le m del davanti destro con il ferro circolare = 144-154-172 (202-226) m. MISURARE ORA IL LAVORO DAI SEGNI SULLE SPALLE. Proseguire avanti e indietro sul ferro, a maglia rasata; lavorare a punto legaccio i bordi delle maniche. Quando il lavoro misura 8½-9½-10 (10-11) cm, cominciare a diminuire le maglie delle maniche. Chiudere all'inizio di ogni ferro da ciascun lato come segue: 21-22-22 (25-26) m per 1 volta, 8 m per 1-1-1 (2-3) volte e 6 m per 2-2-3 (3-3) volte = sul ferro rimangono 62-70-76 (84-90) m. Proseguire a maglia rasata con 1 m vivagno da ciascun lato. Quando il lavoro misura ca. 26-28-32 (36-39) cm – piegare il lavoro in due in corrispondenza dei segni sulle maniche e assicurarsi che il dietro sia lungo come il davanti fino ai ferri a punto legaccio, passare ai ferri n° 2,5 e lavorare 6 ferri a punto legaccio; chiudere poi le m. CONFEZIONE: Cucire le maniche e i lati all'interno della maglia vivagno. Cucire i bottoni. CAPPUCCIO: Riprendere ca. 102-106-112 (118-122) m (comprese le m sui fermamaglie davanti) - ATTENZIONE: se sono state riprese più/meno m, dim/aum in modo uniforme durante il primo ferro. Proseguire a punto legaccio su tutte le m e ALLO STESSO TEMPO lavorare ferri accorciati da ciascun lato ogni 2 cm - VEDERE LE SPIEGAZIONI SOPRA. Chiudere quando il cappuccio misura ca. 21-23-25 (27-28) cm. Cucire il cappuccio nella parte in alto - cucire nell'asola anteriore della m più esterna per evitare una cucitura troppo spessa. BORDO ALL'UNCINETTO: Lavorare un bordo all'uncinetto tutto attorno alla giacca. Cominciare in basso, sul davanti destro e lavorare con l'uncinetto n° 3 e con 2 capi del filato Baby Merino giallo come segue: lavorare 1 m.b. , * 3 cat., 1 m.a nella 1° cat., saltare ca. ½ cm, 1 m.b. nella m successiva *, ripetere da *-*. Lavorare un bordo uguale sui bordi delle maniche. SCARPINA: Si lavora avanti e indietro cominciando dal centro, sul dietro. Avviare 48-52-56 (56) m sui ferri n° 2,5 con 2 capi del filato Baby Merino giallo. Proseguire con 1 solo capo e lavorare a coste (= 2 m a dir/ 2 m a rov) per 5-6-6 (7) cm – fare in modo che il ferro successivo sia sul rovescio del lavoro. Lavorare 1 ferro a rov sul rovescio del lavoro e allo stesso tempo diminuire 14-14-18 (14) m in modo uniforme = 34-38-38 (42) m. Al ferro successivo, sul diritto del lavoro, lavorare a punto traforato come segue: 1 m a dir, *2 m insieme a dir, 1 m gettata *, ripetere da *-* e finire con 1 m a dir. Lavorare 1 ferro a rov sul rovescio del lavoro. Mettere ora le 12-13-13 (15) m più esterne di ciascun lato in attesa su un fermamaglie. Lavorare 4 - 4½ - 5½ (6½) cm a maglia rasata sulle 10-12-12 (12) m centrali. Passare le m dai fermamaglie ai ferri di lavoro e riprendere 10-11-13 (16) m da ciascun lato della parte centrale = sul ferro ci sono 54-60-64 (74) m. Lavorare tutte le m a punto legaccio per 3-4-5 (5) cm e allo stesso tempo dopo 1½ - 2 - 2½ (3) cm, diminuire ogni 2 ferri, fino alla fine del lavoro, come segue: diminuire 1 m all'inizio e 1 m alla fine del ferro e lavorare 2 m insieme a dir da ciascun lato delle 2 m centrali. Chiudere le m e cucire insieme la parte sotto del piede; proseguire lungo il centro, sul dietro nell'asola anteriore della m più esterna per evitare una cucitura troppo spessa. Lavorare un'altra scarpina in modo uguale. CORDONCINI: Tagliare 3 capi del filato giallo chiaro lunghi ca. 1 metro ciascuno, avvolgerli insieme molto stretti, piegarli in due in modo che si avvolgano ancora; fare un nodo ad ogni estremità. Passare il cordoncino nella riga traforata della scarpina. BORDO ALL'UNCINETTO: Lavorare un bordo all'uncinetto sul bordo superiore della scarpina; con l'uncinetto n° 2,5 e il filato giallo chiaro, lavorare come segue: 1 m.b. nella 1° m, * 3 cat., 1 m.a nella 1° cat., saltare ca. ½ cm, 1 m.b. nella m successiva *, ripetere da *-* e finire con 1 m.bss nella 1° m.b. all’inizio del giro. |
|
 |
|
Avete terminato questo modello?Allora taggate le vostre foto con #dropspattern #buttercupset o inviatele alla #dropsfan gallery. Avete bisogno di aiuto con questo modello?Troverete 20 video tutorial, una sezione per i commenti/domande e molto altro guardando il modello su www.garnstudio.com © 1982-2026 DROPS Design A/S. Ci riserviamo tutti i diritti. Questo documento, compreso tutte le sue sotto-sezioni, è protetto dalle leggi sul copyright. Potete leggere quello che potete fare con i nostri modelli alla fine di ogni modello sul nostro sito. |
|


Con oltre 40 anni di esperienza nel design di modelli di maglia e uncinetto, DROPS Design offre la più estesa collezione di modelli gratuiti su internet - tradotti in 17 lingue. Ad oggi vi possiamo fornire 325 cataloghi e 12298 modelli - 9569 dei quali sono tradotti in Italiano.
Ci stiamo impegnando molto per darvi il meglio che vi possiamo offrire in termini di maglia e uncinetto, ispirazioni e consigli così come filati di grande qualità ad un prezzo incredibile! Volete utilizzare i nostri modelli per qualcosa d'altro oltre al vostro uso personale? Potete leggere tutto ciò che è consentito nel testo sul Copyright in basso su tutte le pagine dei nostri modelli. Buon lavoro!
Lasciare un commento sul modello DROPS Baby 21-1
Noi saremmo felici di ricevere i tuoi commenti e opinioni su questo modello!
Se vuoi fare una domanda, fai per favore attenzione a selezionare la categoria corretta nella casella qui sotto per velocizzare il processo di risposta. I campi richiesti sono indicati da *.