
Categorie popolari
State cercando un filato?


Commenti / Domande (129)
![]() Helen ha scritto:
Helen ha scritto:
I have reached the point of switching to a US size 6 circular needle and have picked up 104 stitches with the size 6 needle. So now I have 104 on the size 7 and 104 on the size 6. To follow the next step, "P1 round, at the same time inc. 80," do I keep the right sides together when I begin the round? If yes, the working yarn is starting from the left (size 7) needle. Is that correct?
11.09.2013 - 03:36DROPS Design ha risposto:
Dear Helen, you pick up the 104 sts from RS, and then start working in the round, from this poing (beg of round) with P1 round. Happy knitting!
11.09.2013 - 08:58Sia ha scritto:
Hello, I have a question regarding the instruction increase after approx every other and 3rd st alternately. Does this mean that the first time I increase in the second stitch, then in the third and then in the second? I mean we increase every 2-3-2-3 stitches etc (if I explained it correcly). Thank you in advance for your help.
09.06.2013 - 17:20DROPS Design ha risposto:
Dear Sia, you are correct, you will *work 2 sts, inc 1, work 3 sts, inc 1* and repeat from *-* all the round to have the requested inc. Happy knitting!
10.06.2013 - 10:15Dana ha scritto:
Thank you for you're quick answer. what is the size of the bolero in the pic?
08.05.2013 - 22:00DROPS Design ha risposto:
Dear Dana, it's a size M on the picture. Happy knitting!
10.05.2013 - 08:12
![]() Laura ha scritto:
Laura ha scritto:
Three questions: do I start with m1a on every row for both the RS and WS? Also, does every "K" in this pattern refer to a twisted knit stitch? For instance, when it says to S1,K2tog, psso, is that referring to a regular K2tog or a twisted k2tog? I have the same question for every time it says "P." My third question is, Is the garter stitch the same thing as a regular knit stitch? Thanks so much!
10.02.2013 - 15:22
![]() Laura ha scritto:
Laura ha scritto:
Three questions: do I start with m1a on every row for both the RS and WS? Also, does every "K" in this pattern refer to a twisted knit stitch? For instance, when it says to S1,K2tog, psso, is that referring to a regular K2tog or a twisted k2tog? I have the same question for every time it says "P." My third question is, Is the garter stitch the same thing as a regular knit stitch? Thanks so much!
10.02.2013 - 15:22DROPS Design ha risposto:
Dear Laura, Row 1 in M1 is worked from RS. K means work 1 st knitwise and P means to work it purlwise. I recommand you to watch the video called "Decrease - sl1, K2tog, psso" to visualize how to do (see index if necessary). You work a regular knit st for garter st. Happy knitting!
11.02.2013 - 09:57
![]() Susan ha scritto:
Susan ha scritto:
Hi, could you please clarify what the pattern means by '1 thread of each quality'? Does it mean the pattern needs to be knitted with one thread of cotton viscose and one thread of kid-silk at the same time? If this is the case, shouldn't the pattern require equal amount of both types of yarn, rather than smaller amount for kid-silk as stated?
09.02.2013 - 18:27DROPS Design ha risposto:
Dear Susan, you are correct, this pattern is worked with 1 strand each quality worked together : 1 cotton viscose + 1 Kid-Silk. If you click on see color chart for each quality, you will read that Cotton Viscose is approx 110 m /50 g and Kid-Silk approx 200 m /25 g. That's why weight is different but metrage match. Happy knitting !
11.02.2013 - 09:25
![]() Ula Kaae ha scritto:
Ula Kaae ha scritto:
Forslag til navn til Bolero Ravels Drøm (dansk)
12.07.2012 - 09:26
![]() Beverly ha scritto:
Beverly ha scritto:
I am trying to knit this. I am to the part where you increase after first part of the sleeve. I am stumped... can you help me??
25.05.2012 - 19:51
![]() Barbara ha scritto:
Barbara ha scritto:
I'm trying to figure out how to start row 6 in this pattern since it starts with a yarn over.
25.03.2012 - 20:28DROPS Design ha risposto:
First on row you K your 3 edge sts, then when starting chart you start with a yo right after the 3rd edge st.
28.03.2012 - 00:03
![]() DROPS Deutsch ha scritto:
DROPS Deutsch ha scritto:
Wir haben leider nicht die Möglichkeit Muster umzuschreiben. In Ihrem Fachgeschäft kan man Ihnen bestimmt weiterhelfen.
19.12.2011 - 09:24
|
|||||||||||||
Sea Blush#seablushbolero |
|||||||||||||
 |
 |
||||||||||||
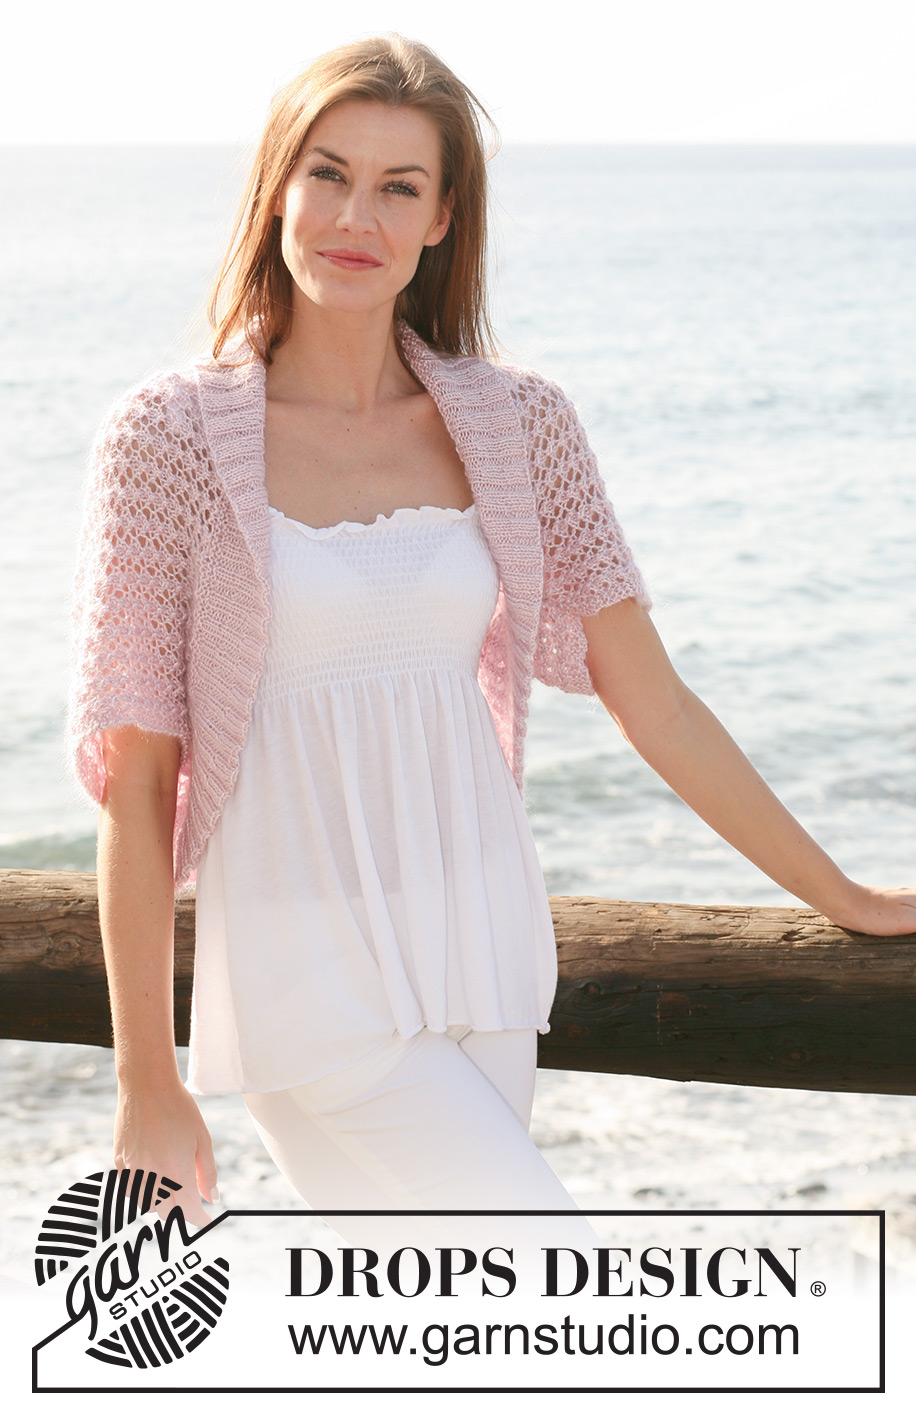
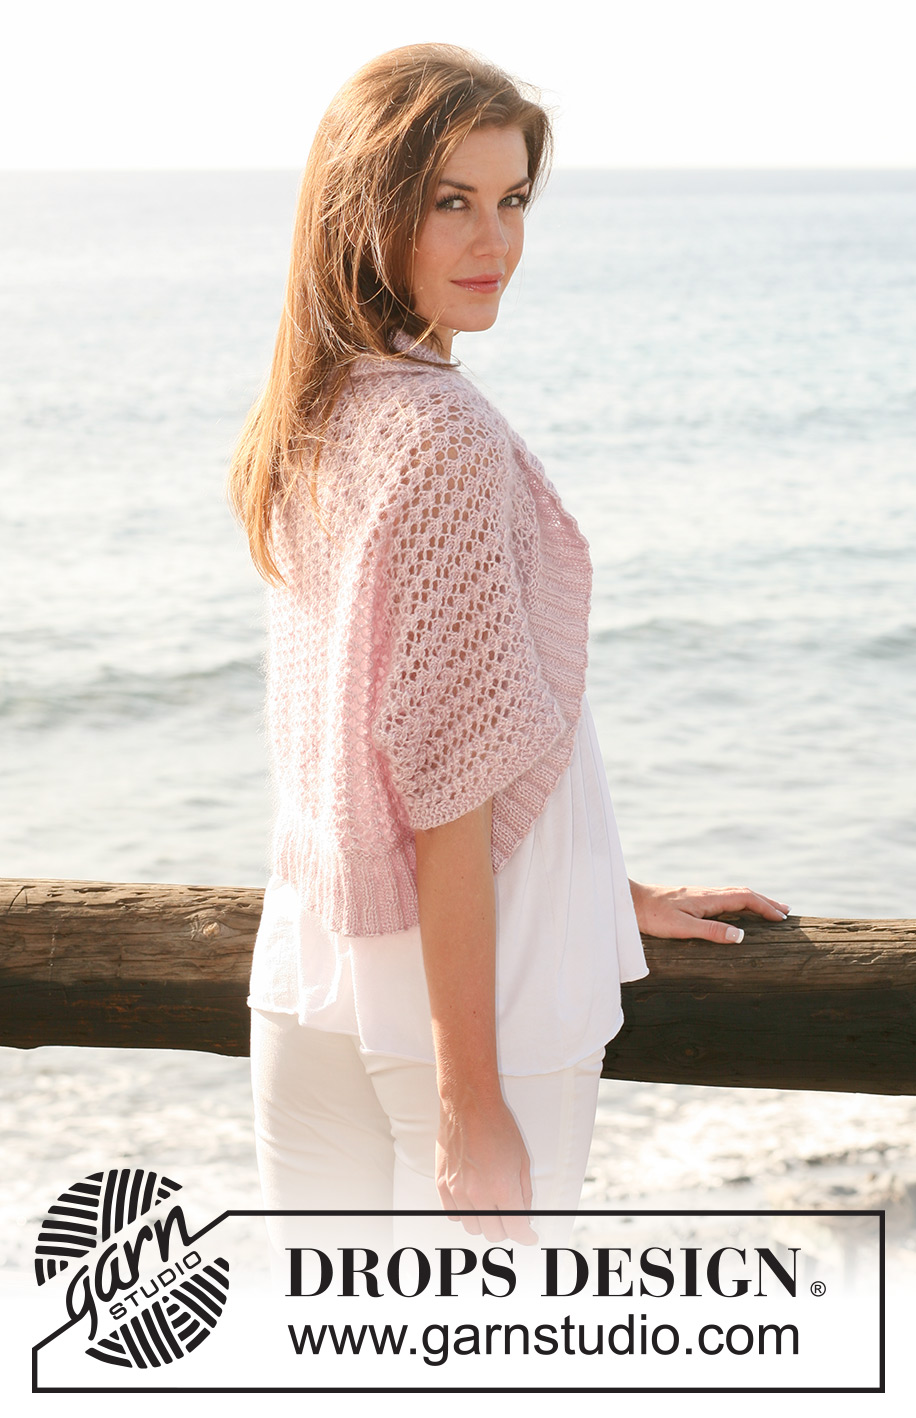
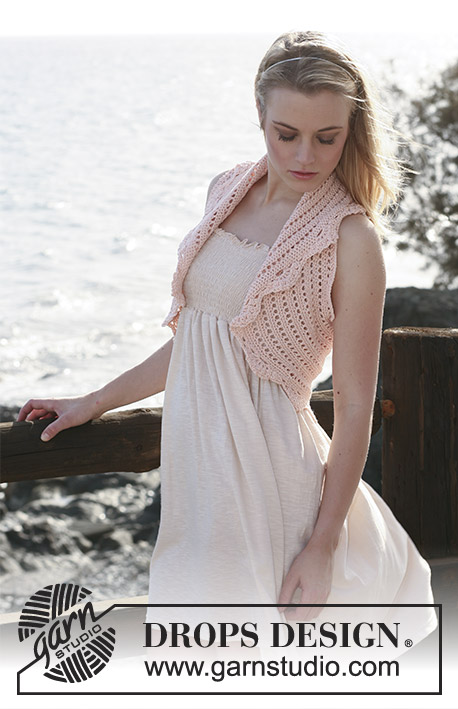
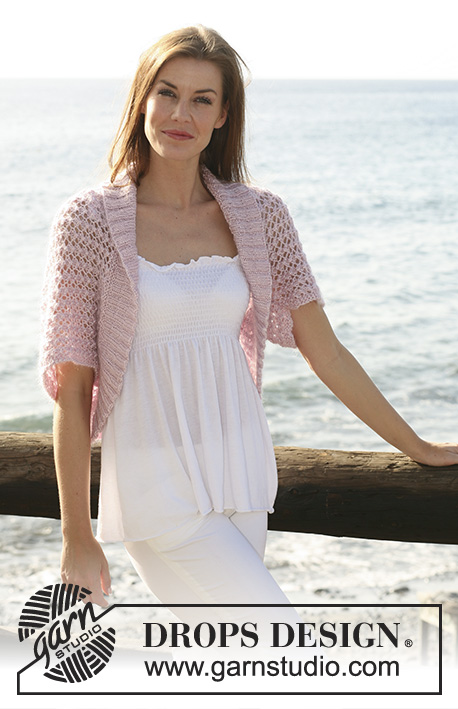
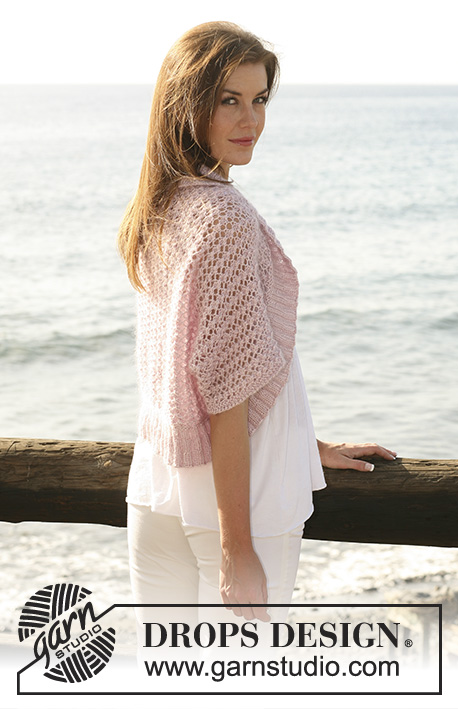
Bolero DROPS ai ferri, con motivo traforato, in "Cotton Viscose" e "Kid-Silk". Taglie: Dalla XS/S alla XXXL.
DROPS 119-21 |
|||||||||||||
|
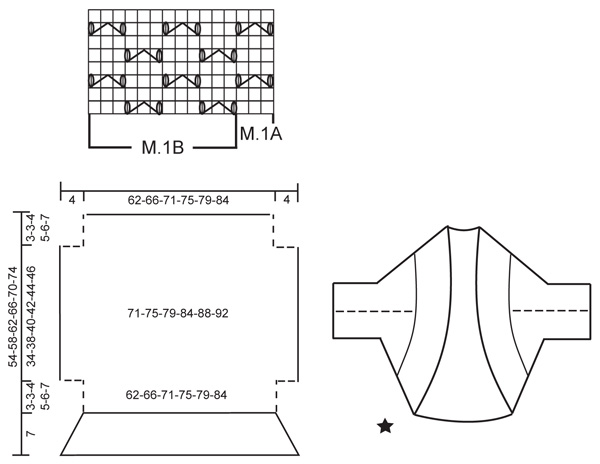
PUNTO LEGACCIO (avanti e indietro sui ferri): Lavorare tutti i ferri a dir. MOTIVO: Vedere il diagramma M.1 – Il diagramma mostra il motivo sul diritto del lavoro. SUGGERIMENTO PER GLI AUMENTI: Per aumentare, fare 1 m gettata. Nel corso del ferro successivo, lavorare la m gettata ritorta per evitare che si formi un buco. --------------------------------------------------------- --------------------------------------------------------- BOLERO: Il davanti e il dietro si lavorano avanti e indietro sui ferri; il bordo a coste si lavora in tondo sui ferri circolari. Avviare 104-111-118-126-133-140 m sui ferri circolari n° 4,5 con 1 capo di ognuna delle qualità di filato. Lavorare 3 ferri a dir (primo ferro = rovescio del lavoro); ALLO STESSO TEMPO, nel corso del 3° ferro, diminuire 17-18-19-21-22-23 m in modo uniforme (per diminuire, lavorare ca. ogni 5a e 6a m insieme a dir) = 87-93-99-105-111-117 m. Proseguire come segue sul diritto del lavoro: 3 m a PUNTO LEGACCIO - vedere sopra, diagramma M.1A (= 3 m), diagramma M.1B finché non rimangono 3 m e finire con 3 m a punto legaccio. Proseguire seguendo il diagramma M.1 in questo modo con 3 m a punto legaccio da ciascun lato. RICORDARSI LA TENSIONE DEL LAVORO! Quando il lavoro misura 3-3-4-5-6-7 cm, avviare 6 nuove m da ciascun lato per le maniche = 99-105-111-117-123-129 m. Proseguire lavorando il diagramma M.1 su tutte le m, con 3 m a punto legaccio da ciascun lato. Quando il lavoro misura 37-41-44-47-50-53 cm, intrecciare 6 m da ciascun lato = 87-93-99-105-111-117 m. Proseguire lavorando il diagramma M.1 con 3 m a punto legaccio da ciascun lato, finché il lavoro non misura 39-43-47-51-55-59 cm (assicurarsi che il ferro successivo sia sul rovescio del lavoro). Lavorare 3 ferri a dir; ALLO STESSO TEMPO, nel corso del primo ferro, aumentare 17-18-19-21-22-23 m in modo uniforme (aumentare dopo ogni 5a m ca.) = 104-111-118-126-133-140 m. Passare ai ferri circolari n° 4. Riprendere ora 104-111-118-126-133-140 m lungo il ferro di avvio delle m = 208-222-236-252-266-280 m, e proseguire in tondo. Lavorare 1 giro a rov e, ALLO STESSO TEMPO, aumentare 80-86-92-100-106-112 m in modo uniforme (aumentare alternando: una volta ogni 2 m e una volta ogni 3 m) – vedere il SUGGERIMENTO PER GLI AUMENTI = 288-308-328-352-372-392 m. Lavorare 1 giro a dir e poi proseguire a coste 2 m dir / 2 m a rov su tutte le m. Quando le coste misurano 2,5 cm, aumentare 1 m rov in ogni gruppo di m lavorate a rov (lavorare 2 m rov nella prima m a rov) e proseguire a coste 2 m dir / 3 m rov finché le coste non misurano 5 cm. Al giro successivo, aumentare 1 m dir in ogni gruppo di m lavorate a dir (lavorare 2 m dir nell’ultima m a dir) e proseguire a coste 3 m dir / 3 m rov finché le coste non misurano 7 cm. Intrecciare le m lavorando a dir le m dir e a rov le m rov. CONFEZIONE: Cucire i lati e sotto le maniche all’interno di 1 m vivagno – vedere la linea tratteggiata nel grafico. |
|||||||||||||
Spiegazioni del diagramma |
|||||||||||||
|
|||||||||||||
 |
|||||||||||||
Avete terminato questo modello?Allora taggate le vostre foto con #dropspattern #seablushbolero o inviatele alla #dropsfan gallery. Avete bisogno di aiuto con questo modello?Troverete 18 video tutorial, una sezione per i commenti/domande e molto altro guardando il modello su www.garnstudio.com © 1982-2026 DROPS Design A/S. Ci riserviamo tutti i diritti. Questo documento, compreso tutte le sue sotto-sezioni, è protetto dalle leggi sul copyright. Potete leggere quello che potete fare con i nostri modelli alla fine di ogni modello sul nostro sito. |
|||||||||||||


Con oltre 40 anni di esperienza nel design di modelli di maglia e uncinetto, DROPS Design offre la più estesa collezione di modelli gratuiti su internet - tradotti in 17 lingue. Ad oggi vi possiamo fornire 324 cataloghi e 12290 modelli - 9561 dei quali sono tradotti in Italiano.
Ci stiamo impegnando molto per darvi il meglio che vi possiamo offrire in termini di maglia e uncinetto, ispirazioni e consigli così come filati di grande qualità ad un prezzo incredibile! Volete utilizzare i nostri modelli per qualcosa d'altro oltre al vostro uso personale? Potete leggere tutto ciò che è consentito nel testo sul Copyright in basso su tutte le pagine dei nostri modelli. Buon lavoro!
Lasciare un commento sul modello DROPS 119-21
Noi saremmo felici di ricevere i tuoi commenti e opinioni su questo modello!
Se vuoi fare una domanda, fai per favore attenzione a selezionare la categoria corretta nella casella qui sotto per velocizzare il processo di risposta. I campi richiesti sono indicati da *.