
Categorie popolari
State cercando un filato?


Commenti / Domande (142)
![]() Esther Oz ha scritto:
Esther Oz ha scritto:
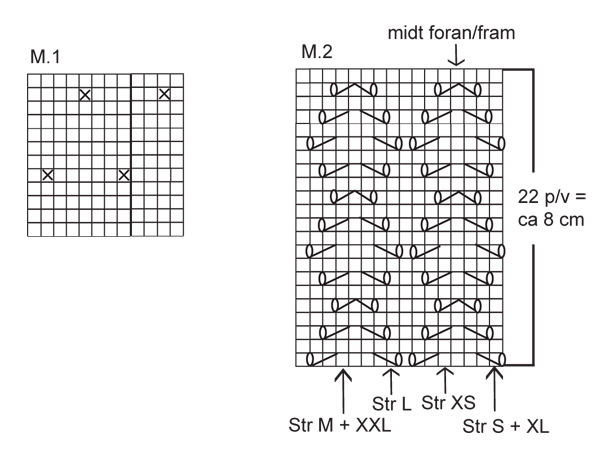
I’m still doing something wrong whenI start M2. 1 vertical repeat of M2 beg by arrow for my size mean if starting at xs, my first stitch is purl on fifth stitch of first row in M2 , and then each row I start from 5th stitch, correct? I also still don’t understand next section where it states 19 stockinette. Do I start from row 7 (5th stitch for xs) and go for 25 sts then finish in stockinette for round, then go back to where I left off starting from row 7?
03.10.2020 - 04:52DROPS Design ha risposto:
Dear Mrs Oz, I'm sorry I'm not sure anymore which part of the pattern you have worked and where you are stuck. Did you already work the 22 rows of M.2 in height over all stitches? If this is done, you now continue working M.2 over the middle 25 sts on front piece only (when working these M.2 start now diag. on row 7 and repeat row 7 to 22 over previous M.2); Work remaining stitches in stockinette. Hope this helps. Happy kniting!
05.10.2020 - 08:57
![]() Esther Oz ha scritto:
Esther Oz ha scritto:
So does that mean I start every round with 19 stockinette to get me to the mid front?
02.10.2020 - 14:08DROPS Design ha risposto:
Dear Mr Oz, correct, you have worked the lace pattern around the dress and now you work the lace pattern on mid front = you start now from the side with 19 sts stocking st until you will divide piece. Happy knitting!
02.10.2020 - 15:09
![]() Esther Oz ha scritto:
Esther Oz ha scritto:
So I got through vertical repeat of M2, and did 19 stockinette sts, and started from row 7 in M2. On row eight, I get to second round at 14 of 16 stockinette sts, do I just do last 2 stockinette at beginning of 2nd round? And am I repeating round starting with stockinette and M2 (from row 7) 4x7 times, increasing on each side on round 4?
01.10.2020 - 17:53DROPS Design ha risposto:
Dear Mrs Oz, M.2 is now worked only over the middle 25 sts on mid front, starting on row 7 in M.2 repeat rows 7 to the end of diagram then repeat from row 7 again as long as you have to work M.2. At the same time, work all other sts in stocking stitch (back piece and sides) and increase on the sides starting on 4th round (= row 10 in M.2 when you start again from row 7 the first time).Happy knitting!
02.10.2020 - 08:16
![]() Esther Oz ha scritto:
Esther Oz ha scritto:
Sorry still confused. Do I read, after first row starting in my size, left to right and then right to left or for each row do I read right to left. Also, M2 is 16 sts across (= 1 row) Do I use a marker to know when I completed all 128 sts for a round?
01.10.2020 - 04:59DROPS Design ha risposto:
Hi Esther, As you are working in the round, each row in the diagram is read from right to left (starting at the bottom). Happy knitting!
01.10.2020 - 07:21
![]() Esther Oz ha scritto:
Esther Oz ha scritto:
So I think I understand a little bit better. I’m suppose to start M2 from xs and continue the pattern going up for the 22 rows of the pattern. After I do the first row do I only go to xs each row or do I do the entire row after the first row of the pattern.
30.09.2020 - 23:22DROPS Design ha risposto:
Dear Mrs Oz, yes right, when working M.2 the first time in height, the rounds will all start with the same stitch = the one with the arrow for your size. Happy knitting!
01.10.2020 - 10:17
![]() Esther Oz ha scritto:
Esther Oz ha scritto:
Sport I do not understand last response. I followed M2 pattern for xs for one round. Is that right. Then next explanation I didn’t understand. Do I do 19 stockinette sts and then rest of round start from row 7 of the pattern and then do row 7-22. ?
30.09.2020 - 18:38DROPS Design ha risposto:
Dear Mrs Oz, you have to work diagram M.2 one time in height (= 22 rows), then work next round as explained: 19 sts stocking st, work row 7 in M.2 over the next 25 sts and work stocking st to the end of the round. Continue like this starting to increase on the sides of the dress on 4th round. Happy knitting!
01.10.2020 - 10:06
![]() Esther Oz ha scritto:
Esther Oz ha scritto:
I finished first round of M2 then says work next round as follows: 19 stockinette sts, M2 (continue from row 7 in chart and repeat from row 7-22) on sts mid front and stockinette st on remaining sts on round. Can you please explain. Thanks
30.09.2020 - 14:52DROPS Design ha risposto:
Dear Mrs Oz, work first one whole repeat in A.2 in height (= the 22 rows) then work the lace pattern as explained: 19 sts in stocking st, then repeat M.2 from row 7 to 22 over the next 25 sts, and work stocking sts over remaining sts on round - on 4th of these rounds you will start increasing on the sides. Happy knitting!
30.09.2020 - 16:01
![]() Esther Oz ha scritto:
Esther Oz ha scritto:
Finished M1 decreases and got to 47 cm. Next need to start in M2 (for xs) how do I go from k2 tog, 1 yo to 1 yo, slip st as if to k, k1, psso? I see first stitch is knit, but if I follow I’m going to end in ago in next Set and start you in 2 nd st. Also what does it mean after 1 vertical repeat?
30.09.2020 - 07:05DROPS Design ha risposto:
Dear Mrs Oz, start working diagram from the stitch with an arrow in your size and finish the diagram reading towards the left, then repeat all sts in diagram, ie work now whole diagram from first stitch to the last. Happy knitting!
30.09.2020 - 08:27
![]() Esther Oz ha scritto:
Esther Oz ha scritto:
When inserting markers in beginning of pattern and it says to “work” a certain number of stitches does this mean to knot between markers or does it mean to continue in M.1 while adding the stitches?
26.09.2020 - 06:41DROPS Design ha risposto:
Dear Mrs Oz, just continue to work as before when inserting the markers. Happy knitting!
28.09.2020 - 09:18
![]() Esther Oz ha scritto:
Esther Oz ha scritto:
After I complete first part to 7” and it says to insert markers after working a number of stitches, i don’t understand when it says insert marker-3 “in last of these sts “ and says same thing with Marker -6. Is this different then just placing the markers after you work the number of stitches as indicated with the other markers?
25.09.2020 - 17:09DROPS Design ha risposto:
Dear Mrs Oz, you insert a total of 6 markers, 4 of them are between stitches (= the 1st, 2nd, 4th and 5th marker = for the darts ) and 2 markers are inserted in a stitch (= the 3rd and 6th marker ) on the sides); Happy knitting!
28.09.2020 - 07:50
|
||||||||||||||||
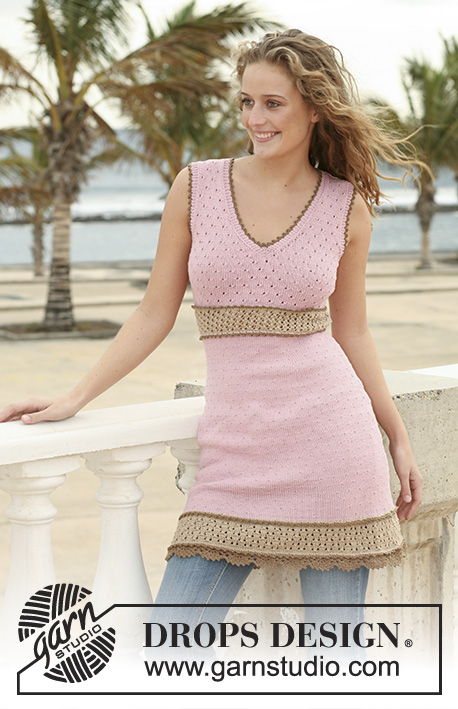
Endless Summer#endlesssummerdress |
||||||||||||||||
|
|
||||||||||||||||
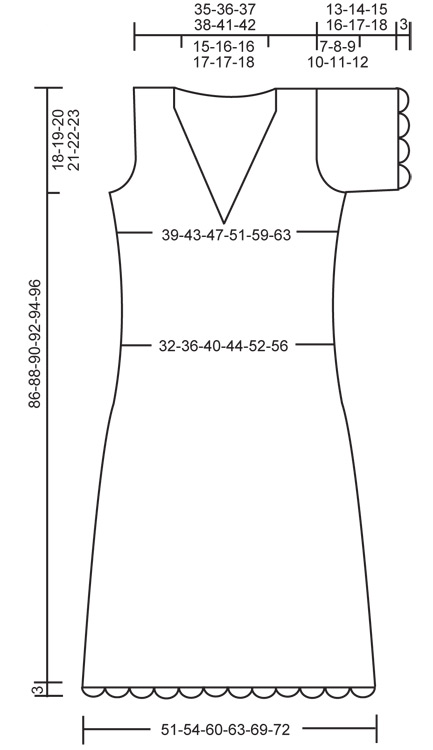
Vestito DROPS in "Muskat" con motivo a pizzo, maniche corte e bordi all’uncinetto. Taglie: XS - XXL.
DROPS 111-4 |
||||||||||||||||
|
M. LEGACCIO (in tondo):
1 giro dir., 1 giro rov. M. LEGACCIO (avanti e indietro sui f.): Lavorare tutti i f. a dir. MOTIVO: vedere i diagrammi M.1 e M.2 – i diagrammi mostrano il motivo dal diritto del lavoro. SUGGERIMENTO PER LE DIMINUZIONI-1: Diminuire come segue prima del segnapunti: 2 m. insieme a dir. Diminuire come segue dopo il segnapunti: passare 1 m. a dir. senza lavorarla, 1 m. dir., accavallare la m. passata sopra quella appena lavorata. NOTA! Assicurarsi di non spostare le m. a rov. in M.1 durante le diminuzioni. SUGGERIMENTO PER LE DIMINUZIONI-2: Fare tutte le diminuzioni dal diritto del lavoro prima/dopo le 9 m. del motivo e le 3 m. a m. legaccio = 12 m. Diminuire come segue prima delle 12 m.: 2 m. insieme a dir. Diminuire come segue dopo le 12 m.: passare 1 m. a dir. senza lavorarla, 1 m. dir., accavallare la m. passata sopra quella appena lavorata. SUGGERIMENTO PER GLI AUMENTI: aumentare 1 m. a ogni lato della m. con il segnapunti facendo 1 gettato. Lavorare il gettato nel filo dietro sul f. di ritorno per evitare un buco. ---------------------------------------------------------- VESTITO: lavorato in tondo con i f. circolari. Avviare 204-216-240-252-276-288 m. con i f. circolari n° 4,5 mm con il Muskat. Lavorare 1 giro rov., 1 giro dir., 1 giro rov. e continuare in M.1. FARE ATTENZIONE ALLA TENSIONE DEL LAVORO! Quando il lavoro misura 18-18-18-20-22-26 cm inserire 6 segnapunti nel lavoro come segue: lavorare 32-34-38-40-44-46 m., inserire il segnapunti-1, lavorare 37-39-43-45-49-51 m., inserire il segnapunti-2, lavorare 33-35-39-41-45-47 m., inserire il segnapunti-3 nell’ultima di queste m. (= lato), lavorare 32-34-38-40-44-46 m., inserire il segnapunti-4, lavorare 37-39-43-45-49-51 m., inserire il segnapunti-5, lavorare 33-35-39-41-45-47 m., inserire il segnapunti-6 nell’ultima di queste m. (= l’altro lato). Sul giro successivo diminuire 1 m. a ogni lato dei segnapunti-3 e -6 (cioè ai lati) – LEGGERE IL SUGGERIMENTO PER LE DIMINUZIONI-1 – e ripetere le diminuzioni ogni 6 giri per un totale di 13-12-14-13-11-10 volte. ALLO STESSO TEMPO durante la 8°-7°-9°-8°-6°-5° diminuzione, diminuire anche 1 m. all’altezza degli altri segnapunti come segue: DOPO i segnapunti-1 e -4 e PRIMA del segnapunti-2 e -5 – LEGGERE IL SUGGERIMENTO PER LE DIMINUZIONI-1. Ripetere queste diminuzioni ogni 6 giri (cioè sugli stessi giri delle diminuzioni ai lati) per un totale di 6 volte. Alla fine di tutte le diminuzioni ci sono 128-144-160-176-208-224 m. sul giro. Continuare con M.1 fino a quando il lavoro misura circa 47-48-49-50-51-52 cm – aggiustarlo dopo almeno 2 giri a m. rasata. Ora togliere i segnapunti-1, -2, -4 e -5. Continuare con M.2 – iniziare dalla freccia per la vostra taglia nella parte inferiore del diagramma in modo che la m. al centro davanti = freccia in cima al diagramma. Dopo 1 ripetizione verticale di M.2 lavorare il giro successivo come segue: 19-23-27-31-39-43 m. a m. rasata, M.2 (continuare dal f. 7 nello schema e ripetere dal f. 7 al 22) su 25 m. al centro davanti e a m. rasata sulle m. rimaste sul giro. ALLO STESSO TEMPO sul 4° giro aumentare 1 m. a ogni lato dei segnapunti ai lati – LEGGERE IL SUGGERIMENTO PER GLI AUMENTI – e ripetere gli aumenti ogni 4 giri per un totale di 7 volte = 156-172-188-204-236-252 m. Quando il lavoro misura circa 67-68-69-70-71-72 cm (aggiustarlo in modo che il giro successivo sia un giro con gettati) lavorare 4 giri a m. legaccio – leggere sopra – su 7 m. al centro davanti, con le m. rimaste come prima. Sul giro successivo intrecciare la m. centrale sul davanti per lo spacco e sullo stesso giro intrecciare 7 m. a ogni lato per lo scalfo (= m. con il segnapunti + 3 m. a ogni lato di questa). Ora finire ogni parte in modo separato. DAVANTI SINISTRO: = 35-39-43-47-55-59 m. Continuare con 3 m. a m. legaccio verso la scollatura, 9 m. di M.2 e m. rasata sulle m. rimaste. ALLO STESSO TEMPO diminuire per la scollatura e per lo scalfo come segue: SCOLLATURA: diminuire 1 m. sulla scollatura prima/dopo le 12 m. – LEGGERE IL SUGGERIMENTO PER LE DIMINUZIONI -2 – e ripetere le diminuzioni a f. alterni per un totale di 9-10-10-10-10-11 volte e poi ogni 4 f. 5-5-5-6-6-6 volte. SCALFO: intrecciare per lo scalfo all’inizio di ogni f. dal lato: 3 m. 0-0-1-1-2-2 volte, 2 m. 0-1-1-2-3-4 volte e 1 m. 1-2-2-3-3-4 volte. Alla fine di tutte le diminuzioni ci sono 20-20-21-21-24-24 m. rimaste sulla spalla. Intrecciare quando il lavoro misura 86-88-90-92-94-96 cm. DAVANTI DESTRO: come il davanti sinistro, ma a specchio. DIETRO: = 71-79-87-95-111-119 m. Continuare a m. rasata e intrecciare per lo scalfo a ogni lato come descritto per il davanti = 69-71-73-75-81-83 m. Quando il lavoro misura 83-85-87-89-91-93 cm lavorare 4 f. a m. legaccio sulle 35-37-37-39-39-41 m. centrali, con le m. rimaste a m. rasata. Ora intrecciare le 29-31-31-33-33-35 m. centrali per il collo e finire ogni spalla in modo separato. Continuare a m. rasata con 3 m. legaccio verso la scollatura e intrecciare quando il lavoro misura 86-88-90-92-94-96 cm. MANICA: lavorata avanti e indietro sui f. Avviare 62-62-68-68-74-80 m. (compresa 1 m. di vivagno a ogni lato) con i f. n° 4,5 mm con il Muskat. Lavorare 4 f. a m. legaccio e continuare con M.1 con 1 m. di vivagno a ogni lato. Quando il lavoro misura 2 cm aumentare 1 m. a ogni lato, e ripetere gli aumenti a f. alterni per un totale di 2-4-3-5-5-4 volte, lavorare le m. aumentate a m. rasata = 66-70-74-78-84-88 m. Quando il lavoro misura 6 cm intrecciare per l’arrotondamento della manica a ogni lato all’inizio di ogni f.: 4 m. 1 volte, 2 m. 3 volte e 1 m. 1-2-4-5-6-8 volte, poi 2 m. a ogni lato fino a quando il lavoro misura 12-13-14-15-16-17 cm, ora intrecciare 4 m. a ogni lato 1 volta e intrecciare le m. rimaste, il lavoro misura circa 13-14-15-16-17-18 cm. CONFEZIONE: cucire i margini delle spalle. Cucire i margini delle maniche all’interno della m. di vivagno e attaccare le maniche. BORDI ALL’UNCINETTO: lavorare un bordo con l’uncinetto n° 4 mm e il Muskat attorno ai bordi delle maniche e lungo il bordo inferiore del vestito come segue: 1° GIRO: 1 m.b. nella 1° m., * 4 cat., saltare 2 m., 1 m.b. nella m. successiva *, ripetere *-*, e finire con 1 m.bss. nella 1° m.b. dall’inizio del giro. 2° GIRO: lavorare a m.bss. fino al centro del 1° arco di cat., 1 m.b. attorno all’arco, * 2 cat., 1 m.b. attorno all’arco successivo, 5 cat., 1 m.b. attorno all’arco successivo *, ripetere *-* ma affrancare l’ultimo arco con 1 m.bss. nella 1° m.b. dall’inizio del giro. 3°GIRO: lavorare 1 m.b. in ognuno degli archi piccoli e lavorare 1 m.b., 5 m.a. e 1 m.b. in ognuno degli archi grandi, finire il giro con 1 m.bss. nella 1° m.b. Lavorare un bordo attorno alla scollatura con l’uncinetto n° 4 mm e il Muskat come segue – iniziare al centro dietro: 1 m.b. nella 1° m., * 1 picot (= 4 cat., 1 m. nella 1° cat.), saltare circa 1,5 cm, 1 m.b. nella m. successiva *, ripetere *-* e finire il giro con 1 m.bss. nella 1° m.b. dall’inizio del giro. |
||||||||||||||||
Spiegazioni del diagramma |
||||||||||||||||
|
||||||||||||||||
 |
||||||||||||||||
 |
||||||||||||||||
Avete terminato questo modello?Allora taggate le vostre foto con #dropspattern #endlesssummerdress o inviatele alla #dropsfan gallery. Avete bisogno di aiuto con questo modello?Troverete 27 video tutorial, una sezione per i commenti/domande e molto altro guardando il modello su www.garnstudio.com © 1982-2026 DROPS Design A/S. Ci riserviamo tutti i diritti. Questo documento, compreso tutte le sue sotto-sezioni, è protetto dalle leggi sul copyright. Potete leggere quello che potete fare con i nostri modelli alla fine di ogni modello sul nostro sito. |
||||||||||||||||


Con oltre 40 anni di esperienza nel design di modelli di maglia e uncinetto, DROPS Design offre la più estesa collezione di modelli gratuiti su internet - tradotti in 17 lingue. Ad oggi vi possiamo fornire 324 cataloghi e 12290 modelli - 9561 dei quali sono tradotti in Italiano.
Ci stiamo impegnando molto per darvi il meglio che vi possiamo offrire in termini di maglia e uncinetto, ispirazioni e consigli così come filati di grande qualità ad un prezzo incredibile! Volete utilizzare i nostri modelli per qualcosa d'altro oltre al vostro uso personale? Potete leggere tutto ciò che è consentito nel testo sul Copyright in basso su tutte le pagine dei nostri modelli. Buon lavoro!
Lasciare un commento sul modello DROPS 111-4
Noi saremmo felici di ricevere i tuoi commenti e opinioni su questo modello!
Se vuoi fare una domanda, fai per favore attenzione a selezionare la categoria corretta nella casella qui sotto per velocizzare il processo di risposta. I campi richiesti sono indicati da *.