
Categorie popolari
State cercando un filato?


Commenti / Domande (142)
![]() Mona Jensen ha scritto:
Mona Jensen ha scritto:
Spørgsmål. Jeg er blevet færdig med den flotte kjole til mit barnebarn. Problemet nu er at hæklingen i udskæringen ruller ind under retmaskerne mod halsen. Hvordan løser jeg det. Venlig hilsen og tak fra Mona
29.07.2025 - 10:00DROPS Design ha risposto:
Hei Mona. Mulig det er heklet for stramt, slik at kanten trekker seg innover. Prøv å fukte kanten og la det tørke flatt. mvh DROPS Design
11.08.2025 - 12:56
![]() Mona ha scritto:
Mona ha scritto:
Jeg er færdig med den flotte kjole til mit barnebarn. Blot et lille problem. I halskanten bukker hæklingen ind under de 3 masker mod halsen. Hvordan retter jeg det. Venlig hilsen og tak fra Mona Jensen
20.07.2025 - 16:36DROPS Design ha risposto:
Hei Mona. Mulig det er blitt heklet for stramt. Prøv å dampe kanten lett, evnt fukte og blokke kanten. mvh DROPS Design
31.07.2025 - 13:51
![]() Mona Jensen ha scritto:
Mona Jensen ha scritto:
Jeg kan ikke komme videre i mønstret, sørg for at næste omg er 1 omgang med omslag. Og der strikkes 4 p. Retstrik -se forklaring over- over 7 m midt for. Det sidste stykke inden jeg skal til venstre forstå. Håber på hjælp. Venlig hilsen Mona Jensen
15.05.2025 - 05:55DROPS Design ha risposto:
Hej Mona, jo når du er kommet til en pind med omslag, så strikker du retstrik over de midterste 7 masker (midt foran), de andre masker strikker du som før, det gør du på 4 omgange. De 7 masker midt foran strikkes i retstrik således: (1.pind ret, 2.pind vrang, 3.pind ret og 4.pind vrang). Når du har gjort det, lukker du den midterste maske af til hals og fortsætter ifølge opskriften.
20.05.2025 - 15:01
![]() Mona Jensen ha scritto:
Mona Jensen ha scritto:
Jeg forstår ikke mønsteret på side 3/6. Sørg for at næste omgang er en omg. Med omslag og videre med begge forstykker . Et sted står der strikkes 4 p retstrik, se forklaring over ??? Håber på hjælp. Venlig hilsen Mona
14.05.2025 - 17:39
![]() Katarzyna Witek ha scritto:
Katarzyna Witek ha scritto:
Brakuje mi informacji, czy sukienka jest robiona od dołu do góry, czy od góry do dołu, co jest istotne, ponieważ chcę zrobić projekt z innej włóczki, więc muszę rozliczyć oczka.
24.04.2025 - 19:13DROPS Design ha risposto:
Witaj Kasiu, sukienka jest przerabiana od dołu do góry. Pozdrawiamy!
25.04.2025 - 09:17
![]() Ria ha scritto:
Ria ha scritto:
Hello. I've almost completed the dress. I'm confused with the sleeve instructions. 1. Do I create sleeves as separate pieces and not pick up sts from the dress? 2. Does the cast-on number include the edge or do I need to add 1 edge stitch on each side? 3. What type of edge sts? e,g, sl1, garter, etc. ?? 4. I don't understand the instructions after "When piece measures 6cm cast off sleeve cap each side..." until the seaming. Please clarify. Thanks.
19.01.2024 - 06:04DROPS Design ha risposto:
Hi Ria, The sleeves are worked separately, bottom up and the number of cast-on stitches includes 1 edge stitch on each side. The edge stitch can be knitted on all rows (garter stitch) or stocking stitch if you prefer. The sleeve cap is shaped by casting off the number of stitches given in the text on each side, i.e., first 4 sts on each side (beginning of each row), then 2 sts 3 times on each side, etc. Hope this helps and happy knitting!,
19.01.2024 - 07:06
![]() Ria ha scritto:
Ria ha scritto:
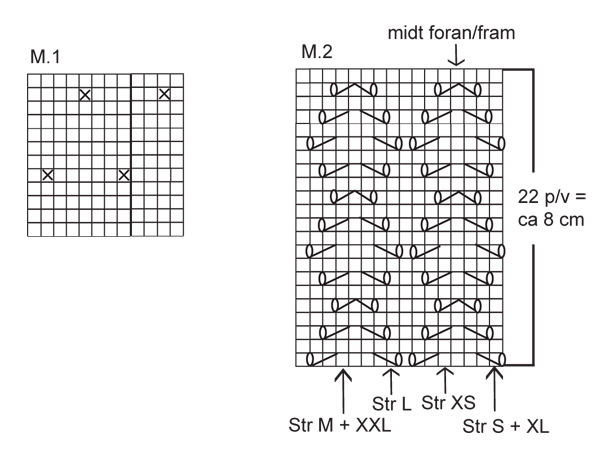
Hello! I'm really excited to make this dress but I am confused with the pattern. I thought I understood charts but maybe I don't. What do the M.1 and M.2 references mean? Is it the pattern name/type or 'make one', an increase and 'make two', increase two? Please help! Are there any video follow-alongs I could refer to? Thanks!
07.08.2023 - 10:04DROPS Design ha risposto:
Dear Ria, M.1 and M.2 refer to the diagram you will find at the bottom of the pattern page, under the measurement chart. Read more about diagrams here. Happy knitting!
07.08.2023 - 11:18
![]() Ellinor ha scritto:
Ellinor ha scritto:
Hej! När minskningar börjar, hur gör man för att avig-m i M1 inte ska bli förskjuten? Man kan ju inte längre ha 5 maskor mellan varje avig-m när man har minskat.
27.03.2022 - 08:25DROPS Design ha risposto:
Hei Ellinor. Vrangmasken i M.1 vil bli forskjøvet. Men pass på at de ikke blir forskjøvet kun den ene veien, men tilpasses mønstret. mvh DROPS Design
04.04.2022 - 10:11
![]() Jane ha scritto:
Jane ha scritto:
Så vacker klänning. TIPS! Är man inte pinnsmal kan man göra den lte kortare och använda den som en sommartröja.
29.12.2020 - 21:59
![]() Esther Oz ha scritto:
Esther Oz ha scritto:
I finally completed and can’t wait for my daughter to see it and try it on. I just wanted to thank you for all your help. I am a beginner and this was a more advanced project. I am happy I got through it and learned so much. Looking forward to the next project. Thanks again
14.12.2020 - 14:19
|
||||||||||||||||
Endless Summer#endlesssummerdress |
||||||||||||||||
|
|
||||||||||||||||
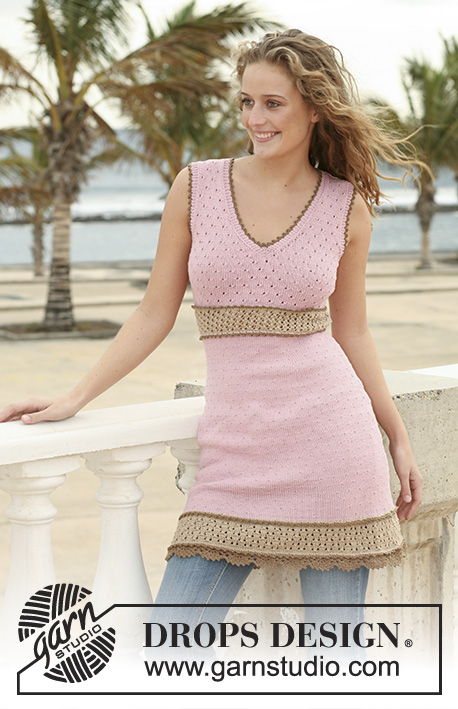
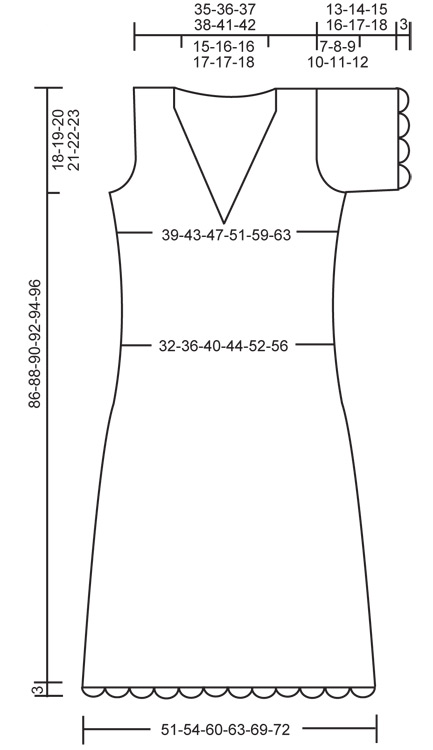
Vestito DROPS in "Muskat" con motivo a pizzo, maniche corte e bordi all’uncinetto. Taglie: XS - XXL.
DROPS 111-4 |
||||||||||||||||
|
M. LEGACCIO (in tondo):
1 giro dir., 1 giro rov. M. LEGACCIO (avanti e indietro sui f.): Lavorare tutti i f. a dir. MOTIVO: vedere i diagrammi M.1 e M.2 – i diagrammi mostrano il motivo dal diritto del lavoro. SUGGERIMENTO PER LE DIMINUZIONI-1: Diminuire come segue prima del segnapunti: 2 m. insieme a dir. Diminuire come segue dopo il segnapunti: passare 1 m. a dir. senza lavorarla, 1 m. dir., accavallare la m. passata sopra quella appena lavorata. NOTA! Assicurarsi di non spostare le m. a rov. in M.1 durante le diminuzioni. SUGGERIMENTO PER LE DIMINUZIONI-2: Fare tutte le diminuzioni dal diritto del lavoro prima/dopo le 9 m. del motivo e le 3 m. a m. legaccio = 12 m. Diminuire come segue prima delle 12 m.: 2 m. insieme a dir. Diminuire come segue dopo le 12 m.: passare 1 m. a dir. senza lavorarla, 1 m. dir., accavallare la m. passata sopra quella appena lavorata. SUGGERIMENTO PER GLI AUMENTI: aumentare 1 m. a ogni lato della m. con il segnapunti facendo 1 gettato. Lavorare il gettato nel filo dietro sul f. di ritorno per evitare un buco. ---------------------------------------------------------- VESTITO: lavorato in tondo con i f. circolari. Avviare 204-216-240-252-276-288 m. con i f. circolari n° 4,5 mm con il Muskat. Lavorare 1 giro rov., 1 giro dir., 1 giro rov. e continuare in M.1. FARE ATTENZIONE ALLA TENSIONE DEL LAVORO! Quando il lavoro misura 18-18-18-20-22-26 cm inserire 6 segnapunti nel lavoro come segue: lavorare 32-34-38-40-44-46 m., inserire il segnapunti-1, lavorare 37-39-43-45-49-51 m., inserire il segnapunti-2, lavorare 33-35-39-41-45-47 m., inserire il segnapunti-3 nell’ultima di queste m. (= lato), lavorare 32-34-38-40-44-46 m., inserire il segnapunti-4, lavorare 37-39-43-45-49-51 m., inserire il segnapunti-5, lavorare 33-35-39-41-45-47 m., inserire il segnapunti-6 nell’ultima di queste m. (= l’altro lato). Sul giro successivo diminuire 1 m. a ogni lato dei segnapunti-3 e -6 (cioè ai lati) – LEGGERE IL SUGGERIMENTO PER LE DIMINUZIONI-1 – e ripetere le diminuzioni ogni 6 giri per un totale di 13-12-14-13-11-10 volte. ALLO STESSO TEMPO durante la 8°-7°-9°-8°-6°-5° diminuzione, diminuire anche 1 m. all’altezza degli altri segnapunti come segue: DOPO i segnapunti-1 e -4 e PRIMA del segnapunti-2 e -5 – LEGGERE IL SUGGERIMENTO PER LE DIMINUZIONI-1. Ripetere queste diminuzioni ogni 6 giri (cioè sugli stessi giri delle diminuzioni ai lati) per un totale di 6 volte. Alla fine di tutte le diminuzioni ci sono 128-144-160-176-208-224 m. sul giro. Continuare con M.1 fino a quando il lavoro misura circa 47-48-49-50-51-52 cm – aggiustarlo dopo almeno 2 giri a m. rasata. Ora togliere i segnapunti-1, -2, -4 e -5. Continuare con M.2 – iniziare dalla freccia per la vostra taglia nella parte inferiore del diagramma in modo che la m. al centro davanti = freccia in cima al diagramma. Dopo 1 ripetizione verticale di M.2 lavorare il giro successivo come segue: 19-23-27-31-39-43 m. a m. rasata, M.2 (continuare dal f. 7 nello schema e ripetere dal f. 7 al 22) su 25 m. al centro davanti e a m. rasata sulle m. rimaste sul giro. ALLO STESSO TEMPO sul 4° giro aumentare 1 m. a ogni lato dei segnapunti ai lati – LEGGERE IL SUGGERIMENTO PER GLI AUMENTI – e ripetere gli aumenti ogni 4 giri per un totale di 7 volte = 156-172-188-204-236-252 m. Quando il lavoro misura circa 67-68-69-70-71-72 cm (aggiustarlo in modo che il giro successivo sia un giro con gettati) lavorare 4 giri a m. legaccio – leggere sopra – su 7 m. al centro davanti, con le m. rimaste come prima. Sul giro successivo intrecciare la m. centrale sul davanti per lo spacco e sullo stesso giro intrecciare 7 m. a ogni lato per lo scalfo (= m. con il segnapunti + 3 m. a ogni lato di questa). Ora finire ogni parte in modo separato. DAVANTI SINISTRO: = 35-39-43-47-55-59 m. Continuare con 3 m. a m. legaccio verso la scollatura, 9 m. di M.2 e m. rasata sulle m. rimaste. ALLO STESSO TEMPO diminuire per la scollatura e per lo scalfo come segue: SCOLLATURA: diminuire 1 m. sulla scollatura prima/dopo le 12 m. – LEGGERE IL SUGGERIMENTO PER LE DIMINUZIONI -2 – e ripetere le diminuzioni a f. alterni per un totale di 9-10-10-10-10-11 volte e poi ogni 4 f. 5-5-5-6-6-6 volte. SCALFO: intrecciare per lo scalfo all’inizio di ogni f. dal lato: 3 m. 0-0-1-1-2-2 volte, 2 m. 0-1-1-2-3-4 volte e 1 m. 1-2-2-3-3-4 volte. Alla fine di tutte le diminuzioni ci sono 20-20-21-21-24-24 m. rimaste sulla spalla. Intrecciare quando il lavoro misura 86-88-90-92-94-96 cm. DAVANTI DESTRO: come il davanti sinistro, ma a specchio. DIETRO: = 71-79-87-95-111-119 m. Continuare a m. rasata e intrecciare per lo scalfo a ogni lato come descritto per il davanti = 69-71-73-75-81-83 m. Quando il lavoro misura 83-85-87-89-91-93 cm lavorare 4 f. a m. legaccio sulle 35-37-37-39-39-41 m. centrali, con le m. rimaste a m. rasata. Ora intrecciare le 29-31-31-33-33-35 m. centrali per il collo e finire ogni spalla in modo separato. Continuare a m. rasata con 3 m. legaccio verso la scollatura e intrecciare quando il lavoro misura 86-88-90-92-94-96 cm. MANICA: lavorata avanti e indietro sui f. Avviare 62-62-68-68-74-80 m. (compresa 1 m. di vivagno a ogni lato) con i f. n° 4,5 mm con il Muskat. Lavorare 4 f. a m. legaccio e continuare con M.1 con 1 m. di vivagno a ogni lato. Quando il lavoro misura 2 cm aumentare 1 m. a ogni lato, e ripetere gli aumenti a f. alterni per un totale di 2-4-3-5-5-4 volte, lavorare le m. aumentate a m. rasata = 66-70-74-78-84-88 m. Quando il lavoro misura 6 cm intrecciare per l’arrotondamento della manica a ogni lato all’inizio di ogni f.: 4 m. 1 volte, 2 m. 3 volte e 1 m. 1-2-4-5-6-8 volte, poi 2 m. a ogni lato fino a quando il lavoro misura 12-13-14-15-16-17 cm, ora intrecciare 4 m. a ogni lato 1 volta e intrecciare le m. rimaste, il lavoro misura circa 13-14-15-16-17-18 cm. CONFEZIONE: cucire i margini delle spalle. Cucire i margini delle maniche all’interno della m. di vivagno e attaccare le maniche. BORDI ALL’UNCINETTO: lavorare un bordo con l’uncinetto n° 4 mm e il Muskat attorno ai bordi delle maniche e lungo il bordo inferiore del vestito come segue: 1° GIRO: 1 m.b. nella 1° m., * 4 cat., saltare 2 m., 1 m.b. nella m. successiva *, ripetere *-*, e finire con 1 m.bss. nella 1° m.b. dall’inizio del giro. 2° GIRO: lavorare a m.bss. fino al centro del 1° arco di cat., 1 m.b. attorno all’arco, * 2 cat., 1 m.b. attorno all’arco successivo, 5 cat., 1 m.b. attorno all’arco successivo *, ripetere *-* ma affrancare l’ultimo arco con 1 m.bss. nella 1° m.b. dall’inizio del giro. 3°GIRO: lavorare 1 m.b. in ognuno degli archi piccoli e lavorare 1 m.b., 5 m.a. e 1 m.b. in ognuno degli archi grandi, finire il giro con 1 m.bss. nella 1° m.b. Lavorare un bordo attorno alla scollatura con l’uncinetto n° 4 mm e il Muskat come segue – iniziare al centro dietro: 1 m.b. nella 1° m., * 1 picot (= 4 cat., 1 m. nella 1° cat.), saltare circa 1,5 cm, 1 m.b. nella m. successiva *, ripetere *-* e finire il giro con 1 m.bss. nella 1° m.b. dall’inizio del giro. |
||||||||||||||||
Spiegazioni del diagramma |
||||||||||||||||
|
||||||||||||||||
 |
||||||||||||||||
 |
||||||||||||||||
Avete terminato questo modello?Allora taggate le vostre foto con #dropspattern #endlesssummerdress o inviatele alla #dropsfan gallery. Avete bisogno di aiuto con questo modello?Troverete 27 video tutorial, una sezione per i commenti/domande e molto altro guardando il modello su www.garnstudio.com © 1982-2026 DROPS Design A/S. Ci riserviamo tutti i diritti. Questo documento, compreso tutte le sue sotto-sezioni, è protetto dalle leggi sul copyright. Potete leggere quello che potete fare con i nostri modelli alla fine di ogni modello sul nostro sito. |
||||||||||||||||


Con oltre 40 anni di esperienza nel design di modelli di maglia e uncinetto, DROPS Design offre la più estesa collezione di modelli gratuiti su internet - tradotti in 17 lingue. Ad oggi vi possiamo fornire 324 cataloghi e 12290 modelli - 9561 dei quali sono tradotti in Italiano.
Ci stiamo impegnando molto per darvi il meglio che vi possiamo offrire in termini di maglia e uncinetto, ispirazioni e consigli così come filati di grande qualità ad un prezzo incredibile! Volete utilizzare i nostri modelli per qualcosa d'altro oltre al vostro uso personale? Potete leggere tutto ciò che è consentito nel testo sul Copyright in basso su tutte le pagine dei nostri modelli. Buon lavoro!
Lasciare un commento sul modello DROPS 111-4
Noi saremmo felici di ricevere i tuoi commenti e opinioni su questo modello!
Se vuoi fare una domanda, fai per favore attenzione a selezionare la categoria corretta nella casella qui sotto per velocizzare il processo di risposta. I campi richiesti sono indicati da *.