
Categorie popolari
State cercando un filato?


Commenti / Domande (99)
![]() Karin ha scritto:
Karin ha scritto:
Hej Ska nu lägga upp maskor till ärmen. Där står: lägg upp i slutet av varje v mot sidan 1-1-2(1-2) gr Förstår inte hur jag ska tänka här. Ser att ni tidigare svarat med att man ska öka med 4,6,8,17 men var kommer dessa siffror ifrån och sker den ökningen under 4 varv? Med vänlig hälsning, Karin
28.03.2018 - 22:07DROPS Design ha risposto:
Hej Karin, vi skriver lägg upp 4 masker 1-1-2(1-2)ggr - her vælger du det antal gange som den størrelse du strikker. God fornøjelse!
04.04.2018 - 13:32Claire Vaillancourt ha scritto:
At the end of the RT front piece instructions the " place a marker and measure from here "...is that for when doing the back
18.01.2018 - 20:19DROPS Design ha risposto:
Dear Mrs Vaillancourt, the next measurements will be done from this marker, this match the middle of shoulder, ie middle of piece between front and back piece. Happy knitting!
19.01.2018 - 10:48Carolina ha scritto:
Hola me parece faltó aclarar en el delantero derecho, luego de tejer 5 cm, dice disminuir, pero no aclara si es del lado de la manga o del borde. Creo es del lado de la manga no?? Gracias! Esto es solo un aporte!!
23.06.2017 - 01:01
![]() Lucia ha scritto:
Lucia ha scritto:
Questo modello è proprio bello! Ho seguito le istruzioni passo passo e non ho avuto problemi, anche se non sono espertissima di ferri e filati.
22.06.2017 - 00:25Jill Spring ha scritto:
I've printed the pattern but there are no sleeve instructions!
17.05.2017 - 22:11DROPS Design ha risposto:
Dear Mrs Spring, the sts for sleeves are cast on the side of right front piece and on the side of left front piece and then cast off on each side on back piece. Happy knitting!
18.05.2017 - 08:45
![]() Suzanne ha scritto:
Suzanne ha scritto:
When working the BACK PIECE, do you measure from the Mid-shoulder marker that you placed while working the Right Front Piece OR from the back neckline where you cast on extra stitches. THANK YOU!
21.03.2017 - 18:34DROPS Design ha risposto:
Dear Suzanne, you will measure from the marker added on front piece, ie 1 cm before putting piece aside. Happy knitting!
22.03.2017 - 09:15
![]() Suzanne Kagen ha scritto:
Suzanne Kagen ha scritto:
"When piece measures 22-24-27 (28-31) cm [8¾”-9½”-10 4/8” (11”-12¼”)] slip the first 9-10-11 (12-12) sts towards mid front on a stitch holder for neck. Bind off to shape the neckline at the beg of every row from neckline..." Probably a silly question, but do I work those "first stitches towards the mid front" in moss stitch and THEN slip them onto a holder? Or do I cut the yarn and re-attach the yarn to "Bind off to shape the neckline"?
14.03.2017 - 08:22DROPS Design ha risposto:
Dear Mrs Kagen, you can work them first to avoid cutting the yarn. Happy knitting!
14.03.2017 - 09:44
![]() Marlene Amaral Vayens ha scritto:
Marlene Amaral Vayens ha scritto:
I loved that jacket Pattern. Thank you for Share with Us. Merry Christmas.
26.12.2016 - 04:30
![]() Mar Valentijn ha scritto:
Mar Valentijn ha scritto:
Bij het printen van patronen vallen er regelmatig woorden weg aan het begin en einde van de zin. Weet u hoe ik dit kan oplossen op een andere manier dan de ontbrekende info erbij te schrijven. Overigens zijn de patronen prima. met groet.
18.10.2016 - 16:58DROPS Design ha risposto:
Hoi Mar. Wij hebben getest met verschillende browsers en alles print goed. Wij denken dat het aan jouw instellingen kan liggen. Ik weet helaas niet goed hoe je dat kan aanpassen.
28.11.2016 - 17:12Reut ha scritto:
Hi , I knitted the right part and now I want to knit the left part , but the result is not symmetrical ... how should I begin to knit the left side so the body of the garment will be the same ?
22.07.2016 - 16:09DROPS Design ha risposto:
Dear Mrs Reut, work left front piece reversed, ie from RS: 1 edge st, work in stocking st and finish with 12 sts in seed st. Dec at beg of row from RS (instead of end of row from RS) and cast on new sts for sleeve at the end of row from WS. Happy knitting!
25.07.2016 - 10:27
|
|
Miss Mossy#missmossyjacket |
|
|
|
|
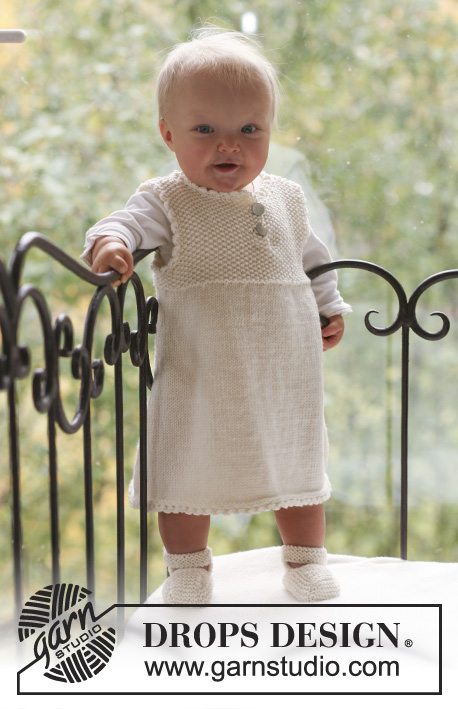
Completo formato da cardogan e calze a grana di riso lavorati ai ferri per neonati e bambini in Merino Extra Fine.
DROPS Baby 18-10 |
|
|
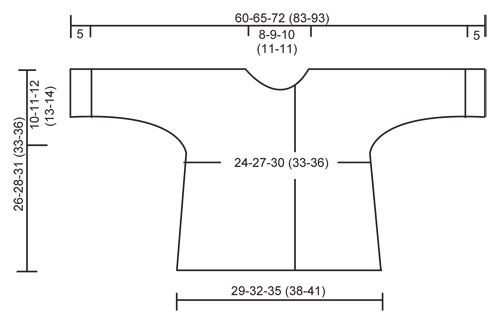
GIACCHINO: M. A LEGACCIO (avanti e indietro sul ferro): Lavorare a dir. tutti i f. M. A GRANA DI RISO: Ferro 1: * 1 dir., 1 rov. *, ripetere da *-*. Ferro 2: dir. su rov. e rov. su dir. Ripetere il f. 2. ASOLE: Fare le asole sul bordo davanti dx. 1 asola = lavorare insieme a dir. la 2° e la 3° m. dal centro davanti e fare 1 gettato. Fare le asole quando il lavoro misura : TAGLIA 1/3 MESI: 11, 16 e 21 cm TAGLIA 6/9 MESI: 13, 18 e 23 cm TAGLIA 12/18 MESI: 16, 21 e 26 cm TAGLIA 2 ANNI: 15, 21 e 27 cm TAGLIA 3/4 ANNI: 18, 24 e 30 cm. ---------------------------------------------------------- GIACCHINO: Iniziare con il davanti, avviare le m. per le maniche e lavorare il dietro dalle spalle in giù. DAVANTI DX.: Lavorato avanti e indietro sui ferri circolari. Con i ferri misura 4,5 mm e il filato Merino Extra Fine avviare 36-39-42 (45-48) m. (compresa 1 m. di vivagno a lato e 12 m. per il bordo frontale verso il centro davanti). Lavorare 4 f. a m. a legaccio – LEGGERE SOPRA. Lavorare il f. successivo come segue dal centro davanti: 12 m. per il bordo frontale a m. a grana di riso, 23-26-29 (32-35) m. a m. rasata e 1 m. di vivagno a m. legaccio. FARE ATTENZIONE ALLA TENSIONE DEL LAVORO. Quando il lavoro misura 5 cm diminuire 1 m. al lato e ripetere le diminuzioni ogni 2-2.5-3 (3-3.5) cm per un totale di 5 volte = 31-34-37 (40-43) m. Ricordarsi delle asole sul bordo davanti – LEGGERE SOPRA. Quando il lavoro misura 16-17-19 (20-22) cm avviare le m. per la manica, alla fine di ogni f. verso il lato: 4 m. 1-1-2 (1-2) volte, 6 m. 1-1-1 (1-1) volte, 8 m. 1-1-1 (2-2) volte e 17-19-19 (23-26) m. 1 volta = 66-71-78 (89-99) m. Continuare a m. rasata con 12 m. a m. a grana di riso sul bordo frontale e 10 m. a m. a grana di riso in fondo alla manica. Quando il lavoro misura 22-24-27 (28-31) cm trasferire le prime 9-10-11 (12-12) m. verso il centro davanti su un ferro ausiliario per il collo. Intrecciare per modellare il collo all’inizio di ogni f. dalla scollatura: 2 m. 1 volta e 1 m. 3 volte = 52-56-62 (72-82) m. rimaste sulla spalla/manica. Quando il lavoro misura 26-28-31 (33-36) cm inserire un segnapunti nel lavoro (= centro della spalla). ORA MISURARE IL LAVORO DA QUI. Continuare per 1 cm e mettere il lavoro da parte. DAVANTI SX.: Avviare e lavorare come il davanti dx., ma al contrario. Non fare le asole! DIETRO: Lavorare le m. dal davanti sx. sul ferro di lavoro, avviare 16-18-20 (22-22) nuove m. (= dietro della scollatura) e lavorare le m. dal davanti dx. indietro sul f. di lavoro = 120-130-144 (166-186) m. Continuare a m. rasata con 10 m. a m. a grana di riso per lato (= margini della manica). Quando il lavoro misura 7.5-8.5-8.5 (9.5-10) cm intrecciare le m. per la manica all’inizio di ogni f. da ogni lato come segue: 17-19-19 (23-26) m. 1 volta, 8 m. 1-1-1 (2-2) volta, 6 m. 1-1-1 (1-1) volta e 4 m. 1-1-2 (1-2) volte = 50-56-62 (68-74) m. rimaste sul f. Continuare a m. rasata con 1 m. di vivagno a m. legaccio da ogni lato. Quando il lavoro misura 13-13-14 (16-17) cm aumentare 1 m. a ogni lato ogni 2-2,5-3 (3-3,5) cm per un totale di 5 volte = 60-66-72 (78-84) m. Quando il lavoro misura 25-27-30 (32-35) cm lavorare 4 f. a m. legaccio su tutte le m. e intrecciare. SCOLLATURA: Riprendere circa da 46 a 66 m. lungo la scollatura (comprese le m. sul ferro ausiliario sul davanti) con i ferri misura 4,5 mm e lavorare 3 f. a m. a legaccio avanti e indietro sul ferro, intrecciare. CONFEZIONE: Cucire la manica e i bordi all’interno della prima m. di vivagno. Attaccare i bottoni in corrispondenza delle asole. Piegare i margini della manica verso il diritto del lavoro se necessario. ---------------------------------------------------------- CALZE: Lunghezza del piede: 10-11-12 (14-16) cm CALZA: lavorata in tondo con i ferri a doppia punta. Con i ferri a doppia punta misura 3 mm e il filato Merino Extra Fine avviare 40-44-48 (48-52) m. Lavorare 1 giro a dir. e continuare a coste, 2 dir./2 rov., per 6-7-7 (8-8) cm. Lavorare 1 giro a dir., ALLO STESSO TEMPO distribuire 6 diminuzioni in modo uniforme sul giro = 34-38-42 (42-46) m. Ora tenere le prime 10-10-12 (12-14) m. sul ferro (= sopra del piede) e trasferire le rimanenti 24-28-30 (30-32) m. su un ferro ausiliario. Lavorare 3-3,5-4 (5-6) cm a m. a grana di riso – LEGGERE SOPRA – sulle m. del sopra del piede. Ora riprendere 7-8-9 (12-14) m. a ogni lato del sopra del piede e trasferire le m. dal ferro ausiliario sul ferro di lavoro = 48-54-60 (66-74) m. Continuare a m. a grana di riso su tutte le m. per 1,5-2-2,5 (3-3,5) cm, e poi lavorare 1 giro a rov. Intrecciare tutte le m. tranne le 10-10-12 (12-14) m. al centro davanti. Lavorare 9-10-11 (13-14) cm a m. a grana di riso su queste m. per la suola e intrecciare. Cucire la suola alla calza, margine a margine per evitare una cucitura spessa. |
|
 |
|
Avete terminato questo modello?Allora taggate le vostre foto con #dropspattern #missmossyjacket o inviatele alla #dropsfan gallery. Avete bisogno di aiuto con questo modello?Troverete 16 video tutorial, una sezione per i commenti/domande e molto altro guardando il modello su www.garnstudio.com © 1982-2026 DROPS Design A/S. Ci riserviamo tutti i diritti. Questo documento, compreso tutte le sue sotto-sezioni, è protetto dalle leggi sul copyright. Potete leggere quello che potete fare con i nostri modelli alla fine di ogni modello sul nostro sito. |


Con oltre 40 anni di esperienza nel design di modelli di maglia e uncinetto, DROPS Design offre la più estesa collezione di modelli gratuiti su internet - tradotti in 17 lingue. Ad oggi vi possiamo fornire 325 cataloghi e 12298 modelli - 9569 dei quali sono tradotti in Italiano.
Ci stiamo impegnando molto per darvi il meglio che vi possiamo offrire in termini di maglia e uncinetto, ispirazioni e consigli così come filati di grande qualità ad un prezzo incredibile! Volete utilizzare i nostri modelli per qualcosa d'altro oltre al vostro uso personale? Potete leggere tutto ciò che è consentito nel testo sul Copyright in basso su tutte le pagine dei nostri modelli. Buon lavoro!
Lasciare un commento sul modello DROPS Baby 18-10
Noi saremmo felici di ricevere i tuoi commenti e opinioni su questo modello!
Se vuoi fare una domanda, fai per favore attenzione a selezionare la categoria corretta nella casella qui sotto per velocizzare il processo di risposta. I campi richiesti sono indicati da *.