
Categorie popolari
State cercando un filato?


Commenti / Domande (99)
![]() Ellen ha scritto:
Ellen ha scritto:
Dank je wel, helemaal duidelijk nu.
19.02.2026 - 21:15
![]() Ellen ha scritto:
Ellen ha scritto:
Ik heb maar 2 naalden gebreid over de gehele breedte van rugpand en de hoogte van 7,5 cm al bereikt, is dit wel oké.?
19.02.2026 - 14:55DROPS Design ha risposto:
Dag Ellen,
Je begint op het achterpand met het afkanten van de mouwsteken op een hoogte van 7½ vanaf de markeerdraad die 1 cm voor het einde van het rechter voorpand hebt geplaatst. Het antwoord op je vorige post klopte niet, ik keek per ongeluk bij een ander patroon, dus dat verwijder ik weer.
19.02.2026 - 20:25
![]() Ellen ha scritto:
Ellen ha scritto:
Ik moet bij 7,5 cm mouw af gaan kanten, wordt dan uiteinde/ mouwuitgang niet erg smal? Nog geen 4 cm. Waar handje door moet, bij kleinste maat.
19.02.2026 - 14:43DROPS Design ha risposto:
Dag Ellen,
Zie het antwoord op je volgende vraag
19.02.2026 - 20:16
![]() Lydia ha scritto:
Lydia ha scritto:
I am now at the back piece, do I work the sts from left front piece from the RS or WS back onto the needle?
04.02.2026 - 17:14DROPS Design ha risposto:
Hi Lydia, It doesn't matter whether you work from the right or wrong side as long as all the pieces are the same way. and you continue the pattern correctly on the front pieces. Regards, Drops Team.
05.02.2026 - 06:26
![]() Lydia ha scritto:
Lydia ha scritto:
I'm sorry if this is an obvious question, but should I slip (9) stitches onto a stitch holder for the left front piece too?
30.01.2026 - 17:21DROPS Design ha risposto:
Dear Lydia, yes, you should slip 9 stitches onto a stitch holder also for the left front piece. Happy knitting!
01.02.2026 - 20:26
![]() Lydia ha scritto:
Lydia ha scritto:
Neckline: "Pick up approx 46 to 66 stitches round neckline"- do I pick these up randomly from available stitches on fronts and back ?? Thank you in advance
29.01.2026 - 17:53DROPS Design ha risposto:
Hi, yes. In the next row you can adjust the number of stitches - the neckline should't be too loose or too tight. Happy knitting!
29.01.2026 - 20:14
![]() Penny Fisher ha scritto:
Penny Fisher ha scritto:
I have started knitting the Right Front piece. I am at about 11 cm and the work is not straight, The side with the moss stitch is longer than the garter stitch? I did a tension square before I started which was spot on. What has happened?
15.09.2025 - 23:02DROPS Design ha risposto:
Hi Penny, it will look fine after blocking. Happy knitting!
17.09.2025 - 09:21
![]() Cheryl Anderson ha scritto:
Cheryl Anderson ha scritto:
Hello! I need clarification as I begin the sleeves for this pattern. Directions: cast on sts for sleeve, at the end of every row towards the side: Question: Am I always casting on at the end of the right side only on the knitted side since I am beginning the row with the moss st? and then am I always casting on at the end of the left side on the purl side only because I am ending the edge on the purl side? Thank you so much Cheryl
25.04.2025 - 17:46DROPS Design ha risposto:
Dear Cheryl, the sleeves are worked only in one side for the front pieces, so you cast on sts only in one side (in the left front piece it will be in the opposite side). You cast on stitches on the side with the 1 edge stitch and not the one with the front band stitches, that is, on the rows where you start working the 12 front band stitches and cast on beside the 1 edge stitch. Happy knitting!
27.04.2025 - 12:05
![]() Cheryl ha scritto:
Cheryl ha scritto:
Hello, I am knitting both fronts of Miss Mossy on the same circular needle. I would like to know if I am understanding this direction correctly: "LEFT FRONT PIECE: Cast on and work like right front piece, but mirrored. " When I am knitting the right side of the sweater on the knitted side , I knit the moss stitch followed by the stockinette stitch. When I am knitting the left side on the knitted side, I knit the stockinette stitch followed by have moss stitch. Is this correct? Thank you!
13.04.2025 - 00:50DROPS Design ha risposto:
Dear Cheryl, yes, that's correct. Happy knitting!
14.04.2025 - 00:50
![]() Simona ha scritto:
Simona ha scritto:
Ciao, ma per la taglia 3-6 come mi devo regolare?
22.10.2024 - 18:03DROPS Design ha risposto:
Buonasera Simona, può adattare le spiegazioni alla taglia che le interessa. Buon lavoro!
25.10.2024 - 23:41
|
|
Miss Mossy#missmossyjacket |
|
|
|
|
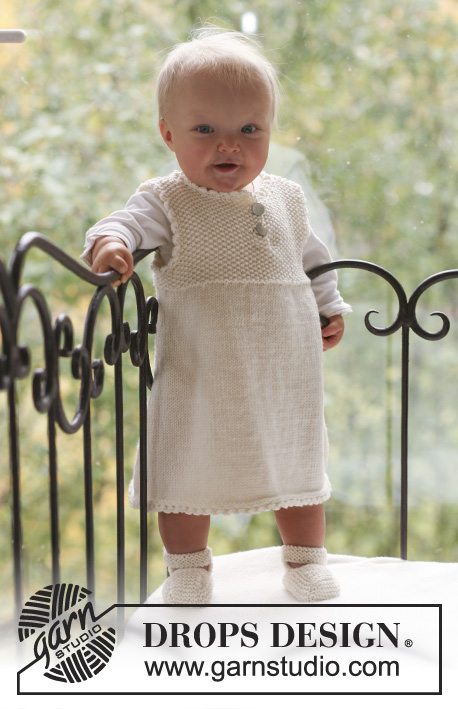
Completo formato da cardogan e calze a grana di riso lavorati ai ferri per neonati e bambini in Merino Extra Fine.
DROPS Baby 18-10 |
|
|
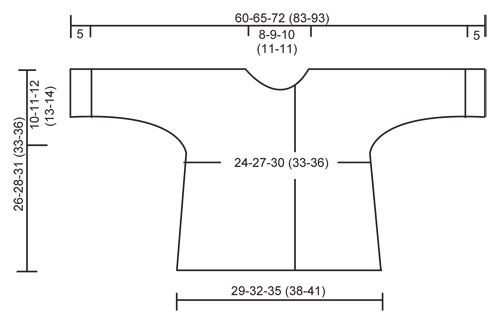
GIACCHINO: M. A LEGACCIO (avanti e indietro sul ferro): Lavorare a dir. tutti i f. M. A GRANA DI RISO: Ferro 1: * 1 dir., 1 rov. *, ripetere da *-*. Ferro 2: dir. su rov. e rov. su dir. Ripetere il f. 2. ASOLE: Fare le asole sul bordo davanti dx. 1 asola = lavorare insieme a dir. la 2° e la 3° m. dal centro davanti e fare 1 gettato. Fare le asole quando il lavoro misura : TAGLIA 1/3 MESI: 11, 16 e 21 cm TAGLIA 6/9 MESI: 13, 18 e 23 cm TAGLIA 12/18 MESI: 16, 21 e 26 cm TAGLIA 2 ANNI: 15, 21 e 27 cm TAGLIA 3/4 ANNI: 18, 24 e 30 cm. ---------------------------------------------------------- GIACCHINO: Iniziare con il davanti, avviare le m. per le maniche e lavorare il dietro dalle spalle in giù. DAVANTI DX.: Lavorato avanti e indietro sui ferri circolari. Con i ferri misura 4,5 mm e il filato Merino Extra Fine avviare 36-39-42 (45-48) m. (compresa 1 m. di vivagno a lato e 12 m. per il bordo frontale verso il centro davanti). Lavorare 4 f. a m. a legaccio – LEGGERE SOPRA. Lavorare il f. successivo come segue dal centro davanti: 12 m. per il bordo frontale a m. a grana di riso, 23-26-29 (32-35) m. a m. rasata e 1 m. di vivagno a m. legaccio. FARE ATTENZIONE ALLA TENSIONE DEL LAVORO. Quando il lavoro misura 5 cm diminuire 1 m. al lato e ripetere le diminuzioni ogni 2-2.5-3 (3-3.5) cm per un totale di 5 volte = 31-34-37 (40-43) m. Ricordarsi delle asole sul bordo davanti – LEGGERE SOPRA. Quando il lavoro misura 16-17-19 (20-22) cm avviare le m. per la manica, alla fine di ogni f. verso il lato: 4 m. 1-1-2 (1-2) volte, 6 m. 1-1-1 (1-1) volte, 8 m. 1-1-1 (2-2) volte e 17-19-19 (23-26) m. 1 volta = 66-71-78 (89-99) m. Continuare a m. rasata con 12 m. a m. a grana di riso sul bordo frontale e 10 m. a m. a grana di riso in fondo alla manica. Quando il lavoro misura 22-24-27 (28-31) cm trasferire le prime 9-10-11 (12-12) m. verso il centro davanti su un ferro ausiliario per il collo. Intrecciare per modellare il collo all’inizio di ogni f. dalla scollatura: 2 m. 1 volta e 1 m. 3 volte = 52-56-62 (72-82) m. rimaste sulla spalla/manica. Quando il lavoro misura 26-28-31 (33-36) cm inserire un segnapunti nel lavoro (= centro della spalla). ORA MISURARE IL LAVORO DA QUI. Continuare per 1 cm e mettere il lavoro da parte. DAVANTI SX.: Avviare e lavorare come il davanti dx., ma al contrario. Non fare le asole! DIETRO: Lavorare le m. dal davanti sx. sul ferro di lavoro, avviare 16-18-20 (22-22) nuove m. (= dietro della scollatura) e lavorare le m. dal davanti dx. indietro sul f. di lavoro = 120-130-144 (166-186) m. Continuare a m. rasata con 10 m. a m. a grana di riso per lato (= margini della manica). Quando il lavoro misura 7.5-8.5-8.5 (9.5-10) cm intrecciare le m. per la manica all’inizio di ogni f. da ogni lato come segue: 17-19-19 (23-26) m. 1 volta, 8 m. 1-1-1 (2-2) volta, 6 m. 1-1-1 (1-1) volta e 4 m. 1-1-2 (1-2) volte = 50-56-62 (68-74) m. rimaste sul f. Continuare a m. rasata con 1 m. di vivagno a m. legaccio da ogni lato. Quando il lavoro misura 13-13-14 (16-17) cm aumentare 1 m. a ogni lato ogni 2-2,5-3 (3-3,5) cm per un totale di 5 volte = 60-66-72 (78-84) m. Quando il lavoro misura 25-27-30 (32-35) cm lavorare 4 f. a m. legaccio su tutte le m. e intrecciare. SCOLLATURA: Riprendere circa da 46 a 66 m. lungo la scollatura (comprese le m. sul ferro ausiliario sul davanti) con i ferri misura 4,5 mm e lavorare 3 f. a m. a legaccio avanti e indietro sul ferro, intrecciare. CONFEZIONE: Cucire la manica e i bordi all’interno della prima m. di vivagno. Attaccare i bottoni in corrispondenza delle asole. Piegare i margini della manica verso il diritto del lavoro se necessario. ---------------------------------------------------------- CALZE: Lunghezza del piede: 10-11-12 (14-16) cm CALZA: lavorata in tondo con i ferri a doppia punta. Con i ferri a doppia punta misura 3 mm e il filato Merino Extra Fine avviare 40-44-48 (48-52) m. Lavorare 1 giro a dir. e continuare a coste, 2 dir./2 rov., per 6-7-7 (8-8) cm. Lavorare 1 giro a dir., ALLO STESSO TEMPO distribuire 6 diminuzioni in modo uniforme sul giro = 34-38-42 (42-46) m. Ora tenere le prime 10-10-12 (12-14) m. sul ferro (= sopra del piede) e trasferire le rimanenti 24-28-30 (30-32) m. su un ferro ausiliario. Lavorare 3-3,5-4 (5-6) cm a m. a grana di riso – LEGGERE SOPRA – sulle m. del sopra del piede. Ora riprendere 7-8-9 (12-14) m. a ogni lato del sopra del piede e trasferire le m. dal ferro ausiliario sul ferro di lavoro = 48-54-60 (66-74) m. Continuare a m. a grana di riso su tutte le m. per 1,5-2-2,5 (3-3,5) cm, e poi lavorare 1 giro a rov. Intrecciare tutte le m. tranne le 10-10-12 (12-14) m. al centro davanti. Lavorare 9-10-11 (13-14) cm a m. a grana di riso su queste m. per la suola e intrecciare. Cucire la suola alla calza, margine a margine per evitare una cucitura spessa. |
|
 |
|
Avete terminato questo modello?Allora taggate le vostre foto con #dropspattern #missmossyjacket o inviatele alla #dropsfan gallery. Avete bisogno di aiuto con questo modello?Troverete 16 video tutorial, una sezione per i commenti/domande e molto altro guardando il modello su www.garnstudio.com © 1982-2026 DROPS Design A/S. Ci riserviamo tutti i diritti. Questo documento, compreso tutte le sue sotto-sezioni, è protetto dalle leggi sul copyright. Potete leggere quello che potete fare con i nostri modelli alla fine di ogni modello sul nostro sito. |


Con oltre 40 anni di esperienza nel design di modelli di maglia e uncinetto, DROPS Design offre la più estesa collezione di modelli gratuiti su internet - tradotti in 17 lingue. Ad oggi vi possiamo fornire 325 cataloghi e 12298 modelli - 9569 dei quali sono tradotti in Italiano.
Ci stiamo impegnando molto per darvi il meglio che vi possiamo offrire in termini di maglia e uncinetto, ispirazioni e consigli così come filati di grande qualità ad un prezzo incredibile! Volete utilizzare i nostri modelli per qualcosa d'altro oltre al vostro uso personale? Potete leggere tutto ciò che è consentito nel testo sul Copyright in basso su tutte le pagine dei nostri modelli. Buon lavoro!
Lasciare un commento sul modello DROPS Baby 18-10
Noi saremmo felici di ricevere i tuoi commenti e opinioni su questo modello!
Se vuoi fare una domanda, fai per favore attenzione a selezionare la categoria corretta nella casella qui sotto per velocizzare il processo di risposta. I campi richiesti sono indicati da *.