
Categorie popolari
State cercando un filato?


Commenti / Domande (58)
![]() Marit Hjelmeland ha scritto:
Marit Hjelmeland ha scritto:
Hei, jeg stusser over enda en ting i denne oppskriften. Ser at dere har svart at mønsteret skal strikkes frem og tilbake. Slik jeg leser oppskriften skal alle 352 m inn på rundpinne. Det passer jo med fellingsbeskrivelsen og at alt skal over på en tynnere rundpinne senere. Tar jeg feil?
23.03.2023 - 11:42DROPS Design ha risposto:
Hei Marit, Ja, du strikker fram og tilbake, selv om du bruker rundpinne. Rundpinnen er brukt fordi det er for mange masker til vanlige pinner. God fornøyelse!
24.03.2023 - 06:50
![]() Marit Hjelmeland ha scritto:
Marit Hjelmeland ha scritto:
Hei,har. Problemer med å plukke opp masker på skrå. Hvor langt inne starter js fra toppen og hvor mange tråder hopper jeg over mellom hver maske jeg tar opp. Klarer det fint på en rett linje, men ser ikke helt løsningen når det er skrått.
22.03.2023 - 12:48DROPS Design ha risposto:
Hei Marit. Ingen fasit på hva som er riktig eller galt. Det må bare plukkes opp slik at det ikke blir "hull" / minst mulig "hull", og at det blir ca likt på begge sider. mvh DROPS Design
27.03.2023 - 11:00
![]() Mette Schnitler ha scritto:
Mette Schnitler ha scritto:
Hei, spørsmålet gjelder bolen. 1) Nå strikkes høyre og venstre del ferdig for seg - det felles mot halsen 1 m i hver ende av hver p 3 ganger og deretter 1 p uten å felle. Betyr det å felle 1 maske på begynnelsen og slutten av hver pinne eller bare i begynnelsen av pinnen? 2) Når arbeidet måler 28 (32) cm deles det til ermhull på midten av atbeidet og hver del strikkes for seg. Hvor mange masker skal felles til ermhullet?
07.01.2023 - 11:07DROPS Design ha risposto:
Hej Mette, På hver pind betyder både begyndelsen og slutten af hver pind. Du deler bare arbejdet, det skal altså ikke felles til ærmehull :)
10.01.2023 - 12:19
![]() Jacqueline ha scritto:
Jacqueline ha scritto:
Hola buenas tardes, saben quiero ocupar el ícono para poder cambiar el hilo para el mismo patrón pero no funciona, no hace la conversión.\\r\\nGracias un abrazo desde CHILE
23.08.2022 - 00:41
![]() Bjørg Hildre Pedersen ha scritto:
Bjørg Hildre Pedersen ha scritto:
Må man strikke mønster frem og tilbake? Altså 1 omg rett og 1 vrang? Synes det er vanskelig med mønster...
12.06.2022 - 15:52DROPS Design ha risposto:
Hei Bjørg. På denne modellen må det strikkes slik som det står på oppskriften, altså frem og tilbake når det strikkes mønster. mvh DROPS Design
13.06.2022 - 13:08
![]() Torunn Sørvik ha scritto:
Torunn Sørvik ha scritto:
Finner ikke i oppskriften Drops 14-9 hvor jeg skal begynne på mønsteret . Mvh Torunn
25.04.2022 - 20:48DROPS Design ha risposto:
Hej Torunn, selve mønsteret begynder nede hvor det står Montering :)
26.04.2022 - 14:55
![]() Vicki ha scritto:
Vicki ha scritto:
Thank you. I really appreciate your kind response. But I do not understand your answer. The height is the row count. I am talking about the width. As I decrease left and right of center I no longer have 8 stitches to complete the 8 stitch repeat on each side and it gets smaller and smaller until now I am down to 10 repeats on each side instead of 11 and so on. How should I adjust the 8 stitch repeat in the center as I decrease so that I have the pattern or a pattern?
21.03.2022 - 16:23DROPS Design ha risposto:
Dear Vicki, let's say you have decreased the first stitch in the diagram, on the next row you will continue working diagram over the last 7 sts only (skip first stitch), when you have decreased the first 2 sts in the diagram, you continue working only the last 6 sts and so on, ie diagram will continue in height over less and less stitches, but it shouldn't be displaced (so that the remaining diagrams continue in height as before/in diagram).Can this helpe?
22.03.2022 - 09:39
![]() Vicki ha scritto:
Vicki ha scritto:
I am doing the Yoke. As I decrease midpoint front and back I also have less stitches for the 8-stitch repeats. How do you suggest changing the design? For example when there are only 6 stitches on each side do I do the first 6 stitches of the pattern on one side and again on the left (if though it will be offset) or do I improvise, and make slight adjustments so that it looks good, which is what I am doing? I've been reading and watching videos but can't find the answer.
21.03.2022 - 15:24DROPS Design ha risposto:
Dear Vicki, continue working pattern in height as before, ie there will be always less stitches on each side of the decreases that are worked in the pattern since they will be "eaten" by the decreases, but the pattern should always fit in height as before. Happy knitting!
21.03.2022 - 15:37
![]() Vicki ha scritto:
Vicki ha scritto:
At a critical point. The English version says "Dec to shape the V-neck towards mid front and towards mid back like this: dec 1 st in each end on every row 3 times, 1 row without dec, repeat until you have dec 124 (124) sts – 62 (62) sts on each side." Should I dec one stitch at the end of row 1, 2 & 3 only or one stitch each end of 1, 2 & 3? Thanks.
06.03.2022 - 05:11DROPS Design ha risposto:
Dear Vicki, you need to decrease one stitch at each end of the rows (one for each V-neck, in the front and in the back). Happy knitting!
06.03.2022 - 13:37
![]() Vicki Greene ha scritto:
Vicki Greene ha scritto:
I do not understand what to do when it is time to create the space for opening for the armholes. The pattern seems to have a word or two missing and I have no idea what to do at that point. Please help, I am enjoying the pattern and don't want to ruin it at that point. Thank you,
26.02.2022 - 02:46DROPS Design ha risposto:
Dear Vicki, for the armhole, you divide the garment for the back and front after 18-32 cm (you don't cast off for the armhole). Happy knitting!
27.02.2022 - 17:15
|
|||||||||||||
Bluescape |
|||||||||||||
|
|
|||||||||||||
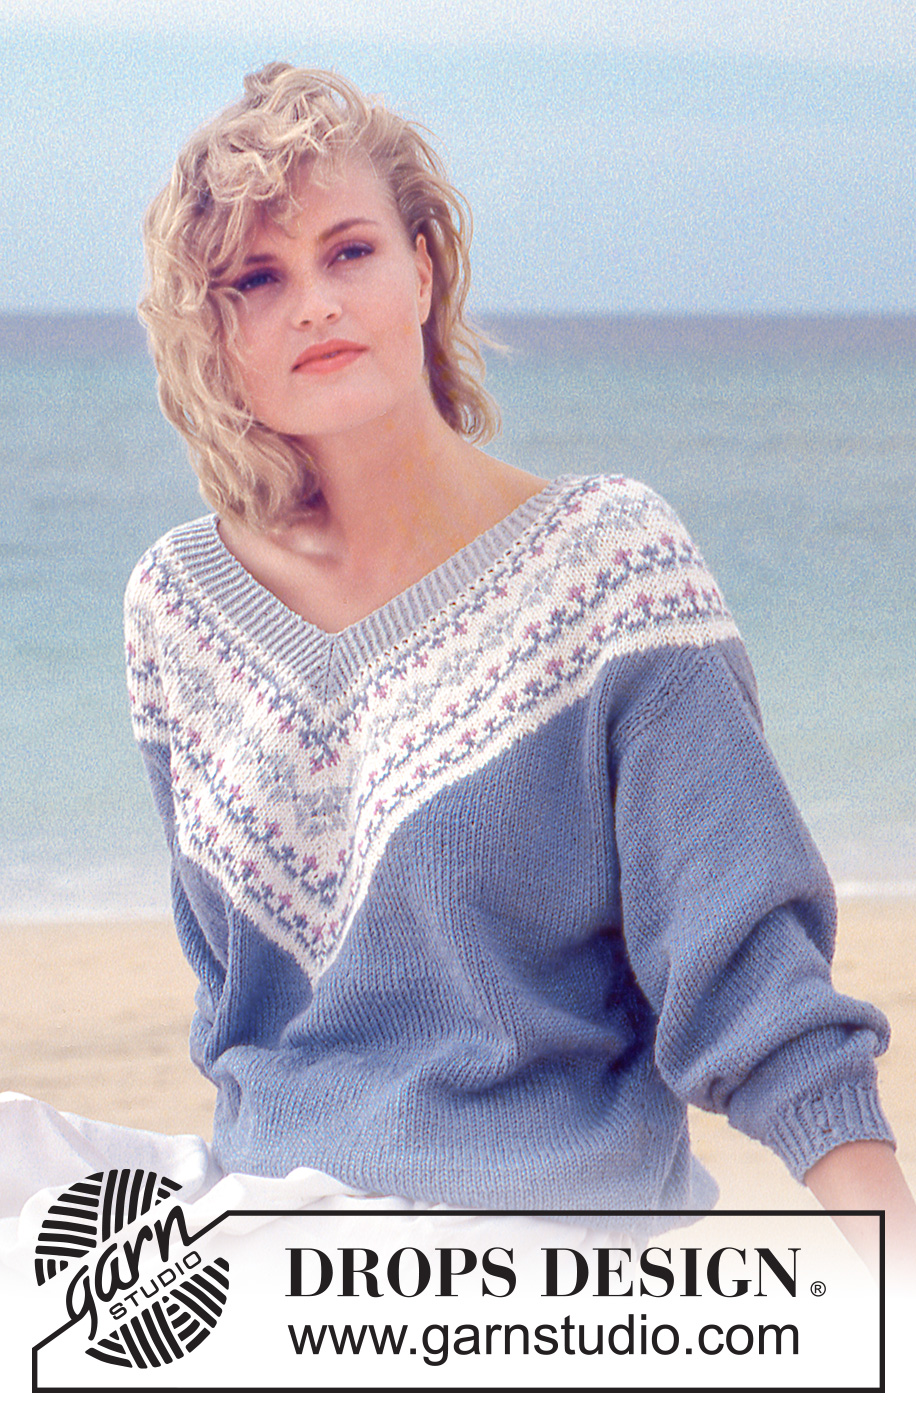
Maglione DROPS lavorato ai ferri con bordo con motivo floreale sul collo a V in Muskat o Lima.
DROPS 14-9 |
|||||||||||||
|
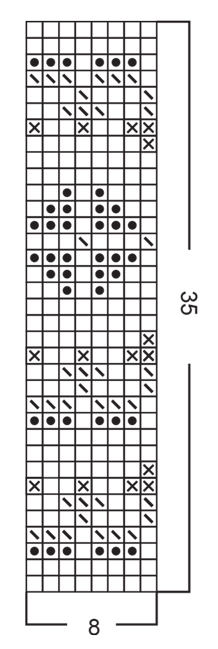
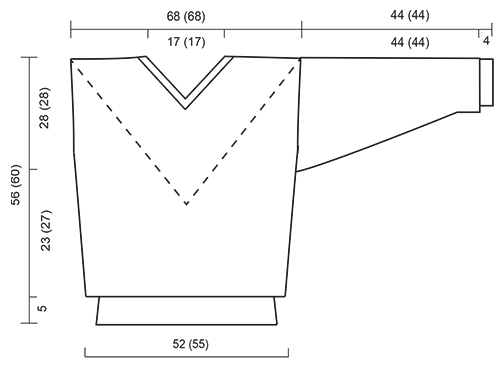
MOTIVO: Vedere il diagramma. Il diagramma mostra il motivo dal diritto del lavoro e tutto il motivo viene lavorato a m rasata. COSTE: *1 m dir nel filo dietro della m, 1 m rov*, ripetere *-*. ----------------------------------------------- CORPO: Il maglione viene lavorato in tondo con i f circolari, dal basso verso l'alto. Avviare 170-178 m con i f circolari n° 2,5 mm con blu chiaro e lavorare 5 cm a coste. Passare ai f circolari n° 4,5 mm e continuare a m rasata, ALLO STESSO TEMPO distribuire 28-32 aumenti in modo uniforme sul 1° giro = 198-210 m. FARE ATTENZIONE ALLA TENSIONE DEL LAVORO! Ora aumentare 2 m a ogni lato per un totale di 15-12 volte come segue: per la taglia S/M aumentare ogni 3, 4 e 4 giri in modo alternato; per la taglia M/L aumentare ogni 5 e 6 giri in modo alternato = 258-258 m. Quamdo il lavoro misura 22-26 cm intrecciare la m centrale sul davanti e sul dietro e continuare lavorando la parte destra e sinistra in modo separato. Diminuire per modellare il collo a V verso il centro davanti e verso il centro dietro, come segue: diminuire 1 m alla fine si ogni f 3 volte, lavorare 1 f senza diminuzioni, ripetere finché non sono state diminuite in tutto 124-124 m (= 62-62 m da ciascun lato). ALLO STESSO TEMPO quando il lavoro misura 28-32 cm dividerlo per gli scalfi a ogni lsto e ora finire il davanti e il dietro in modo separato. Alla fine dell’ultima diminuzione per il collo a V ci sono 2 m rimaste, intrecciarle. Il lavoro misura circa 56-60 cm. MANICA: Avviare 40-42 m con i f a doppia punta n° 2,5 mm con il blu chiaro e lavorare 5 cm a coste. Passare ai f a doppia punta n° 4,5 mm e continuare a m rasata, ALLO STESSO TEMPO distribuire 15-13 aumenti in modo uniforme sul 1° giro = 55-55 m. ALLO STESSO TEMPO dopo le coste aumentare 2 m al centro sotto il braccio per un totale di 26-26 volte ogni 3 e 4 giri in modo alternato = 107-107 m. Quando il lavoro misura 41-41 cm intrecciare 10 m al centro sotto il braccio e finire il lavoro avanti e indietro sui f. Intrecciare 10 m all’inizio di ogni f fino a quando il lavoro misura 44-44 cm e intrecciare le m rimaste. CONFEZIONE: Cucire i margini delle spalle. Riprendere 88 m lungo ogni lato del collo a V con i f n° 4,5 mm con il bianco = 352 m. Lavorare il motivo (11 ripetizioni a ogni lato del collo a V), ALLO STESSO TEMPO diminuire al centro davanti e al centro dietro come segue: * lavorare insieme a dir ritorto le 2 m prima della m centrale e lavorare insieme a dir le 2 m dopo la m centrale sui 3 giri successivi, non diminuire al 4° giro *; ripetere da *-* fino alla fine del lavoro. Alla fine dell’ultimo f del motivo passare ai f n° 2,5 mm e al blu viola chiaro, lavorare 3 cm a coste (continuare le diminuzioni) e intrecciare. Attaccare le maniche. |
|||||||||||||
Spiegazioni del diagramma |
|||||||||||||
|
|||||||||||||
 |
|||||||||||||
 |
|||||||||||||
Avete terminato questo modello?Allora taggate le vostre foto con #dropspattern o inviatele alla #dropsfan gallery. Avete bisogno di aiuto con questo modello?Troverete 26 video tutorial, una sezione per i commenti/domande e molto altro guardando il modello su www.garnstudio.com © 1982-2026 DROPS Design A/S. Ci riserviamo tutti i diritti. Questo documento, compreso tutte le sue sotto-sezioni, è protetto dalle leggi sul copyright. Potete leggere quello che potete fare con i nostri modelli alla fine di ogni modello sul nostro sito. |
|||||||||||||


Con oltre 40 anni di esperienza nel design di modelli di maglia e uncinetto, DROPS Design offre la più estesa collezione di modelli gratuiti su internet - tradotti in 17 lingue. Ad oggi vi possiamo fornire 324 cataloghi e 12290 modelli - 9561 dei quali sono tradotti in Italiano.
Ci stiamo impegnando molto per darvi il meglio che vi possiamo offrire in termini di maglia e uncinetto, ispirazioni e consigli così come filati di grande qualità ad un prezzo incredibile! Volete utilizzare i nostri modelli per qualcosa d'altro oltre al vostro uso personale? Potete leggere tutto ciò che è consentito nel testo sul Copyright in basso su tutte le pagine dei nostri modelli. Buon lavoro!
Lasciare un commento sul modello DROPS 14-9
Noi saremmo felici di ricevere i tuoi commenti e opinioni su questo modello!
Se vuoi fare una domanda, fai per favore attenzione a selezionare la categoria corretta nella casella qui sotto per velocizzare il processo di risposta. I campi richiesti sono indicati da *.