
Categorie popolari
State cercando un filato?


Commenti / Domande (99)
![]() Nicole ha scritto:
Nicole ha scritto:
Vielen herzlichen Dank für diese schöne Anleitung. Ich habe nun fast das Ende erreicht (82 % aller Maschen und somit in der letzten M2 Partie nach M3). Es war mein erstes Lace-Tuch und es hat sehr viel Spass gemacht. Ich fand die Anleitung sehr verständlich und das Muster sehr schön. Ich hoffe, dass ich den Hälelrand auch noch meistere. Aber falls nicht, hilft ihr einem ja auch toll weiter. Danke Nicole
21.08.2016 - 01:06
![]() Angela Borner ha scritto:
Angela Borner ha scritto:
Hallo, ich habe eine Frage - in der Anleitung steht, man beginnt mit 7 Maschen oben am Hals. Durch die Zunahmen wird das Tuch aber doch immer weiter und die grade Kante ist unten und die Spitze oben? Oder habe ich da einen Denkfehler?
06.04.2016 - 15:22DROPS Design ha risposto:
Liebe Abgela, aus den 7 Maschen entsteht ein kleines Dreieck, dass dann immer weiter wächst. Der Beginn ist wirklich oben hinten im Nacken. Wenn Sie der Anleitung folgen, sehen Sie recht bald, wie die Form entsteht.
07.04.2016 - 07:14
![]() Regina Kircher ha scritto:
Regina Kircher ha scritto:
Habe ein Problem mit Muster M2. Bei der Zunahme muss ich doch die 3 zusammengestrickten Maschen nach einigen Reihen ins Muster links und rechts und auch bei der Mittelmasche beidseitig neu integrieren, ich weiß nur nicht, an welcher Stelle. Wenn ich einfach nur M2 stricke, erhalte ich ja einen großen musterfreien Platz, der im Foto aber ausgefüllt ist. Wäre sehr froh über eine Nachricht, liebe Grüße Regina
22.02.2016 - 14:50DROPS Design ha risposto:
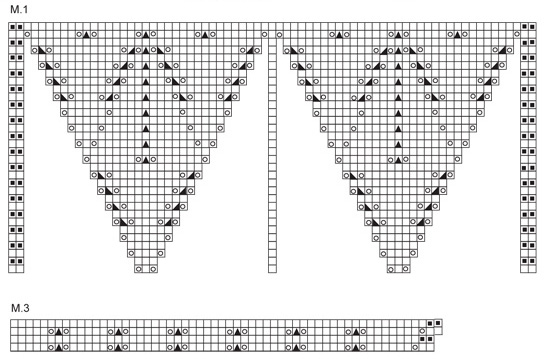
Liebe Regina, beziehen Sie sich auf die weissen Stellen im Diagramm? Die haben wir nur der Darstellung halber gemacht, die existieren eigentlich nicht. Stricken Sie einfach in der entsprechenden Reihe weiter, wie wenn es diese unausgefüllte Fläche gar nicht gäbe.
02.03.2016 - 16:38Christine Rohde ha scritto:
Question about assembly: I am confused about how to use the yarn end from cast on to crochet the border on both sides of the middle stitch. Do I use the yarn end for one side and then start a new strand of yarn for the other side of the middle stitch and for the long sides? Do I use the same yarn end and go all the way around? Thanks!
23.01.2016 - 12:32DROPS Design ha risposto:
Dear Mrs Rohde, you work a crochet edge along 3 sides of shawl starting at cast on edge, then to the tip, along both diagonales, and back to the cast-on edge. Happy knitting!
25.01.2016 - 11:09
![]() Christine Rohde ha scritto:
Christine Rohde ha scritto:
Great pattern! I am confused about the last few rows before the bind off. It says to knit 4 rows in garter, then 3 rows in stockinette, then knit 1 from the WS - "continue the inc as before..." When do I continue the increase and does it mean repeat M3 one more time after the K1 from the WS? I am confused about that. Thanks.
22.12.2015 - 05:34DROPS Design ha risposto:
Dear Mrs Rohde, while working the last 4 rows in garter st + 3 rows in stocking st + K1 from RS you have to inc as before: 1 st after the 2 edge sts at beg of row + 1 st on each side of mid st + 1 st before the last 2 edge sts at the end of row = 4 sts every row from RS. Happy knitting!
22.12.2015 - 10:52
![]() Saskia Snijders ha scritto:
Saskia Snijders ha scritto:
Ik heb het patroon doorgelezen maar ben vanaf de eerste regel de kluts kwijt. Is er iemand die het duidelijk kan maken hoe ik van 7 steken naar 71 ga. Alvast bedank.
07.11.2015 - 15:38DROPS Design ha risposto:
Hoi Saskia. Je breit het telpatroon M.1, die vind je onderaan het patroon. Je hebt 7 st en breit dus (eerste rij): 2 r (rand die in r worden gebreid op alle naalden) 1 omsl, 1 r, 1 omsl, 1 r (midden), 1 omsl, 1 r, 1 omsl en 2 r. Je hebt nu de 7 st gebreid en 4 omslagen gemaakt = +4 st en je hebt nu 11 st op de nld. Brei zo verder tot M.1 één keer in de hoogte is gebreid en je hebt 71 st. Lees hier hoe je onze telpatronen moet lezen en breien
09.11.2015 - 12:07
![]() Riet ha scritto:
Riet ha scritto:
Prachtige omslagdoek, ik ga hem nu al voor de 4e keer breien.....mijn moeder is weer aan een nieuwe toe....
17.10.2014 - 20:21
![]() Lucia ha scritto:
Lucia ha scritto:
El graf. M.3, emp. Con 2d,1h, (6d ) 1h,3pj,1h.en la sig. Ya no seran 6 sino 7d, luego 8d, esta seria la 5ta. Vuelta. justo aqui dentro de los 8d, puedo emp. Una nueva vena osea los 3 puntos juntos? O en que numero de vuelta del graf. Tengo que empezar 1h,3pjd,1h.
21.11.2013 - 01:01DROPS Design ha risposto:
Hola Lucía! El dibujo es 5 d., 1 HEB, 3 pjd, 1 HEB. . Puedes añadir un dibujo nuevo cuando tienes suf pts para ello. El resto de los pts se trabaja en pt jersey.
26.11.2013 - 12:18
![]() Lucia ha scritto:
Lucia ha scritto:
El graf. M.3, emp. Con 2d,1h, (6d ) 1h,3pj,1h.en la sig. Ya no seran 6 sino 7d, luego 8d, esta seria la 5ta. Vuelta. justo aqui dentro de los 8d, puedo emp. Una nueva vena osea los 3 puntos juntos? O en que numero de vuelta del graf. Tengo que empezar 1h,3pjd,1h.
20.11.2013 - 19:12
![]() Lucia ha scritto:
Lucia ha scritto:
Tengo una duda ya termine el grafico M.3, empezare otro M.3 pero ya tengo 8 ptos, cojo los 3 primeros para hacer 3ptos juntos como el grafico o necesito mas puntos?
18.11.2013 - 16:47DROPS Design ha risposto:
Hola Lucia. Me temo que no entiendo bien tu pregunta. Puedes especificar por favor que parte del patrón estas trabajando.
19.11.2013 - 13:09
|
|||||||||||||||||||
DROPS 98-21 |
|||||||||||||||||||
|
|
|||||||||||||||||||
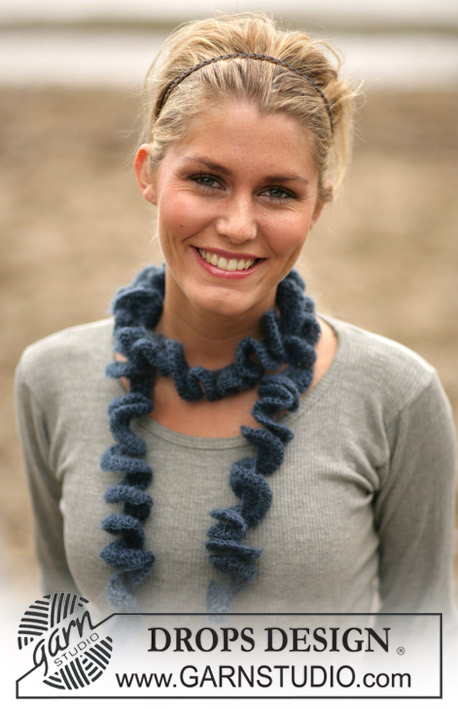
Scialle DROPS con motivo a foglie, in "Alpaca".
DROPS 98-21 |
|||||||||||||||||||
|
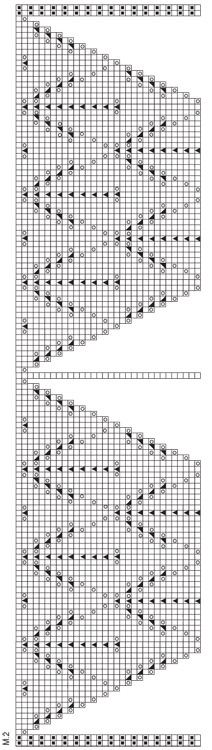
CAMPIONE: 20 m x 26 ferri sui ferri n° 4,5/5 a maglia rasata = 10 x 10 cm. MOTIVO: Vedere i diagrammi M.1, M.2 e M.3. I diagrammi mostrano il motivo sul diritto del lavoro. 1 ripetizione del diagramma M.2 (= 1 foglia) = ca. 12 cm. ATTENZIONE! Saltare le parti senza quadrati e proseguire con il quadrato successivo sulla sinistra. Si lavora avanti e indietro sui ferri circolari per avere sufficiente spazio per tutte le m. Iniziare dall’alto verso il basso (verso la punta). Avviare 7 m sui ferri n° 4,5/5 con il filato Alpaca (lasciare una estremità lunga ca. 100 cm; verrà utilizzata per la confezione). Lavorare seguendo il diagramma M.1 con 2 m vivagno da ciascun lato a punto legaccio e 1 m al centro a maglia rasata. Dopo aver completato una ripetizione del diagramma M.1, sul ferro ci sono 71 m. Proseguire seguendo il diagramma M.2 finché il lavoro non misura ca. 50 cm al centro, sul dietro – assicurarsi di aver completato una intera ripetizione del diagramma M.2 = 1 foglia intera. Lavorare ora seguendo il diagramma M.3 (= gli ultimi 2 ferri del diagramma M.2 per avere delle righe con i fori) – fare 1 m gettata da ciascun lato e ai due lati della m centrale, ogni 2 ferri. Lavorare 12 cm seguendo il diagramma M.3; lavorare ora 1 ripetizione del diagramma M.2. Lavorare ora 4 ferri a punto legaccio su tutte le m, 3 ferri a maglia rasata e 1 ferro a dir sul rovescio del lavoro – proseguire aumentando come prima da ciascun lato e ai due lati della m centrale. Intrecciare ora le m senza stringere troppo il filo. CONFEZIONE: Usare l’estremità lasciata all’avvio delle m. Con l’uncinetto n° 3 avviare 3 cat, 1 m.b nella m centrale dello scialle, 3-4 cat, saltare ca. 1 cm, 1 m.bss nella m successiva. Ripetere da entrambe le parti della m centrale. Lavorare lungo entrambi i lati come segue: 1 m.b, * 3 cat, saltare ca. 1 cm, 1 m.b *, ripetere da *-*. |
|||||||||||||||||||
Spiegazioni del diagramma |
|||||||||||||||||||
|
|||||||||||||||||||
 |
|||||||||||||||||||
 |
|||||||||||||||||||
Avete terminato questo modello?Allora taggate le vostre foto con #dropspattern o inviatele alla #dropsfan gallery. Avete bisogno di aiuto con questo modello?Troverete 16 video tutorial, una sezione per i commenti/domande e molto altro guardando il modello su www.garnstudio.com © 1982-2026 DROPS Design A/S. Ci riserviamo tutti i diritti. Questo documento, compreso tutte le sue sotto-sezioni, è protetto dalle leggi sul copyright. Potete leggere quello che potete fare con i nostri modelli alla fine di ogni modello sul nostro sito. |
|||||||||||||||||||


Con oltre 40 anni di esperienza nel design di modelli di maglia e uncinetto, DROPS Design offre la più estesa collezione di modelli gratuiti su internet - tradotti in 17 lingue. Ad oggi vi possiamo fornire 324 cataloghi e 12290 modelli - 9561 dei quali sono tradotti in Italiano.
Ci stiamo impegnando molto per darvi il meglio che vi possiamo offrire in termini di maglia e uncinetto, ispirazioni e consigli così come filati di grande qualità ad un prezzo incredibile! Volete utilizzare i nostri modelli per qualcosa d'altro oltre al vostro uso personale? Potete leggere tutto ciò che è consentito nel testo sul Copyright in basso su tutte le pagine dei nostri modelli. Buon lavoro!
Lasciare un commento sul modello DROPS 98-21
Noi saremmo felici di ricevere i tuoi commenti e opinioni su questo modello!
Se vuoi fare una domanda, fai per favore attenzione a selezionare la categoria corretta nella casella qui sotto per velocizzare il processo di risposta. I campi richiesti sono indicati da *.