
Categorie popolari
State cercando un filato?


Commenti / Domande (50)
![]() Amy ha scritto:
Amy ha scritto:
Hello Thanks for previous reply that really helped. Another confusion it says in the pattern increase on body every second round and increase on the sleeves every 4th round so that means on the 4th round you have to increase for body and sleeves at the same time. Thanks
16.12.2025 - 03:26DROPS Design ha risposto:
Dear Amy, you will increase alternately 4 and 8 stitches, ie increase 4 sts (front and back pieces only), work 1 round without increasing, increase 8 sts (front, back pieces and sleeves), work 1 round without increasing and repeat these 4 rounds as many times as stated for the size. Happy knitting!
17.12.2025 - 10:10
![]() Amy ha scritto:
Amy ha scritto:
Hello I am confused when you knit the first short row and A1 how you do raglan on both side of A1. Because there are only 2 stitches before marker and you can not increase for raglan because in the instructions it says the knit stitch should be on the marker. And there are only 2 stitches before marker. Please explain Thanks
12.12.2025 - 00:40DROPS Design ha risposto:
Dear Amy, the increases for raglan are worked on each side of A.1/A.2, so on first round, work A.1 and increase for raglan at the same time as follows: YO (raglan increase), P1, YO, K1, YO, P1 (= A.1 with 2 increases), YO (raglan increase), on next row, purl the yarn overs on each side of A.1 twisted, and knit the both yarn overs on each side of the middle stitch in A.1 twisted; you have now P2, K1, P2 for A.2 on next row. Happy knitting!
12.12.2025 - 08:17
![]() Amy ha scritto:
Amy ha scritto:
Hi Please let me know how to increase in the second row of A1 from wrong side. Because it says in the pattern only increase for body 4 stitches. Thanks
10.12.2025 - 22:46DROPS Design ha risposto:
Hi Amy, When increasing only on the body, you increase before marker-1 (on the back piece), the work across the sleeve without increasing, increase after marker-2 and before marker-3 on the front piece, work across the sleeve without increasing and, finally, increase after marker-4. Hope this helps. Regards, Drops Team.
11.12.2025 - 06:25
![]() Amy ha scritto:
Amy ha scritto:
Thanks for reply. Another question It says in the pattern Turn, tighten the strand and work from the wrong side (increasing for raglan on the body only) to 2 stitches past where the short rows began by marker-3 (4 increased stitches. So that means you have to increase from wrong side also. Thanks
10.12.2025 - 18:21DROPS Design ha risposto:
Hi Amy, When working short rows you increase from both the right and wrong side. Follow the instructions for how to increase as described under Raglan at the top of the pattern. Regards, Drops Team.
11.12.2025 - 06:32
![]() Amy ha scritto:
Amy ha scritto:
Hello increasing for raglan and working A.2 over A.1, to 2 stitches Please explain how do you work A2overA1 Thanks
10.12.2025 - 00:56DROPS Design ha risposto:
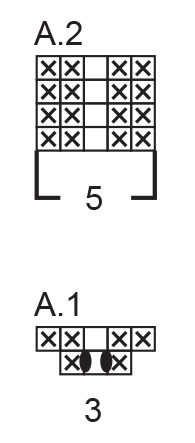
Hi Amy, Both A.1 and A.2 consist of 5 stitches, so when you work across the stitches from the last row in A.1, you work according to A.2 (which is the same pattern but without increases). Regards, Drops Team.
10.12.2025 - 06:44
![]() Amy ha scritto:
Amy ha scritto:
Hi I am confused at this point. Knit 10-12-12-14-14-16 and increase 1 stitch (half back piece), insert marker-1 in the next stitch. Do I have to insert marker in the next stitch without knitting or after knitting the stitch. Thanks
09.12.2025 - 20:24DROPS Design ha risposto:
Hi Amy, The marker-stitch is also knitted but not included in the numbers (so for the smallest size, you knit 10, then knit the next stitch with marker, knit 21, knit the next stitch with marker, etc.). Regards, Drops Team.
10.12.2025 - 06:59
![]() Alexandra ha scritto:
Alexandra ha scritto:
Thank you for answering my last question. I have one more. Are the raglan increases (yo) worked twisted on the next row? When I work twisted, I am getting a lumpy result. When I work regular, I am still getting holes, even when "pulling tight".
15.03.2025 - 00:34DROPS Design ha risposto:
Dear Alexandra, if you want to close the holes you need to work the yarn over twisted, otherwise there will be a hole. You can see a video here on how to work these yarn overs, including how to work the yarn over twisted to better close the hole. Happy knitting!
16.03.2025 - 19:10
![]() Alexandra ha scritto:
Alexandra ha scritto:
Hello! I'm having trouble understanding the neckline. What does "work A.2 over A.1" signify? Why are there 5 rows for A.2 but only 2 for A.1? Why am I getting holes in the raglan and body increases, even when working a correct yarn over? I've had to frog 2x now, a little frustrated as I can see the end result is a beautiful fit, but the pattern seems needlessly complex.
13.03.2025 - 15:17DROPS Design ha risposto:
Dear Alexandra, you first work the 2 rows A.1 increasing on first row and then, on next row diagram shows how to work these 5 stitches. After these 2 rows, work these 5 stitches as shown in A.2, ie P2, K1, P2 (seen from RS, ie K2, P1, K2 from WS) all the way until yoke is done. Happy knitting!
14.03.2025 - 07:06
![]() Theresa ha scritto:
Theresa ha scritto:
Hi! I am wondering about the dividing of the body and sleeves. How is it possible that in the instructions there is an equal amount of stitches in the front and back section, when I did the short rows and increased the stitches in the front? Thank you for clarifying! Kind regards, Theresa
05.03.2025 - 18:23DROPS Design ha risposto:
Dear Theresa, while working shor trows for neckline you should have the same number of increases on front and back pieces; then, because of the uneven number of stitches on both front/back piece, you will have a different number of stitches at the beginning of the round (37 to 58, see size) than at the end of the round (38-57) but in both case you will have 75-115 sts for front piece and for both half back pieces. Happy knitting!
06.03.2025 - 10:22
![]() Prerana Karki ha scritto:
Prerana Karki ha scritto:
I am working on the Yoke(sizeL) and having the same trouble Start mid-back, round 1: A.2 no increases round 2: increase for raglan on the body and sleeve- that's 8 increases and repeat the above?
10.01.2025 - 03:24DROPS Design ha risposto:
Dear Mrs Karki, correct, work these 2 rounds a total of 10 times = you get 212 stitches on needle. Happy knitting!
10.01.2025 - 09:40
|
||||||||||
Spice Market#spicemarketsweater |
||||||||||
 |
 |
|||||||||
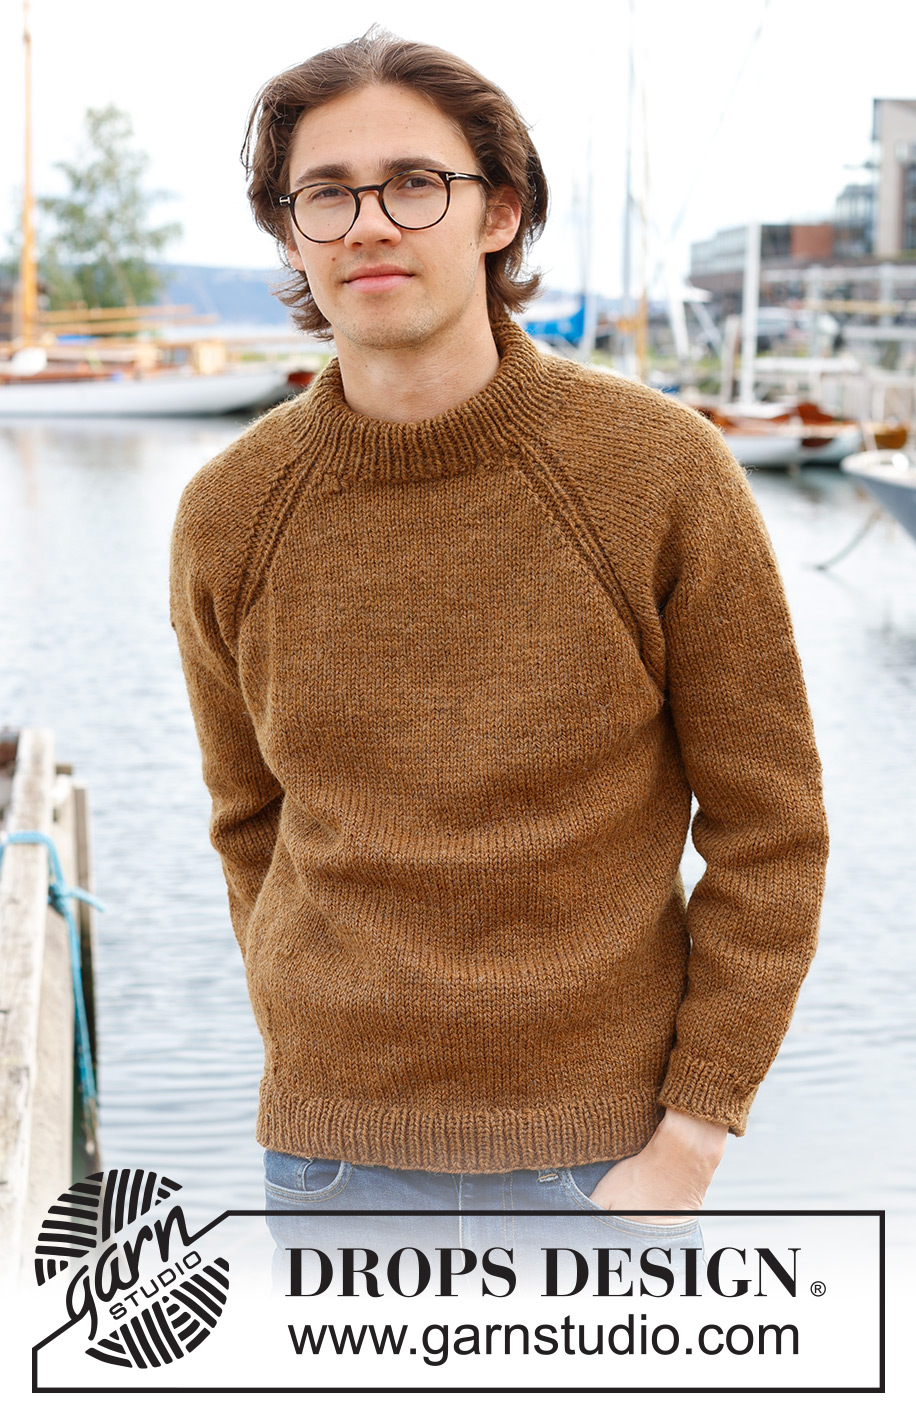
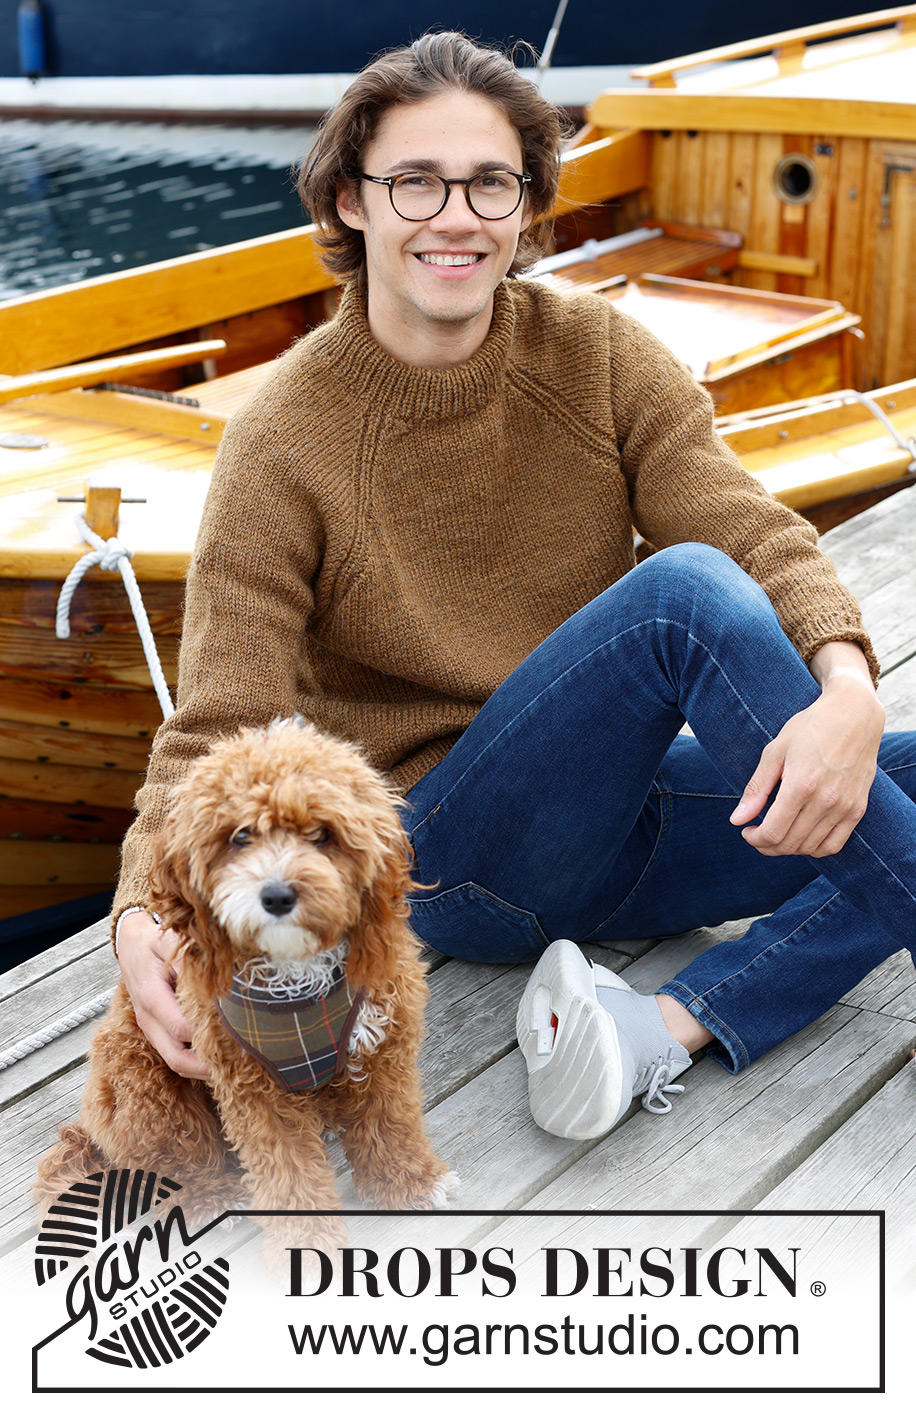
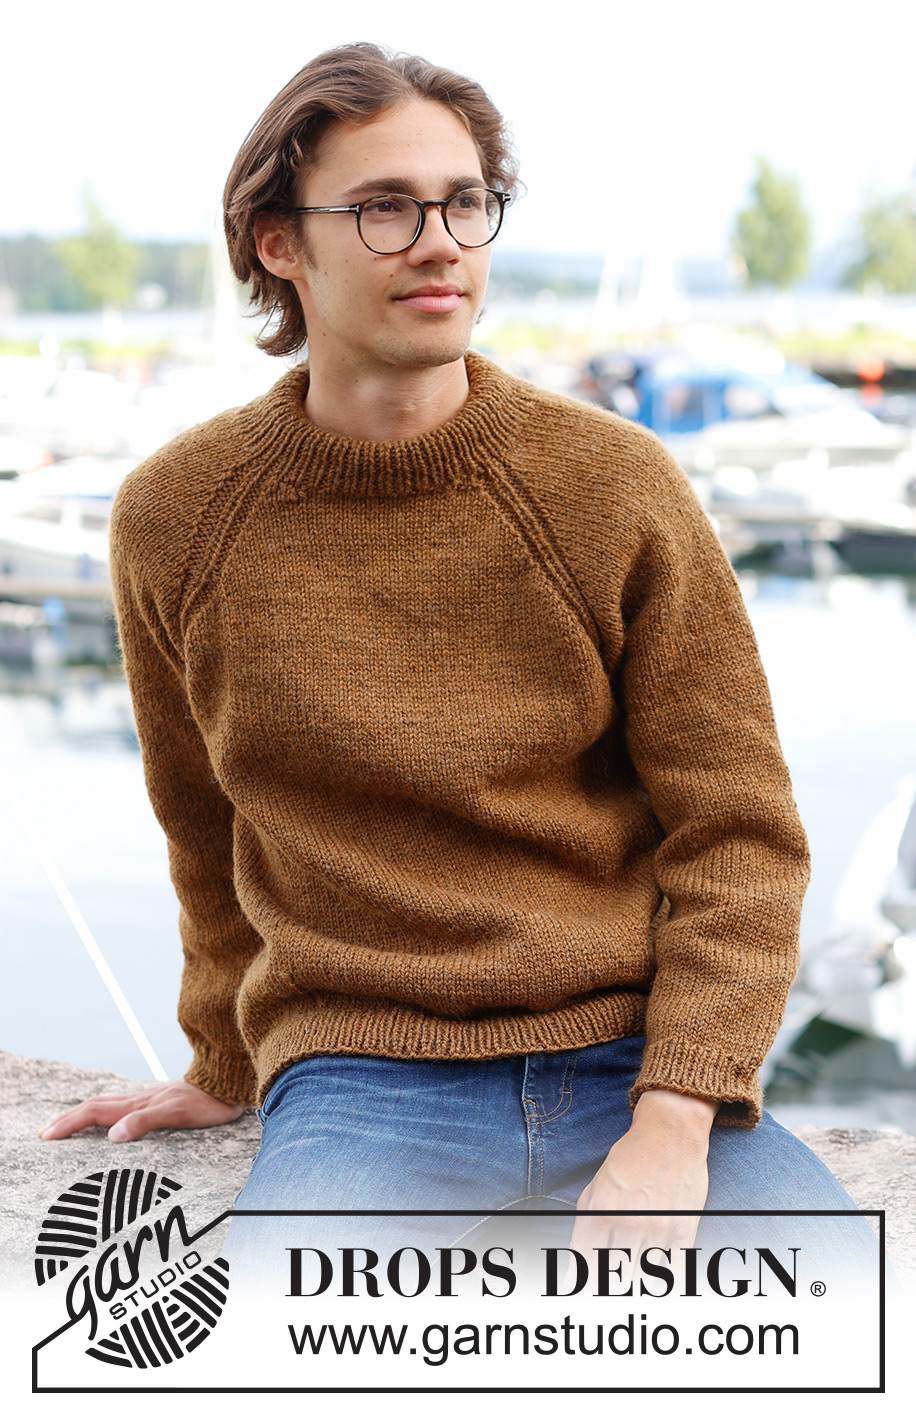
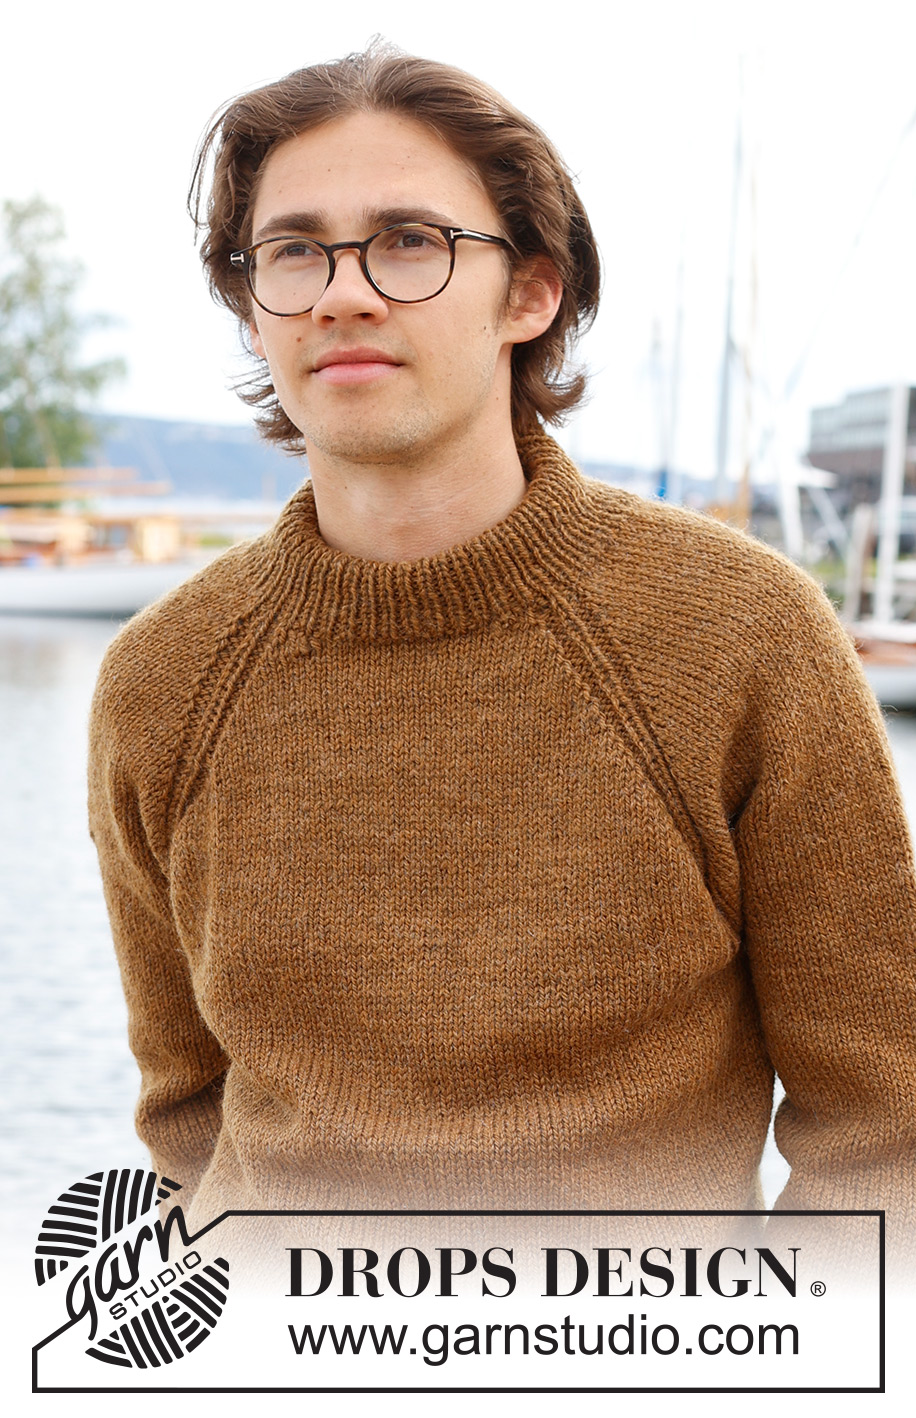
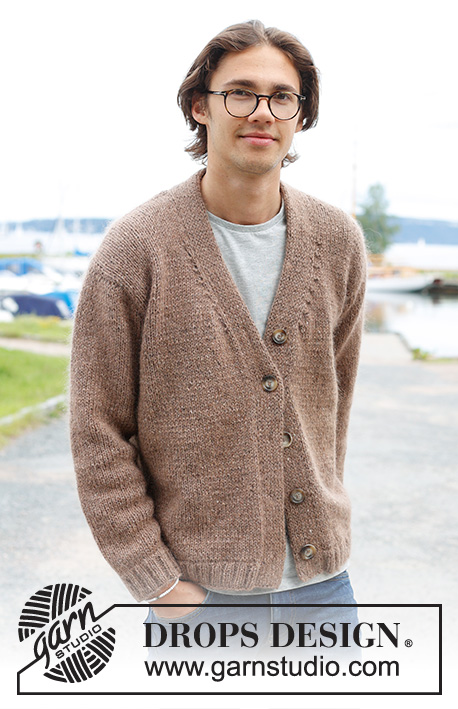
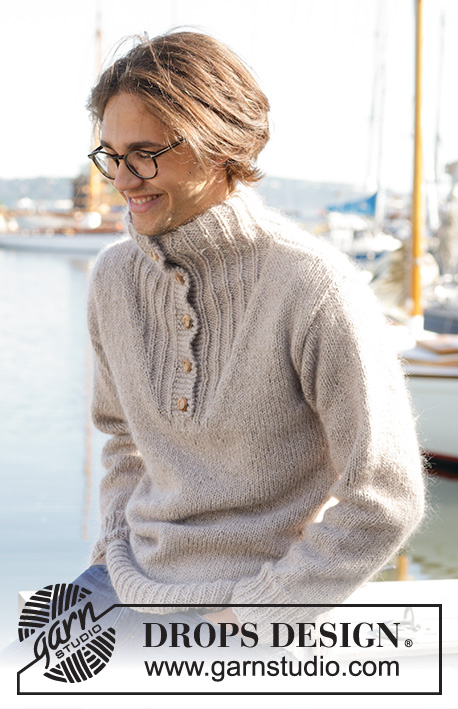
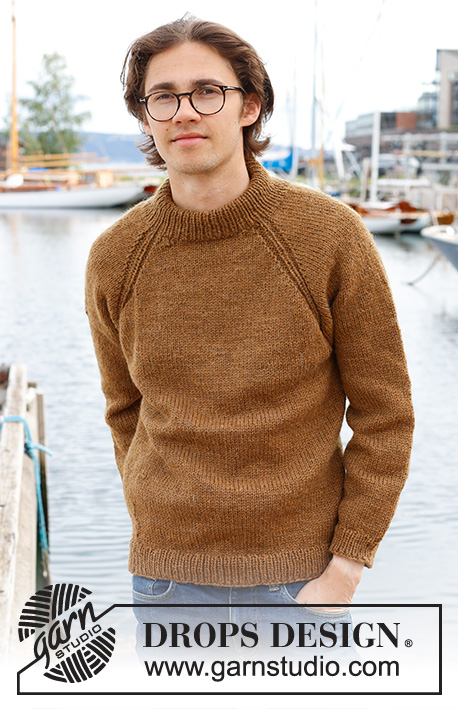
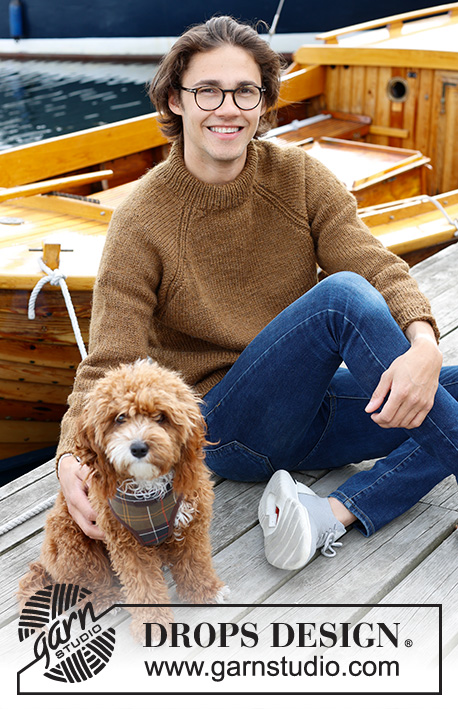
Maglione da uomo lavorato ai ferri in DROPS Alaska. Lavorato dall’alto in basso a maglia rasata, collo doppio e raglan. Taglie: S - XXXL.
DROPS 233-10 |
||||||||||
|
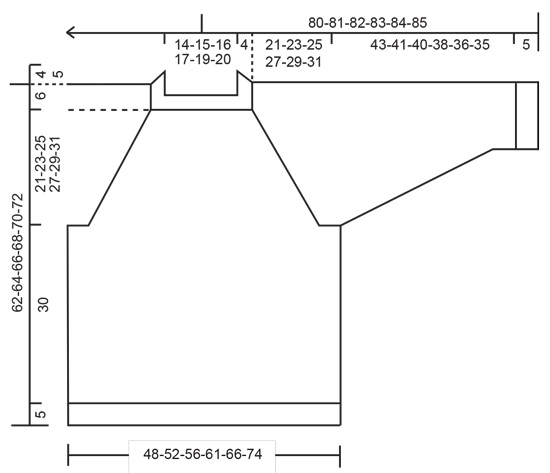
------------------------------------------------------- TECNICHE IMPIEGATE: ------------------------------------------------------- MOTIVO: Vedere i diagrammi A.1 e A.2. I diagrammi mostrano tutti i ferri dal diritto del lavoro. RAGLAN: Gli aumenti sono diversi sul corpo e sulle maniche per le diverse taglie. Aumentare prima/dopo A.1/A.2 (la maglia con il segnapunti è la maglia centrale di A.1/A.2). Aumentare per il corpo prima dei segnapunti 1 e 3 e dopo i segnapunti 2 e 4 quando si lavora dal diritto del lavoro, dopo i segnapunti 1 e 3 e prima dei segnapunti 2 e 4 quando si lavora dal rovescio del lavoro. Aumentare per le maniche dopo i segnapunti 1 e 3 e prima dei segnapunti 2 e 4. Aumentare sempre dal diritto del lavoro sulle maniche. Aumentare facendo 1 gettato. Quando si lavora in piano lavorare i gettati dal rovescio del lavoro come segue: PRIMA DI A.1/A.2: Lavorare a rovescio il filo dietro. Nessun buco. DOPO A.1/A.2: Prendere il gettato dal ferro e rimetterlo sul ferro a ritorto (inserire il ferro sinistro da dietro quando si rimette sul ferro). Lavorare a rovescio il filo davanti. Nessun buco. Quando si lavora in piano lavorare i gettati dal diritto del lavoro come segue (si applica anche alla lavorazione in tondo): PRIMA DI A.1/A.2: Prendere il gettato dal ferro e rimetterlo sul ferro a ritorto (inserire il ferro sinistro da dietro quando si rimette sul ferro). Lavorare a diritto il filo davanti (la maglia è ritorta verso destra). Nessun buco. DOPO A.1/A.2: Lavorare a diritto il filo dietro (la maglia è ritorta verso sinistra). Nessun buco. SUGGERIMENTO PER LE DIMINUZIONI (applicato alle maniche): Iniziare 3 maglie prima del segnapunti, 2 maglie insieme a diritto, 2 maglie diritto (il segnapunti è al centro di queste 2 maglie), passare 1 maglia a diritto senza lavorarla, 1 maglia diritto, accavallare la maglia passata sopra quella appena lavorata. ------------------------------------------------------- INIZIO DEL LAVORO: ------------------------------------------------------- MAGLIONE – BREVE RIASSUNTO DEL LAVORO: Lavorare il collo e lo sprone in tondo con i ferri circolari, dal centro dietro e dall’alto in basso. Dividere lo sprone per il corpo e le maniche e continuare il corpo in tondo con i ferri circolari. Lavorare le maniche con i ferri circolari corti/ferri a doppia punta. COLLO DOPPIO: Avviare 88-92-96-100-104-108 maglie con i ferri circolari corti n° 5 mm e DROPS Alaska. Passare ai ferri circolari n° 4 mm e lavorare a coste in tondo (1 maglia diritto, 1 maglia rovescio) per 9-9-9-11-11-11 cm. Sul giro successivo inserire 4 segnapunti e aumentare 4 maglie come descritto sotto. I segnapunti vengono usati durante gli aumenti per il raglan (inserire ogni segnapunti nella maglia diritto delle coste): Lavorare 10-12-12-14-14-16 maglie diritto e aumentare 1 maglia (metà dietro), inserire il segnapunti-1 nella maglia successiva, 21 maglie diritto (manica), inserire il segnapunti-2 nella maglia successiva, 21-23-25-27-29-31 maglie diritto e aumentare 2 maglie in modo uniforme (davanti), inserire il segnapunti-3 nella maglia successiva, 21 maglie diritto (manica), inserire il segnapunti-4 nella maglia successiva, lavorare a diritto le ultime 11-11-13-13-15-15 maglie e aumentare 1 maglia (metà dietro) = 92-96-100-104-108-112 maglie. Tagliare il filo. SCOLLATURA: Passare ai ferri circolari n° 5 mm e lavorare una scollatura con i ferri accorciati, ALLO STESSO TEMPO aumentare per il raglan come descritto sotto. Inoltre, lavorare A.1 all’altezza di ogni segnapunti (le maglie con il segnapunti sono le maglie centrali di ogni A.1). Iniziare dal diritto del lavoro 2 maglie prima della maglia con il segnapunti-3 (collo davanti con il capo indossato). Lavorare a maglia rasata, A.1 e aumentare per il RAGLAN – leggere la descrizione sopra, fino a quando sono state lavorate 2 maglie dopo la maglia con il segnapunti-2 (davanti destro del collo e 8 aumenti per il raglan). Girare, tirare il filo e lavorare dal rovescio del lavoro (aumentando per il raglan solo sul corpo) fino a 2 maglie dopo il punto in cui iniziano i ferri accorciati all’altezza del segnapunti-3 (4 maglie aumentate). Girare e lavorare dal diritto del lavoro, aumentando per il raglan e lavorando A.2 su A.1, fino a 2 maglie dopo il punto in cui è stato effettuato l’ultimo giro all’altezza del segnapunti-2. Girare, tirare il filo e lavorare dal rovescio del lavoro (aumentando per il raglan solo sul corpo) fino a 2 maglie dopo il segnapunti-3. Tagliare il filo. SPRONE: = 124-128-132-136-140-144 maglie. Lavorare in tondo su tutte le maglie come segue: TAGLIE S, M, L e XL: Iniziare al centro dietro, lavorare a maglia rasata e A.2 e aumentare per il raglan sul corpo e sulle maniche ogni 2 giri 2-8-10-11 volte = 140-192-212-224 maglie. Continuare a lavorare e aumentare, ma lavorare ogni 2° aumento solo sul corpo (4 aumenti); cioè aumentare sul corpo ogni 2 giri e sulle maniche ogni 4 giri. Aumentare in questo modo 18-15-14-16 volte sul corpo (9-7-7-8 volte sulle maniche). Per un totale di 24-27-28-31 volte sul corpo e 13-17-19-21 volte sulle maniche. Alla fine dell’ultimo aumento ci sono 248-280-296-320 maglie. Passare al paragrafo TUTTE LE TAGLIE. TAGLIE XXL e XXXL: Iniziare al centro dietro, lavorare a maglia rasata e A.2 continuando ad aumentare per il raglan sul corpo e sulle maniche su ogni giro altre 2-6 volte e a giri alterni sulle maniche altre 1-3 volte = 152-180 maglie. Poi aumentare sul corpo e sulle maniche ogni 2 giri 10-7 volte = 232-236 maglie. Continuare a lavorare a aumentare ma lavorare ogni 2° aumento solo sul corpo (4 aumenti); cioè aumentare sul corpo ogni 2 giri e sulle maniche ogni 4 giri. Aumentare in questo modo 18-22 volte sul corpo (9-11 volte sulle maniche). Per un totale di 34-39 volte sul corpo e 22-23 volte sulle maniche. Alla fine dell’ultimo aumento ci sono 340-368 maglie. Passare al paragrafo TUTTE LE TAGLIE. TUTTE LE TAGLIE: = 248-280-296-320-340-368 maglie. Continuare a maglia rasata e A.2 senza ulteriori aumenti fino a quando il lavoro misura 21-23-25-27-29-31 cm al centro davanti – misurati dal collo. Ora dividere il lavoro per il corpo e e le maniche come segue: Lavorare 37-42-43-48-51-58 maglie (metà dietro), mettere in sospeso le 49-57-61-65-67-69 maglie successive per la manica, avviare 6-6-8-8-10-10 maglie (a lato sotto la manica), lavorare 75-83-87-95-103-115 maglie (davanti), mettere in sospeso le 49-57-61-65-67-69 maglie successive per la manica, avviare 6-6-8-8-10-10 maglie (a lato sotto la manica), lavorare le ultime 38-41-44-47-52-57 maglie (metà dietro). Finire il corpo e le maniche in modo separato. Ora misurare il lavoro da qui! CORPO: = 162-178-190-206-226-250 maglie. Lavorare a maglia rasata in tondo fino a quando il corpo misura 30 cm dalla divisione. Lavorare 1 giro diritto e aumentare 20-20-22-26-26-32 maglie in modo uniforme = 182-198-212-232-252-282 maglie. Passare ai ferri circolari n° 4 mm e lavorare a coste (1 maglia diritto, 1 maglia rovescio) per 5 cm. Intrecciare senza stringere con diritto su diritto e rovescio su rovescio. Il maglione misura circa 62-64-66-68-70-72 cm dalla spalla in giù. MANICHE: Riportare le 49-57-61-65-67-69 maglie in sospeso a un lato del lavoro sui ferri circolari corti/ferri a doppia punta n° 5 mm e riprendere 1 maglia in ognuna delle 6-6-8-8-10-10 maglie avviate sotto la manica = 55-63-69-73-77-79 maglie. Inserire un segnapunti al centro delle nuove maglie sotto la manica. Lasciare che il segnapunti segue il lavoro; verrà utilizzata durante le diminuzioni sotto la manica. Lavorare a maglia rasata in tondo. Quando la manica misura 4 cm diminuire 2 maglie a ogni lato del segnapunti – leggere il SUGGERIMENTO PER LE DIMINUZIONI. Diminuire in questo modo ogni 6-3½-3-2½-2-2 cm per un totale di 7-10-12-13-15-15 volte = 41-43-45-47-47-49 maglie. Continuare a lavorare fino a quando la manica misura 43-41-40-38-36-35 cm dalla divisione (o fino alla lunghezza desiderata; mancano circa 5 cm). Lavorare 1 giro diritto e aumentare 5-5-5-5-7-7 maglie in modo uniforme = 46-48-50-52-54-56 maglie. Passare ai ferri a doppia punta n° 4 mm e lavorare a coste (1 maglia diritto, 1 maglia rovescio) per 5 cm. Intrecciare senza stringere con diritto su diritto e rovescio su rovescio. La manica misura circa 48-46-45-43-41-40 cm dalla divisione. Lavorare l’altra manica nello stesso modo. CONFEZIONE: Piegare il collo a metà verso l’interno e affrancare con un punto in ogni linea del raglan. |
||||||||||
Spiegazioni del diagramma |
||||||||||
|
||||||||||
 |
||||||||||
 |
||||||||||
Avete terminato questo modello?Allora taggate le vostre foto con #dropspattern #spicemarketsweater o inviatele alla #dropsfan gallery. Avete bisogno di aiuto con questo modello?Troverete 32 video tutorial, una sezione per i commenti/domande e molto altro guardando il modello su www.garnstudio.com © 1982-2026 DROPS Design A/S. Ci riserviamo tutti i diritti. Questo documento, compreso tutte le sue sotto-sezioni, è protetto dalle leggi sul copyright. Potete leggere quello che potete fare con i nostri modelli alla fine di ogni modello sul nostro sito. |
||||||||||


Con oltre 40 anni di esperienza nel design di modelli di maglia e uncinetto, DROPS Design offre la più estesa collezione di modelli gratuiti su internet - tradotti in 17 lingue. Ad oggi vi possiamo fornire 324 cataloghi e 12290 modelli - 9561 dei quali sono tradotti in Italiano.
Ci stiamo impegnando molto per darvi il meglio che vi possiamo offrire in termini di maglia e uncinetto, ispirazioni e consigli così come filati di grande qualità ad un prezzo incredibile! Volete utilizzare i nostri modelli per qualcosa d'altro oltre al vostro uso personale? Potete leggere tutto ciò che è consentito nel testo sul Copyright in basso su tutte le pagine dei nostri modelli. Buon lavoro!
Lasciare un commento sul modello DROPS 233-10
Noi saremmo felici di ricevere i tuoi commenti e opinioni su questo modello!
Se vuoi fare una domanda, fai per favore attenzione a selezionare la categoria corretta nella casella qui sotto per velocizzare il processo di risposta. I campi richiesti sono indicati da *.