
Categorie popolari
State cercando un filato?


Commenti / Domande (126)
![]() Marie Magnell ha scritto:
Marie Magnell ha scritto:
Stickar xxxl och vid A 2 rad 3, ska ' stjärnan 'stickas endast 4 ggr på hela detta varv? Vid rad 4 hur stickar jag denna stjärna med 9 maskor? Den ska ju stickas rät.
26.04.2025 - 08:47DROPS Design ha risposto:
Hej Marie, når du strikker masken med stjerne, så får du 9 nye masker som skal strikkes ret på næste pind :)
30.04.2025 - 14:29
![]() Mette Bodin ha scritto:
Mette Bodin ha scritto:
Spurgte den 16.04. Nu er hjernen begyndt at fungere, og jeg har fundet ud af opskriften. Undskyld ulejligheden.
18.04.2025 - 17:00
![]() Mette Bodin ha scritto:
Mette Bodin ha scritto:
Strikker str L. I diagram A.2 efter pind 8 har jeg 208 masker. Pind 9 ender med 12 masker ved udt 7 m og 5 m. 12 masker går ikke op i 208 masker, men giver 17,33 mønsterstrik. her er noget jeg slet ikke forstår-
16.04.2025 - 16:33DROPS Design ha risposto:
Hei Mette. Om du setter maskemarkører mellom hvert diagram har du en bedre oversikt. Du strikker 9. rad over 8. rad hele omgangen rundt og det økes med 4 masker per gang du strikker A.2. Så når omgangen er ferdig strikket a 26 rapporter av A.2 x 4 økte masker = 104 masker + 208 masker = 312 masker, som står i oppskriften. Du må ikke tenkte at pinne 9 ender med 12 masker, du må tenkte at du strikker 9. pinne over 8 masker og når 9. pinne er ferdig /10. pinne skal strikkes er det 12 masker. mvh DROPS Design
28.04.2025 - 12:03
![]() Jan ha scritto:
Jan ha scritto:
I’m a sock knitter but now venturing into knitwear. Knitting size M A1… I’ve knitted around row 1 and done the yarn over increases, on the next round the pattern says to ‘twist’ the yarn over to avoid a large hole. Not sure how you twist that stitch as it falls between two purl stitches.
14.04.2025 - 22:20DROPS Design ha risposto:
Hi Jan, The yarn overs are twisted by working through the back loop. Happy Easter!
16.04.2025 - 12:13
![]() Anne-Karin Lihaug Grimstad ha scritto:
Anne-Karin Lihaug Grimstad ha scritto:
Hvorfor har jeg 100 m mer enn jeg skal ha når A2 er ferdig
27.03.2025 - 11:16DROPS Design ha risposto:
Hej Anne-Karin, følger du diagrammet for din størrelse? Hvilken størrelse strikker du? Hvor mange masker har du når du starter diagrammet?
27.03.2025 - 14:09
![]() Kirsten Schou ha scritto:
Kirsten Schou ha scritto:
Hvordan laver jeg starten på trøjen, hvor den starter med 3vrang 1 ret 3vrang og så er der et hul og1ret hvad skal jeg strikke i "hullet" venlig hilsen Kirsten Schou
18.03.2025 - 15:44DROPS Design ha risposto:
Hei Kristen. Du strikker de maskene du ser i diagrammet. Der det er "hull" er det ingen masker. Om du ser på 3. rad (A.2) og masken med stjerne ikonet, så økes det med 6 masker og da fylles "hullet". Se gjerne på hjelpevideoen til blusen: Hvordan strikkes diagram A.2 til DROPS 222-32 og DROPS 223-2 – Del 1 og Hvordan strikkes diagram A.2 til DROPS 222-32 og DROPS 223-2 – Del 2. DU finner videoene til høyre eller under bildene. mvh DROPS Design
24.03.2025 - 10:06
![]() Gullevi Ljungström ha scritto:
Gullevi Ljungström ha scritto:
Var laddar jag ner mönstret
11.03.2025 - 11:21DROPS Design ha risposto:
Hej Gullevi, det ligger her, det er bare at scrolle lidt længere ned :)
14.03.2025 - 12:08
![]() Ute Mehnert ha scritto:
Ute Mehnert ha scritto:
Ich verstehe das Diagramm A2 nicht, bezüglich der 8 Maschen, wobei der Rapport 11 Maschen beträgt. Ich bitte um Hilfe Lg Ute
21.02.2025 - 17:40DROPS Design ha risposto:
Liebe Frau Mehnert, vielleicht können diese beide Videos helfen? Wir zeigen, wie man das Diagram A.2 strickt: Runde 1-9 und Runde 10-28. Viel Spaß beim Stricken!
24.02.2025 - 07:37
![]() Hazel Wilson ha scritto:
Hazel Wilson ha scritto:
I don't see any free patterns! It goes to a link that does not show any pattern.
24.08.2024 - 21:40DROPS Design ha risposto:
Dear Hazel, all of our patterns are free! You can find this one right here in this page; remember to select pattern right under the title of the model to see the full pattern instructions. When you select "FREE PATTERNS" at the top of the page, it should display several pattern types to choose from. Happy knitting!
25.08.2024 - 23:04
![]() Pollie ha scritto:
Pollie ha scritto:
Ik begrijp niet goed welke scheiding er wordt bedoelt bij het lijf, er staat 3 cm na de scheiding, is dat de scheiding waar 12 steken zijn opgezet en dan die markeerdraad?
04.08.2024 - 15:57
|
|||||||||||||||||||||||||
Swing by Spring Top#swingbyspringtop |
|||||||||||||||||||||||||
 |
 |
||||||||||||||||||||||||
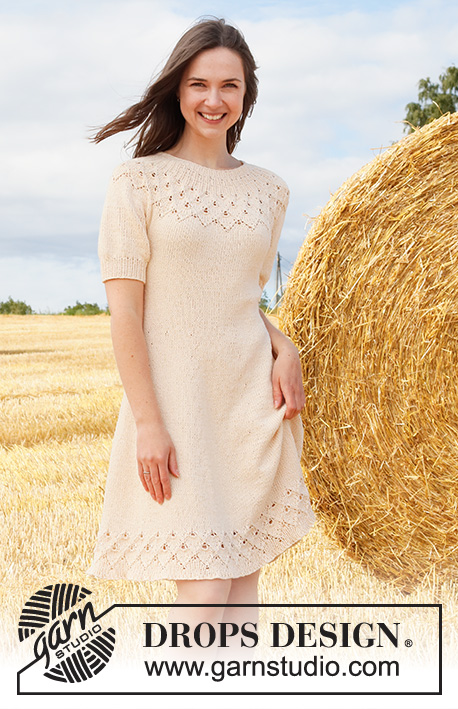
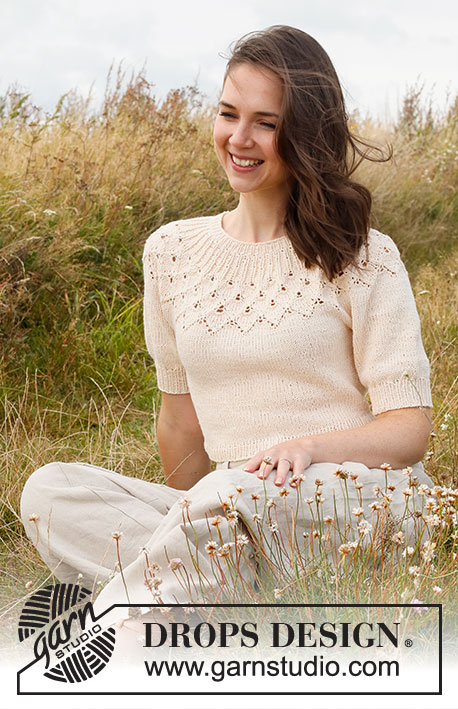
Maglione lavorato ai ferri in DROPS Belle. Lavorato dall'alto in basso con sprone rotondo, motivo traforato, motivo a foglie e maniche corte a palloncino. Taglie: S - XXXL.
DROPS 222-32 |
|||||||||||||||||||||||||
|
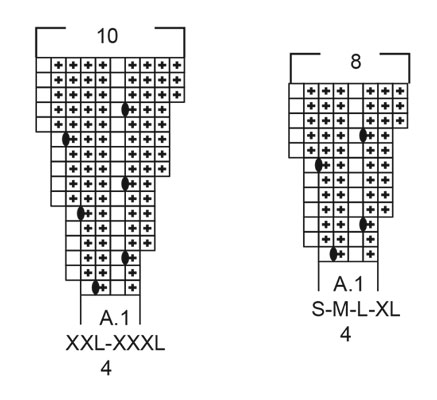
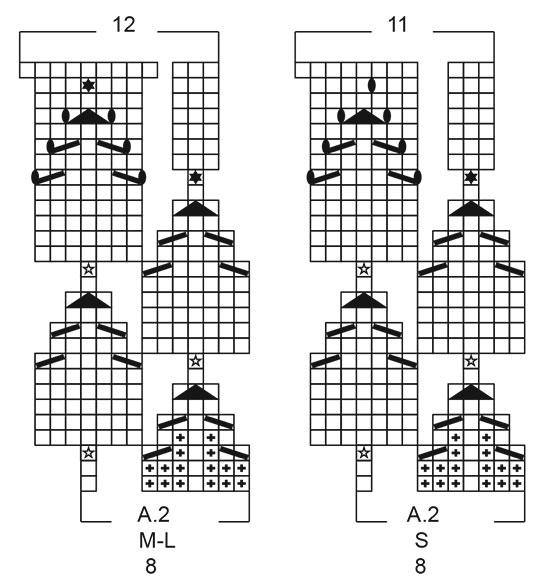
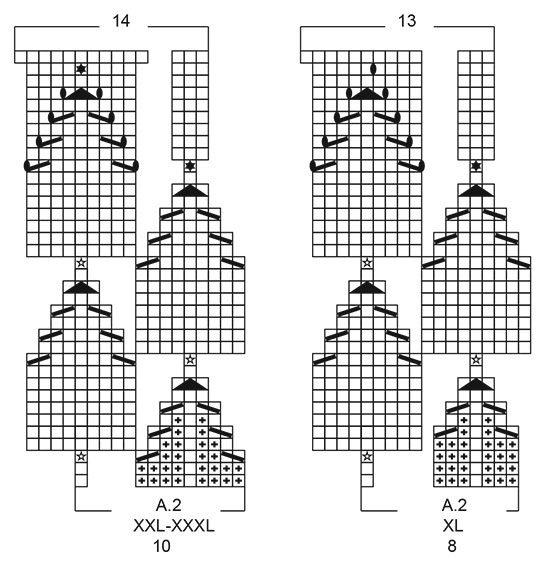
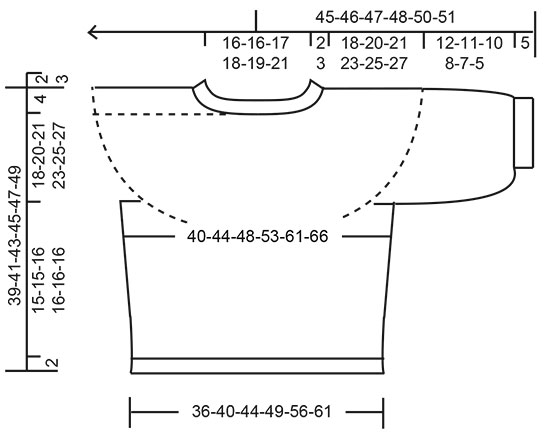
------------------------------------------------------- TECNICHE IMPIEGATE: ------------------------------------------------------- MOTIVO: Vedere i diagrammi A.1 e A.2. Scegliere il diagramma per la vostra taglia. SUGGERIMENTO PER LE DIMINUZIONI (applicato ai lati del corpo): Diminuire 1 maglia a ogni lato del segnapunti come segue: lavorare fino a quando rimangono 3 maglie prima del segnapunti e lavorare 2 maglie insieme a diritto, 2 maglie diritto (= il segnapunti è al centro di queste maglie), passare 1 maglia a diritto senza lavorarla, 1 maglia diritto, accavallare la maglia passata sopra quella appena lavorata. SUGGERIMENTO PER LA CHIUSURA: Per evitare che il bordo di chiusura sia tirato potete intrecciare con un ferro di una misura più grande. Se il bordo risulta ancora tirato, fare 1 gettato dopo circa 4 maglie durante la chiusura e intrecciare i gettati come maglie normali. ------------------------------------------------------- INIZIO DEL LAVORO: ------------------------------------------------------- MAGLIONE - BREVE RIASSUNTO DEL LAVORO: Lavorare il bordo del collo e lo sprone in tondo dal centro dietro, dall'alto in basso. Ora dividere lo sprone per il corpo e le maniche. Lavorare il corpo in tondo con i ferri circolari, dall'alto in basso. Lavorare le maniche in tondo con i ferri a doppia punta/ferri circolari corti, dall'alto in basso. BORDO DEL COLLO: Avviare 100-100-104-108-112-120 maglie con i ferri circolari n° 3 mm con Belle. Lavorare 1 giro diritto. Poi lavorare a coste = 1 maglia diritto/1 maglia rovescio. Quando le coste misurano 2-2-3-3-3-3 cm, passare ai ferri circolari n° 4 mm. Inserire 1 segnapunti all'inizio del giro al centro dietro, misurare lo sprone da questo segnapunti! SPRONE: Lavorare A.1 in tondo (= 25-25-26-27-28-30 ripetizioni di 4 maglie). Alla fine di A.1, ci sono 200-200-208-216-280-300 maglie sul ferro. Il lavoro ora misura 4-4-4-4-6-6 cm dal segnapunti. Poi lavorare A.2 in tondo (= 25-25-26-27-28-30 ripetizioni di 8-8-8-8-10-10 maglie). FARE ATTENZIONE ALLA TENSIONE DEL LAVORO! Alla fine di A.2, ci sono 275-300-312-351-392-420 maglie sul ferro. Il lavoro misura circa 14-14-14-17-19-19 cm dal segnapunti (cioè 16-16-17-20-22-22 cm dal bordo di avvio). Lavorare a maglia rasata fino a quando il lavoro misura 18-20-21-23-25-27 cm dal segnapunti. Ora dividere il lavoro per il corpo e le maniche. Lavorare il giro successivo come segue: 38-42-44-50-58-63 maglie diritto (= ½ dietro), trasferire le 62-66-68-76-80-84 maglie successive su un fermamaglie per la manica, avviare 8-8-12-12-12-12 nuove maglie (= a lato sotto la manica), 75-84-88-99-116-126 maglie diritto (= davanti), trasferire le 62-66-68-76-80-84 maglie successive su un fermamaglie per la manica, avviare 8-8-12-12-12-12 nuove maglie (= a lato sotto la manica), lavorare a diritto le ultime 38-42-44-50-58-63 maglie (= ½ dietro). Finire il corpo e le maniche in modo separato. ORA MISURARE IL LAVORO DA QUI! CORPO: = 167-184-200-223-256-276 maglie. Inserire 1 segnapunti al centro delle 8-8-12-12-12-12 nuove maglie sotto ogni manica (= a lato del corpo). Ora ci sono 83-92-100-111-128-138 maglie sul davanti e 84-92-100-112-128-138 maglie sul dietro. Spostare i segnapunti durante il lavoro; verranno usati durante le diminuzioni laterali. Lavorare a maglia rasata in tondo. Quando il lavoro misura 3 cm dalla divisione, diminuire 1 maglia a ogni lato di tutti i segnapunti - leggere il SUGGERIMENTO PER LE DIMINUZIONI (= 4 diminuzioni). Diminuire in questo modo ogni 2 cm 4-4-4-4-5-5 volte in totale = 151-168-184-207-236-256 maglie. Lavorare a maglia rasata in tondo fino a quando il lavoro misura 15-15-16-16-16-16 cm dalla divisione – o fino alla lunghezza desiderata (mancano circa 2 cm alla fine del lavoro). Lavorare 1 giro diritto in cui aumentare 23-26-28-31-36-38 maglie in modo uniforme = 174-194-212-238-272-294 maglie. Passare ai ferri circolari n° 3 mm. Lavorare a coste (1 maglia diritto/1 maglia rovescio) in tondo per 2 cm. Intrecciare con diritto su diritto e rovescio su rovescio - leggere il SUGGERIMENTO PER LA CHIUSURA. Il maglione misura circa 39-41-43-45-47-49 cm dalla spalla in giù. MANICHE: Riportare le 62-66-68-76-80-84 maglie in sospeso a un lato del lavoro sui ferri a doppia punta/ferri circolari corti n° 4 mm, e riprendere 1 maglia in ognuna delle 8-8-12-12-12-12 nuove maglie avviate a lato sotto la manica = 70-74-80-88-92-96 maglie. Lavorare a maglia rasata in tondo fino a quando la manica misura 12-11-10-8-7-5 cm dalla divisione (mancano circa 5 cm alla fine del lavoro, provare il maglione e lavorare fino alla lunghezza desiderata. Lavorare 1 giro diritto in cui diminuire 16-16-14-14-14-14 maglie in modo uniforme = 54-58-66-74-78-82 maglie. Passare ai ferri a doppia punta n° 3 mm. Lavorare a coste in tondo = 1 maglia diritto/1 maglia rovescio per 5 cm. Intrecciare con diritto su diritto e rovescio su rovescio - ricordarsi del SUGGERIMENTO PER LA CHIUSURA! La manica misura circa 17-16-15-13-12-10 cm dalla divisione. Lavorare l'altra manica nello stesso modo. |
|||||||||||||||||||||||||
Spiegazioni del diagramma |
|||||||||||||||||||||||||
|
|||||||||||||||||||||||||
 |
|||||||||||||||||||||||||
 |
|||||||||||||||||||||||||
 |
|||||||||||||||||||||||||
 |
|||||||||||||||||||||||||
Avete terminato questo modello?Allora taggate le vostre foto con #dropspattern #swingbyspringtop o inviatele alla #dropsfan gallery. Avete bisogno di aiuto con questo modello?Troverete 31 video tutorial, una sezione per i commenti/domande e molto altro guardando il modello su www.garnstudio.com © 1982-2026 DROPS Design A/S. Ci riserviamo tutti i diritti. Questo documento, compreso tutte le sue sotto-sezioni, è protetto dalle leggi sul copyright. Potete leggere quello che potete fare con i nostri modelli alla fine di ogni modello sul nostro sito. |
|||||||||||||||||||||||||


Con oltre 40 anni di esperienza nel design di modelli di maglia e uncinetto, DROPS Design offre la più estesa collezione di modelli gratuiti su internet - tradotti in 17 lingue. Ad oggi vi possiamo fornire 325 cataloghi e 12298 modelli - 9569 dei quali sono tradotti in Italiano.
Ci stiamo impegnando molto per darvi il meglio che vi possiamo offrire in termini di maglia e uncinetto, ispirazioni e consigli così come filati di grande qualità ad un prezzo incredibile! Volete utilizzare i nostri modelli per qualcosa d'altro oltre al vostro uso personale? Potete leggere tutto ciò che è consentito nel testo sul Copyright in basso su tutte le pagine dei nostri modelli. Buon lavoro!
Lasciare un commento sul modello DROPS 222-32
Noi saremmo felici di ricevere i tuoi commenti e opinioni su questo modello!
Se vuoi fare una domanda, fai per favore attenzione a selezionare la categoria corretta nella casella qui sotto per velocizzare il processo di risposta. I campi richiesti sono indicati da *.