
Popular categories
Looking for a yarn?


Comments / Questions (2)
![]() Sabrina wrote:
Sabrina wrote:
Ich verstehe nicht, wie ich den Kragen arbeiten muss. Ich habe 16 Maschen auf der Nadel, Stricke 2 Rd, soll dann nur die 10 Maschen der Innenseite stricken. Was mache ich mit den übrigen 6? Abketten? Und wie komme ich zu den 10 Maschen innen? Muss ja hin stricken....😳 Freue mich auf eine Antwort!!!
20.09.2015 - 11:49DROPS Design answered:
Das sind verkürzte Reihen, die Sie am Kragen stricken, schauen Sie sich hierzu auch einmal ein Hilfsvideo an, im Kopf neben dem Foto unter Videos. Sie stricken also wie folgt: 2 R (d.h. Hin- und Rück-R) über alle 16 M, dann stricken Sie die 10 ersten M (also die, die außen am Rand des Kragens liegen), wenden mitten in der R und stricken die 10 M wieder zurück. Dann wieder 2 R über alle 16 Kragen-M, dann stricken Sie nur die ersten 8 M, wenden mitten in der R und stricken die 8 M zurück. Das machen Sie so lange, bis Sie die angegebene Kragen-Länge erreicht haben. Beim anderen Vorderteil beginnen Sie dann einfach die verkürzten R mit einer Rück-R und arbeiten genauso.
20.09.2015 - 14:37
![]() Conny wrote:
Conny wrote:
Snap niet waar ik nu precies de steken moet meerderen tbv de kraag na de markeerdraad. Ik heb op dit moment 26 steken. Waar plaats ik dan een kantsteek en waar meerder ik dan precies???
04.10.2013 - 08:26DROPS Design answered:
Brei je het linker voorpand dan is middenvoor aan de linkerkant van de nld en de zijkant aan de rechterkant van de nld. Je meerdert dus voor de voor de ronding en kraag aan de linkerkant, en meerderingen aan de zijkant en afkanten voor het armsgat aan de rechterkant.
07.10.2013 - 21:22
|
|
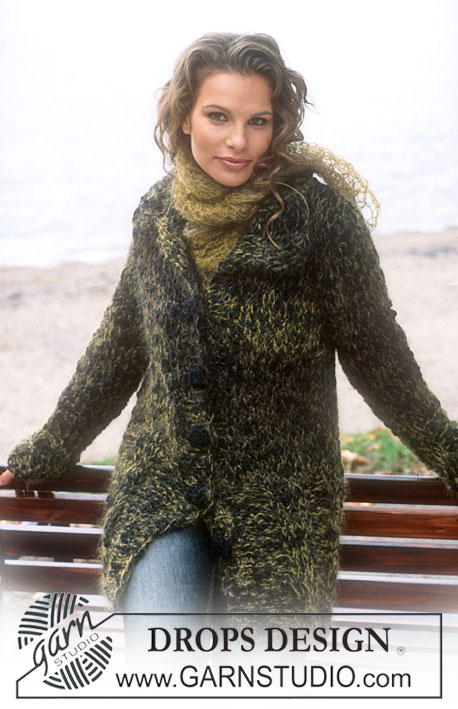
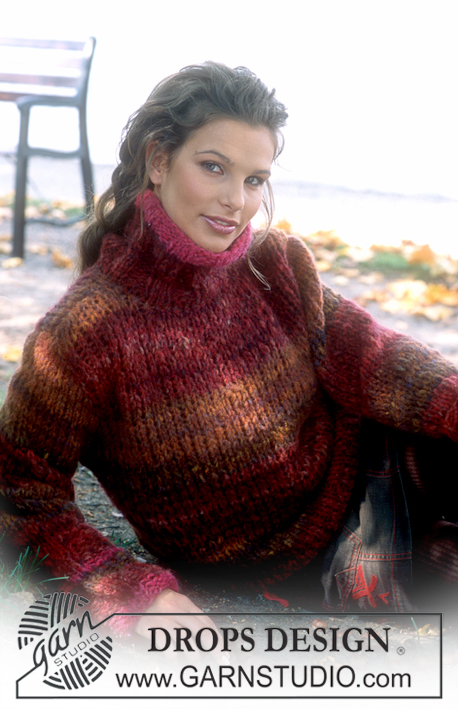
DROPS 84-3 |
|
|
|
|
DROPS Cardigan
DROPS 84-3 |
|
|
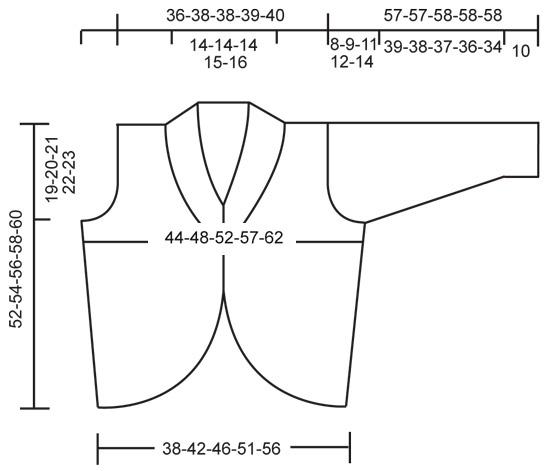
Gauge: 10 sts x 16 rows in stockinette st = 10 x 10 cm. Increasing tips (for the collar): Inc 1 st as follows: pick up and K a st from the previous row. All incs are made on right side rows. Back: Cast on 40-44-48-53-58 sts and knit stockinette st. When the piece measures 10 cm inc 1 st at each side 8-8-9-9-10 cm a total of 3 times = 46-50-54-59-64 sts. When the piece measures 33-34-35-36-37 cm bind off for armhole at each side every other row: 3 sts 1 time, 2 sts 0-0-1-2-3 times and 1 st 2-3-3-3-3 times = 36-38-38-39-40 sts. When the piece measures 50-52-54-56-58 cm bind off the center 12-12-12-13-14 sts for the neck. On the next row dec 1 st at each neck edge = 11-12-12-12-12 sts remain on each shoulder. Bind off when the piece measures 52-54-56-58-60 cm. Left front: Cast on 5-7-9-11-14 sts and knit stockinette st. Read the entire next section before knitting: Rounded edge + shawl collar: After 2 rows cast on new sts at the center front edge every other row: 3 sts 2 times, 2 sts 2 times and 1 st 5 times (rounded edge) = 20-22-24-26-29 sts. When the piece measures 20-21-22-23-24 cm put a marker at the center front (to mark where the fringe will start) and inc for collar: inc 1 st inside of 1 edge st at the center front – see increasing tips above – every other row 2 times, every 4 rows 4 times and every 6 rows 3 times = 9 increased sts for collar. Side inc: When the piece measures 10 cm inc at the side as on back. Armhole: When the piece measures 33-34-35-36-37 cm bind off for armhole at the side as on back. When all incs and decs are complete 27-28-28-28-29 sts remain. When the piece measures 52-54-56-58-60 cm bind off the 11-12-12-12-13 sts for shoulder = 16 collar sts remain. Collar: Knit 2 rows stockinette st over all sts, then 2 rows over only the outermost 10 sts (at the center front edge), * 2 rows over all sts, 2 rows over only the outermost 8 sts at the center front *, repeat * - * untill the collar measures approx. 7-8 cm on the short side and approx. 14-16 cm on the long side. Put sts on a st holder. Right front: Cast on and knit the same as the left reversing shaping. Sleeve: Cast on 25-26-26-28-28 sts and knit 2 rows garter st, and then stockinette st. When the piece measures 10 cm inc 1 st at each side every 7-7-5.5-5.5-4.5 cm a total of 6-6-7-7-8 times = 37-38-40-42-44 sts. When sleeve measures 49-48-47-46-44 cm bind off for sleeve cap at each side every other row: 3 sts 1 time, 2 sts 1 time and 1 st 2-3-5-5-7 times, then 2 sts at each side until the piece measures 56-56-57-57-57 cm, then bind off 3 sts at each side 1 time. Bind off the remaining sts, the piece measures approx. 57-57-58-58-58 cm. Assembly: Sew shoulder seams. Weave the collar together at center back. Sew the collar to back neckband with the seam on the right side so it will not show when the collar is folded out. Sew in sleeves. Sew sleeve and side seams in one, using edge sts as seam allowance. Fringe: Fasten fringe tufts along the collar – start at the marker on one front, continue around neck to marker on the other front (approx. 3-4 cm between each fringe tuft). 1 fringe tuft = cut two 20 cm long strands, fold them in half and pull loop through outermost edge sts, then pull ends through loop. Crochet edge: Crochet 1 row sc – start at the marker on one front, crochet down along front, back and up along front on the other side up to the marker. Crochet loosely, so that the edge is not too tight. Buttonhole loop: The cardigan is held together with a pin in the photo, but you can alternately crochet a buttonhole loop on the right front edge as follows: 1 sc where the fringe starts, ch 4 (adjust for button size) and fasten with 1 sc approx. 2 cm lower. Sew in a button on left front. |
|
 |
|
Have you finished this pattern?Tag your pictures with #dropspattern or submit them to the #dropsfan gallery. Do you need help with this pattern?You'll find 22 tutorial videos, a Comments/Questions area and more by visiting the pattern on garnstudio.com. © 1982-2026 DROPS Design A/S. We reserve all rights. This document, including all its sub-sections, has copyrights. Read more about what you can do with our patterns at the bottom of each pattern on our site. |


With over 40 years in knitting and crochet design, DROPS Design offers one of the most extensive collections of free patterns on the internet - translated to 17 languages. As of today we count 324 catalogues and 12290 patterns translated into English (UK/cm). 12290
We work hard to bring you the best knitting and crochet have to offer, inspiration and advice as well as great quality yarns at incredible prices! Would you like to use our patterns for other than personal use? You can read what you are allowed to do in the Copyright text at the bottom of all our patterns. Happy crafting!
Post a comment to pattern DROPS 84-3
We would love to hear what you have to say about this pattern!
If you want to leave a question, please make sure you select the correct category in the form below, to speed up the answering process. Required fields are marked *.