
Popular categories
Looking for a yarn?


Comments / Questions (8)
![]() Claudia Wächtler wrote:
Claudia Wächtler wrote:
Hallo Habe jetzt noch mal eine Frage.Wenn ich die 12Maschen abgenommen habe.Sind die Randmasche inbegriffen oder wird die Randmasche extra gezählt? Liebe Grüße Claudia
19.02.2020 - 23:56DROPS Design answered:
Liebe Frau Wächtler, die Randmaschen sind immer in den gegebenen Maschenanzahl inbegriffen, dh wenn Sie die 12 Maschen für den Daumen zugenommen haben, sind es 56-62 Maschen auf der Nadel. Viel Spaß beim stricken!
20.02.2020 - 08:06
![]() Claudia Wächtler wrote:
Claudia Wächtler wrote:
Liebes Drops Team Ja vielen Dank noch einmal an Euch alle.Dann bin ich doch etwas schlau zum nachdenken.Eh übrigens seit 15 Jahren kaufe ich Wolle von Drops und bin total begeistert.Viele Liebe Grüße Claudia Wächtler
17.02.2020 - 16:23
![]() Claudia Wächtler wrote:
Claudia Wächtler wrote:
Liebes Drops Team Im nachhinein habe ich es verstanden wie Sie es meinen.Und zwar jede 2 Reihe 3 Maschen abnehmen und das 9 mal.Aber sind es nur 3 Maschen pro Reihe.Die letzte Reihe mit 2Maschen einmal abnehmen. Liebe Grüße Claudia Wächtler
17.02.2020 - 15:44DROPS Design answered:
Liebe Frau Wächtler, ja genau, Sie haben 42-48 Maschen (je nach der Größe), und nehmen Sie 3 Maschen in jeder 2. Reihe (= in jeder Hinreihe) insgesamt 9 x ab = 27 Maschen nehmen Sie ab; Es waren 42-48 M - 27 M = 15-21 M; bei der nächsten Hinreihe stricken Sie 2 M re zs fortlaufend mit 1 Randmasche auf beiden Seiten = 9-12 M sind noch übrig. Viel Spaß beim stricken!
17.02.2020 - 16:10
![]() Claudia Wächtler wrote:
Claudia Wächtler wrote:
Hallo Drops Team Ich meine ganz am Ende des Handschuhes wo steht nach 23cm 9x Maschen a 3 abnehmen und die Frage noch 6 Maschen pro Reihe?Meinen Sie das in einer Reihe 9 x oder muss ich jede 2 Reihe hoch stricken und dann abnehmen. Liebe Grüsse Claudia
17.02.2020 - 11:35DROPS Design answered:
Liebe Frau Wächtler, hat Ihnen die vorrige Antwort geholfen?
17.02.2020 - 12:53
![]() Claudia Wächtler wrote:
Claudia Wächtler wrote:
Liebes Team von Drops Ich gerade beim Handschuh am stricken.Können Sie mir bitte genauer sagen wie das gemeint ist mit den 3Maschen abnehmen.Danke schon mal im voraus. Liebe Grüße Claudia
17.02.2020 - 06:29DROPS Design answered:
Liebe Frau Wächtler, meinen Sie wenn man In jeder 2. Reihe 3 Maschen gleichmäßig verteilt abnehmmen muss? Es bedeutet, daß Sie jetzt 1 Reihe stricken und gleichzeitig 3 Maschen abnehmen (siehe hier), dann die Rückreihe stricken. Diese 2 Reihen wiederholen Sie 8 Mal insgesamt, dann stricken Sie noch 1 Reihe mit Abnahmen. Viel Spaß beim stricken!
17.02.2020 - 10:32
![]() Kakis wrote:
Kakis wrote:
Vielen Dank!
19.03.2018 - 11:21
![]() Kakis wrote:
Kakis wrote:
Hallo, sind mit den Nadeln 3,5 und 4 Rundnadeln gemeint?
17.03.2018 - 16:07DROPS Design answered:
Liebe Frau Kakis, das Set wird in Hin- und Rück-R gestrickt, Sie können entweder mit Paar oder mit einer Rundnadel (hin und zurück) stricken. Viel Spaß beim stricken!
19.03.2018 - 09:49
![]() Krause, Ilona (w) wrote:
Krause, Ilona (w) wrote:
Sehr geehrtes Team, was bedeutet bitte: "1 RM kraus rechts stricken"? Ist damit "rechts verschränkt" gemeint? Danke für Ihre Antwort I. Krause
07.11.2014 - 06:11DROPS Design answered:
"kraus rechts" bedeutet, dass Sie die M in jeder R re stricken, die Rand-M wird also immer, in Hin- und Rück-R, re gestrickt, nie li.
07.11.2014 - 17:42
|
|
Maribel#maribelset |
|
|
|
|
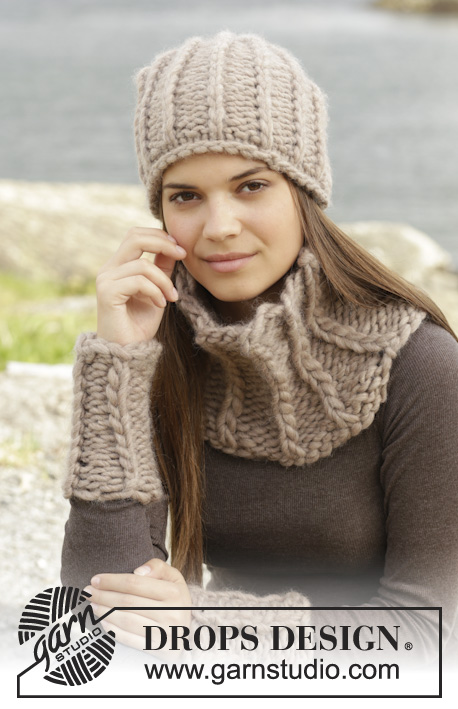
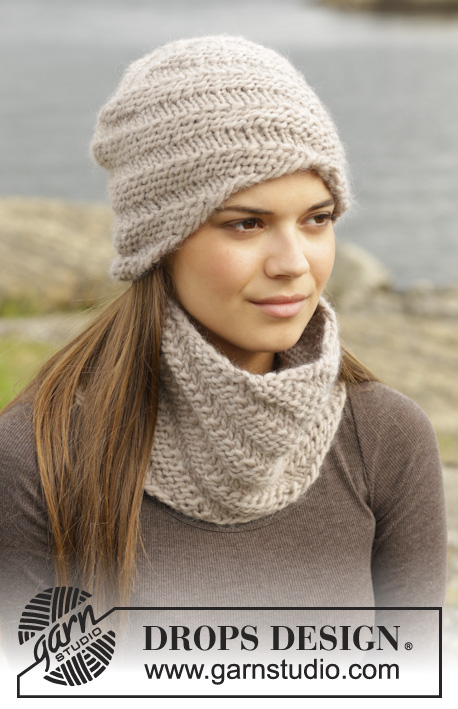
Knitted DROPS hat, mittens and scarf in garter st in ”Karisma”.
DROPS Extra 0-1036 |
|
|
GARTER ST (back and forth): K all rows. 1 ridge = 2 rows K. ---------------------------------------------------------- HAT: Worked back and forth on needle. Loosely cast on 108-118 sts (incl 1 edge st in each side of piece) with Karisma on needle size 3.5 mm and K 1 row. Work 1 edge st in GARTER ST – see explanation above, rib * K 1, P 1 *, repeat from *-* until 1 st remains and finish with 1 edge st in garter st. Work edge sts in garter st until finished measurements. Work 5 more rows in rib and 1 edge st in garter st in each side of piece. Switch to needle size 4 mm. K 1 row AT THE SAME TIME dec 6 sts evenly = 102-112 sts. Then work piece in garter st. REMEMBER THE KNITTING TENSION! When piece measures 20-21 cm, adjust so that next row is from RS, dec as follows: ROW 1: 1 edge st in garter st, * K 8-9 sts, K the next 2 sts tog *, repeat from *-* until 1 st remains, 1 edge st in garter st = 92-102 sts = 10 dec sts. ROW 2 (and rows from WS): K all sts. ROW 3: 1 edge st in garter st, * K 7-8 sts, K the next 2 sts tog *, repeat from *-* until 1 st remains, 1 edge st in garter st = 82-92 sts. ROW 5: 1 edge st in garter st, * K 6-7 sts, K the next 2 sts tog *, repeat from *-* until 1 st remains, 1 edge st in garter st = 72-82 sts. ROW 7: 1 edge st in garter st, * K 5-6 sts, K the next 2 sts tog *, repeat from *-* until 1 st remains, 1 edge st in garter st = 62-72 sts. ROW 9: 1 edge st in garter st, * K 4-5 sts, K the next 2 sts tog *, repeat from *-* until 1 st remains, 1 edge st in garter st = 52-62 sts. ROW 11: 1 edge st in garter st, * K 3-4 sts, K the next 2 sts tog *, repeat from *-* until 1 st remains, 1 edge st in garter st = 42-52 sts. ROW 13: 1 edge st in garter st, * K 2-3 sts, K the next 2 sts tog *, repeat from *-* until 1 st remains, 1 edge st in garter st = 32-42 sts. ROW 15: 1 edge st in garter st, * K 1-2 sts, K the next 2 sts tog *, repeat from *-* until 1 st remains, 1 edge st in garter st = 22-32 sts. ROW 17: 1 edge st in garter st, * K 0-1 sts, K the next 2 sts tog *, repeat from *-* until 1 st remains, 1 edge st in garter st = 12-22 sts. Only Size L/XL: ROW 19: 1 edge st in garter st, * K 2 tog *, repeat from *-* until 1 st remains, 1 edge st in garter st = 12 sts. Cut the yarn and pull it through the remaining sts, tighten tog and fasten. Piece measures approx. 24-25½ cm vertically. ASSEMBLY: Sew hat tog in the side inside 1 edge st. ---------------------------------------------------------- MITTEN: Worked back and forth on needle. Cast on 56-60 sts (incl 1 edge st in each side of piece) with Karisma on needle size 3.5 mm and K 1 row. Then work 1 edge st in GARTER ST – see explanation above, rib * K 1, P 1 *, repeat from *-* until 1 st remains and finish with 1 edge st in garter st. Work edge sts in garter st until finished measurements. Work 5 more rows in rib and 1 edge st in garter st in each side of piece. Switch to needle size 4 mm. K 1 row AT THE SAME TIME dec 12-10 sts evenly = 44-50 sts. Turn piece with RS towards you and insert 1 marker in the 22nd-25th st (marker for thumb). Then work in GARTER ST - see explanation above. REMEMBER THE KNITTING TENSION! When piece measures 8 cm, inc 2 sts by making 1 YO on each side of st with marker - to avoid holes K YO twisted (i.e. work in back loop of st instead of front) on next row. Repeat inc outside the inc sts every 4th row 6 times in total = 13 thumb sts and 56-62 sts in total. After last inc slip thumb sts + 1 st on each side (= 15 sts) on 1 stitch holder. Cast on 1 new st behind the thumb = 42-48 sts. Continue in garter st until piece measures 23 cm (= approx. 4 cm remain). Now dec 3 sts evenly every other row 9 times in total = 15-21 sts. Then work 1 edge st in garter st, work 2 and 2 sts tog until 1 st remains, 1 edge st in garter st = 9-12 sts. Cut the yarn and pull it through the remaining sts and tighten tog. Piece measures approx. 27 cm. THUMB: Slip the 15 sts from stitch holder back on needle size 4 mm. Continue in garter st back and forth AT THE SAME TIME inc 1 st on 1st row = 16 sts. When thumb measures approx. 5 cm (measured from where sts were put back on needle), work sts tog 2 by 2 = 8 sts. K 1 row. Work all sts tog 2 by 2 = 4 sts. Cut the yarn and pull it through the remaining sts and tighten tog. Sew side seams on thumb in outer loops of edge sts to avoid a chunky seam. ASSEMBLY: Place the mitten double and sew tog on the side of hand inside 1 edge st. Knit another mitten the same way. ---------------------------------------------------------- SCARF: Cast on 45 sts on needle size 8 mm with Karisma. Work in GARTER ST - see explanation above. REMEMBER THE KNITTING TENSION! Cast off when piece measures approx. 145 cm. |
|
Have you finished this pattern?Tag your pictures with #dropspattern #maribelset or submit them to the #dropsfan gallery. Do you need help with this pattern?You'll find 19 tutorial videos, a Comments/Questions area and more by visiting the pattern on garnstudio.com. © 1982-2026 DROPS Design A/S. We reserve all rights. This document, including all its sub-sections, has copyrights. Read more about what you can do with our patterns at the bottom of each pattern on our site. |


With over 40 years in knitting and crochet design, DROPS Design offers one of the most extensive collections of free patterns on the internet - translated to 17 languages. As of today we count 324 catalogues and 12290 patterns translated into English (UK/cm). 12290
We work hard to bring you the best knitting and crochet have to offer, inspiration and advice as well as great quality yarns at incredible prices! Would you like to use our patterns for other than personal use? You can read what you are allowed to do in the Copyright text at the bottom of all our patterns. Happy crafting!
Post a comment to pattern DROPS Extra 0-1036
We would love to hear what you have to say about this pattern!
If you want to leave a question, please make sure you select the correct category in the form below, to speed up the answering process. Required fields are marked *.