
Popular categories
Looking for a yarn?


Comments / Questions (127)
![]() Judith Ward wrote:
Judith Ward wrote:
Thank you re. answer about sizes. I can see the chart at the bottom of the page, and that is graded in four sizes, but the pattern is in six. Am I looking in the right place! I just want to know what the S - XXXL equate in inches.
07.06.2016 - 10:40DROPS Design answered:
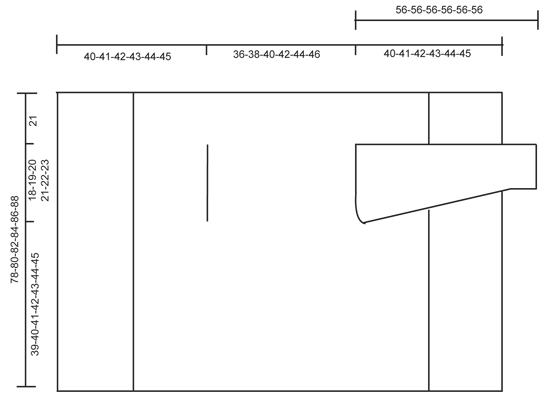
Dear Mrs Ward, all measurements are given in the 6 sizes in chart, ex. total height is 78-80-82-84-86-88 cm (only the 21 cm on top of jacket apply to all sizes). Happy crocheting!
07.06.2016 - 13:31Judith wrote:
Hello, the pattern is sized for S - XXXL - is there a guide anywhere as to inches/cms equivalent to these sizes?
06.06.2016 - 19:20DROPS Design answered:
Dear Judith, at the bottom of the page you can find a measurement chart: compare them with a garment you like and you'll find the right size. Happy crocheting!
07.06.2016 - 07:54Ingrid wrote:
I think what causes a lot of confusion about the sleeve holes is the diagram showing the measurements, because people forget that when you start making the sleeve hole your square is only eg for the smallest size, 36cm x 36cm, so you start your sleeve hole from the side of that square. Maybe a dotted line on the diagram and a note about it would help.
06.05.2016 - 18:02Ximena Gomez wrote:
Muchas gracias por las indicaciones, voy terminando y esta quedando precioso.
29.03.2016 - 04:12Ximena Gomez wrote:
Buenos dias, ya voy a empezar a hacer las mangas y no entiendo bien lo de repetir las vueltas 1 y 2 al mismo tiempo. Por favor quisiera una guia que estoy ansiosa de usar este cardigan. Muchas gracias
17.03.2016 - 18:02DROPS Design answered:
Hola Ximena. En las vtas 1 y 2 está explicado el patrón para las mangas. En el apartado que empieza con las palabras - AL MISMO TIEMPO - está explicado cómo trabajar las dism en el centro bajo la manga- trabajando 2 p.a. juntos al inicio de la vta. (ver dentro del patrón las vtas donde se trabajan las dism).
21.03.2016 - 10:33
![]() Daria wrote:
Daria wrote:
Dziękuje za pomoc, udało się ale mam kolejny problem...podkroje rękawów:rozumiem że mam zrobić łańcuszek między 1-szym i 2-gim rogiem oraz 3-cim i 4-tym. Dalej już nie rozumiem...mogę prosić o bardzo dokładne wytłumaczenie jak mam dalej postępować? :)
11.02.2016 - 11:01DROPS Design answered:
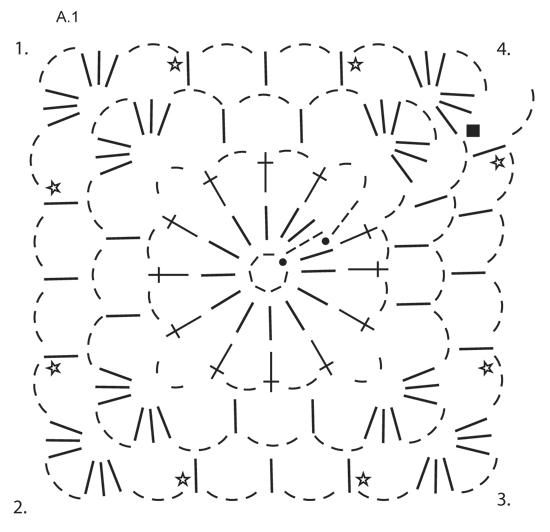
Proszę popatrzeć na schemat na dole: 2 podłużne linie to podkroje rękawów, w tych miejscach będą łańcuszki. Teraz proszę zobaczyć schemat A.1- łańcuszek przerabiamy od rogu nr 1, ale tylko do środka lewego boku kwadratu (między 1-szym i 2-gim rogiem); drugi łańcuszek przerabiamy od środka prawego boku kwadratu (między 3-cim i 4-tym rogiem) aż do rogu nr 4. Tam będą później otwory, w które zostaną przerobione rękawy. POWODZENIA
12.02.2016 - 22:10
![]() Daria wrote:
Daria wrote:
A potem przerabiamy znów 4 okrążenia, powtórka okrążenia 4 i w 6 dodajemy w sumie 8 dodatkowych słupków? czy po 6 okrążeniu przerabiamy tak jak okrążenie 5? i jeszcze jedno pytanie o podkroje rękawów: między 1-szym a 2-gim i 3-cim a 4-tym rogiem ma zrobić łańcuszek? jakoś ciężko mi to sobie wyobrazić :) z góry dziękuję za odpowiedź :)
07.02.2016 - 19:44DROPS Design answered:
Już odpowiedziałam na to pytanie. W razie dalszych pytań proszę pisać.
12.02.2016 - 22:11
![]() Daria wrote:
Daria wrote:
Dzień dobry, przeczytałam wszystkie zapytania i niestety ciągle nie rozumiem...co macie namyśli pisząc: powtórka okrążenia 4 z dodawaniem o. (co to jest o. ?). I gdzie dokładnie mam dodać 1 słupek + 3 oczka łańcuszka? w dowolnym miejscu między powiedzmy rogiem 1 a 2? pośrodku tych rogów? czy zaraz za rogiem 1-szym, 2-gim itd.? i teraz tak...w okrążeniu 6 dodajemy 1sł+3oł z każdej strony rogów?
07.02.2016 - 19:43DROPS Design answered:
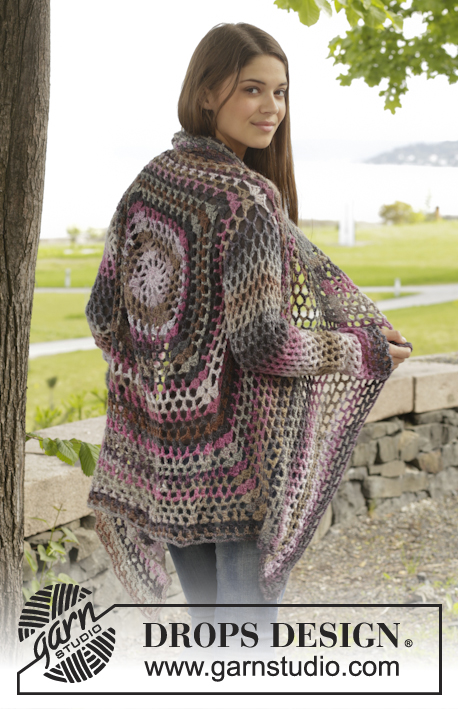
Witam. Skrót o. to oczko. Proszę spojrzeć na zdjęcie tyłu swetra - kwadrat, który jest wykonywany na początku składa się z 4 trójkątów ze wspólnym wierzchołkiem w środku kwadratu. W każdym następnym okrążeniu musi być kolejny słupek i 3 oczka łańcuszka, aby trójkąt się poszerzał. To dlatego mamy dodatkowy 1 sł i 3 oł na każdym boku kwadratu. Proszę spróbować i dać znać czy się udało. POWODZENIA
08.02.2016 - 19:25
![]() April wrote:
April wrote:
Thank you for all the help. I just want to clarify. 1) When making the armhole, you make a chair for every 3 CH + the 1 DC from the previous row? 2) On the next row, when you get to the chain, do you make the 3 ch + 1 dc in the stitches that were skipped? For example...1 ch=1 ch (x3), then 1ch =1dc? Will that look uneven?
17.01.2016 - 14:54DROPS Design answered:
Dear April, for armhole, you have to chain the exact number of sts you skip, ie for every 3 ch + 1 dc skipped, you have to crochet 4 ch, then on next round, continue as before, crocheting 3ch, 1 dc as before in the chains for armholes. Happy crocheting!
18.01.2016 - 14:35
![]() Monika Hügel wrote:
Monika Hügel wrote:
Hallo! Ich habe eine Frage zu den Zunahmen in jeder 6. Rd. Wenn ich wie in der Anleitung beschrieben vorgehe, dann habe ich quasi 3 Löcher zwischen zwei Ecken mehr, als in der Rd. davor. Auf den Fotos ist allerdings nur eine Zunahme von einem Loch zu sehen. Was ist denn nun richtig? Danke!
11.01.2016 - 22:44DROPS Design answered:
Es entsteht an jeder Seite 1 Luftmaschenbogen mehr, wenn Sie zunehmen, Sie können das auch im Diagramm ganz gut erkennen. Die Zunahme erfolgt ja in der Ecke, indem Sie 3 Stb, 1 Lm-Bogen aus 3 Lm und 3 Stb um denselben Lm-Bogen häkeln. Dadurch entsteht in jeder Rd genau 1 Lm-Bogen mehr pro Seite. Zusätzlich gibt es in jeder 6. Rd noch weitere Zunahmen, sodass Sie in jeder 6. Rd tatsächlich 3 Lm-Bögen mehr pro Seite haben. Allerdings ist das auf dem Foto nicht gut ersichtlich.
08.02.2016 - 12:51
|
||||||||||||||||||||||
Around the World#aroundtheworldcardigan |
||||||||||||||||||||||
 |
 |
|||||||||||||||||||||
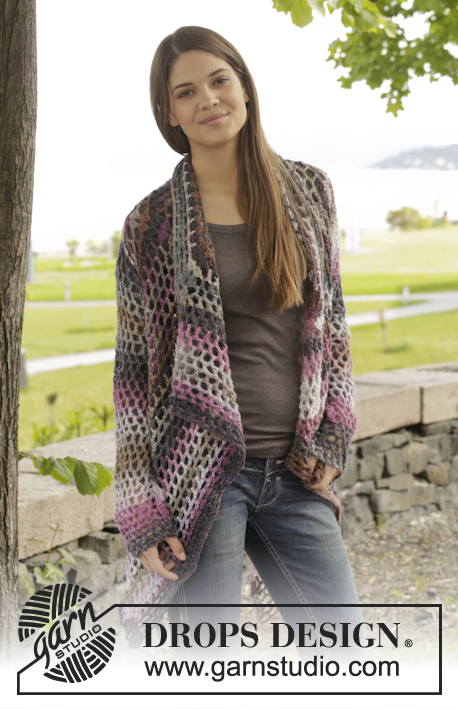
Crochet DROPS jacket with lace pattern in ”Big Delight”. Size: S - XXXL
DROPS 156-42 |
||||||||||||||||||||||
|
PATTERN: See diagram A.1. DECREASE TIP (applies to sleeves): Dec 1 repetition (= 1 tr + 3 ch) by not working ch, but work 2 tr into 1 tr as follows: Work 1 tr but wait with last pull through (= 2 strands on hook), then work next tr but on last pull through, pull yarn through all sts on hook. ---------------------------------------------------------- BODY: Worked in the round from mid back on the back. Work 6 ch on hook size 5 mm with Big Delight and form a ring with 1 sl st in first ch. Work according to diagram A.1, i.e. work as follows: ROUND 1: Work 3 ch, 13 tr in ch-ring, finish with 1 sl st in 3rd ch from beg of round. ROUND 2: 5 ch, skip 1 tr, 1 tr in next tr, * 2 ch, 1 tr in next tr *, repeat from *-* the entire round, finish with 2 ch = 12 tr + 2 ch. ROUND 3: Now work the circle into a square, i.e. work as follows: Work 3 tr + 3 ch + 3 tr (= corner) in first ch-space, 3 ch, 1 tr in next ch-space, 3 ch, 1 tr in next ch-space, 3 ch, * 3 tr + 3 ch + 3 tr (= corner) in next ch-space, 3 ch, 1 tr in next ch-space, 3 ch, 1 tr in next ch-space, 3 ch *, repeat from *-* 3 times in total, 1 tr in next ch-space (= last 2 ch from previous round), 3 ch. ROUND 4: Work 3 tr + 3 ch + 3 tr (= corner) in first ch-space, * 3 ch, 1 tr in next ch-space, 3 ch, 1 tr in next ch-space, 3 ch, 1 tr in next ch-space, 3 ch, 3 tr + 3 ch + 3 tr (= corner) in next ch-space *, repeat from *-* 3 times in total, 3 ch, 1 tr in next ch-space, 3 ch, 1 tr in next ch-space, 3 ch, 1 tr in next ch-space, 3 ch, 1 tr in next ch-space, 3 ch. REMEMBER THE CROCHET TENSION! Repeat 4th round with inc, i.e. work 1 tr + 3 ch more between each corner on every round (= 4 inc per round) AT THE SAME TIME on every 6th round inc 1 tr + 3 ch extra on each side of each corner – see star in diagram (= 8 extra inc per round). Continue like this until square measures 36-38-40-42-44-46 cm x 36-38-40-42-44-46 cm. Now work armhole as follows: Work as before until first corner, work 3 tr + 3 ch + 3 tr in ch-space in the corner. Now work ch until the middle of next side (i.e. in the middle between 1st and 2nd corner) as follows: Work 1 ch for every ch/tr skipped. Then work pattern as before until the middle between 3rd and 4th corner. Now work ch until beg of round as follows: Work 1 ch for every ch/tr skipped. On next round work pattern and inc as before over all sts, also in ch for armholes. Continue like this until square measures 78-80-82-84-86-88 cm x 78-80-82-84-86-88 cm (i.e. 21 cm in all sizes from armhole). Fasten off. FRONT PIECE: Now work back and forth between first and second corner. NOTE! Work front piece without inc. 1st ROW: Work from first corner as follows: 3 tr in ch-space in the corner, * 3 ch, 1 tr in ch-space *, repeat from *-* ending with 3 ch and 3 tr in the corner. 2nd ROW: Turn and work like this: 1 tr in each of the first 3 tr, * 1 tr in the ch-space, 3 ch *, repeat from *-* ending with 1 tr in the last ch-space and 1 tr in each of the 3 tr. 3rd ROW: Turn and work like this: 1 tr in each of the first 3 tr, * 3 ch, 1 tr in the ch-spance *, repeat from *-* and end with 3 ch and 1 tr in each of the last 3 tr. Continue repeating 2nd and 3rd row. Continue working like this until 19-20-21-22-23-24 cm have been worked back and forth, fasten off. Repeat on the other side, now work back and forth from third to fourth corner. Finally work a round around the entire square, work pattern as before but in ch-space in each corner work 6 tr. Fasten off. SLEEVE: Work in the round, top down from armhole, beg from mid under sleeve from RS. ROUND 1: Work 6 ch (= 1 tr + 3 ch), * 1 tr in next ch-space, 3 ch *, repeat from *-* 16-17-18-19-20-21 times in total, finish with 1 sl st in 3rd ch. ROUND 2: Work 5 ch, * 1 tr in next ch-space, 3 ch *, repeat from *-* 16-17-18-19-20-21 times in total, work 1 ch, finish with 1 sl st in 3rd ch at beg of round. Repeat 1st and 2nd ROUND - AT THE SAME TIME dec 1 tr + 3 ch at beg of 4th-6th-6th-8th-8th-6th round by working 2 tr tog – READ DECREASE TIP – mid under sleeve. Repeat dec every 6th-6th-6th-4th-4th-4th round = 12-12-13-13-14-14 tr. Repeat round without dec until sleeve measures approx. 56 cm in all sizes. Fasten off. Work another sleeve. |
||||||||||||||||||||||
Diagram explanations |
||||||||||||||||||||||
|
||||||||||||||||||||||
 |
||||||||||||||||||||||
 |
||||||||||||||||||||||
Have you finished this pattern?Tag your pictures with #dropspattern #aroundtheworldcardigan or submit them to the #dropsfan gallery. Do you need help with this pattern?You'll find 7 tutorial videos, a Comments/Questions area and more by visiting the pattern on garnstudio.com. © 1982-2026 DROPS Design A/S. We reserve all rights. This document, including all its sub-sections, has copyrights. Read more about what you can do with our patterns at the bottom of each pattern on our site. |
||||||||||||||||||||||


With over 40 years in knitting and crochet design, DROPS Design offers one of the most extensive collections of free patterns on the internet - translated to 17 languages. As of today we count 324 catalogues and 12290 patterns translated into English (UK/cm). 12290
We work hard to bring you the best knitting and crochet have to offer, inspiration and advice as well as great quality yarns at incredible prices! Would you like to use our patterns for other than personal use? You can read what you are allowed to do in the Copyright text at the bottom of all our patterns. Happy crafting!
Post a comment to pattern DROPS 156-42
We would love to hear what you have to say about this pattern!
If you want to leave a question, please make sure you select the correct category in the form below, to speed up the answering process. Required fields are marked *.