
Popular categories
Looking for a yarn?


Comments / Questions (317)
![]() Mònica Berta wrote:
Mònica Berta wrote:
Soy traductora y domino tanto el castellano como el alemán y he notado un ERROR en la traducción al alemán de la instrucción del modelo158-10 En alemán, en el apartado ... Armauschnitte ... GR. XXL/XXXL 29.R (Rück-R) .... 23 Stb. häkeln, 1 Mustergruppe, 23 Stb. .... y en ESPAÑOL, en el mizmo apartado ...... 24 puntos altos ..... ¿Porqué esta diferencia? Valdría la pena prestar atención a las traducciones y estos detalles.
08.02.2026 - 23:53DROPS Design answered:
Hola Mònica, parece que hay un error en el patrón en alemán, mandaremos la correción al departamento de diseño para que lo comprueben.
16.02.2026 - 14:21
![]() Marina wrote:
Marina wrote:
Buongiorno, non riesco a capire come devo proseguire dal giro 29 al 52 ( taglia L/XL ):devo lavorare solo in cerchio lasciando in sospeso le maglie dello scalfo? Grazie
17.11.2025 - 13:59DROPS Design answered:
Buongiorno Marina, le maglie dello scalfo sono state avviate e lavorate nei 2 giri precedenti, dal 29 deve proseguire come indicato. Buon lavoro!
17.01.2026 - 11:42
![]() Anne wrote:
Anne wrote:
Das soll nicht auftreten heißen, sondern "auftrennen". Die Worterkennung berichtigt wohl falsch, sorry! Bitte nochmals um Hilfe oder sagen Sie wenigstens, warum Sie nicht helfen können oder wollen!!!
04.10.2025 - 22:48DROPS Design answered:
Liebe Anne, wenn Sie das rechte Vorderteil häkeln, häkeln Sie genauso wie zuvor weiter, dh mit den Zunahmen zwischen jeder Mustergruppe genauso wiezuvor nur am Anfang und am Ende vom Vorderteil nehmen Sie nicht mehr zu, hier wird anstatt abgenommen (= 3 Stb zusammen am Anfang jeder Reihe (Hin- sowie Rückreihe) wie oben erklärt - Es wird für jedes Vorderteil 12, 14 or 16 Reihen so gehäkelt, so mit 12 Reihen = 10 cm, wird jedes Vorderteil ca 10, 12 oder 14 cm (siehe Maßskizze) messen. Kann das helfen oder misverstehe ich Ihre Frage?
16.03.2026 - 07:02
![]() Anne wrote:
Anne wrote:
Hallo, warum bekommen andere Leute Antwort und ich nicht? Sind meine Fragen so unverständlich? Geben Sie doch bitte wenigstens eine Rückmeldung. Möchte die Jacke nicht wieder auftreten, warum helfen Sie mir nicht? Gruß Anne
04.10.2025 - 22:45DROPS Design answered:
Liebe Anne, entschuldigen Sie die Verzögerung. Leider kann ich Ihnen aber auch nicht sagen, warum Sie weniger Maschen als angegeben haben. Mit der jeweils äußersten Stäbchengruppe ist die Stäbchengruppe gemeint, die sich ganz außen rechts und links an jedem Vorderteil befindet. Die Vorderteile häkeln Sie wie beschrieben ab den Markierern an. Diese müssen Sie der Anleitung entsprechend setzen, Sie zählen ab dem Rundenbeginn. Zwischen dem 1. und 2. Markierer häkeln Sie das eine Vorderteil, zwischen dem 3. und 4. Markierer das zweite Vorderteil.
23.10.2025 - 01:25
![]() Anne wrote:
Anne wrote:
Hallo, leider hab ich noch keine Antwort auf meine Frage vom 05.09. bekommen. Meine Probleme detaillierter: Wie bereits gesagt, habe ich, warum auch immer, weniger Maschen und möchte gerne wissen, wo ich die Vorderteile beginnen muss, hinten am Kragen oder weiter unten? Cm- Angaben zwischen den Markierungen wären hilfreich. Bitte helfen Sie mir, ich bin doch schon so weit und möchte nicht wieder auftreten. Danke und Gruß Anne
25.09.2025 - 12:26DROPS Design answered:
Liebe Anne, Antwort siehe oben!
23.10.2025 - 10:36
![]() Betti wrote:
Betti wrote:
Als ik alle vragen lees, zal het blijkbaar een moeilijk werk(je) worden, maar "moeilijk gaat ook". Maar ik zit al vast voor ik begin, nl. bij het proeflapje: 10 cm = 22 st & 12 toeren, met welke steek? Ik probeerde het met stokjes (wat toch de basisteek is?), maar dat klopt helemaal niet.
23.09.2025 - 15:17DROPS Design answered:
Dag Betti,
Het proeflapje haak je in stokjes.
27.09.2025 - 19:38
![]() Anne wrote:
Anne wrote:
Hallo, Ich komme leider mit den Vorderteilen nicht klar. Können Sie das bitte ausführlicher schreiben? Was meinen Sie mit "der jeweils äußeren Stäbchengruppe"? Dabei wäre vlt auch eine Maßangabe hilfreich, da ich weniger Maschen habe. Ich hoffe, Sie können mir helfen. Vielen Dank und Gruß Aus dem Diagramm werde ich auch nicht schlau, sorry.
05.09.2025 - 20:54
![]() Rosi Bekaan wrote:
Rosi Bekaan wrote:
Hallo! Danke dass ich die Möglichkeit habe Fragen zu stellen. Ich bin jetzt auf der Reihe 53 angelangt, also das heißt dass ich jetzt die Markierer setzen muss. Muss ich in dem Muster weiter fortfahren oder ein neues Muster ansetzen, weil das nicht ganz genau hinkommt. Es wäre schön, wenn ich wüsste wie ich weiterverfahren muss. Vielen Dank für Ihre Hilfe, einen schönen Tag mit lieben Grüßen Rosi Bekaan
09.07.2025 - 06:14DROPS Design answered:
Liebe Frau Bekaan, Sie häkeln Größe L/XL, richtig? Dann nach der 52. Reihe häkeln Sie die 53. Reihe wit unter ALLE GR.: erklärt wird, dh diese Rückreihe häkeln Sie wie zuvor und gleichzeitig setzen Sie Markierungen ein, dann häkeln Sie das rechte Vorderteil zwischen 1. und 2. Markierer, und danach das linke Vorderteil zwischen 3. und 4. Markeirer. Ganz am Ende häkeln Sie noch eine HÄKELRAND: um herum die ganze Jacke. Viel Spaß beim Häkeln!
23.07.2025 - 12:41
![]() Maja wrote:
Maja wrote:
Dzień dobry, pracuję nad tym projektem już jakiś czas i utknęłam pracując nad rękawami. Nie do końca rozumiem ten pattern, ponieważ idąc zgodnie z nim wzór jaki wychodzi na rękawach od samej góry wygląda jak ten na wzorze który występuje od połowy rękawa. Co zrobić żeby rękawy wyglądały identycznie jak na zdjęciach?
27.06.2025 - 13:22DROPS Design answered:
Witaj Maju, rękaw zaczynasz przerabiać słupkami od góry, czyli od otworu na rękaw. W tym samym czasie zamykasz oczka na środku pod rękawem tyle razy ile widzisz we wzorze dla swojego rozmiaru (lub tyle ile to konieczne), a następnie zaczynasz dopiero ażurowy motyw. Kończysz na nadgarstku. Powodzenia!
30.06.2025 - 08:44
![]() Anna wrote:
Anna wrote:
Tut mir leid, dass ich noch mal stören muss, aber ich verstehe die Anleitung der Ärmel nicht. Mache in der Größe L/XL. Ich weiß nicht wie ich von 94 Stb auf 58 Stb kommen soll. Können sie mir das leicht verständlich erklären? Wie viele Runden muss ich insgesamt häkeln um auf die 58 Stb zu kommen?
25.05.2025 - 16:05DROPS Design answered:
Liebe Anna, man wird 1 Stäbchen beidseitig (= 1 Stäbchen am Anfang + 1 Stäbchen am Anfang der Reihe (siehe ABNAHMETIPP (gilt für die Ärmel): am Anfang der schriftlichen Anleitung) abnehmen, und diese Abnahmen werden insgesamt 18 Mal (abwechslungsweise in jeder 2. und in jeder 3 Reihe) gehäkelt, so sind es noch: 94-(2x18)=58 Stäbchen übrig. Viel Spaß beim Häkeln!
26.05.2025 - 09:29
|
|
Winter Solstice#wintersolsticecardigan |
|
 |
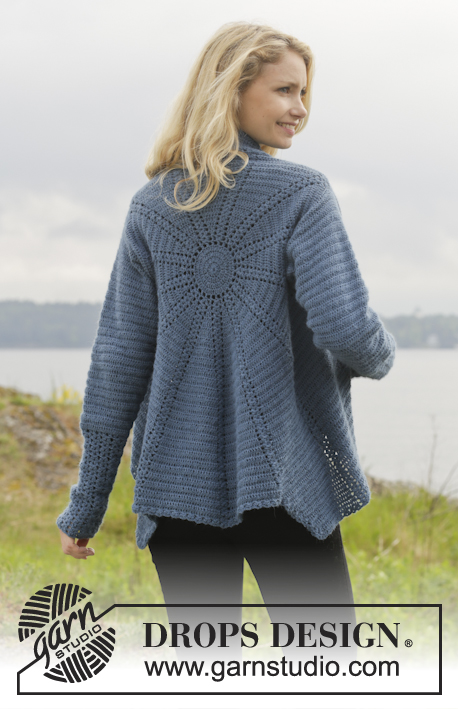 |
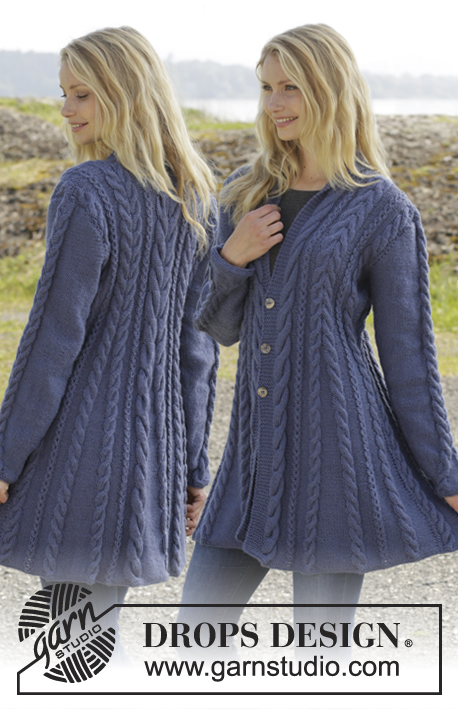
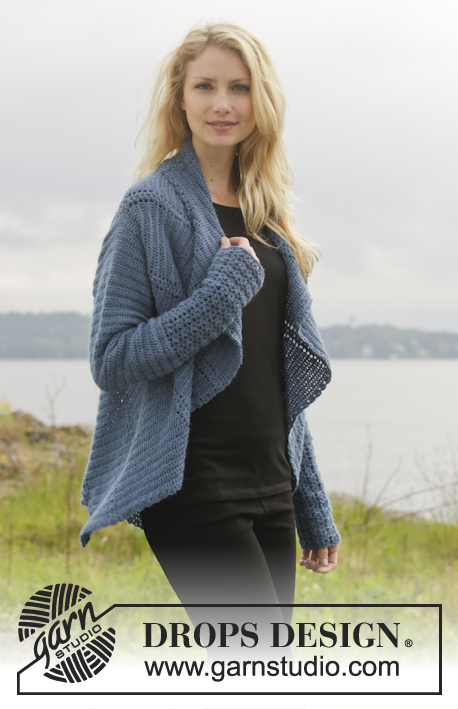
Crochet DROPS jacket worked in a circle in "Alpaca". Size: S - XXXL.
DROPS 158-10 |
|
|
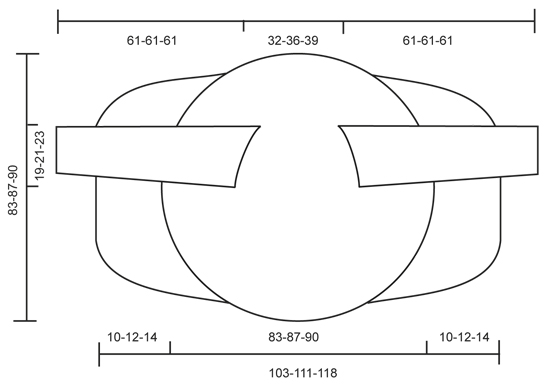
CROCHET INFO: Beg every round/row with 3 ch that replace 1st tr and finish every round/row with 1 sl st in 3rd ch from beg of round/row. PATTERN GROUP: Each pattern group consists of: 1 ch, 2 TR WORKED TOG - see explanation below, 2 ch, 2 tr worked tog and 1 ch. TR WORKED TOG: * Make 1 YO, insert hook in ch-space, get yarn, make a YO, pull through 2 of the sts on hook *, repeat from *-* one more time, make 1 YO and pull yarn through all 3 sts on hook. CROCHET 3 TR TOG: Work 3 tr into 1 tr at beg of row as follows: Work 2 ch (= replace 1 tr), work 1 tr, but wait with last pull through (= 2 strands on hook), then work next tr but on last pull through, pull yarn through all sts on hook. DECREASE TIP (applies to sleeves): Dec at beg of row by working 1 sl st over the tr to be dec. Dec at end of row by working until 1 tr to be dec remains, turn piece. -------------------------------------------------------- CIRCLE: Work 5 ch on hook size 3.5 mm with Alpaca and form a ring with 1 sl st in first ch. READ CROCHET INFO. ROUND 1: Work 13 tr in ch-ring. ROUND 2: Work * 2 tr in every tr*, repeat from *-* the entire round = 26 tr. ROUND 3: Work * 2 tr in first tr, then 1 tr in next tr *, repeat from *-* the entire round = 39 tr. ROUND 4: Work * 2 tr in first tr, then 1 tr in each of the next 2 tr *, repeat from *-* the entire round = 52 tr. ROUND 5: Work * 1 tr in next tr, then 2 ch, skip 1 tr *, repeat from *-* the entire round = 26 ch-spaces and 26 tr. REMEMBER THE CROCHET TENSION! ROUND 6: In first tr work PATTERN GROUP - see explanation above, * 1 tr in next tr, 1 pattern group in next tr *, repeat from *-* until 1 tr remains, 1 tr in last tr = 13 pattern groups with 1 tr between each. Then work piece back and forth. Work every row tog at the end of row with 1 sl st in first st on row. Turn piece. ROW 7 (= from WS): 2 tr in first tr, * 1 pattern group in next pattern group, 2 tr in next tr (= tr-group) *, repeat from *-* until 1 pattern group from previous row remains, 1 pattern group = 13 pattern groups with 13 tr-groups between each. Turn piece. ROW 8: 1 pattern groups in first pattern group, * 2 tr in first tr, 1 tr in each of the next tr in tr-group, 1 pattern group in next pattern group *, repeat from *-* until 1 tr-group remains, 2 tr in first tr, 1 tr in each of the next tr in tr-group = 13 groups with 3 tr between each. Turn piece. ROW 9: 2 tr in first tr, 1 tr in each of the next tr in tr-group, * 1 pattern group in pattern group, 2 tr in first tr of tr-group, 1 tr in each of the next tr *, repeat from *-* until 1 pattern group from previous row remains, 1 pattern group = 13 groups with 4 tr between each. Turn piece. Then repeat 8th and 9th row until 6 rounds + 18-20-22 rows have been worked (= 19-21-23 tr between every pattern group) = 247-273-299 tr and 13 pattern group. Piece measures approx. 20-22-23 cm from centre and outwards. Now work armholes as follows in the different sizes: SIZE S/M: ROW 25 (= from WS): Inc in every group with tr as before. Work 20 tr, 1 pattern group, 20 tr, work 50 loose ch (= right armhole), skip 2 tr-groups and 2 pattern groups. Then work tr-groups and pattern groups as before over the next 114 tr, work 50 loose ch (= left armhole), skip 2 tr-groups and 2 pattern groups, work as before the rest of row, finish with 1 sl st in first tr on row = 180 tr and 100 ch. Turn piece. ROW 26: Continue with pattern and inc as before but work first ch-row (= left armhole) as follows: 10 tr, skip 1 ch, 11 tr, skip 1 ch, 1 pattern group, skip 1 ch, 11 tr, skip 1 ch, 10 tr, skip 1 ch, 1 pattern group and skip 1 ch. I next ch-row (= right armhole) work the same way but in opposite order, i.e. beg by skipping 1 ch, 1 pattern group and finish with tr = 273 tr. ROW 27-50: Work pattern as before but now inc only on even numbered rows until 50 rows have been worked in total = 429 tr (33 tr in every tr-group). Piece measures approx. 42 cm from centre and outwards. SIZE L/XL: ROW 27 (= from WS): Inc in every group with tr as before. Work 22 tr, 1 pattern group, 22 tr, work 54 loose ch (= right armhole), skip 2 tr-groups and 2 pattern groups. Then work pattern as before over the next 126 tr, work 54 loose ch (= left armhole), skip 2 tr-groups and 2 pattern groups, work as before the rest of row, finish with 1 sl st in first tr on row = 198 tr and 108 ch. Turn piece. ROW 28: Continue with pattern and inc as before but work first ch-row (= left armhole) as follows: 11 tr, skip 1 ch, 12 tr, skip 1 ch, 1 pattern group, skip 1 ch, 12 tr, skip 1 ch, 11 tr, skip 1 ch, 1 pattern group and skip 1 ch. I second ch-row (= right armhole) work the same way but in opposite order, i.e. beg by skipping 1 ch, 1 pattern group and finish with tr = 299 tr. ROW 29-52: Work pattern as before but now inc only on even numbered rows until 52 rows have been worked in total = 455 tr (35 tr in every tr-group). Piece measures approx. 43 cm from centre and outwards. SIZE XXL/XXXL: ROW 29 (= from WS): Inc in every group with tr as before. Work 24 tr, 1 pattern group, 24 tr, work 58 loose ch (= right armhole), skip 2 tr-groups and 2 pattern groups. Then work pattern as before over the next 138 tr, work 58 loose ch (= left armhole), skip 2 tr-groups and 2 pattern groups, work as before the rest of row, finish with 1 sl st in first pattern group on row = 216 tr and 116 ch. Turn piece. ROW 30: Continue with pattern and inc as before but work first ch-row (= left armhole) as follows: 12 tr, skip 1 ch, 13 tr, skip 1 ch, 1 pattern group, skip 1 ch, 13 tr, skip 1 ch, 12 tr, skip 1 ch, 1 pattern group and skip 1 ch. I second ch-row (= right armhole) work the same way but in opposite order, i.e. beg by skipping 1 ch, 1 pattern group and finish with tr = 325 tr. ROW 31-54: Work pattern as before but now inc only on even numbered rows until 54 rows have been worked in total = 481 tr and 37 tr in every tr-group. Piece measures approx. 45 cm from centre and outwards. ALL SIZES: Insert 4 markers in the piece as follows from WS: Work 16-17-18 tr, insert 1st marker here, work 17-18-19 tr, * 1 pattern group, 33-35-37 tr *, repeat from *-* 3 more times, insert 2nd marker here (1st-2nd marker = right front piece). Work 1 pattern group, 33-35-37 tr, 1 pattern group, 33-35-37 tr and 1 pattern group, insert 3rd marker here. * Work 33-35-37 tr, 1 pattern group *, repeat from *-* 3 more times, 17-18-19 tr, insert 4th marker. (3rd-4th marker = left front piece). Work the rest of row. Sts between 1st and 4th marker are up towards neck. Cut the yarn and fasten. RIGHT FRONT PIECE: Now work right front piece between 1st and 2nd marker, beg from 2nd marker (i.e. from RS) = 149-158-167 tr and 4 pattern groups. Continue inc on every row in tr-groups as before BUT do not inc in tr-groups in each side of front piece - AT THE SAME TIME dec 2 tr at beg of every row by CROCHET 3 TR TOG - see explanation above. Continue to work until 12-14-16 rows have been worked over front piece. Cut the yarn and fasten. LEFT FRONT PIECE: Work left front piece between 3rd and 4th marker the same way as right front piece, beg from 4th marker (i.e. from RS). SLEEVES: Work back and forth from armhole and down, work every row tog with 1 sl st at the end of row. Use hook size 3.5 mm and Alpaca. Beg by working 86-94-102 tr around the opening for sleeve, beg of row should be under sleeve. Then work 3 rows with 1 tr in every tr. Continue with 1 tr in every tr - AT THE SAME TIME dec in the different sizes as follows: READ DECREASE TIP! SIZE S/M: Dec 1 st in each side of piece every other row 4 times and then every 3rd row 12 times (= 16 times in total) = 54 tr. SIZE L/XL: Dec 1 st in each side of piece alternately every 3rd and 2nd row 18 times in total = 58 tr. SIZE XXL/XXXL: Dec 1 st in each side of piece every other row 17 times and then every 3rd row 4 times (= 21 times in total) = 60 tr. Then work pattern groups as follows: ROW 1: 2 tr, 1 ch * work the next 2 tr tog, 1 ch *, repeat from *-* and finish with 2 tr. ROW 2: Work 2 tr, * in next ch work 1 pattern group, skip 1 ch *, repeat from *-*, and finish with 1 tr in each of the last 2 tr. Turn piece. ROW 3: Work 2 tr, 1 pattern group in each of the next pattern groups until 2 tr remain, work 1 tr in each of these. Turn piece. Repeat 3rd row until piece measures approx. 61 cm in all sizes. Cut the yarn and fasten. CROCHET EDGE: Work 1 round with around the entire jacket as follows: * 1 pattern group, skip 2 tr/1 row *, repeat from *-* the entire round. |
|
 |
|
Have you finished this pattern?Tag your pictures with #dropspattern #wintersolsticecardigan or submit them to the #dropsfan gallery. Do you need help with this pattern?You'll find 8 tutorial videos, a Comments/Questions area and more by visiting the pattern on garnstudio.com. © 1982-2026 DROPS Design A/S. We reserve all rights. This document, including all its sub-sections, has copyrights. Read more about what you can do with our patterns at the bottom of each pattern on our site. |
|


With over 40 years in knitting and crochet design, DROPS Design offers one of the most extensive collections of free patterns on the internet - translated to 17 languages. As of today we count 324 catalogues and 12290 patterns translated into English (UK/cm). 12290
We work hard to bring you the best knitting and crochet have to offer, inspiration and advice as well as great quality yarns at incredible prices! Would you like to use our patterns for other than personal use? You can read what you are allowed to do in the Copyright text at the bottom of all our patterns. Happy crafting!
Post a comment to pattern DROPS 158-10
We would love to hear what you have to say about this pattern!
If you want to leave a question, please make sure you select the correct category in the form below, to speed up the answering process. Required fields are marked *.