
Popular categories
Looking for a yarn?


Comments / Questions (46)
![]() MOREAU wrote:
MOREAU wrote:
Bonjour, JE ne comprends pas cette phrase: "tourner et tricoter le retour juqu'au début du tour." Est le debut du tour pour être au milieu dos (donc tricoter que 30mailles) ou est ce le debut du tour à l'origine. Merci
08.04.2015 - 12:53DROPS Design answered:
Bonjour Mme Moreau, le début du tour se trouve effectivement au milieu dos dès le début, le dernier des rangs raccourcis se fait sur l'envers, jusqu'au marqueur du début du tour. On place ensuite les marqueurs au tour suivant (sur l'endroit). Bon tricot!
08.04.2015 - 13:05
![]() CINZIA wrote:
CINZIA wrote:
Buonasera sono una vostra fan. Vorrei sapere se per il modello scelto c'è la versione normale e non top down perchè ho paura di non essere capace.Grazie a presto
17.02.2015 - 16:30DROPS Design answered:
Buonasera Cinzia! Il modello in questione è stato progettato top down dalle designers DROPS per una migliore vestibilità. Se segue attentamente le istruzioni non avrà problemi nella realizzazione, ma se incontrasse difficoltà può chiedere aiuto nei commenti o nel forum DROPS. Buon lavoro!!
17.02.2015 - 17:49
![]() Sarah Rokus wrote:
Sarah Rokus wrote:
Could you please check the directions on the back neck elevation for this sweater? I can't understand them. After some trial and error on paper, I thought it should read: knit 24, turn, knit 48 then proceed from there. If not, I need clarification on: knit 48, turn, knit 53. Thank you.
30.01.2015 - 07:04DROPS Design answered:
Dear Mrs Rokus, in 2nd size work the short rows as follows (in stocking st): K 48 sts from RS, turn and P 53 sts from WS, turn and work 5 sts more = 53+5= K 55 sts from RS, turn and P 5 sts more = 63 sts from WS, turn and K 68 sts from RS, turn and work row to the end of row. Happy knitting!
02.12.2015 - 17:48
![]() Lucia wrote:
Lucia wrote:
Molto bello, a dire il vero mi sembrava più facile. Mi sono bloccata già all'alzata dietro. Non mi è chiaro da dove inizia. Grazie
06.11.2014 - 22:52DROPS Design answered:
Buonasera Lucia, deve lavorare un'alzata sul dietro del collo a ferri accorciati, esattamente come indicato, e anche alla fine dei ferri accorciati deve seguire esattamente le indicazioni su come inserire i segnapunti. Ci riscriva se non è chiaro. Buon lavoro!!
06.11.2014 - 23:25
![]() Alexa wrote:
Alexa wrote:
Verstehe ich das Diagramm richtig: 2 Reihen M rechts - M links, dann 2 Reihen M links - M rechts?
01.11.2014 - 15:43DROPS Design answered:
Ja, also so, dass auf der Vorderseite immer in 2 R übereinander erst 1 M re, 1 M li im Wechsel und dann in den nächsten 2 R 1 M li, 1 M re im Wechsel zu sehen ist. Es handelt sich um das große Perlmuster, falls Ihnen das unter diesem Namen geläufiger ist. Das Diagramm zeigt alle R des Musters.
01.11.2014 - 20:22
![]() Iren Olsen wrote:
Iren Olsen wrote:
Venter på oppskrift :-)
01.07.2014 - 00:09
![]() Celine wrote:
Celine wrote:
Super joli,simple, je vais enfin pouvoir commander de la cotton merino.
21.06.2014 - 23:28
![]() Aase wrote:
Aase wrote:
Den vil jeg helt sikkert strikke.
21.06.2014 - 13:51
![]() Emma wrote:
Emma wrote:
Semplice e raffinato
14.06.2014 - 17:38Kerstin Sheldrake wrote:
Endlich was in Cotton Merino! ;)
12.06.2014 - 17:35
|
|||||||
Come Here#comeheresweater |
|||||||
|
|
|||||||
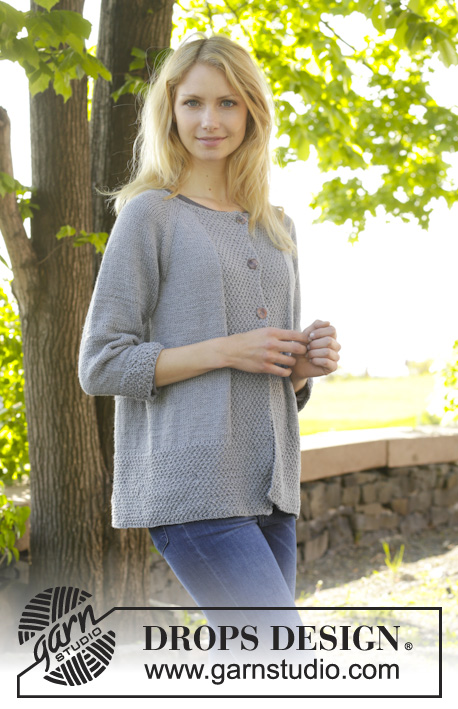
Knitted DROPS jumper with raglan and moss st worked top down in ”Cotton Merino”. Size: S - XXXL.
DROPS 157-34 |
|||||||
|
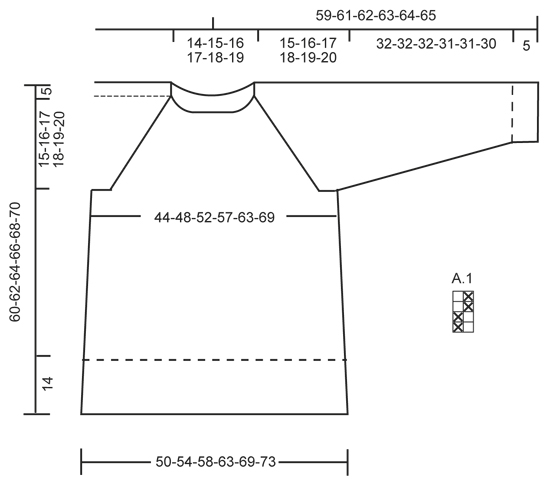
GARTER ST (in the round on circular needle): * K 1 round and P 1 round *, repeat from *-*. 1 ridge = 2 rounds. PATTERN (double moss st vertically): See diagram A.1. The diagram shows all rows in pattern seen from RS. RAGLAN: Inc 2 sts on each side of every raglan as follows (= 16 sts inc): Inc as follows before 4 sts in stocking st and marker: K 2 in the next 2 sts (i.e. work in front and back loop of st) = 2 sts inc. Inc as follows after marker and 2 sts in stocking st: K 2 in the next 2 sts (i.e. work in front and back loop of st) = 2 sts inc. Inc 1 st on each side of every raglan as follows (= 8 sts inc): Inc as follows before 2 sts in stocking st and marker: 1 YO, 2 sts in stocking st. Inc after marker as follows: 2 sts in stocking st, 1 YO. K YOs twisted on next row to avoid holes. DECREASE TIP: Dec as follows before marker: Work until 3 sts remain before marker, K 2 tog, K 1. Dec as follows after marker: K 1, slip 1 st as if to K, K 1, psso. ---------------------------------------------------------- JUMPER: Work jumper top down on circular needle. Work sleeve in the round on circular needle/double pointed needles. YOKE: Cast on 100-106-110-114-118-122 sts on circular needle size 3.5 mm with Cotton Merino. Work 3 ridges in GARTER ST – see explanation above, AT THE SAME TIME on 1st round in 2nd ridge inc 10-14-18-22-29-35 sts evenly. Repeat inc in 3rd ridge = 120-134-146-158-176-192 sts. Switch to circular needle size 4 mm. Then work an elevation in back of neck in stocking st as follows, beg from RS Work 20-24-27-30-34-38 sts, turn, work 40-48-54-60-68-76 sts, turn. Continue back and forth over 5 sts more on every turn until 60-68-75-80-88-96 sts are worked, turn and work back to beg of round = mid back. Now work as follows from mid back: 19-22-25-28-32-36 sts in stocking st, insert a marker, 22-23-23-23-24-24 sts in stocking st, insert a marker, 38-44-50-56-64-72 sts in stocking st, insert a marker, 22-23-23-23-24-24 sts in stocking st, insert a marker, stocking st over the last 19-22-25-28-32-36 sts on round. REMEMBER THE KNITTING TENSION! On next round start inc for RAGLAN – see explanation above! Inc 2 sts on each side of every marker on every other round 1-1-1-2-2-3 times. Then inc 1 st on each side of every marker on every other round 18-19-21-21-23-23 times in total, and on every 4th round 1 time in all sizes = 288-310-338-366-400-432 sts. Piece measures 20-21-22-23-24-25 cm from shoulder. Now work as follows: Work the first 40-44-49-54-60-66 sts, slip the next 64-67-71-75-80-84 sts on a stitch holder (= sleeve), cast on 12 new sts under left sleeve (insert a marker in the middle of these new sts), work the next 80-88-98-108-120-132 sts, slip the next 64-67-71-75-80-84 sts on a stitch holder (= sleeve), cast on 12 new sts under right sleeve (insert a marker in the middle of these new sts), work the remaining 40-44-49-54-60-66 sts. NOW MEASURE THE PIECE FROM HERE. BODY: There are now 184-200-220-240-264-288 sts for body. Work in stocking st in the round. When piece measures 4 cm, inc 2 sts in each side as follows: Work until 1 st before marker, 1 YO, 2 sts in stocking st, 1 YO, continue as before over front piece until 1 st remains before next marker, 1 YO, 2 sts in stocking st, 1 YO, work the rest of round = 188-204-224-244-268-292 sts. NOTE: On next round K YOs twisted to avoid holes. Repeat inc every 2½-2½-3-3-3-3½ cm 6-6-5-5-5-4 more times = 212-228-244-264-288-308 sts. When all inc are done and piece measures 26-27-28-29-30-31 cm, continue with A.1 over all sts. When piece measures 40-41-42-43-44-45 cm, cast off with K over K and P over P. SLEEVE: Work sleeve in stocking st in the round on circular needle/double pointed needles. There are 64-67-71-75-80-84 sts for each sleeve. Slip sts from stitch holder back on circular needle/double pointed needles size 4 mm and cast on 12 new sts under sleeve = 76-79-83-87-92-96 sts. Work in stocking st in the round, AT THE SAME TIME insert a marker in the middle of the new sts under sleeve (i.e. 6 sts on each side of marker). NOW MEASURE THE PIECE FROM HERE. When piece measures 4 cm, dec 1 st on each side of marker - READ DECREASE TIP. Repeat dec approx. every 2-2-2-1½-1½-1½ cm 11-11-12-13-15-15 more times = 52-55-57-59-60-64 sts. When sleeve measures 32-32-32-31-31-30 cm, dec 0-1-1-1-0-0 sts = 52-54-56-58-60-64 sts. Continue with A.1 over all sts. Cast off when sleeve measures 37-37-37-36-36-35 cm. Work the other sleeve the same way. ASSEMBLY: Sew the holes under the sleeves. |
|||||||
Diagram explanations |
|||||||
|
|||||||
 |
|||||||
Have you finished this pattern?Tag your pictures with #dropspattern #comeheresweater or submit them to the #dropsfan gallery. Do you need help with this pattern?You'll find 25 tutorial videos, a Comments/Questions area and more by visiting the pattern on garnstudio.com. © 1982-2026 DROPS Design A/S. We reserve all rights. This document, including all its sub-sections, has copyrights. Read more about what you can do with our patterns at the bottom of each pattern on our site. |
|||||||


With over 40 years in knitting and crochet design, DROPS Design offers one of the most extensive collections of free patterns on the internet - translated to 17 languages. As of today we count 324 catalogues and 12290 patterns translated into English (UK/cm). 12290
We work hard to bring you the best knitting and crochet have to offer, inspiration and advice as well as great quality yarns at incredible prices! Would you like to use our patterns for other than personal use? You can read what you are allowed to do in the Copyright text at the bottom of all our patterns. Happy crafting!
Post a comment to pattern DROPS 157-34
We would love to hear what you have to say about this pattern!
If you want to leave a question, please make sure you select the correct category in the form below, to speed up the answering process. Required fields are marked *.