
Popular categories
Looking for a yarn?


Comments / Questions (21)
![]() Leona wrote:
Leona wrote:
1. Increase row after rib. Is this a rib row or a knit row 2. Says to use Pattern 1. No such pattern, only M1 3. Page 2 has half the legend, only then on page 3 is the full diagram explanation. Extremely confusing 4. No video showing the actual pattern. All videos in stocking stitch. Why no sample knit of pattern?
01.04.2020 - 15:26DROPS Design answered:
Dear Leona, increase the 0-2-4 sts on a WS row so that first row in M.1 will be worked from RS - you will find how to read knitting diagrams here. Happy knitting!
01.04.2020 - 15:45
![]() Leona wrote:
Leona wrote:
How do I know what each of these refer to? The diagram is there but I do not know which character refers to which instruction..... I see this is the same on all Drops patterns. Is the assumption taht everyone has used your patterns before? = stockinette = yo =K2tog
28.03.2020 - 11:01DROPS Design answered:
Dear Leona, see symbol before diagram text like first one = white square = 1 stitch in stocking stitch, 2nd one: round in a square = yarn over and so on. Read more about diagrams here. Happy knitting!
30.03.2020 - 09:29
![]() Rinzivillo B wrote:
Rinzivillo B wrote:
Bonjour, Pouvez vous me confirmer que dans M1 tous les rangs se tricotent à l.endroit formant ainsi une base en point mousse ?Merci !
28.02.2020 - 20:10DROPS Design answered:
Bonjour Mme Rinzivillo, les diagrammes montrent tous les rangs du motif, vus sur l'endroit, autrement dit, les diagrammes se tricotent en jersey (= on verra une maille endroit sur l'endroit). Bon tricot!
02.03.2020 - 08:55
![]() Friederike wrote:
Friederike wrote:
Das Muster sieht so schön aus, aber ich krieg es einfach nicht hin. Die 184 M incl. 2 Randmaschen für Gr. S/M werden in jeder Reihe weniger! Im letzten Rapport fehlen in jeder Reihe mehr Maschen. Ich habe schon 2 mal wieder aufgeribbelt, ganz akribisch gezählt - und das Problem stellt sich jedesmal von neuem. Ich habe versucht zu schummeln, indem ich am Ende Maschen dazu aufgenommen habe, bis der Rapport komplett war, aber das sieht doof aus. Wie mache ich es richtig?
28.08.2019 - 09:04DROPS Design answered:
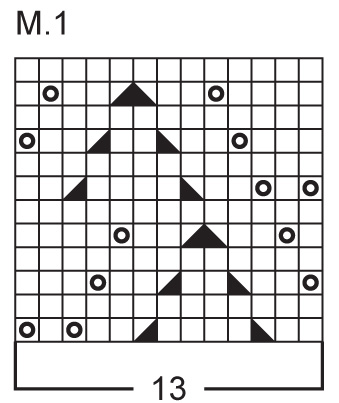
Liebe Friederike, so stricken Sie die 184 Maschen: 1 Randmasche kraus rechts, M.1 (= 13 M) x 14 Mal wiederholen (= über die nächsten 182 Maschen), 1 Randmasche krausrechts = 1+182+1=184. Setzen Sie Markierungen zwischen jedem Rapport ein, es kann Ihnen helfen, die richtige Maschenanzahl in jedem Rapport zu prüfen. Viel Spaß beim stricken!
28.08.2019 - 12:09
![]() SAVALLE Christiane wrote:
SAVALLE Christiane wrote:
Bonjour je trouve que l'explication de ce point ne me dit pas comment commencer mon premier rang après mes côtes merci pour votre réponse christiane savalle
01.08.2019 - 14:35DROPS Design answered:
Bonjour Mme Savalle, tricotez le 1er rang après les côtes en suivant M.1, en même temps, montez 1 m de chaque côté (après avoir mis les 10 m de chaque côté en attente) et augmentez si besoin dans votre taille. Bon tricot!
08.08.2019 - 10:53
![]() Bogumiła Franiewska wrote:
Bogumiła Franiewska wrote:
Co oznacza czarny trójkąt obejmujący dwa oczka w schemacie wzoru. Nie ma tego w objaśnieniu. Bardzo proszę o odpowiedż
24.06.2019 - 23:17DROPS Design answered:
Witaj Bogusiu! Są to 2 symbole obok siebie: pierwsza połowa trójkąta oznacza 2 o. razem na prawo, a druga oznacza: zdjąć 1 o. jak do przerobienia na prawo, 1 o.p., przełożyć oczko zdjęte nad przerobionym oczkiem. Pozdrawiamy!
25.06.2019 - 12:46
![]() Susan Lloyd wrote:
Susan Lloyd wrote:
Thank you for your help
25.04.2018 - 20:20
![]() Susan Lloyd wrote:
Susan Lloyd wrote:
Is this the pattern for the sleeveless version as well - it looks different
24.04.2018 - 19:44DROPS Design answered:
Dear Mrs Lloyd, you will find the sleeveless version here. Happy knitting!
25.04.2018 - 08:08Pauline Martin wrote:
Re 73-7 left front with 50 sts on needle. Pattern chart, line 1, last stitch shows knit 2 together at front edge. So do I include the edge stitch? Otherwise how do I knit 2 together? In looking at the graph, it looks to me that on every other row, the decrease on the front edge must include the garter edge stitch. please clarify this for me. I find this pattern VERY confusing. Thank you. Pauline Martin
16.08.2017 - 03:50DROPS Design answered:
Hello Pauline. You decrease inside 1 edge st; the edge st is not shown on chart, but is worked in garter st throughout. Happy knitting!
20.08.2017 - 17:43
![]() Sylvia wrote:
Sylvia wrote:
Jag förstår inte beskrivningen på vänster framstycke. Förklaring tack
04.02.2015 - 03:09
|
|||||||||||||
DROPS 73-7 |
|||||||||||||
|
|
|||||||||||||
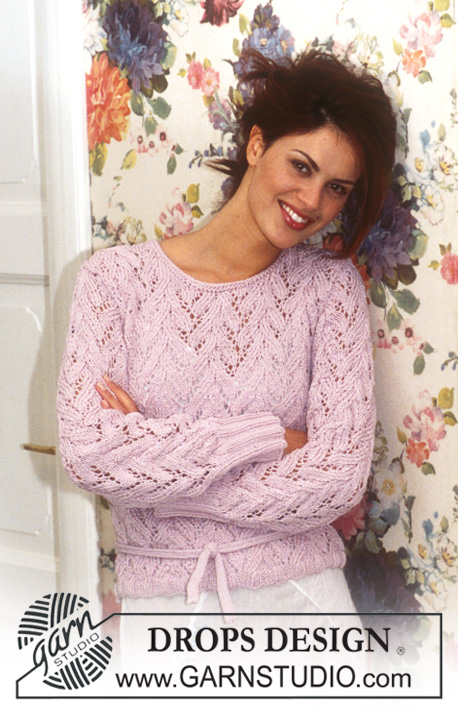
DROPS Cardigan in Muskat
DROPS 73-7 |
|||||||||||||
|
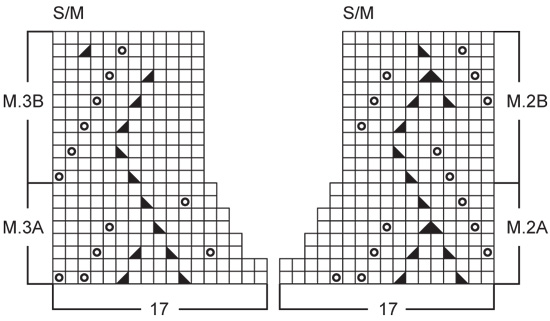
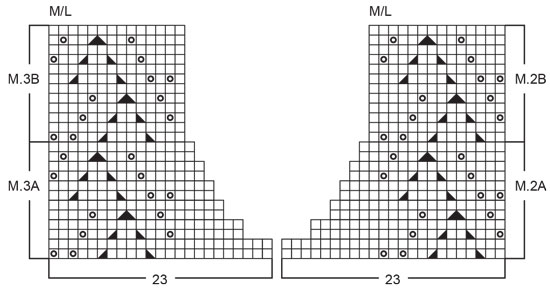
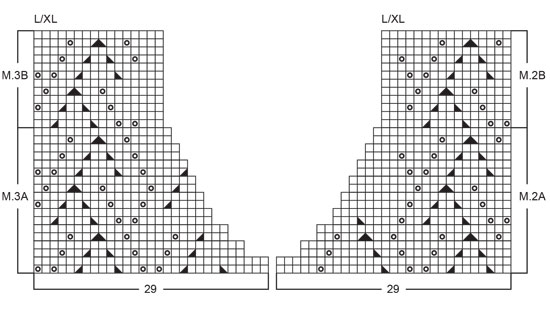
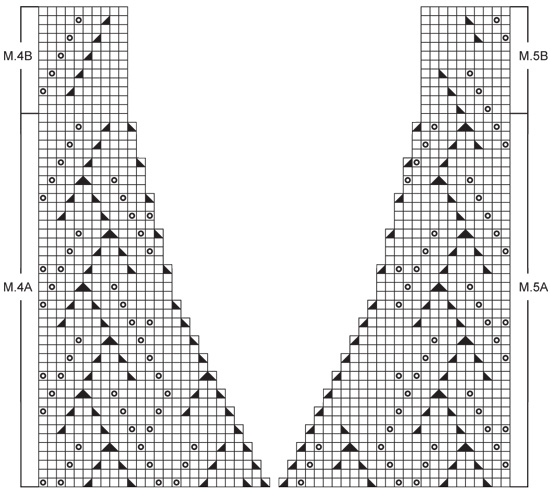
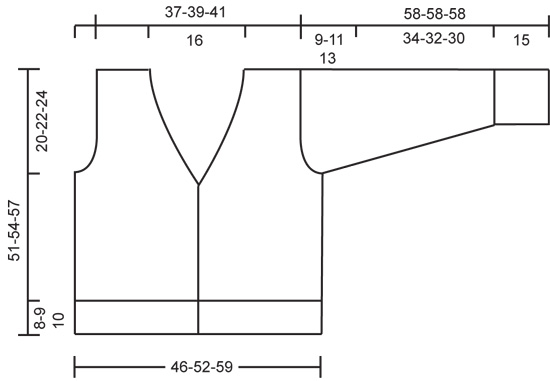
Gauge: 20 sts x 26 rows = 10 x 10 cm on larger needles in pattern. 1 repeat of Pattern 1 = 7 cm wide. Garter st, when knitting flat: Knit all sts, all rows. Pattern: See diagrams M.1 - M.5. The pattern is seen from the right side. Note: Patterns 2 and 3 (armhole shaping) are different for each size - use the chart for your size. NB: On the garment, the lace pattern (by mistake) is shown with a couple of holes too small, but follow the diagram and possibly see DROPS Design Model no. 73-5 to see how the pattern will look when the diagram is worked. Rib: * K 2, P 4 *, repeat from * - *. Buttonhole: Make buttonholes along right button band. 1 buttonhole = bind off the 2 sts at center of buttonband (P sts) and cast on 2 new sts over the bound off sts on the next row. Make buttonholes when buttonband measures: Size S/M: 2, 9, 15, 22, 28 and 34 cm. Size M/L: 2, 9, 15, 22, 29 and 35 cm. Size XL: 2, 9, 16, 22, 29 and 36 cm. Body: Cast on 202-226-250 sts on smaller circular needles. Knit rib as follows (right side row): K 2 (edge sts knit in garter st), K 2, P 2, K 2, P 2 (these 10 sts are the buttonband), * K 2, P 4 *, repeat from * - * to last 12 sts, K 2, P 2, K 2, P 2, K 2 and K 2 (edge sts knit in garter st). Knit rib for 8-9-10 cm - make buttonhole on right buttonband - see instructions above. Then put the 10 button band sts at each side on st holders, these will be knit separately. Change to larger circular needles, cast on 1 new st at each side at the center front (for sewing buttonbands) and inc 0-2-4 sts evenly distributed on the row = 184-210-236 sts. Knit Pattern 1, keeping 1 st at each edge in garter st throughout. When the piece measures approx. 31-32-33 cm - adjust to end after a complete repeat of Pattern 1 - knit the next row as follows (right side row): K 1 (edge st), 26 sts of Pattern 1, Pattern 2 (17-23-29 sts), bind off 5-6-7 sts for armhole, Pattern 3A (17-23-29 sts), 52 sts of Pattern 1, Pattern 2 (17-23-29 sts), bind off 5-6-7 sts for armhole, Pattern 3A (17-23-29 sts), 26 sts of Pattern 1, K 1 (edge st). Knit each piece separately. Left front: = 44-50-56 sts. Read the entire next section before knitting: Now bind off for armhole at the side following Pattern 3A, knit the remaining sts as before. After armhole bind off knit Pattern 3B to finished measurements. At the same time when 1 repeat of Pattern 1 has been knit after the start of armhole shaping (the piece measures approx. 35-38 cm), shape the neck following Pattern 5A (dec inside 1 edge st not shown on chart). After neck shaping follow Pattern 5B to finished measurements. After all armhole and neck shaping is complete 23-25-27 sts remain on shoulder. Bind off when the piece measures approx. 51-54-57 cm. Right front: = 44-50-56 sts. Bind off for armhole and neck as on left front but follow Pattern 2A/B and Pattern 4A/B. Bind off when the piece measures approx. 51-55-57 cm. Back: = 86-98-110 sts. Bind off for armhole at each side following Pattern 2A and Pattern 3A = 76-80-84 sts remain on needles. Continue with Pattern 1 over the center 52 sts and Pattern 2B and Pattern 3B over 12-14-16 sts at each side. When the piece measures 49-52-55 cm bind off the center 30 sts for the neck = 23-25-27 sts remain on each shoulder. Bind off the remaining sts when the piece measures 51-54-57 cm. Sleeve: Cast on 54-54-60 sts on smaller double-pointed needles; join and place a marker at the join. Knit rib for 15 cm. Knit the next row as follows: * K 1, yo, slip 1 as if to knit, K 1, psso, K 1, K 2 tog, yo *, repeat from * - *. Change to larger double-pointed needles and knit stockinette st to finished measurements. At the same time when the piece measures 17 cm inc 1 st each side of marker every 9-6-5 rows a total of 10-13-14 times = 74-80-88 sts. When the piece measures 49-47-45 cm bind off 3 sts each side of marker and knit the rest back and forth on needles. Then bind off for sleeve cap at each side every other row: 2 sts 4 times and 1 st 2-5-7 times, then bind off 2 sts each side until the piece measures 57 cm and then bind off 3 sts 1 time. Bind off, sleeve measures approx. 58 cm. Assembly: Sew shoulder seams. Left button band: Pick up sts on st holder and continue with rib on smaller needles until buttonband measures approx. 60-66 cm (measured to fit to center back, the buttonband should fit loosely when sewn. Bind off in pattern. Right button band: knit the same as the left but make buttonholes along buttonband. Sew button bands at center back. Sew buttonbands to the edge st on the cardigan. Sew in sleeves and buttons. |
|||||||||||||
Diagram explanations |
|||||||||||||
|
|||||||||||||
 |
|||||||||||||
 |
|||||||||||||
 |
|||||||||||||
 |
|||||||||||||
 |
|||||||||||||
 |
|||||||||||||
Have you finished this pattern?Tag your pictures with #dropspattern or submit them to the #dropsfan gallery. Do you need help with this pattern?You'll find 23 tutorial videos, a Comments/Questions area and more by visiting the pattern on garnstudio.com. © 1982-2026 DROPS Design A/S. We reserve all rights. This document, including all its sub-sections, has copyrights. Read more about what you can do with our patterns at the bottom of each pattern on our site. |
|||||||||||||


With over 40 years in knitting and crochet design, DROPS Design offers one of the most extensive collections of free patterns on the internet - translated to 17 languages. As of today we count 324 catalogues and 12290 patterns translated into English (UK/cm). 12290
We work hard to bring you the best knitting and crochet have to offer, inspiration and advice as well as great quality yarns at incredible prices! Would you like to use our patterns for other than personal use? You can read what you are allowed to do in the Copyright text at the bottom of all our patterns. Happy crafting!
Post a comment to pattern DROPS 73-7
We would love to hear what you have to say about this pattern!
If you want to leave a question, please make sure you select the correct category in the form below, to speed up the answering process. Required fields are marked *.