
Popular categories
Looking for a yarn?


Comments / Questions (97)
![]() Paris wrote:
Paris wrote:
Bonjour J’ai fait la bordure en suivant le diagramme A1 Ensuite une série de rangs raccourcis 1 Si bien que j’arrive encore à 17 mailles Même si je fais 18 fois ça va me faire une bande ajourée Il y a quelque chose que je ne comprends pas au moment de faire les rangs raccourcis . Merci de votre réponse Joli modèle .
23.06.2024 - 16:37DROPS Design answered:
Bonjour Mme Paris, lorsque le diagramme A.1 a été tricoté, tricotez les 4 rangs des rangs raccourcis ainsi: (1 rang sur l'endroit sur toutes les mailles, sur l'envers: tricotez les 17 premières mailles seulement, tournez et tricotez les 17 mailles sur l'endroit, tournez, rabattez les 6 premières mailles au début du rang sur l'envers, tournez et tricotez toutes les mailles à l'endroit). Au rang suivant, reprenez le diagramme A.1 et les augmentations comme vous avez fait la 1ère fois. Continuez ainsi en tricotant A.1 (avec les augm.) et les 4 rangs raccourcis pour former un joli arrondi. Bon tricot!
24.06.2024 - 09:52
![]() Marie wrote:
Marie wrote:
Bonsoir,est il obligatoire de tricoter ce modèle sur des aiguilles circulaires? Merci pour votre réponse.
16.10.2023 - 19:50DROPS Design answered:
Bonjour Marie, le bonnet et le châle se tricotent tous deux en allers et retours sur aiguille circulaire, vous pouvez donc utiliser des aiguilles droites, vos mailles seront juste (beaucoup) plus serrées, pensez à bien conserver la bonne tension. Retrouvez plus d'infos sur les aiguilles circulaires ici. Bon tricot!
17.10.2023 - 09:20
![]() Lisbeth wrote:
Lisbeth wrote:
Hej. Flot sjal, men kan man gøre det højere, fx ved af sætte 3 ekstra masker på før mærketråd (6 masker).
01.05.2023 - 15:12DROPS Design answered:
Hej Lisbeth, ja det kan du gøre :)
03.05.2023 - 07:52
![]() STEPHANIE MAETZ wrote:
STEPHANIE MAETZ wrote:
Bonjour, Sur le dernier rang impair du diagramme A2 ne manque t il pas 2 mailles ensembles endroit et 1 jeter? Merci de votre réponse
14.12.2022 - 11:31DROPS Design answered:
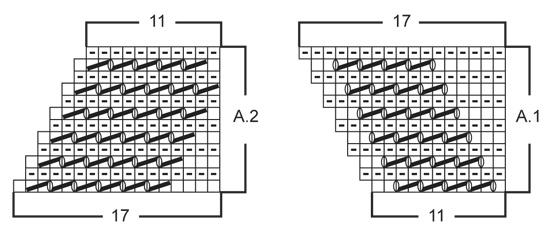
Bonjour Mme Maetz, au 10ème rang de A.2 on a 12 mailles, au 11ème rang, on va tricoter 1 m end, (2 m ens à l'end, 1 jeté)x4, 2 m ens à l'end, 1 m end = il reste 11 mailles pour le dernier rang. Bon tricot!
14.12.2022 - 13:14
![]() Ayse wrote:
Ayse wrote:
I cannot see the diagrams on the page. Are they not loading properly or gone missing?
20.11.2022 - 18:22DROPS Design answered:
Dear Ayse, the diagrams can be seen just fine on our end. If you have trouble visualizing them, it may be a problem with high Internet traffic on our website, weak Internet connection or incompability with a browser. We suggest trying again at a later time to see if they load and, if this doesn't work, try using another browser. Happy knitting!
21.11.2022 - 00:51
![]() Christine wrote:
Christine wrote:
Bonjour, Il faudrait préciser dans vos explications que les rgs raccourcis 2 et 3 sont fait uniquement dans le point mousse tout en tricotant la bordure comme depuis le début. Ce n'est pas du tout intuitif pour les débutantes et absolument pas indiqué. Cordialement
21.10.2022 - 08:12
![]() Jo Wallace wrote:
Jo Wallace wrote:
I love the finished item, but am terribly confused by so much of the pattern. I do hope you can help me to knit it.....I think I have struggled through the shawl to Row 12 (hopefully correctly) I have 23 stitches on. Do I then go up to Short Row 1 and knit on the same stitches? I've tried this but it doesn't look right to me. And I don't know how to knit vertically. I would do value your help, and hope I'm not a lost cause. Thank you. Jo
20.08.2022 - 13:56DROPS Design answered:
Dear Mrs Wallace, once you have worked the first 12 fows, you now work one repeat of the short-rows-1, ie starting from RS work all stitches a sbefore, turn and work the first 17 sts from WS, turn and work these 17 sts from RS, turn, cast off the first 6 sts, work to the end of the row. Now (work as before with A.1 and increasing on row 3, 7 and 11, then work the short rows-1), repeat from (to) until you have worked A.1 17more times (18 times in total from beg), there are now 68 sts on needle. Happy knitting!
22.08.2022 - 09:39
![]() Adrienne Owen wrote:
Adrienne Owen wrote:
Hi there,after working the middle turn,short rows 2, I dont have the lacy tips around the edge of this part,they recommence after the turn.Have I misread the pattern? Thank you for your advise,it is a beautiful garment anyway.
05.06.2022 - 23:04DROPS Design answered:
Dear Mrs Owen, that's correct, when working the short rows-2 you just work in garter stitch without the lacy edge. Happy knitting!
07.06.2022 - 08:48
![]() Elisabete wrote:
Elisabete wrote:
Olá. Iniciei a segunda parte do xaile onde uso o esquema a2. Notei que assim a ultima carreira fica com 4 buracos originados pelas lacadas em vez dos cinco habituais . Estou a interpretar mal ? Estou a adorar o efeito do xaile
22.08.2021 - 01:36DROPS Design answered:
Bom dia, No esquema a2, há 5 laçadas, pelo que também deverá haver cinco buracos. A diminuição antes da 1.ª laçada é relativa ao corpo do xaile. Esperamos que termine rapidamente este bonito xaile. Bons tricôs!
23.08.2021 - 10:08
![]() Elisabete wrote:
Elisabete wrote:
Olá! Uma ajudinha: quando terminamos a primeira repetição de a1 temos 23 malhas e temos o marcador à direita,visto pelo direito. A quantas malhas da direita? 6? Essa distancia vai ser proporcional ,ou seja,o marcador vai estar afastado do bordo ajourado o maximo de 17 pontos,correcto? As carreiras encurtadas acabam por ser apenas 4,correcto?sendo que a primeira e a ultima percorrem o trabalho todo de ponta a ponta? O xaile é mais meia lua do que triângulo, não é? Beijinhos
03.08.2021 - 00:15DROPS Design answered:
Boa tarde, 1) De facto, o número de malhas aumenta no lado direito (visto pelo direito) por ser a barra rendada. O número de malhas varia. O importante é manter o marcador no local certo (entre a parte tricotada em meia e o ponto rendado). 2) Há 3 grupos de carreiras encurtadas neste xaile. A série de carreiras encurtadas 1 é efectivamente composta por 4 carreiras e tanto a primeira carreira como a última carreira percorrem o trabalho todo. A última carreira vai "fechar" as malhas que encurtam a carreira. 3) Sim, o xaile tem a forma de meia lua ou de elipse. Bons tricôs! Beijinhos
04.08.2021 - 16:18
|
|||||||||||||
Ladylike#ladylikeset |
|||||||||||||
 |
 |
||||||||||||
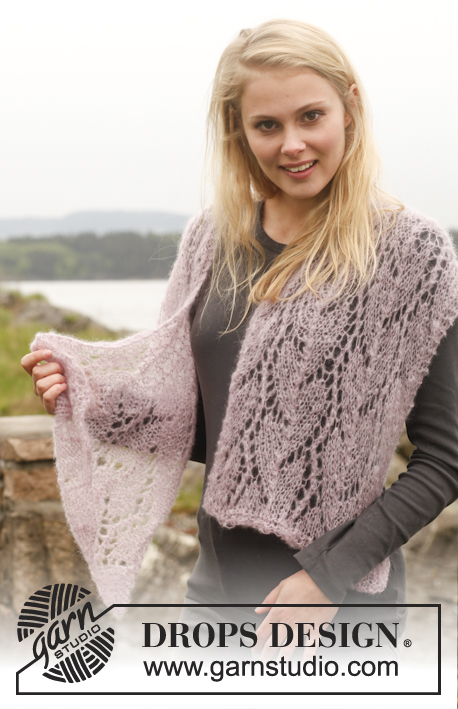
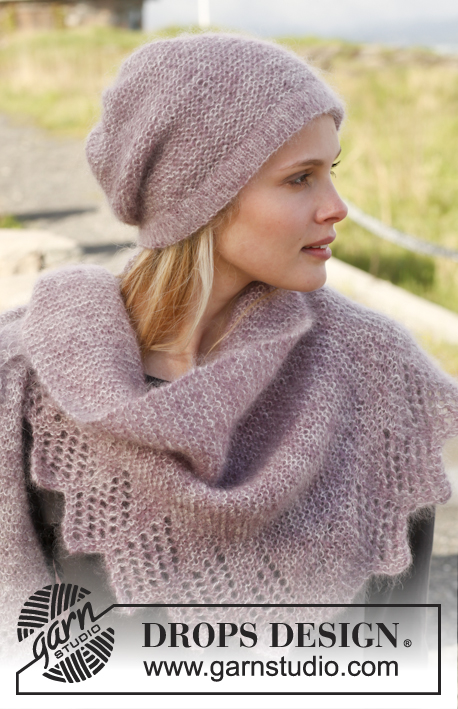
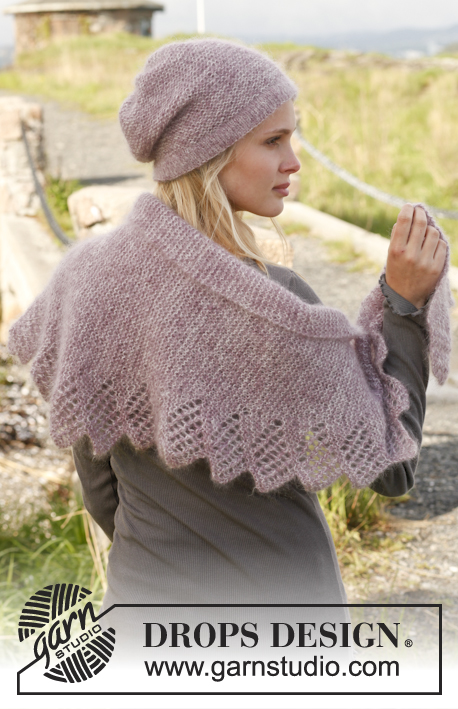
Set consists of: Knitted DROPS hat and shawl in garter st with lace pattern in 2 strands ”Kid-Silk”.
DROPS 151-8 |
|||||||||||||
|
GARTER ST (back and forth on circular needle): K all rows. 1 ridge = 2 rows K. INCREASE TIP: Inc 1 st by making 1 YO, K YO twisted on next row to avoid holes. PATTERN: See diagrams A.1 and A.2. The diagrams show all rows in pattern seen from RS. SHORT ROWS 1: Work short rows to get a nice shape on lace edge as follows: Beg from RS and K over all sts, turn piece and K 17 from WS (i.e. until marker), turn piece and K 17 from RS, turn piece, cast off the first 6 sts and K over all sts on row = 1 repetition with short rows. SHORT ROWS 2: Beg from RS and K over all sts, turn piece and K 11 from WS (i.e. until marker), turn piece and K 11 from RS, turn piece and K 8 from WS, turn piece and K 8 from RS, turn piece and K 5 from WS, turn piece and K 5 from RS, turn piece and K 2 from WS, turn piece and K 2 from RS. Work 2 ridges in garter st back and forth over all 68 sts, the shawl has been worked to the middle. Then work as follows, beg from WS: K 2, turn piece and K 2 from RS, turn piece and K 5 from WS, turn piece and K 5 from RS, turn piece and K 8 from WS, turn piece and K 8 from RS, turn piece and K 11 from WS, turn piece and K 11 from RS, turn piece and K back over all sts = 1 repetition with short rows. SHORT ROWS 3: Beg from RS, K over all sts and cast on 6 new sts at end of row, turn piece and K 17 from WS (i.e. until marker), turn piece and K 17 from RS, turn piece and K back over all sts on row = 1 repetition with short rows. DECREASE TIP: Dec 1 st by K 2 sts tog. ---------------------------------------------------------- HAT: Worked back and forth on circular needle. Cast on 100 sts with 1 strand of each colour (= 2 strands) on circular needle size 3.5 mm. Work in stocking st for 3 cm with 1 edge st in GARTER ST in each side - see explanation above. K 1 row from WS (= folding edge) and continue in stocking st with 1 edge st in garter st in each side for 3 cm – adjust so that next row is from RS. Switch to circular needle size 5 mm and work 1 ridge in garter st AT THE SAME TIME dec 16 sts evenly on 1st row = 84 sts. NOW MEASURE THE PIECE FROM HERE. Continue in garter st back and forth until piece measures 20 cm. On next row from RS K all sts tog 2 by 2 = 42 sts remain on needle. K 3 rows. On next row (= RS) K all sts tog 2 by 2 = 21 sts remain on needle. K 3 rows. On next row (= RS) K all sts tog 2 by 2 = 11 sts remain on needle. Cut the yarn and pull it through the remaining sts, tighten tog and fasten. ASSEMBLY: Fold the bottom edge on hat double towards WS in folding edge and fasten with small stitches - make sure to avoid a tight seam. Then sew hat tog mid back, sew in front loop of outermost st to avoid a chunky seam. Hat measures approx. 26 cm vertically (incl 3 cm edge at the bottom). ---------------------------------------------------------- SHAWL: Shawl is worked in garter st with an edge in lace pattern and worked back and forth on circular needle. Cast on 14 sts on circular needle size 5 mm with 1 strand of each colour (= 2 strands). Work 1 ridge in GARTER ST - see explanation above (1st row = RS). Then work as follows: Row 1 (= RS): K 3, insert 1 marker, work pattern according to diagram A.1 (= 11 sts) = 15 sts on needle, turn piece. Row 2 (= WS): Work A.1 over the first 12 sts, marker, K the rest of row, turn piece. Row 3 (= RS): K until marker, 1 YO – READ INCREASE TIP, marker, A.1 over the last 12 sts = 17 sts on row, turn piece. Row 4 (= WS): Work A.1 over the first 13 sts, marker, K YO twisted and K the rest of row, turn piece. Row 5 (= RS): K until marker and work A.1 over the last 13 sts = 18 sts on row, turn piece. Row 6 (= WS): Work A.1 over the first 14 sts, marker, K the rest of row, turn piece. Row 7 (= RS): K until marker, 1 YO (READ INCREASE TIP), marker, A.1 over the last 14 sts = 20 sts on row, turn piece. Row 8 (= WS): Work A.1 over the first 15 sts, marker, K the rest of row, turn piece. Row 9 (= RS): K until marker, A.1 over the last 15 sts = 21 sts on row, turn piece. Row 10 (= WS): Work A.1 over the first 16 sts, marker, K the rest of row, turn piece. Row 11 (= RS): K until marker, 1 YO, marker, A.1 over the last 16 sts = 23 sts on row, turn piece. Row 12 (= WS): Work A.1 over the first 17 sts, marker, K the rest of row. 1 repetition with A.1 has now been worked and 3 sts have been inc in garter st before marker (seen from RS). Work 1 repetition with SHORT ROWS 1 - see explanation above, over sts in lace edge (do not work the other sts on row). Then work alternately 1 repetition A.1 vertically and 1 repetition SHORT ROWS 1 (NOTE: Every time 1st row in A.1 is worked, there will be 3 sts more before marker). REMEMBER THE KNITTING TENSION! When A.1 and SHORT ROWS 1 have been worked 18 times vertically in total, there are 57 sts in garter st before marker and 11 sts in lace edge after marker = 68 sts on needle. Work 1 repetition SHORT ROWS 2 - see explanation above. After short rows 2 work 1 repetition with SHORT ROWS 3 - see explanation above = 74 sts on needle. Then work back and forth over all sts as follows: Row 1 (= RS): K until marker, work pattern according to diagram A.2 (= 17 sts) = 73 sts on row, turn piece. Row 2 (= WS): Work A.2 over the first 16 sts, marker, K the rest of row, turn piece. Row 3 (= RS): K until 2 sts remain before marker, K 2 tog, marker, A.2 over the last 16 sts = 71 sts on row, turn piece. Row 4 (= WS): Work A.2 over the first 15 sts, marker, K the rest of row, turn piece. Row 5 (= RS): K until marker and work A.2 over the last 15 sts = 70 sts on row, turn piece. Row 6 (= WS): Work A.2 over the first 14 sts, marker, K the rest of row, turn piece. Row 7 (= RS): K until 2 sts remain before marker, K 2 tog, marker, A.2 over the last 14 sts = 68 sts on row, turn piece. Row 8 (= WS): Work A.2 over the first 13 sts, marker, K the rest of row, turn piece. Row 9 (= RS): K until marker and work A.2 over the last 13 sts = 67 sts on row, turn piece. Row 10 (= WS): Work A.2 over the first 12 sts, marker, K the rest of row, turn piece. Row 11 (= RS): K until 2 sts remain before marker, K 2 tog, marker, A.2 over the last 12 sts = 65 sts on row, turn piece. Row 12 (= WS): Work A.2 over the first 11 sts, marker, K the rest of row, turn piece. 1 repetition with A.2 has now been worked and 3 sts have been dec in garter st before marker (seen from RS). Work 1 repetition with SHORT ROWS 3 - see explanation above, over sts in lace edge (do not work the other sts on row). Then work alternately 1 repetition A.2 vertically and 1 repetition SHORT ROWS 3 (NOTE: Every time 1st row in A.2 is worked, there will be 3 sts less before marker). When A.2 and SHORT ROWS 3 have been worked 18 times vertically in total there are 14 sts on needle. Work 1 ridge in garter st over all sts and loosely cast off. Shawl measures approx. 145 cm in width and approx. 40 cm in the middle. |
|||||||||||||
Diagram explanations |
|||||||||||||
|
|||||||||||||
 |
|||||||||||||
Have you finished this pattern?Tag your pictures with #dropspattern #ladylikeset or submit them to the #dropsfan gallery. Do you need help with this pattern?You'll find 17 tutorial videos, a Comments/Questions area and more by visiting the pattern on garnstudio.com. © 1982-2026 DROPS Design A/S. We reserve all rights. This document, including all its sub-sections, has copyrights. Read more about what you can do with our patterns at the bottom of each pattern on our site. |
|||||||||||||


With over 40 years in knitting and crochet design, DROPS Design offers one of the most extensive collections of free patterns on the internet - translated to 17 languages. As of today we count 324 catalogues and 12290 patterns translated into English (UK/cm). 12290
We work hard to bring you the best knitting and crochet have to offer, inspiration and advice as well as great quality yarns at incredible prices! Would you like to use our patterns for other than personal use? You can read what you are allowed to do in the Copyright text at the bottom of all our patterns. Happy crafting!
Post a comment to pattern DROPS 151-8
We would love to hear what you have to say about this pattern!
If you want to leave a question, please make sure you select the correct category in the form below, to speed up the answering process. Required fields are marked *.