
Popular categories
Looking for a yarn?


Comments / Questions (101)
Francine wrote:
En recommençant au 1er rg du diagramme je me retrouve avec un jersey très large et non pas qui va en diminuant, il faudrait que l'on puissent continuer dans le même sens que les autres rg en empièçant trs sur le jersey. Que faire? merci
31.10.2013 - 21:40DROPS Design answered:
Bonjour Francine, en continuant A1 et A2 comme avant, vous continuez à empiéter sur le nombre de mailles jersey, comme pour la 1ère fois que vous avez fait le diagramme en hauteur. Bon tricot!
01.11.2013 - 09:37Francine wrote:
Lorsqu'on a fini les 32 premiers rangs du diagramme comment continu-t-on? recommençons nous au 1er.
31.10.2013 - 06:49DROPS Design answered:
Bonjour Francine, tout à fait vous reprenez au 1er rang du diagramme, on répète A1 et A2 en hauteur jusqu'à ce que les mailles aient été croisées 10-11-11-12 fois au total (nbe de torsades en hauteur - cf taille) Bon tricot!
31.10.2013 - 07:56
![]() Carla wrote:
Carla wrote:
Dank je wel voor de uitleg. Ik begrijp dan uit het telpatroon dat de omslagen niet als steek wordt weergegeven in de volgende toer ( zie gegin toer 1 en dan begin toer 2 dan mis ik 1 steek.
23.10.2013 - 10:21DROPS Design answered:
Hoi Carla. De omslagen worden wel als st in de volgende nld weergegeven. Er is een steek meer in het telpatroon: nld 1: 22 st, nld 2: 23 enzovoort.
23.10.2013 - 17:25
![]() Carla wrote:
Carla wrote:
Wat moet er met de omslag gebeuren? En de kabel staat beschreven dat je steken samen moet breien kun je me uitleggen hoe ik de steken terug krijgt. Groet Carla
22.10.2013 - 18:09DROPS Design answered:
U maakt de omslag tussen twee steken, hierna is de omslag een extra steek. In elk kabel mindert u 4 steken (12 st worden 8 st) maar u hebt hiervoor 4 keer een omslag gemaakt en dus 4 extra steken gemaakt. Het totaal aantal steken in A.1 blijft daardoor 22 st na elke kabel.
22.10.2013 - 21:10Francine Chartrand wrote:
Lors de a1 et a2 doit-on diminuer dans la party jersey car je n'arrive pas à conserver le même nombre de maille totale en suivant vos indications
22.10.2013 - 14:17DROPS Design answered:
Bonjour Mme Chartrand, le nombre total de mailles doit rester le même mais A.1 et A.2 vont "empiéter" sur le nombre de mailles en jersey. Ainsi, on a progressivement moins de mailles tricotées en jersey, qui font alors partie des diagrammes A.1 et A.2. Bon tricot!
22.10.2013 - 16:00
![]() ALAY wrote:
ALAY wrote:
Buenos días, he comenzado el patrón y no entiendo como la parte central puede ir disminuyendo, cada hebra es un aumento y no veo disminuciones en el patrón. ¿me lo pueden aclarar? Muchísimas gracias
13.10.2013 - 11:57DROPS Design answered:
Hola Alay. No hay disminuciones en si , hay cambios en la distribución del dibujo en el patrón entre la parte tejida en pt jersey (que va dism) y las trenzas según los diagramas (que van aumentando). El número de pts no varía.
16.10.2013 - 08:59
![]() Susanne Klausen wrote:
Susanne Klausen wrote:
Er der nogen der har haft strikket denne model, jeg kan slet ikke få mønstret til at passe.
02.10.2013 - 22:10DROPS Design answered:
Hej Susanne. Hvis du skriver hvor du har problemer, saa skal vi pröve at hjaelpe dig videre.
03.10.2013 - 10:47B.morshinkhof wrote:
Deze poncho wil ik graag gaan maken! Kan ik dit ook op 2 naalden breien? Ik kan nl. niet goed met een rondbreinaald breien! Met vriendelijke groet, Beppie Morshinkhof
01.09.2013 - 16:52DROPS Design answered:
Hoi Beppie. Deze poncho wordt heen en weer gebreid op de rondbreinld, het is in dit geval ook mogelijk om het model gewoon heen en weer te breien op rechte naalden. Veel breiplezier!
03.09.2013 - 12:05
![]() Lynn wrote:
Lynn wrote:
What is the gauge for this poncho!
15.08.2013 - 01:49DROPS Design answered:
Dear Mrs Lynn, you will find the gauge on the right side of the picture, in cm and in inches, under tab "Materials". Happy knitting!
15.08.2013 - 10:17Irene Gassner wrote:
Wunderschoen! genau mein stil. weich und schoene form.
19.07.2013 - 23:39
|
||||||||||||||||
Dove#dovecardigan |
||||||||||||||||
 |
 |
|||||||||||||||
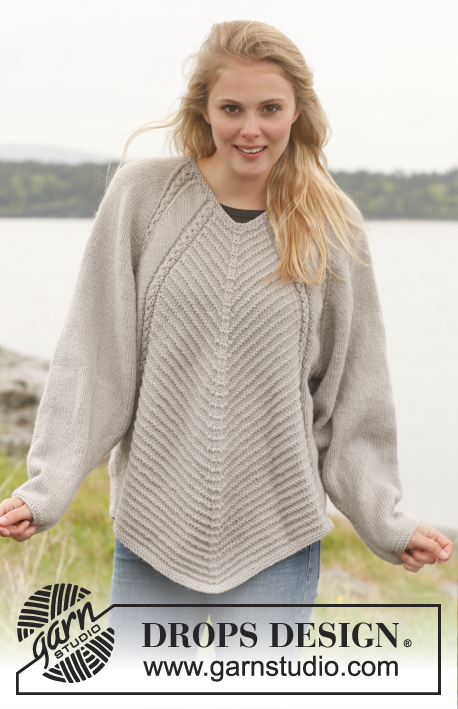
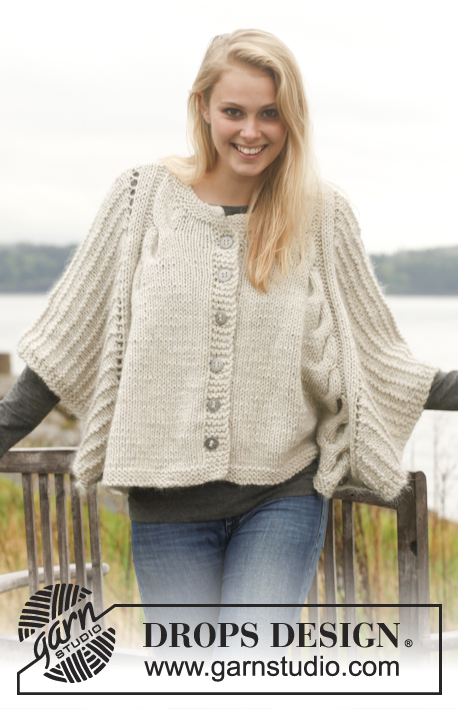
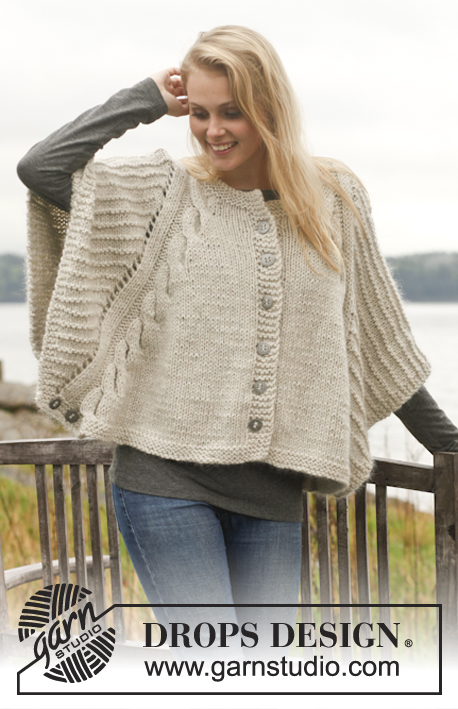
Knitted DROPS poncho with cables and textured pattern in "Nepal" and "Kid-Silk". Size: S - XXXL.
DROPS 150-12 |
||||||||||||||||
|
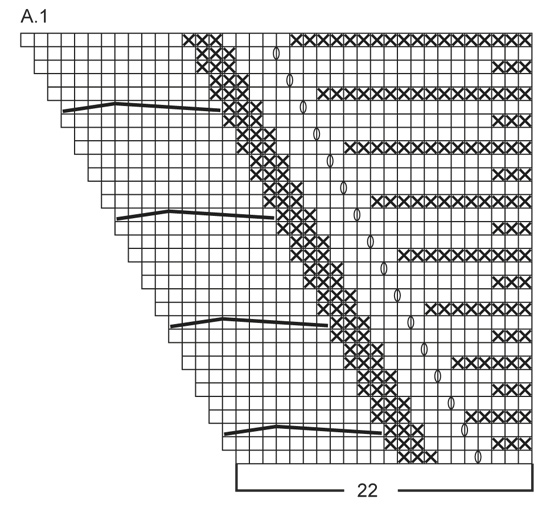
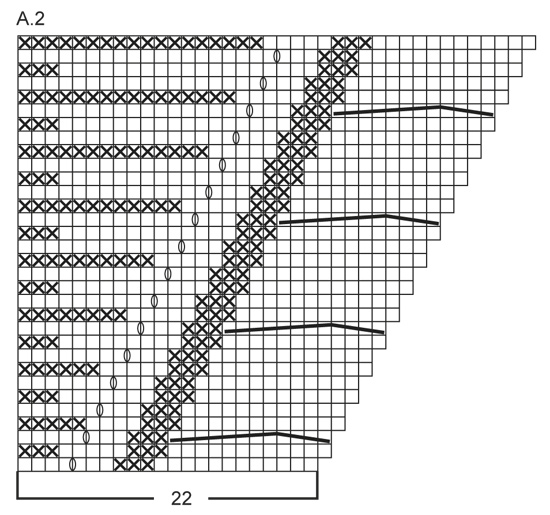
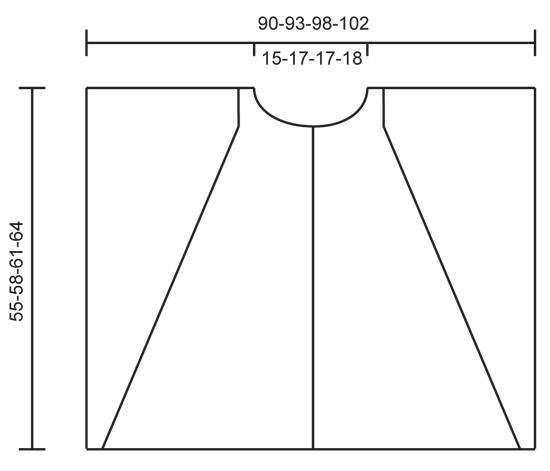
GARTER ST (back and forth on circular needle): K all rows. 1 ridge = 2 rows K. PATTERN: See diagrams A.1 and A.2. The diagrams show all rows in pattern seen from RS. BUTTONHOLE: Dec for buttonholes on right band. 1 buttonhole = K tog third and fourth st from mid front and make 1 YO. Dec for buttonholes when piece measures: SIZE S/M: 7, 15, 23, 31, 39 and 47 cm. SIZE L: 8, 16, 25, 33, 42 and 50 cm. SIZE XL/XXL: 7, 16, 25, 34, 43 and 52 cm. SIZE XXXL: 8, 18, 27, 37, 46 and 55 cm. ---------------------------------------------------------- BACK PIECE: Worked back and forth on circular needle. Cast on 108-112-118-122 sts on circular needle size 6 mm with 1 strand of each yarn (= 2 strands). Work 3 ridges in GARTER ST - see explanation above. Switch to circular needle size 7 mm and work next row from RS as follows: Work 4 sts in garter st, K 3, P 3, 88-92-98-102 sts in stocking st, AT THE SAME TIME inc 12 sts by working 2 sts in each of the first 6 sts and 2 sts in each of the last 6 sts in stocking st (= 12 sts inc), P 3, K 3, 4 sts in garter st = 120-124-130-134 sts in total on needle. Work 1 row as follows from WS: 4 sts in garter st, P 3, K 3, 100-104-110-114 sts in stocking st, K 3, P 3, 4 sts in garter st. On next row from RS work as follows: Work A.1 (= 22 sts), work 76-80-86-90 sts in stocking st and work A.2 (= 22 sts). Continue pattern like this, i.e. on every other row the section in stocking st in the middle gets smaller while A.1 and A.2 get bigger – no of sts does not vary. When A.1 and A.2 have been worked 10-11-11-12 times in total vertically in each side, continue A.1 and A.2 without YOs and cable (work sts over cable in stocking st). When piece measures 53-56-59-62 cm, cast off the middle 16-18-18-20 sts for neck and finish each shoulder separately. Continue to cast off 1 st on the next row towards the neckline = 51-52-55-56 sts remain on each shoulder. Continue until piece measures 55-58-61-64 cm and cast off. Repeat on the other shoulder. RIGHT FRONT PIECE: Cast on 59-61-64-66 sts (incl 5 band sts towards mid front) on circular needle size 6 mm with 1 strand of each yarn. Work 3 ridges in garter st. Switch to circular needle size 7 mm and work as follows from RS: 5 band sts in garter st, work 44-46-49-51 sts in stocking st, AT THE SAME TIME inc 6 sts by working 2 sts in each of the last 6 sts in stocking st (= 6 sts inc), P 3, K 3, 4 sts in garter st = 65-67-70-72 sts in total on needle. Work 1 row as follows from WS: 4 sts in garter st, P 3, K 3, 50-52-55-57 sts in stocking st, 5 band sts in garter st. On next row from RS work as follows: 5 band sts in garter st, 38-40-43-45 sts in stocking st and then pattern according to diagram A.2 (= 22 sts). Continue pattern like this, i.e. section in stocking st towards mid front gets smaller while A.2 gets bigger (no of sts does not vary). Remember BUTTONHOLES on band - see explanation above. NOTE: When A.2 have been worked 9-10-10-11 times in total vertically, continue A.2 without cable (work sts over cable in stocking st) until A.2 has been worked for as many row as for back piece with increases, then continue without the increase, just as on back piece. AT THE SAME TIME when piece measures approx. 47-50-52-55 cm (adjust so that 1 row has been worked after last buttonhole and plaiting in A.2 has been finished), slip the first 10-11-11-12 sts towards mid front on 1 stitch holder for neck (work sts before slipping them on stitch holder to avoid cutting the yarn in piece). Then cast off at beg of every row from neck: 2 sts 1 time and 1 st 2 times = 51-52-55-56 sts remain on shoulder. Continue until piece measures 55-58-61-64 cm - adjust according to back piece, cast off. LEFT FRONT PIECE: Cast on and work as right but reversed. Work pattern according to diagram A.1 instead of A.2. ASSEMBLY: Sew the shoulder seams. Sew 2 decorative buttons at the bottom of edge in garter st, 3 and 9 cm from edge in each side (sew through both layers so that front and back piece is tog at the edge in each side at the bottom of garment). NECK EDGE: Pick up approx. 60 to 70 sts from RS around the neck (incl sts on stitch holders mid front) with 1 strand of each yarn on circular needle size 6 mm. Work 3 ridges in garter st back and forth. Loosely cast off with K from WS. |
||||||||||||||||
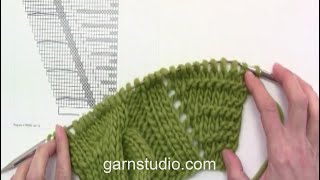
Diagram explanations |
||||||||||||||||
|
||||||||||||||||
 |
||||||||||||||||
 |
||||||||||||||||
 |
||||||||||||||||
Have you finished this pattern?Tag your pictures with #dropspattern #dovecardigan or submit them to the #dropsfan gallery. Do you need help with this pattern?You'll find 22 tutorial videos, a Comments/Questions area and more by visiting the pattern on garnstudio.com. © 1982-2026 DROPS Design A/S. We reserve all rights. This document, including all its sub-sections, has copyrights. Read more about what you can do with our patterns at the bottom of each pattern on our site. |
||||||||||||||||


With over 40 years in knitting and crochet design, DROPS Design offers one of the most extensive collections of free patterns on the internet - translated to 17 languages. As of today we count 324 catalogues and 12290 patterns translated into English (UK/cm). 12290
We work hard to bring you the best knitting and crochet have to offer, inspiration and advice as well as great quality yarns at incredible prices! Would you like to use our patterns for other than personal use? You can read what you are allowed to do in the Copyright text at the bottom of all our patterns. Happy crafting!
Post a comment to pattern DROPS 150-12
We would love to hear what you have to say about this pattern!
If you want to leave a question, please make sure you select the correct category in the form below, to speed up the answering process. Required fields are marked *.